

When it comes to troubleshooting problems with your car, electrical issues are often the trickiest to solve. When a mechanical aspect of your vehicle isn’t working properly, there is not always a direct and apparent reason why. To identify an electrical issue, you’ll need to use a multimeter to see whether or not voltage and continuity are present in your vehicle’s wiring. We’ll explain exactly how to use a multimeter on a car in the rest of this article!
How to Use a Multimeter for Dummies

If you’ve never heard of a multimeter before, it is a tool that can measure voltage, resistance, and current. They are often digital, rectangular-shaped handheld devices that work by connecting probes to wires you want to test. When an electrical component of your car isn’t working, it generally means there is a defective wire causing an open or short circuit.
Identifying Electric Problems
How to find a short in a car with a multimeter?
Multimeters can help you distinguish exactly which wire isn’t working, as you’ll notice a lack of voltage from the defective wire. Finding a short is quite a tedious process and will require you to measure continuity to identify where a short circuit is occurring.
Depending upon what unit you’re looking to measure, you’ll want to set the range and parameters for your multimeter. If you’re going to test for amperage, make sure to always use the fused port for your probes. Otherwise, you can use the non-fused ports. When looking at your probes (or leads), the black one is negative, and the red one is positive. No matter what you plan on testing, make sure to apply the parking brake before you begin!
How do you check the voltage with a multimeter?
If you’re checking the voltage on your car, you will want to use DC voltage. 20V is the correct setting if you’re going to test your battery. Adjust the dial to the proper range/setting, and connect your probes to whatever component you wish to get a reading for.
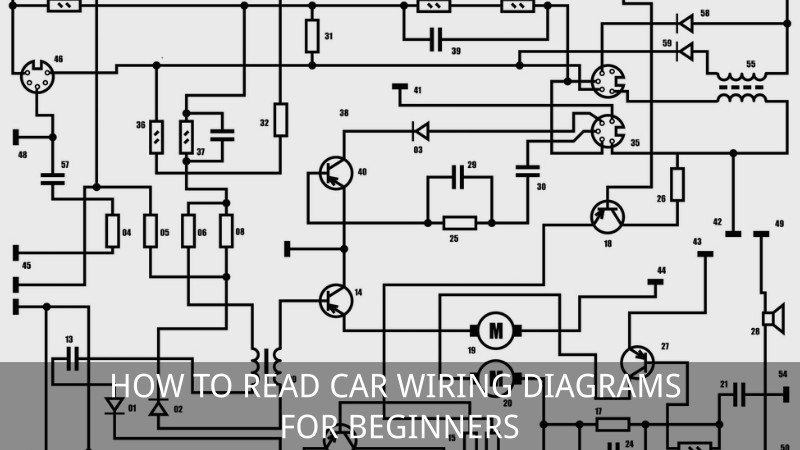
You might also like: How to Read Car Wiring Diagrams for Beginners
How do you check a headlight or light bulb with a multimeter?
In order to test the wiring of your headlight, you’ll actually need to find the ground wire. From the connector that attaches to your headlight, there are two to four wires. With two or three wires, only one of them is a ground wire, while four-wired connectors will have two ground wires. Whichever wire is connected to the chassis is the ground wire. To test it, you’ll want to set your multimeter for resistance. You can place one of your probes on the ground wire and the other on your car battery’s negative terminal. If you do not read continuity, you have a problem with the ground wire, meaning it needs replacement.
How to test a car ground wire with a multimeter?
To test ground wires, you’ll first start by measuring resistance. Test along the wiring to verify your reading is five ohms or less. If it exceeds five ohms, you’ll need to test the wire further. Switch your multimeter to DC voltage and turn on whatever electrical component you’re having issues with. Test the wiring once again to ensure the reading doesn’t exceed 0.05V. If it does, you’ll need to use a different place to ground the accessory or use a bonding strap.
How do you check if a fuse is blown with a multimeter?
Troubleshooting a fuse is extremely simple with a multimeter. Set your multimeter to the lowest ohms setting and place your probes on either side of the fuse caps. Fuses don’t have polarity, so the probes you use don’t matter. If you have a very low ohms reading, the fuse is working great. If the resistance value doesn’t change after connecting your probes, the fuse is blown.
You can also test a fuse using a test light. Turn the key ON and touch both sides of the fuse with the tip of the test light. If it lights up, the fuse is good. If it doesn’t, the fuse needs to be replaced.
How to Use a Multimeter on a Car Battery

If you’re having difficulty getting your car to start, one of the most common reasons is a weak battery. This is something you can quickly test with a multimeter, which will also give you an accurate idea of how much charge the battery actually has left. Testing your car battery first is a great way of ruling out a likely culprit for many electrical issues.
When testing your car battery, you’re going to test for voltage. Consequently, you’ll need to learn how to use a voltmeter on a car first. Start by setting your multimeter to 20V DC. You can connect your probes to both battery terminals, matching up each color to the same-colored terminal. If you can have someone turn the headlights on, do so now so you can get a better reading of what the car can actually handle. You’ll do this with the car turned off.
In most conditions, you’ll have a reading somewhere between 11.8V and 12.6V. The higher the voltage reading you see, the more charge is left in the battery. A 12.5V reading would indicate a like-new battery almost fully charged, while an 11.9V reading would indicate that the battery will need to be replaced soon.
Read more:

How to Use a Multimeter on a Car Alternator
Another reason why your car won’t start is a failing alternator. Unlike your car battery, this isn’t a part that you can directly connect your probes to. Instead, you’ll test the car battery once again. The alternator is responsible for recharging your battery while you drive, so by checking how your battery responds under various electrical loads, you can see if your alternator is the problem.
To test your alternator, you’ll want to set your multimeter to 20V DC again. Make sure the vehicle is off before popping the hood. Match up the corresponding probes to their correct terminals on the battery (negative to negative, positive to positive). Check the reading to see where you’re starting at. Hopefully, you’re starting with at least a 12.4 reading.
Now, you’ll want to start the car. Check the battery reading once again. If you see a reading of fewer than 14 volts, then your alternator is, in all likelihood, the cause of the issue. If the reading is above 14 volts, turn on every electrical accessory you can think of.
Things like your stereo, all lights, heater, and seat warmers are all good options here. You’ll want to read the multimeter once again and see how much the voltage dropped by. If you have a reading above 13 volts, then the alternator isn’t the problem. However, a reading lower than 13 volts means that the alternator can keep up and will need to be replaced.
Using a Multimeter on Your Own Car

There’s no secret that identifying and solving electrical problems can be an absolute nightmare. Some vehicles have more than a mile of wiring (if you unraveled it all and stretched it out), meaning there’s a lot of potential wiring that could go haywire. Finding exactly which portion isn’t working will require a lot of effort, but it is well worth it once you finally fix the problem.
If you want to test the wiring of your vehicle, you’ll need to learn how to use a multimeter, as well as some car repair manuals. To make your life easier, you can even find an how to use a multimeter on a car guide in pdf format to walk you through the process. With this, you can follow step-by-step instructions illustrating which component you should be testing and where to place your probes! Backed with a multimeter and a pdf instruction guide, you can tackle any electrical issues in your own garage!


1. Using a multi meter, how to check if wiring of third brake light is working?
2. Using a multi meter, how to check if LED third brake light is working?
Thanks, Don
Hey!
Alright, so luckily conventional third brake lights are quite simple… the current goes from the brake pedal switch directly to the third brake light. You can easily disconnect the brake light switch connector, identify the right wire, put one probe in the right pin at the brake switch connector and the other at the corresponding brake light connector pin. If there’s continuity, the wire is good.
For the ground, the third brake light will probably use a short body ground wire or a longer wire connecting to a ground splitter. In both cases, make sure the ground’s contact surface is clean, and test the ground wire similarly to the positive one.
However, it might seem simple at first but it might get a lot trickier if you own a recent car. Most brake light switches these days send an input to the Body Control Module, which in turn send a signal to the brake light. In this case, it may be really risky to start testing things around without being really sure which pin does what. Most multimeters will send a 1V reference current to test for continuity, which is way too high for any electronic component. Sending 1V directly into your Body Control Module would probably render it unusable.
And even worse, every single car is built differently so there’s really no one-size-fits-all here. If it was me, I would start by having a look into your car’s repair manual, find the electrical diagram, and make sure I understand how it works first. Then there’s usually a troubleshooting procedure that would describe which pin to test, where are the different connectors (so you don’t have to remove every plastic trim in your car for nothing), and the different readings you should have at each testing point.
When it comes to a LED third brake light, the answer is very similar. Short answer? Get a multimeter designed to test electronic systems (these send a much lower, and safer, reference signal), then test each LED for continuity. Unfortunately, the long answer is that different LEDs have different continuity values, testing them in reverse will more often than most bust them right away, and there’s frequently an annoying electronic module controlling them and sending signals back to the BCM.
I won’t lie, these are a bitch to test without a troubleshooting procedure. The real trick of the trade here would be “test the unit with a known-good one” but I know this isn’t possible for most people…
In any case, a good repair manual is probably your best bet here…
Hope it helps! ✌