

How to Repair Minor Scratches On Your Car’s Paint to Make it Look Like New
Got scratches on your car’s paint? Frustrating, right? Whether it’s from a runaway shopping cart, a rock flying up from the road, or even just an accidental brush against something, scratches happen—it’s part of owning a car.
Now, those little scratches might seem like no big deal at first, but trust me, they add up fast. Next thing you know, your car’s looking rough, and that can take a hit on its resale value too. But here’s the good news: most of these scratches are just surface-level, and with the right tools and a little elbow grease, you can fix them easily. No need to take it to a body shop and spend thousands here.
This guide’s gonna walk you through everything—figuring out what kind of scratch you’ve got and how to make it disappear. You don’t need to be a pro to get this done, just follow along, and by the end, you’ll have your car looking as good as new.
Let’s go!
Understanding the Types of Scratches on Your Car
Before we get into fixing things, you gotta know what you’re dealing with. Not all scratches are the same. Some just skim the surface, while others cut deep enough to expose the bare metal. Figuring out what type of scratch you’ve got is key to choosing the right repair method and making sure you don’t accidentally make things worse.
Let’s break down the three most common types of scratches:
Clear Coat Scratches
The most common and, luckily, the easiest to fix. Clear coat scratches don’t penetrate beyond the top protective layer of your paint, so you won’t see any metal or primer showing through.
- Causes: These usually happen from everyday stuff—like brushing against the car with a jacket zipper, running through some low-hanging branches, or using a dirty sponge when washing the car. They’re shallow, but they stand out because the clear coat reflects light differently where the scratch is.
- How to Identify: Here’s a simple trick—run your fingernail over the scratch. If it doesn’t catch, it’s just in the clear coat. You can also try rubbing some car polish on it—if it fades or disappears, it’s a clear coat scratch.
Base Coat (Paint) Scratches
Now we’re getting into deeper territory. A base coat scratch goes beyond the clear coat and digs into the actual paint layer. These scratches are deeper and will show the car’s color or a different shade if it’s multi-layered.
- Causes: You usually get these from something with more impact—like a rock flying up on the highway or scraping your car against something hard. Even rough washing with a stiff brush can wear through the clear coat and into the paint layer.
- How to Identify: If your fingernail catches in the scratch, it’s gone past the clear coat and into the paint. You’ll probably notice the scratch no matter what light you’re in, and if you see a white or a different-colored line, that’s your base coat showing through.
Deep (Primer) Scratches
These are the ones you really don’t want to ignore. Deep scratches go through the clear coat, the paint, and down to the primer—or worse, right down to the metal. If you don’t fix these ASAP, they can lead to rust and corrosion.
- Causes: Deep scratches usually result from significant impacts, such as car accidents, deep scrapes, or sharp objects like keys being dragged across the paint.
- How to Identify: If you see metal or primer, that’s a deep scratch. You’ll know it when you see it because it looks rough and is usually pretty noticeable.
Sadly, fixing these isn’t a quick DIY job. Deep scratches require more advanced tools and techniques, so it’s often best to let the pros handle it. For now, let’s stick to the stuff you can tackle at home—clear coat and base coat scratches.

Tools and Materials You Need to Repair Minor Scratches
If you want to fix those scratches the right way, you’ll need a few tools and materials. The good news? Most of these are easy to find and won’t break the bank. You can pick them up at your local auto parts store or order them online. Let’s run through the must-haves for tackling both clear coat and base coat scratches.
Microfiber Cloths
An absolute must for any paint job. They’re soft, absorbent, and won’t scratch your car’s paint like a regular rag might. Plus, they won’t leave behind any lint or streaks, so they’re perfect for wiping down your car, applying compounds, or buffing things out. Trust me, once you use microfiber, you won’t go back.
Car Wash Soap and Water
Before you do anything else, you’ve got to clean the area around the scratch. Don’t even think about using dish soap—that stuff strips the wax and can damage your paint. Grab a car-specific wash soap instead. It’s gentle on the paint but tough enough to get rid of dirt and grime. A clean surface means whatever products you’re using will bond properly and won’t trap dirt under the repair.
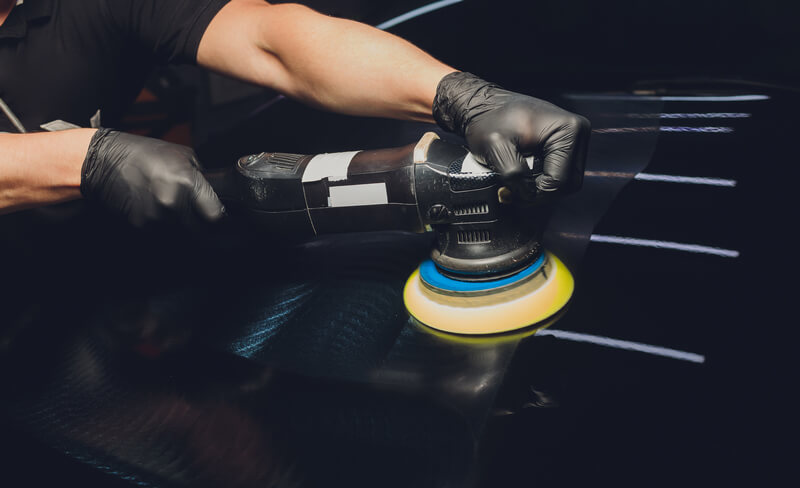
Rubbing Compound
Rubbing compound is a key player in scratch repair. It’s slightly abrasive, so it works to smooth out the clear coat, blend the edges of the scratch, and remove those minor imperfections. Basically, it helps to “cut” into the top layer and make the scratch fade away. Without it, that scratch isn’t going anywhere. For clear coat scratches, rubbing compound is your go-to for leveling the surface and making it look smooth again.
Polishing Compound
After using a rubbing compound, your paint might look a little dull. That’s where polishing compound comes in. This stuff is less abrasive and is all about restoring that glossy, like-new shine to your car’s paint. Think of it as the final touch that smooths out any remaining imperfections. After rubbing compound, polishing compound helps bring back the car’s original sparkle and blends the repair so it’s barely noticeable.
Fine-Grit Sandpaper (1000-4000 grit)
For scratches that go deeper than the clear coat, you’ll need fine-grit sandpaper to level things out. You’re looking at automotive-grade sandpaper in the 1000 to 4000-grit range. The lower the number, the rougher the sandpaper, so start with the finer stuff. Sandpaper helps smooth out the rough edges of deeper scratches before you apply touch-up paint or compound. Just remember to use it with water or a lubricant to avoid scratching the paint further.
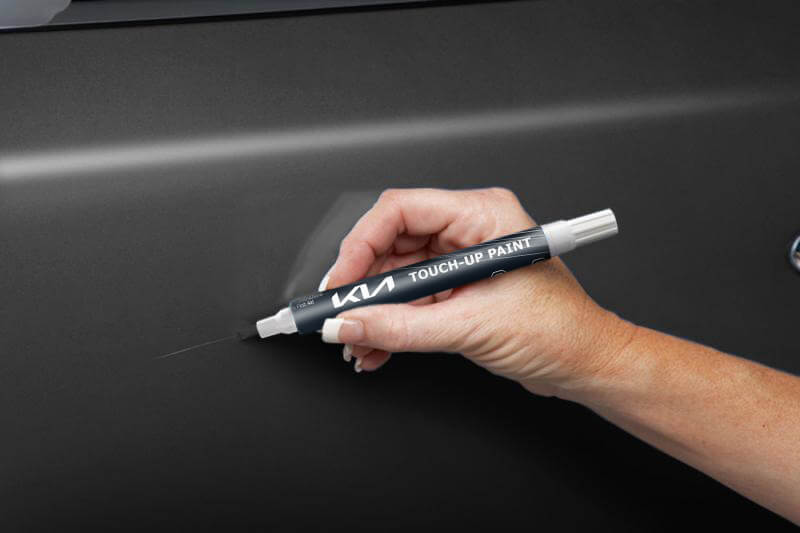
Touch-Up Paint (Optional for Base Coat Scratches)
If the scratch cuts through the clear coat and into the paint, you’re going to need some touch-up paint. The tricky part here is making sure the color matches your car exactly. You can usually find your car’s paint code on a sticker inside the driver’s door or under the hood. Touch-up paint comes in a small pen or brush, so you can apply it directly to the scratch. It’s essential for restoring the color and protecting your car from rust or further damage.
Clear Coat Pens
For shallow scratches that don’t reach the base coat, a clear coat pen is all you need. These pens are super easy to use and are perfect for reapplying that top protective layer. They work great for minor surface scratches, sealing and blending them into the surrounding paint. A quick touch-up with one of these, and the scratch will be nearly invisible.
Car Wax
Once the scratch is repaired, you want to protect the area from any future damage. That’s where car wax comes in. Wax creates a barrier over your car’s paint, shielding it from UV rays, dirt, and moisture. Plus, it keeps your car’s shine looking fresh and helps prevent more scratches. After you’ve finished your repair, a layer of wax will seal the deal—literally.
Quick Tip: Good-quality products make a world of difference when it comes to scratch repair. Don’t go cheap on the rubbing compounds, polishes, or touch-up paints. Investing in decent tools will give you better results and make your hard work last longer.
How to Repair Clear Coat Scratches
Clear coat scratches are the most common and, thankfully, the easiest to handle. Since they don’t dig into the paint itself, you don’t have to worry about color matching or doing any major repainting. Here’s a step-by-step guide to get those scratches out and have your car looking fresh again.
Step 1: Clean the Surface
Before fixing anything, clean the area around the scratch to remove any dirt or grime that could interfere with the repair.
- How to Clean: Grab some car wash soap and water (not dish soap—that’ll strip the wax and damage the paint). Gently wash around the scratch and make sure you’re getting rid of all the dirt.
- Dry Completely: After washing, dry the area with a microfiber cloth. Make sure it’s 100% dry before you move on—any leftover moisture will mess with how well the products stick to the paint. Also, give the scratch another look after cleaning. Sometimes dirt can make it look worse than it actually is, and once it’s clean, you’ll get a better idea of what you’re working with.
Step 2: Use a Clear Coat Pen for Minor Scratches
For those shallow scratches that haven’t cut into the paint, a clear coat pen will do the trick. These pens are super easy to use and are filled with clear coat that will fill in the scratch and restore that smooth, glossy finish.
- How to Apply: Prime the pen on paper until the clear coat flows, then carefully trace the scratch with just enough clear coat to fill it.
- Avoid Excess: These pens can be a bit runny, so don’t overdo it. A thin layer is all you need. Too much, and you’ll end up with a lumpy mess. If the scratch is hard to see, mark the edges with some painter’s tape so you don’t go outside the lines.
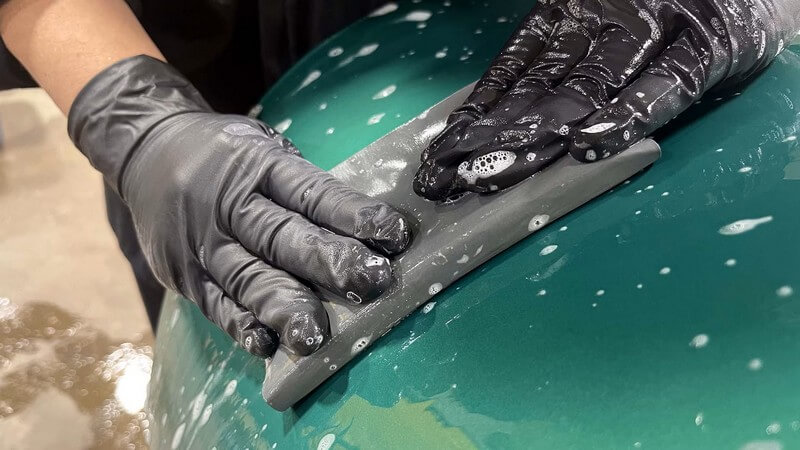
Step 3: Wet Sanding the Scratch (If Necessary)
If the scratch is a little deeper and the clear coat pen isn’t cutting it, you might need to wet sand the area. This helps level out the edges of the scratch and smooth everything down.
- Start with 2000-Grit Sandpaper: Wet the area with water or a lubricant to prevent extra scratches. Using 2000-grit sandpaper, gently sand over the scratched area in circular motions. Be light with it—don’t go too hard.
- Move to 3000-4000 Grit: After the initial sanding, switch to finer grit (3000-4000) to smooth out the surface. The goal is to blend the scratch with the rest of the paint, making it nearly invisible.
It’s important not to over-sand! If you go too hard, you’ll cut right through the clear coat and into the paint, which is what we’re trying to avoid. Check your progress frequently.
Step 4: Apply Rubbing Compound
Once you’re done sanding (or if sanding wasn’t necessary), it’s time to hit the area with some rubbing compound. This stuff is slightly abrasive and helps smooth out the surface, getting rid of any fine scratches left behind.
- How to Apply: Put a little rubbing compound on a clean microfiber cloth. Buff the area with small, circular motions, starting with light pressure and gradually increasing it. The idea is to blend the scratch into the clear coat so it’s less noticeable.
- Buff Until Smooth: Keep buffing until the surface feels smooth and the scratch is barely visible. Work in small sections to prevent the compound from drying out. If it does dry, just add a bit more and keep going.
Step 5: Polish and Wax the Area
After using the rubbing compound, the surface might look a little dull. Don’t worry—that’s where the polishing compound comes in. This will bring back that glossy finish and make the repair look seamless.
- Apply Polishing Compound: Dab a small amount of polishing compound on a microfiber cloth and apply it in circular motions over the repaired area, just like with the rubbing compound. This will smooth out any final imperfections and restore the shine.
- Buff to a Shine: Keep polishing until the area shines like the rest of your car’s paint. The goal is to make the scratch blend in so well that you can’t even tell it was there.
- Wax to Protect: To seal the deal, apply a layer of car wax over the repaired area. Wax creates a protective layer and keeps your car’s paint safe from future scratches. It’s a good idea to wax the whole panel, not just the repair spot, so the finish is even and protected across the board.
How to Repair Base Coat Scratches
Base coat scratches are a little trickier than clear coat ones because they cut deeper into the paint. These scratches go through the clear protective layer and hit the color coat underneath, so you’ll need to fix both the color and the smoothness. But don’t worry—it’s still totally manageable as a DIY job. You just need to take your time and be precise.
Here’s how to get it done:
Step 1: Clean the Area Thoroughly
Like any paint repair, the first thing you need to do is clean the area really well. This is especially important with base coat scratches because any dirt or debris will mess with the touch-up paint and sanding process.
- How to Clean: Use car wash soap and water to wash the area around the scratch, paying close attention to the damaged spot. Get rid of any dirt or grime that might interfere with the repair.
- Dry Completely: After cleaning, dry the area with a microfiber cloth to avoid any residue that could affect the paint. Make sure the surface is completely dry before moving on—any moisture can cause issues when you apply the paint.
Step 2: Apply Touch-Up Paint to Restore Color
Since the scratch goes into the paint, you’ll need to use touch-up paint to fix it. Matching the color is key here, so make sure you get it right.
- Match the Color: Find your car’s paint code (usually inside the driver’s door or under the hood) and use that to buy the right shade of touch-up paint.
- Apply with Precision: Using a fine-tipped brush, toothpick, or the applicator that comes with the touch-up paint, carefully fill in the scratch. Work in thin layers to avoid dripping or uneven application. Make sure you’re staying within the lines of the scratch and not going over the edges.
Take your time with this step—let each layer dry before adding another if the scratch is deep. Rushing the process could leave you with an uneven finish that’s harder to fix later.
Step 3: Sand the Repaired Area
Once the touch-up paint is fully dry, the next step is to smooth everything out. This is where wet sanding comes into play.
- Start with 2000-Grit Sandpaper: Lightly wet the sandpaper and gently sand over the painted area in circular motions. Wet sanding helps level out any uneven paint buildup.
- Move to 3000-4000 Grit: After you’ve sanded with 2000-grit, switch to finer sandpaper to make sure the surface is as smooth as possible. You want everything to blend in seamlessly with the surrounding paint.
Again, be careful not to sand too hard. You want to smooth out the touch-up paint without removing it. Check your progress frequently to avoid going too far.
Step 4: Buff with Rubbing Compound
Now that the surface is smooth, it’s time to bring back the shine and blend the touch-up paint with the rest of the car.
- Apply Rubbing Compound: Put a small amount of rubbing compound on a clean microfiber cloth and buff the area using small, circular motions. Apply light to moderate pressure to smooth out the surface and make the repair less visible.
- Buff Until Smooth: Keep buffing until the area feels smooth and starts to shine. The rubbing compound helps smooth out the transition between the touch-up paint and the original finish.
Step 5: Polish to Restore Shine
After using rubbing compound, the area may still look a bit dull. Polishing compound will bring back that glossy finish and make the repair blend in with the rest of your car’s paint.
- Polish the Surface: Apply a small amount of polishing compound to a microfiber cloth and buff the area in circular motions. Gradually increase the pressure as you work the polish into the surface.
- Buff Until Glossy: Keep polishing until the area has the same gloss as the rest of the paint. This step is what makes the repair nearly invisible by restoring the shine and smoothness.
Step 6: Apply Wax for Protection
Once the scratch is repaired and polished, you’ll want to protect it from future damage. Wax adds a protective layer that shields the paint from the elements.
- How to Apply Wax: Use a microfiber cloth to apply a thin layer of car wax over the repaired area. Buff the wax into the surface using circular motions until the area shines.
- Wax the Entire Panel: For an even finish, it’s best to wax the entire panel, not just the repaired spot. This ensures consistent protection and makes the whole section look smooth and polished.
Waxing seals in your repair and helps protect the paint from UV rays, dirt, and future scratches. It’s the final step to making sure your work lasts and your car stays looking sharp.
Repairing Scratches on Your Car: A Little Effort, Big Results
Fixing those pesky scratches on your car doesn’t have to be a headache. With the right tools, guidance, and a bit of patience, you can have your paint looking good as new without spending a fortune. The trick here isn’t about being a pro—it’s simply about taking the time to work carefully and paying attention to the details. Whether you’re buffing out a clear coat scratch or carefully filling in some touch-up paint, it’s that extra care that makes all the difference in getting a smooth, clean finish.
By investing just a little effort, you’ll not only improve your car’s appearance but also feel the satisfaction of knowing you did it yourself. After all, a well-maintained car reflects more than just good looks—it shows that you care.


very good
Thanks for the tips
Definitely going to do this. Thanks for ALL of your good tips and advice, and most of all, the repair manuals. They are worth their weight in gold.
Thanks for the kind words mate!
Happy to help!