

2005 Acura MDX Service & Repair Manual
What's Included?
Fast Download Speeds
Offline Viewing
Access Contents & Bookmarks
Full Search Facility
Print one or all pages of your manual

2001 ACCESSORIES/SAFETY EQUIPMENT
Acura - Air Bag Restraint Systems
DESCRIPTION & OPERATION
Supplemental Restraint System (SRS), also known as air bag system, is designed to protect driver and front
passenger by activating when vehicle receives a sufficient front-end impact. System includes driver-side air bag,
passenger-side air bag, driver and front passenger side-impact air bags, side-impact sensors, SRS unit (with
internal safing and impact sensors) and cable reel. See Fig. 1 .
The main circuit in SRS unit senses and judges force of impact and, if necessary, ignites inflator charges in air
bag assemblies, causing air bags to inflate. If battery voltage is too low or power is disconnected due to impact,
voltage regulator and back-up power circuit keeps voltage at a constant level.
Side-impact air bags are located in each front seat back. Side-impact air bags are designed to deploy when a
moderate to severe side-impact occurs. Passenger side-impact air bag also includes an Occupant Position
Detection System (OPDS). This system contains sensors and a control unit, located in passenger's setback, to
determine passenger seat's occupant height and position. If OPDS control unit determines passenger seat's
occupant head is in deployment path of side-impact air bag, side-impact air bag will be disabled. If passenger
side-impact air bag is disabled, side-impact indicator light will come on. If passenger setback is replaced, OPDS
control unit must be initialized. See INITIALIZING OCCUPANT POSITION DETECTION SYSTEM
(OPDS) UNIT under DIAGNOSTICS.
COMPONENT LOCATIONS
Refer to illustration for component locations. See Fig. 1 .
WARNING: Accidental air bag deployment is possible. Personal injury may result.
Read and follow all WARNINGS and AIR BAG SAFETY PRECAUTIONS
before working on air bag system or related components.
2001 Acura MDX
2001 ACCESSORIES/SAFETY EQUIPMENT Acura - Air Bag Restraint Systems
2001 Acura MDX
2001 ACCESSORIES/SAFETY EQUIPMENT Acura - Air Bag Restraint Systems
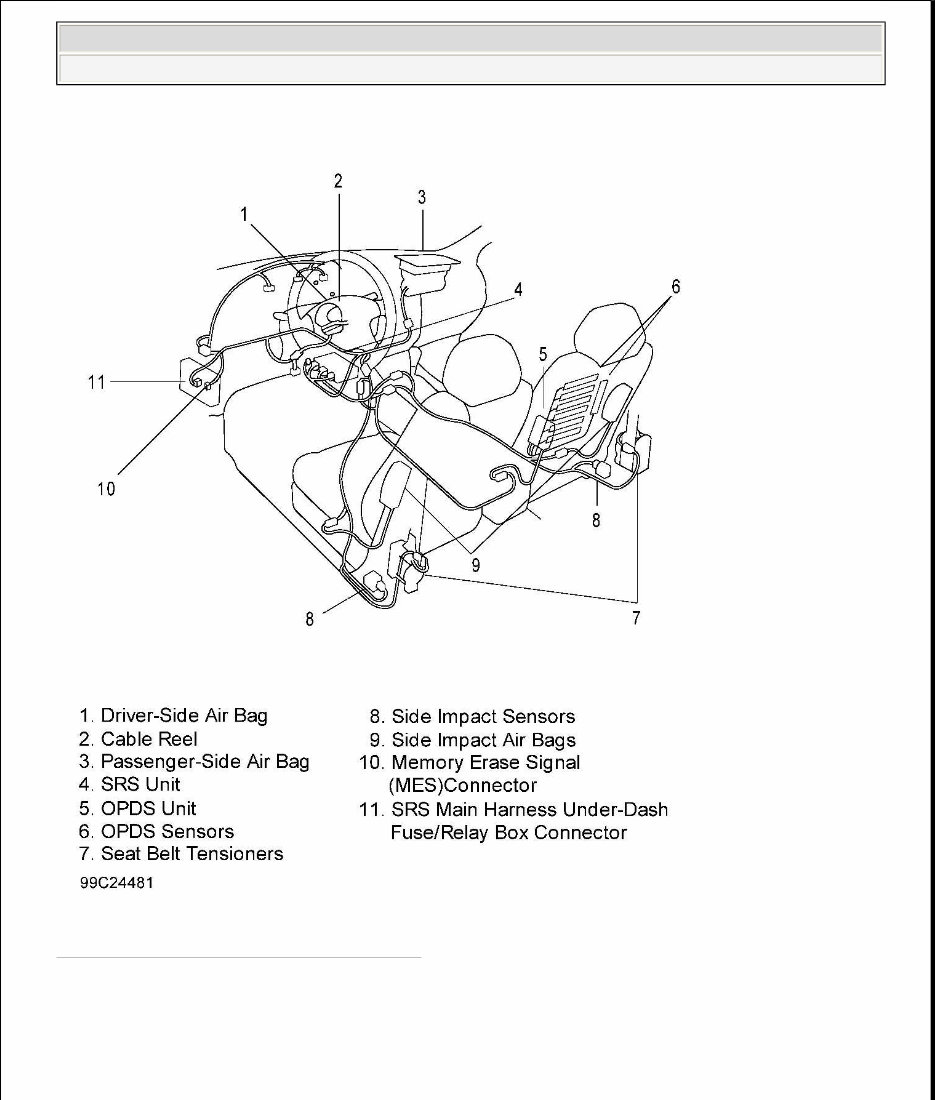
Fig. 1: Locating Restraint System Components
Courtesy of AMERICAN HONDA MOTOR CO., INC.
SYSTEM OPERATION CHECK
When ignition is turned on, SRS indicator light should come on for about 6 seconds, and then go off. Make sure
both horn buttons work. Take a test drive and make sure cruise control switches work. While vehicle is driven,
2001 Acura MDX
2001 ACCESSORIES/SAFETY EQUIPMENT Acura - Air Bag Restraint Systems

SRS indicator light should not come on or flash. If SRS indicator light does not operate as specified, system
must be inspected-repaired as soon as possible. See DIAGNOSTICS .
AIR BAG SAFETY PRECAUTIONS
Observe these precautions when working with air bag system:
Carefully inspect any SRS part before installing. DO NOT install any part that shows signs of being
dropped or improperly handled, such as dents, cracks or deformation.
Use only a digital multimeter to check system. Ensure multimeter output is 10 milliamp (0.01-amp) or
less when switched to lowest value in ohmmeter range. A tester with higher output could damage air bag
circuit or cause accidental deployment and possible injury.
DO NOT install used SRS parts from another vehicle. When making SRS repairs, use only new parts.
Except when indicated, always disconnect negative battery cable, and wait at least 3 minutes before
making SRS repairs.
Whenever ignition is on, or has been turned off for less than 3 minutes, be careful not to bump SRS unit.
Air bags could accidentally deploy and cause damage or injury.
Radio contains an anti-theft protection circuit. Be sure to get anti-theft code number before disconnecting
battery cables.
DO NOT try to disassemble air bags or SRS unit. There are no serviceable parts. Once an air bag has
been deployed, it cannot be repaired or reused.
Store removed air bags with pad surface up. If air bags are improperly stored face down, accidental
deployment could propel unit with enough force to cause serious injury.
Store removed air bags on secure flat surface away from any high heat source and free of any oil, grease,
detergent or water.
Store SRS unit in cool and dry place. DO NOT spill water or oil on SRS unit, and keep away from dust.
Disconnect air bag connectors before disconnecting SRS harness connectors.
Ensure SRS unit is installed securely.
ADJUSTMENTS
CABLE REEL CENTERING
With cable reel installed, rotate cable reel fully clockwise. Rotate cable reel counterclockwise about 2 1-2 turns
until arrow mark on cable reel label points straight up. See Fig. 2 .
NOTE: New replacement cable reels are pre-centered.
2001 Acura MDX
2001 ACCESSORIES/SAFETY EQUIPMENT Acura - Air Bag Restraint Systems
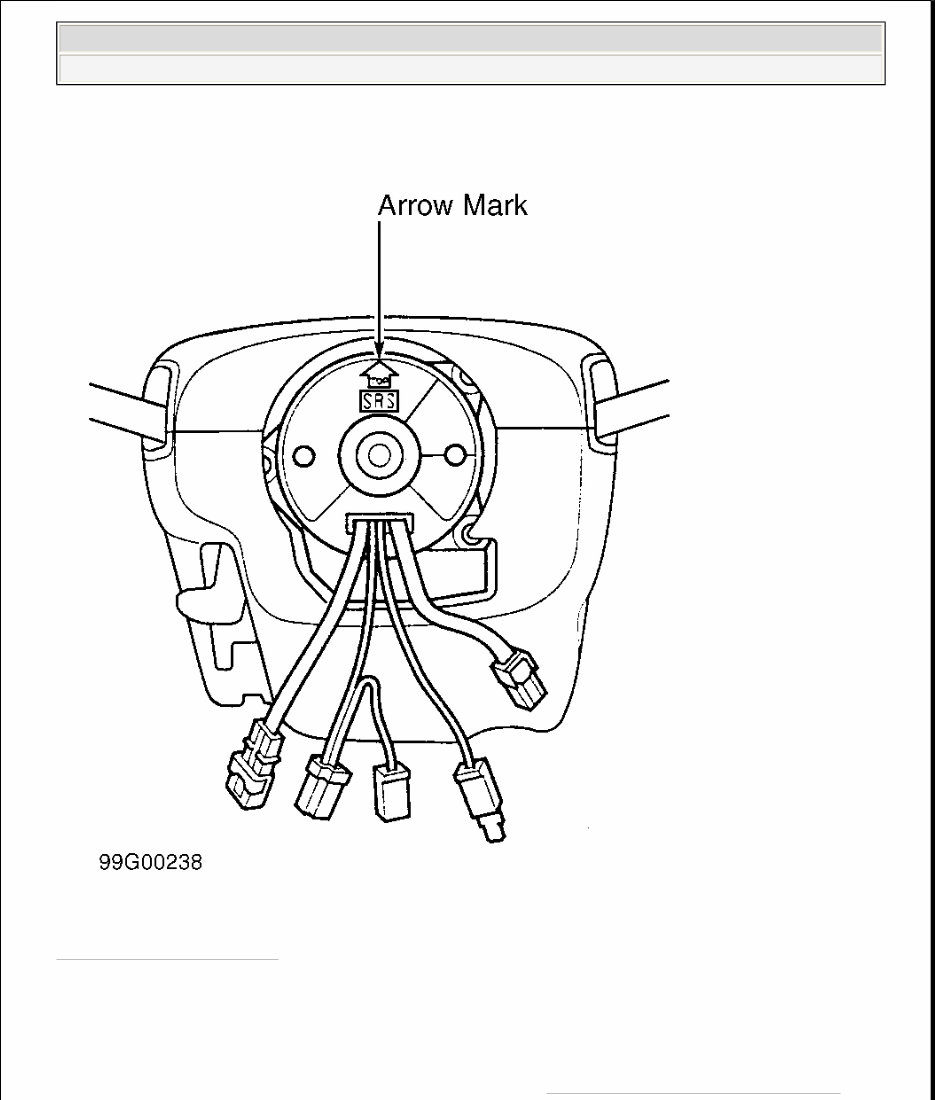
Fig. 2: Centering Cable Reel
Courtesy of AMERICAN HONDA MOTOR CO., INC.
DISABLING & ACTIVATING AIR BAG SYSTEM
WARNING: Accidental air bag deployment is possible. Personal injury may result.
Read and follow all WARNINGS and AIR BAG SAFETY PRECAUTIONS .
2001 Acura MDX
2001 ACCESSORIES/SAFETY EQUIPMENT Acura - Air Bag Restraint Systems

SPRING-LOADED LOCK CONNECTORS
To disconnect, pull spring-loaded sleeve toward stop while holding opposite half of connector. Then pull
connector halves apart. Be sure to pull on sleeve and not on connector itself. See Fig. 3 .
To connect, hold pawl-side connector half, and press on back of sleeve-side connector half in direction shown.
As connector halves are pressed together, sleeve is pushed back by pawl. DO NOT touch sleeve. When
connector halves are completely connected, pawl is released, and spring-loaded sleeve locks connector.
When backprobing spring-loaded lock connectors, remove retainer before inserting test probes from wire side.
Carefully pry out retainer with flat-tip screwdriver. Retainer may be discarded after removal.
NOTE: Radio contains an anti-theft protection circuit. Be sure to obtain anti-theft code
number before disconnecting battery cables.
2001 Acura MDX
2001 ACCESSORIES/SAFETY EQUIPMENT Acura - Air Bag Restraint Systems
You're Reading a Preview
What's Included?
Fast Download Speeds
Offline Viewing
Access Contents & Bookmarks
Full Search Facility
Print one or all pages of your manual
$36.99
$48.99
Viewed 56 Times Today


Secure transaction
What's Included?
Fast Download Speeds
Offline Viewing
Access Contents & Bookmarks
Full Search Facility
Print one or all pages of your manual
$36.99
$48.99
The 2005 Acura MDX Service & Repair Manual is a comprehensive guide designed for both professional mechanics and DIY enthusiasts. It provides detailed instructions and diagrams for various models of the 2005 Acura MDX, including the Base, Touring, Premium, and Sport Package models.
- This manual covers a wide range of topics, including engine maintenance, transmission repairs, electrical system troubleshooting, brake system repairs, and more.
- Each step is explained in detail, accompanied by diagrams and illustrations to enhance understanding.
- Whether you are a DIY enthusiast or a professional mechanic, this manual is an invaluable resource for performing routine maintenance and complex repairs.
- By following the instructions provided in this manual, owners can save time and money by performing routine maintenance tasks on their own.
- Additionally, for more complex repairs, having this manual will enable clear communication with professional mechanics, ensuring accurate and efficient vehicle repair.
- This manual is suitable for anyone who needs comprehensive guidance on maintaining and repairing their 2005 Acura MDX.
Invest in this manual to equip yourself with the knowledge and guidance necessary to keep your vehicle in optimal condition.


