2002 Arctic Cat Snowmobile Service & Repair Manual
What's Included?
Lifetime Access
Fast Download Speeds
Online & Offline Access
Access PDF Contents & Bookmarks
Full Search Facility
Print one or all pages of your manual
TABLE OF CONTENTS Section Click BLACK text to go!! 1. General Information (Vol. I) 2. Engine (Vol. I) 3. Engine-Related Items (Vol. I) 4. Fuel Systems (Vol. I) 5. Engine Electrical Systems (Vol. I) 6. Chassis Electrical Systems (Vol. II) 7. Steering and Body (Vol. II) 8. Drive Train and Brake Systems (Vol. II) 9. Track/Rear Suspension (Vol. II)
SECTION 1 - GENERAL INFORMATION TABLE OF CONTENTS Snowmobi le Identification . . .. ... .. .. .. .. .. .. .. .. ... 1-2 Recommended Gasoline and Oil .. .. ... .. .. .. .. .. .. .. .. ... 1-2 Break- In Procedure .. .. .... .. ..... .. ... .. . .... 1-3 Genuin e Part s ... .. .. ... .. .. ... . ... .. ... . .... 1-3 High Alt itude Operati on .. .... .. ... ......... .... .... ... . 1-4 Dri ve Chain Lubrication (120 cc) .... ... .. .. ...... .. .. .. ... 1-4 Preparation For Storage .. .. ... .. .. ...... ... .. .. ... .. .. ... .. .. ... 1-4 Preparation After Storage . ... .. ... ... . ... .. .. ... .. .. .. ... .. ... 1-6 After Break- In Checkup (100 Mi les) .. .. .. .... ... 1-6 After Break- In Checkup Checklist .. .. ... .. .. ... 1-7 Torque Conversions .. . . .. ... .. ... . .. .. .. ... 1-8 Tightening Torque (General Bolts) .... .. .... .. ... 1-8 Fraction /Decimal Convers i on Chart .. ... ... 1-9 Drill Bit Sizes (Number) Chart .. . 1-9 MM/ ln . Conv ersi on Chart ... ... .. .. ... .. ... . .... ... .. .. . 1-10 Servici ng Symbols ........ .. ... .. ... ......... .. ... .... .. . 1-11 Page: 3 2002 Arctic Ca t Service Manual - al l models - www.ReadMan uals.com 1-1
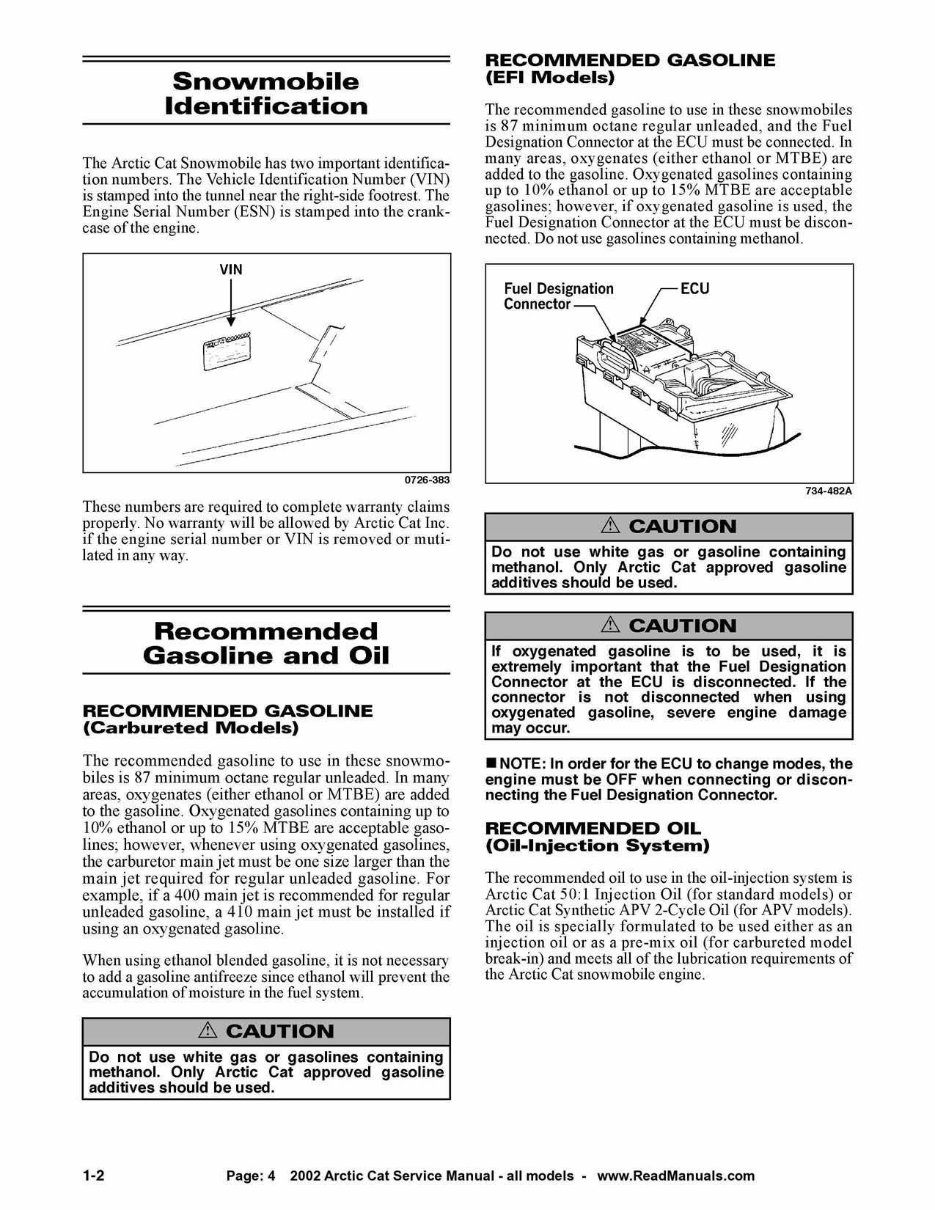
Snovvmobile Identification The Arc li c Cal Snowmobile has Iwo important id entifica- tion numbers. The Vehicle Identifi ca ti on Number (Y IN) is stamped into the tunnel ncar the right-side footres t. The Engine Se ri al Number (ESN) is stamped into Ih e crank- case of the engine. VIN 0726· 383 These lIumbers are required to complete warranty cla im s prope rl y. No warranty w ill be all owed by Arc ti c Cal Inc. irth e engine serial number or YIN is removed or muti- lated in a ny way. Recommended Gasoline and Oil RECOMMENDED GASOLINE (Carbureted Models) Th e reco mm e nd ed gasoline to use in th ese snowmo- bil es is 87 minimum octane r eg ular unl eaded. In ma ll y areas, oxyge nat es (either ethanol or MTB E) ar e added to dI e gasoline. Oxyge nat ed gaso lin cs c ontain ing up to 1 00/0 ethanol or up to 1 5% MTB E are acceptable gaso - lines ; howeve r, wheneve r using oxygenat ed gasolin es , the ca rbure tor main jet must be one size la r ger than the main jet re quir ed for reg ular unleaded gaso li ne. For ex ample , if a 4 00 main jet is reco mmended for reg ular unl eaded gaso li ne, a 4 10 main jet must be insta ll ed if using an o xyge nated gasolin e. When using ethanol bl ended gasoline, it is not necessary to add a gasoline antifreeze sincc ethanol will prcvent th e accumulation of moisture in th e fuel system . .& CAUTION Do not use white gas or gasolines containing methanol. Only Arctic Cat approved gasoline additives s hould be used. RECOMMENDED GASOLINE (EFI Models) The reco mmended gasoline to usc in th ese snow mobiles is 87 minimum oc tane r eg ular unl ea ded, and the Fuel Designa ti on Connector at th e ECU must be conn ec ted. In many ar eas, oxyge nat es (either ethanol or MTB E) ar c added to the gaso line. Oxygenated gasolin es conta inin g tip to 10% ethanol or up to 15% MTB E ar e a cce ptable gasolin es ; however, if oxyge nated gasoline is used, th e Fuel Designa ti on Co nnec tor at th e ECU must be discon- nec ted. Do not use gasolines containing methanol. .& CAUTION Do not use white gas or gasoline containing methanol. Only Arctic Cat approved gasoline additives should be used . .& CAUTION If oxygenated gasoline is to be used , it is extremely important that the Fuel Des ig nation Connector at the ECU is disconnected. If the connector is not disconnected when us i ng oxygenated gasoline, severe engine damage may occur . • NOTE: In order for the ECU to change modes, the engine mus t be OFF when connecting or discon- necting the Fuel Designation Connector. RECOMMENDED OIL (Oil-Injection System) The r ecommended o il to use in the oil-injec ti oll system is Arctic Ca t 50 : I Inj ec ti on Oi l (for standard models) or Arc ti c Cat Sy nthetic APY 2-Cy cl e O il (for APV model s). The o il is spec ia ll y formulated to be used either as an inj ec tion o il or as a pre-mix oil (for c arbur eted model break-in) and mee ts all of th e lubrication requirements of th e Arctic Cat snowmobile engine. 1-2 Page: 4 2002 Arctic Cat Service Manual - all models - www.ReadManuals. com
RECOMMENDED OIL (4-Stroke Model) The recommended oil to usc is a multi- grade oil ca li- brated to the ambie nt temperature at whi ch Ih e engine is run . Sec th e viscos it y chart for details. .& CAUTION Any oil used in place of the recommended oil may cause serious damage. Multi-Grade I I SAE# , I , ENGINE I I I I I I OIL , · C.35_29 _23 . 18 _12 -7 1 4 1015 2127 32 TEMP OF -30 -20 -10 0 10 20 30 40 SO 60 70 80 90 GEN-0048 A ficr th e engi ne break-in period, th e engi ne o il should be changed every 3500 miles (o llih e 4-Stroke To uring a nd Trail) and before prolonged storage. Break-In Procedure (2-Stroke Models) The Arct ic Cat 2-str okc engine (when new or reb uilt) requires a shorl brea k-in pe ri od before th e engine is sub- j ec ted to heavy load conditions. Arc ti c Ca t requires thaL th e first ta nkful or fuel be premixed at a 100: I ratio in all oil-injection models. During the break-in period, a maxi mum of 1/2 throttle is reco mm e nd ed; however, brief full-throttle accelera ti ons and variations in dri\' in g speeds contribute to good engi ne break-in. .& CAUTION 00 NOT exceed the one (1) tankful limitation of a 100:1 gaS/oil break-in mixture. Continuous use of a gaS/oil mixture, unless consistently operati ng in extremely cold conditions (_26 D C/_15 D F or colder), could cause spark plug foul ing and excessive carbon buildup. A 100:1 gaS/oil mixture must be used in conjunction with the oil- injection system to ensure adequate engine lubrication in extremely cold conditions. Break-In Procedure (4-Stroke Model) The Arct ic Cat 4-stroke en gi ne (when new or rebuilt) requires a short break-in pe ri od before th e en gi ne is sub- jected to heavy load conditions. This engin e docs not require any pre-mixed fu el during th e break-in pe ri od. .& CAUTION 00 NOT use premixed fuel in the snowmobile gas tank. Engine damage will occur. To ensure trouble-free operati on, care ful adh erence to the foll owing break-in guidelines wi ll be bene fi c ial. 0-200 miles 112 Throttle (45 MPH·max) 200-400 miles 112-3/4 Throttle 400-600 miles 112-3/4 Th rottle' • With occasional full _throul<: operation. To ensure proper engi ne break-in, Arc ti c Cat recommend s that th e en gi ne oil and filter be chan ge d after 600 mil es or after one month, whi chever comes first. nlis service is at the discretion and expcnse of th e snowmob il e oWll er. Genuine Parts Whcn re pl accment of parts is necessary, usc onl y gc nuine Arc ti c Ca t parts. Th ey are precision-made to ensure hi gh quality and correct fit. Page : 5 2002 Arctic Cat Service Manual - all models - www.ReadMan uals . com 1-3
High Altitude Operation Operati ng a snowmob ile at v ar ying altitud es re quir es changes in pe rforman ce co mp onent s. Th ese changes aff ect dri ve train co mponents (011 all moocls) and carbure- lioll co mponent s (0 11 carbureted models). A high altitude information deca l is located beneath the hood of the snowmob il e. On carbureted models, the infor- mation is incorporated into Ihe Main Jet C hart decal. & CAUTION On carbureted models, carefully follow the Main Jet Chart recommendations for proper main jet selection for altitude, temperature, and gasoline being used. A llumbe ror Arctic Cat snowmobiles arc initially sc t up at the fa ctory f or operation between 5000-9000 fee t. Con- sult the appropriate spec ifi cations for this information. Drive Chain Lubrication (120 eel The drive chain should be lubricated eve ry 20 operating hours wi th a dry, graphite-based chain lubri cant. By using a dry, graphite-based chain lubricant, dirt buildup all th e drive chain will be minimi zed. Before eac h lubrication, ill sp ec t th e dri ve chain for dirt accumulation. To lubricate th e drive chain, shut th e engin e off a nd wait fo r a ll moving paris to stop, remove th e drive cha in guard and lubricate th e drive chai ll . After lubricating Ihe drive chain, in stall th e drive chain guard. If th e dri ve c hain is excessively dirt y, il sh ou ld be removed and cleaned prior to being lubricated (sec Drive Chain and Sprockets in Section 8). • NOTE: If a dry, graphite-based chain lubricant is not available , lubricate the drive chain with several drops of petroleum-based oil. If the snowmobile is operated in the summer with the optional wheel kit, the drive chain should be lubricated more fre- quently. Preparation For Storage Prior to storing th e snowmob il e, it must be prope rl y ser- viced to prevent c orros ion a nd component deterioration. An autho ri zed Arc ti c Cat Snowmobile dea ler should per- form this service: howe\'cr, the ow ner/operator ca n per- f or m this service if des ired. To prepare the snowmobi le for storage, Arc ti c Ca t rCCO lJ1lll cnds the fo ll owi ng proce- dur e: I. Clean the seat cus hj on with a damp cloth and Arct ic Cat Vinyl Protccta nt (pin 0638-3 13). 2. Clean the snow mob il e thor ough ly by h os ing dirt , o il , grass , and odler foreign matt er from the skid frame, tunn el, h ood, and be ll y pan . A ll ow the snowmobil e to dry thoroughly. DO N OT get water into any part of the engine. • NOTE: Steps 3-7 are only for models with an oil- injection system. 3. Place the rear of the snowmobi le up on a shielded s af ety stand. • NOTE: On some models, the air-intake silencer is a one-piece unit, and the silencer boot(s) can be removed to access the intake bore(s). Remove the boots ; then proceed to step 7. • NOTE: On some models , the air-intake silencer includes a cover/tool tray assembly and a baffle! resonator, and the silencer boot cannot be removed to access the intake bores. Proceed to step 4. 4. Open the air-intake s il encer cove r; then rem ove dI e three sc rews sec uring dI e cove r/tool tray assembly to the s il encer. 5. Cl ose the cover ; then tip the cove r/tool tray assembly for wa rd and out of its slots and re mo ve dI e asse mbly . 6. Using a large flat-blade screwdri ve r, remove the barn e/resonat or tabs from the air-intake silencer sl ots and remove the baffl elreso nator to acc ess the intake bores . 1-4 Page : 6 2002 Arctic Cat Service Manual - all models - www.ReadManuals.com
• NOTE: The baffle/reson ator can be removed more easily by removing the back tabs first. 7. Start th e engine and a ll ow to id l e. With the eng ine idling, spray Arc ti c Cat Engin e Storage Preserve r (p/n 0636- 1 77) in to the in take(s) un til th e eng ine exhaust starts to smoke heav il y or until the eng in e starts to drop in RPM . Tum engine off. • NOTE: On some models, install the air-intake silencer boot(s) ; on some models, install the baf- fle/resonator and the coverltool tray assembly. 8. Plu g th e exhau st system outl ct with a cl e an cloth. &. CAUTION Do not do step 9 on the 4-stroke model; severe engine damage could result. 9. With the ignition switch in ti le OFF pos it ion: A. Di sconnect the hi gh tension Ic ad (s) from the spark pl ug(s); then remove the pl ug(s), connect it/ th cm to the lc ad (s), and groun d it/ th em on thc cylinder head(s). &. CAUTION Never crank the engine over without grounding the spark plug(s). Damage to coils and/or COl unit may result. B. Pour 29.5 ml ( I fl oz) of SAE #3 0 petrole um - based oil in to each spa rk plug hole and pu ll the reco il sta rtcr handle slowly about 10 ti mes. C. In sta ll the spark p lug(s) and co nn ect th e high tension lead (s). 1 0. On th e 4- strok e mod el, change the engine o il ; then clean the air fi lter. II . On carbureted models, drai n the gas from each carburetor fl oat chamber. 1 2. Fill the gas tank to its rated capac it y; then add Arctic Cat Fuel Sta bil izer (pIn 0638- 165) to the gas ta nk fo ll ow ing d irec ti ons on th e container for th e sta bilizer/gaso lin e ratio. Ti ghten th e gas tank cap sec urely. 13 . If ap plic ab le, dra in the chain-case lubricant by remov in g the chai n-c ase dra in plug loc at ed on the backside of the chain-case assembl y. Remove the cha in -ca se cover and inspect cha in , sprockets, cha in tensioner, an d roll ers for we ar and th e chain for proper tension. Insta ll th e drain plug, chain- ca se cove r, and seal; th en pour Arctic Cat Transmission Lube (pin 0636-81 7) in to the fi ll er hole ac cording to approp ri ate specifications. 14. Cl ean and inspect the dri ve clutch and dri ve n pull ey. 1 5. If ap plic ab le, remove th e dri ve be lt from the drive el utc h/dri ve n pull ey. Lay the belt on a flat surface or slide it in to a cardboard sleeve to preve nt warp in g or di stort ion duri ng storage; then cl ean and in spect the dri ve cl utc h and dri ven pull ey. 1 6. App ly light oil to the upper steering po st bu shi ng, ski spi ndles and bo lt s, front and rear pivot bushings of the skid frame, and p lun ge rs of the shock absorber s. 17. Lubricate a ll grease fittings (front and rear sll spension, spi ndles, speedometer dri ve ada pter, and the dri ve n shaft support bea rin g) w it h a low- temperature grease. 18. Ti ght en a ll nuts, bo lts, and cap screws mak in g sure all calibrated nut s, bolt s, and cap screws are ti ghtened to specifica ti ons. Make sure all ri vets holding the components together are tight. Replace a ll loose ri vets. 1 9. Cl ean and polish the hood, console, and chassis w ith Arctic Cat Hood and Wi ndshi eld Cleaner/ Poli sh (pin 0636- 17 4) . DO NOT US E SO L- VEN TS OR SPRAY CL EANE RS . THE PRO- PELL ENT WILL DAMAGE TH E FINISH. 20. On elec tr ic sta rt model s, di sconn ect the battery cables making sure to disconn ect the neg at ive cable fir st; then clean the battery posts and cables. 2 1. If possible, store the snowmobil e in doors. Rai se d1 e tr ac k off th e fl oor by bloc kin g up the back end maki ng sure the snowmobi le is secur e. Loosen the trac k adj ustin g bolts to reduce tra ck tension. Cove r dI e snowmobile with a mac hin e cover or a heavy tarpau li n to protec t it fr om dirt and dust. 22. If til e snowmobile must be stored outdoors, pos iti on the snowmobile out of direct sunli ght; tll en block the ent ire snowmobile off the ground maki ng sure the snowmobile is secure. Loosen the trac k adjustin g bolts to reduce tra ck tension. Cove r with a mac hin e cover or a heavy tarpa uli n to protect it from dirt, dust, an d rain . &. CAUTION Avoid storing in direct sunlight and using a plastic c over as moisture may collect on the snowmobile causing corrosion. Pa ge : 7 2002 Arctic Cat Service Manual - a ll models - www. Re a dManual s. com 1-5
Preparation After Storage Taking th e snowmo bil e o ut of storage a nd co rr ec tl y pre- parin g il for another season wi ll ass ur e many mil es a nd ho urs o flr o ubl e-free snowmobilin g. Arc ti c Cat r ecO lll- me nd s th e fo ll owing procedure: ,:1:,. CAUTION On carbureted models if the gas in each carburetor float chamber was not drained prior to storage, the carburetor(s) must be cleaned before starting the engine. I. Cle an th e snowmobile th oroug hl y. Polish th e exte ri or of th e snowmobile. 2. Cle an th e eng in e. RCOlO\ 'C th e c1 0 tb from th e exh au st system. Check exh au st system and mr- intake s il encer/a ir filter for obstmc ti ons. 3. In spect a ll control wires and cables for signs of wear or fray in g. Replace if necessar y. Usc cable ti es or tape to ro ut e wires and cables away from hot or rotating parts. 4. If ap pli cable, in spec t th c drivc belt for cracks a nd t ears. Check belt specificati ons. Re pl ace if damaged or wo rn . Install th e dri ve belt. • NOTE: If the old belt is worn but in reasonable condition , retain it with the snowmobile as a spare in case of emergency. 5. On carbureted models, inspect the in-line fu el filter and replace if necessary. 6. In spect all fue l hoses and o il hoses for dete ri ora ti on or cracks; rep lace if necessary. Make sure a ll conn ections arc ti ght; th en on 2-stroke models, fi ll th e oil-injection re servoir with th e recommended 50: I injection o il . • NOTE: On 2-stroke models after prolonged stor- age, Arctic Cat recommends one tankful of 100:1 gaS/oil mixture be used in conjunction with the oil- injection system to ensure proper lubrication. 7. In spect th e entire brake system, a ll controls, headlight, taillight, brakelight, s ki wear bars, a nd head li ght aim; adjust or replace as necessary. 8. In spect each spark plu g. Replace, gap, or el ean as necessary. 9. Adjust th e track to th e proper tension a nd alignment. Lock th e jam nut s. 10. Adjust the carburetor(s) and choke cable on carb ur eted model s a nd throttle ca bl e on a ll model s. ,:1:,. WARNING On VM-style carburetors , be sure to tighten the swivel adapter jam nuts securely. If a jam nut isn't tightened , the adjuster can rotate out of the carburetor cap causing the piston valve not to return to the full-closed position. 11 . Tighten a ll nuts, bolts, and cap screws making sure all ca librated nuts, bolts, and cap screws arc ti ghtened to specifications. 1 2. Lubricate a ll grease fittings (rear suspension, spindles, speedometer drive adapter, and the driven shaft support bearing) with a low- temperature grease. 1 3. On th e 120 cc model, inspect th e dri\'e chain an d dri ve chain ti ghtener. Replace if necessary; th en lubricate th e binding screw dmm wi th WD-40 and th e dri ve cha in with a dry, graphite-based chain lubricant. 14 . On liquid cooled models, check th e coolant level and all coolant hoses and connections for deterioration or cracks. Add prope rl y mixed coolan t as necessary. 1 5. On fa n cooled models, elean the eng ine cooling fin s and all ve nt s . 1 6. On EFI models, place th e rear of the snowmob il e on a shielded saf ety stand; then start the engine. All ow the eng in e to idle; then us ing a long stiff wire with a hooked end, raise the oil-injection pump control ann to th e wide-open position until th e eng in e starts to smoke heavil y. Release th e con trol ann and tum off the eng in e. 17. On electric start models, charge the batter y; th en COlUlect th e battery cables making sure to co nn ect th e positive cable firs t. Test the electric start system. After Break-In Checkup (100 Miles) The 100 mile chec kup offcred by some dealerships reduces problems and warrant y cost s. A program of thi s ki nd should be olTcred by all dealership s. Ma ny dealer- s hip s h a, 'e addcd the price of th e chcc kup into the se lling price of the snow mobile, and others offcr it as a bonus to th e customers who purchase snowmob il es from th e i.r dealership. There are three areas that require adj lI s tm e nt after th e break-in pe ri od in order to obtain peak perfo rm a nce These arcas arc th e fo ll owi ng. 1-6 Page : 8 2002 Arctic Cat Service Manual - all models - www.ReadManuals.com
A. Carburetor jetting B. Drive belt defl ection C. Track tension and alignment CARBURETOR JETTING (2-Stroke Carbureted Models)- Altitude, te mperature, and the use of oxyge n- at ed gasoline aff ect th e carbureti on needed for optimum engin e performance. The carburetor main jets llIu st be chan ge d in conjunction with changes in operating alti- tude, oxyge nat ed gasoline usa ge, and temperature. DRIVE BELT DEFLECTION - Dri ve be lt deOection is very important to the snowmobil c. Eve n ifit is checked and is co rrect when the snowmobile is set up, it docs chan ge (more so durin g the break-in period). This is becau se th e rubber engin e mounts and th e rubber snubber on th e torque link will all take a "sel" during th e fir st 100 mil es, whi ch allows th e distance between the dri ve clutch and driven pulley to shorten. When this happens, the snowmobile will appear to have a too long dri ve belt. To add to this, th e dri ve belt it se lf wears and s tr etches some- wha t. This a ll leads to a low-e nd pe rf o rm ance pro bl em and, if not corrcetcd, causes premature dri vc belt wear. A rter th e break-in peri od, drive belt deOeeti on should be checked according to the in structions gi ve n in thi s man- ua l. To correct for too mu ch de fl ec ti on, washer(s) from bet wee n the dri ve n pull ey sheaves can be removed to " ti ght en th e dri ve belt" a nd allow the be lt to return to th e proper ratio for dri ve clutch enga ge me nt. DRJVE BELT BREAK-IN - It is critical for maximum dri ve bclt lif e to allow th e belt to bre ak in before s ubj ec t- in g it to hard use such as wide-open-throttle operation or hill climbing. The fir st 20 miles on th e dri ve be lt should be at 1/2 thro t- tl e or lower. This will a ll ow th e be lt to cure to tall y before it is s ubj ected to hard usc. . If thi s procedure isn't foll owed, it is poss ibl e to des tr oy a new dri ve belt in less than 50 miles. This should be ex pl a ined to customers at the tim e of dri ve belt sales. To increase th e life of a dri ve belt, it is vel)' important th at th e belt be warmed up before s ubj ec tin g it to any type of usc. In co ld temperature (0° or be lo w) , th e eng in e should be allowed to idle for a period of &to 10 minutes. Thi s will allow heat from the engine compartment to so ft en the drive belt. No t onl y will thi s procedure in crease belt lif e but w ill also help prevent engin e damage fr om co ld sc i- zur e. "'" WARNING When following the above procedure, the operator must not leave the snowmobile unattended during the warm-up period . Eac h operator should be in s tru cted to dri ve th e snowmo- bil e for se"e ral minutes at a low thro ttl e settin g to wa nn th e belt up before usin g wide-open-throttl e. Thi s prac ti ce should be fo ll owed on all model s for max imum belt life. TRACK TENSION AND ALIGNMENT - There is a certain amount of s tTetch on all tracks durin g th e fir st 500 mil es. The track mu st be adjusted after th e first 50 to 100 miles to the specifica ti ons gi ve n in th e Setup and Pre- delivery Manual and periodically th ereafte r. If th ese adjus tm ents ar en't pe rf o rm ed, the track may "derail" whi ch leads to tr ack a nd slide rail damage. Alon g with th ese three major areas, th ere are also o th er areas that should be checked and adjusted during the " Af ter Break-In Checkup." A chec kli st to ass ist you with this service follows. No t o nl y will th e customer be hap- pier, but it al so ge ts th e customer back into your deal er- ship, which in man y cases will mean additio nal sal es in accessori es, belts, o il , cte. After Break-In Checkup Checklist Bel ow is a rec omm ended li st of items to check after the brea k-in period. By pe rformin g this inspection, warranty cost ca n be reduc ed and customer satis fa c- ti on can be in creased. Th e reco mm ended mil ea ge for this inspe ction is between 100 and 300 miles. Pl ease encourage th e cus- tomers to have thi s important checkup done. o Jet carburetor(s) according to average temperature, type of gasoline being used , and altitude o Adjust dri ve belt deflection o Adjust track te ns ion and alignment o Adjus t throttle cable te nsion o Check oil-injection pump adjus tm e nt o Check engine idl e o Check coolant l evel o Check chain case lubricant level o Check lights (highllow beam, brakelight) o Check safety sw it ch operation o Check dri veshaft area for any rubbing components o Check steering hardware for tightn ess o Check s kid frame and A-arm mounting hardware for tightness o Check brake lever travel and adjus tment o Grease all lubrication po ints Page: 9 2002 Arctic Cat Service Manual - ali models - www.ReadManuals.com 1-7
This manual contains an introductory description and procedures for the inspection, service, and overhaul of its main components. Step-by-step instructions guide you through jobs ranging from simple maintenance to complete engine and suspension overhaul.
This manual can be used by anyone from a first-time do-it-yourselfer to a professional mechanic. Detailed drawings and clear photographs give you all the information you need to do the work right. Troubleshooting, tune-up, maintenance, and repair are not difficult if you know what tools and equipment to use, as well as the proper procedures.
Most all service manual chapters start with an assembly or system illustration, diagrams, exploded parts view, pictures, service information, and troubleshooting for the section. The subsequent pages give detailed procedures. If you don't know the source of the trouble, go to the troubleshooting page (sometimes not all sections have a troubleshooting page provided from the manufacture) for a list of causes and effects to determine the problem. Reference in the shop area.
Models Covers :
All 2002 Arctic-Cat Snowmobile Models
Include :
2002 Arctic-Cat Bearcat Wide Track
2002 Arctic-Cat Mountain Cat 500
2002 Arctic-Cat Mountain Cat 570
2002 Arctic-Cat Mountain Cat 600 EFI
2002 Arctic-Cat Mountain Cat 600 EFI LE
... (full list continues)
Manual Contents :
General Information
Engine
Engine-Related Items
Fuel Systems
Engine Electrical Systems
Chassis Electrical Systems
Steering and Body
Drive Train System and Brake Systems
Track / Rear Suspension
Language : English
Requirements : Reader & Software
Total pages : 710+
Why Pay someone else to do something that you can do yourself? Do you think working on your car, truck, or motorcycle is too hard or confusing? Service manuals have been helping people work on and/or fix automobiles for many years! Seasoned veterans (dealerships and mechanics) and ordinary people (like me) use service manuals on a regular basis! I used to have no idea how to change my own oil, but with a service manual handy, I was able to learn with no problems at all! All mechanics who you would normally pay to work on your car or truck use a service manual to do the job! Everyone has to learn somewhere, and that place is the service manual! Don't pay inflated prices for work when you can easily do it yourself!
These manuals will come in PDF format, so it's EXTREMELY easy to move around with you from computer to computer. Many mechanics purchase electronics manuals like this and use a laptop near them while doing maintenance! If you don't have a laptop, no problem! Just print out the pages of the manual that you need and you've got a hard copy in front of you while doing your work! Simply throw it away when you're finished! It's much easier and quicker than having to deal with a book!
Service Manuals also known as Shop and Repair Manuals are hand guides available by the makers. The manuals cover complete directions to diagnose and fix the specific product. The manuals are very detailed and may contain comprehensive service info and procedures, removal and installing procedures, disassembly and assembly, and overhaul procedures, diagnosis and testing procedures & complete in-depth illustrations. These shop manuals are the equivalent manuals the pros use.
Parts Catalogs also called Parts Manuals are handbooks printed directly from the builder showing a complete list of the builder parts or assembly for the certain product by complete in-depth illustration or a numerical listing of the part numbers and names. It does not include any assembly, maintenance, or owners instructions.
Owner's Manuals also called Operator/Operating & Instruction Manuals are books available directly from the builder accompanying the specific product detailing how to install or operate the specific product, safety directions, and warranty info.
Related Searches :
2002 Arctic-Cat Snowmobile Service Manual
2002 Arctic-Cat Snowmobile Repair Manuals
2002 Arctic-Cat Snowmobile Workshop Manual
2002 Arctic-Cat Snowmobile Shop Manual
2002 Arctic-Cat Snowmobile Factory Service Manual
2002 Arctic-Cat Snowmobile FSM
2002 Arctic-Cat Snowmobile OEM Manual
Recently Viewed
5,521,897Happy Clients
2,594,462eManuals
1,120,453Trusted Sellers
15Years in Business
Price:
Actual Price:
2002 Arctic Cat Snowmobile Service & Repair Manual