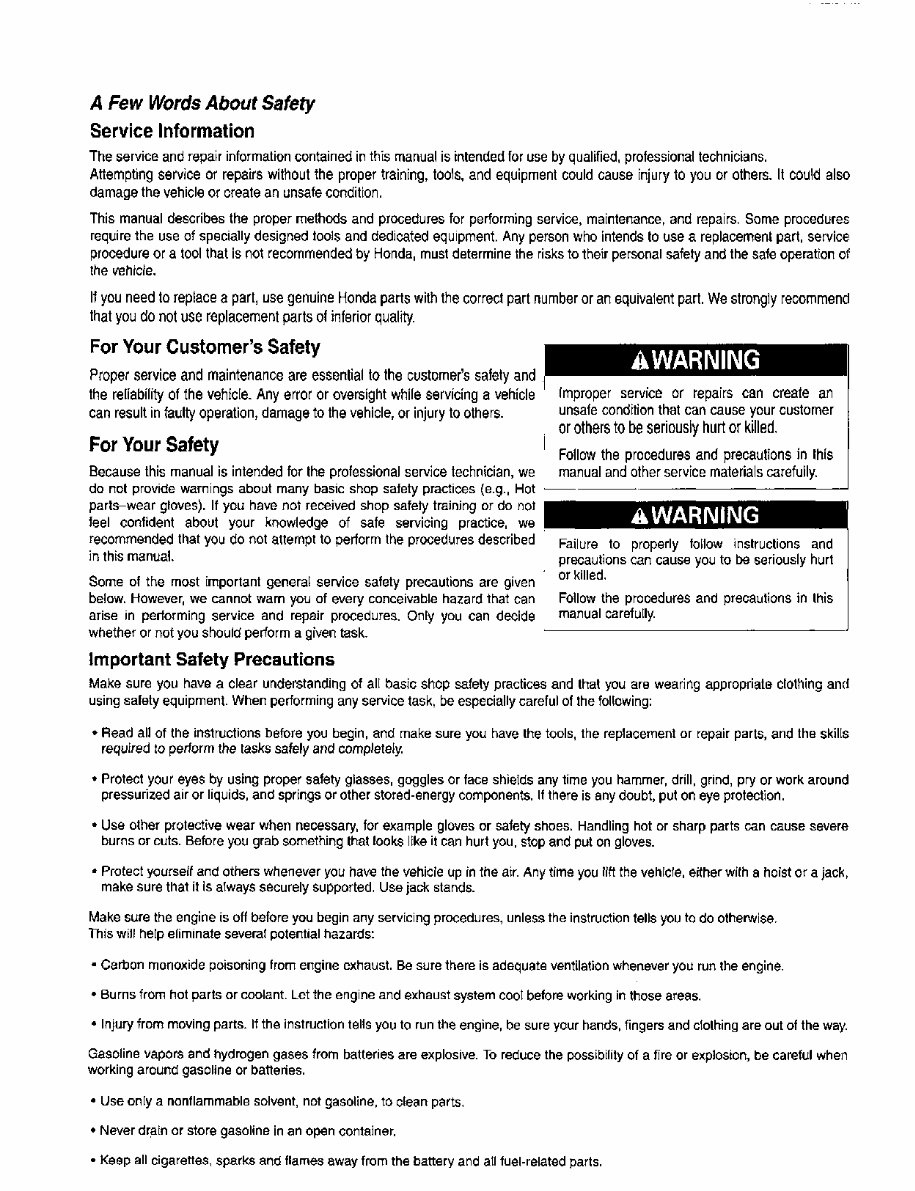
A Few Words About Safety Service Information The service and repair information contained in this manual is intended for use by qualified, professional technicians. Attempting service or repairs without the proper training, tools, and equipment could cause injury to you or others. It could also damage the vehicle or create an unsafe condition. This manual describes the proper methods and procedures for performing service, maintenance, and repairs. Some procedures require the use of specially designed tools and dedicated equipment. Any person who intends to use a replacement part, service procedure or a tool that is not recommended by Honda, must determine the risks to their personal safety and the safe operation of the vehicle. If you need to replace a part, use genuine Honda parts with the correct part number or an equivalent part. We strongly recommend that you do not use replacement parts of inferior quality. For Your Customer's Safety Proper service and maintenance are essential to the customer's safety and the reliability of the vehicle. Any error or oversight while servicing a vehicle can result in faulty operation, damage to the vehicle, or injury to others. AWARIMING Improper service or repairs can create an unsafe condition that can cause your customer or others to be seriously hurt or killed. Follow the procedures and precautions in this manual and other service materials carefully. AWARNING Failure to properly follow instructions and precautions can cause you to be seriously hurt or killed. Follow the procedures and precautions in this manual carefully. For Your Safety Because this manual is intended for the professional service technician, we do not provide warnings about many basic shop safety practices (e.g., Hot parts-wear gloves). If you have not received shop safety training or do not feel confident about your knowledge of safe servicing practice, we recommended that you do not attempt to perform the procedures described in this manual. Some of the most important general service safety precautions are given below. However, we cannot warn you of every conceivable hazard that can arise in performing service and repair procedures. Only you can decide whether or not you should perform a given task. Important Safety Precautions Make sure you have a clear understanding of all basic shop safety practices and that you are wearing appropriate clothing and using safety equipment. When performing any service task, be especially careful of the following: • Read all of the instructions before you begin, and make sure you have the tools, the replacement or repair parts, and the skills required to perform the tasks safely and completely. • Protect your eyes by using proper safety glasses, goggles or face shields any time you hammer, drill, grind, pry or work around pressurized air or liquids, and springs or other stored-energy components. If there is any doubt, put on eye protection. • Use other protective wear when necessary, for example gloves or safety shoes. Handling hot or sharp parts can cause severe burns or cuts. Before you grab something that looks like it can hurt you, stop and put on gloves. • Protect yourself and others whenever you have the vehicle up in the air. Any time you lift the vehicle, either with a hoist or a jack, make sure that it is always securely supported. Use jack stands. Make sure the engine is off before you begin any servicing procedures, unless the instruction tells you to do otherwise. This will help eliminate several potential hazards: • Carbon monoxide poisoning from engine exhaust. Be sure there is adequate ventilation whenever you run the engine. • Burns from hot parts or coolant. Let the engine and exhaust system cool before working in those areas. • Injury from moving parts. If the instruction tells you to run the engine, be sure your hands, fingers and clothing are out of the way. Gasoline vapors and hydrogen gases from batteries are explosive. To reduce the possibility of a fire or explosion, be careful when working around gasoline or batteries. • Use only a nonflammable solvent, not gasoline, to clean parts. • Never drain or store gasoline in an open container. • Keep all cigarettes, sparks and flames away from the battery and all fuel-related parts.
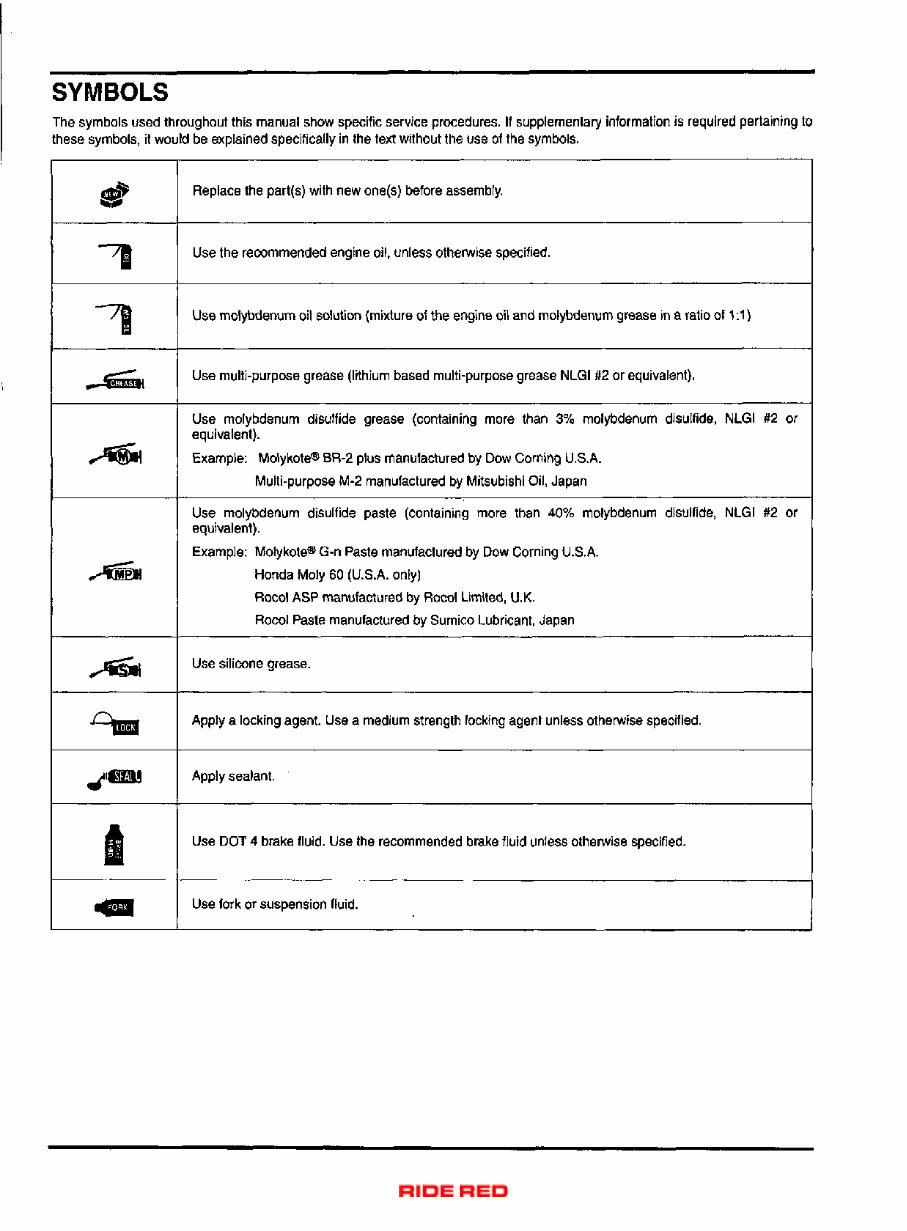
SYMBOLS The symbols used throughout this manual show specific service procedures. If supplementary information is required pertaining to these symbols, it would be explained specifically in the text without the use of the symbols. Replace the part(s) with new one(s) before assembly. Use the recommended engine oil, unless otherwise specified. Use molybdenum oil solution (mixture of the engine oil and molybdenum grease in a ratio of 1:1) Use multi-purpose grease (lithium based multi-purpose grease NLGI #2 or equivalent). Use molybdenum disulfide grease (containing more than 3% molybdenum disulfide, NLGI #2 or equivalent). Example: Molykote® BR-2 plus manufactured by Dow Corning U.S.A. Multi-purpose M-2 manufactured by Mitsubishi Oil, Japan Use molybdenum disulfide paste (containing more than 40% molybdenum disulfide, NLGI #2 or equivalent). Example: Molykote® G-n Paste manufactured by Dow Corning U.S.A. Honda Moly 60 (U.S.A. only) Rocol ASP manufactured by Rocol Limited, U.K. Rocol Paste manufactured by Sumico Lubricant, Japan Use silicone grease. Apply a locking agent. Use a medium strength locking agent unless otherwise specified. Apply sealant. Use DOT 4 brake fluid. Use the recommended brake fluid unless otherwise specified. Use fork or suspension fluid.
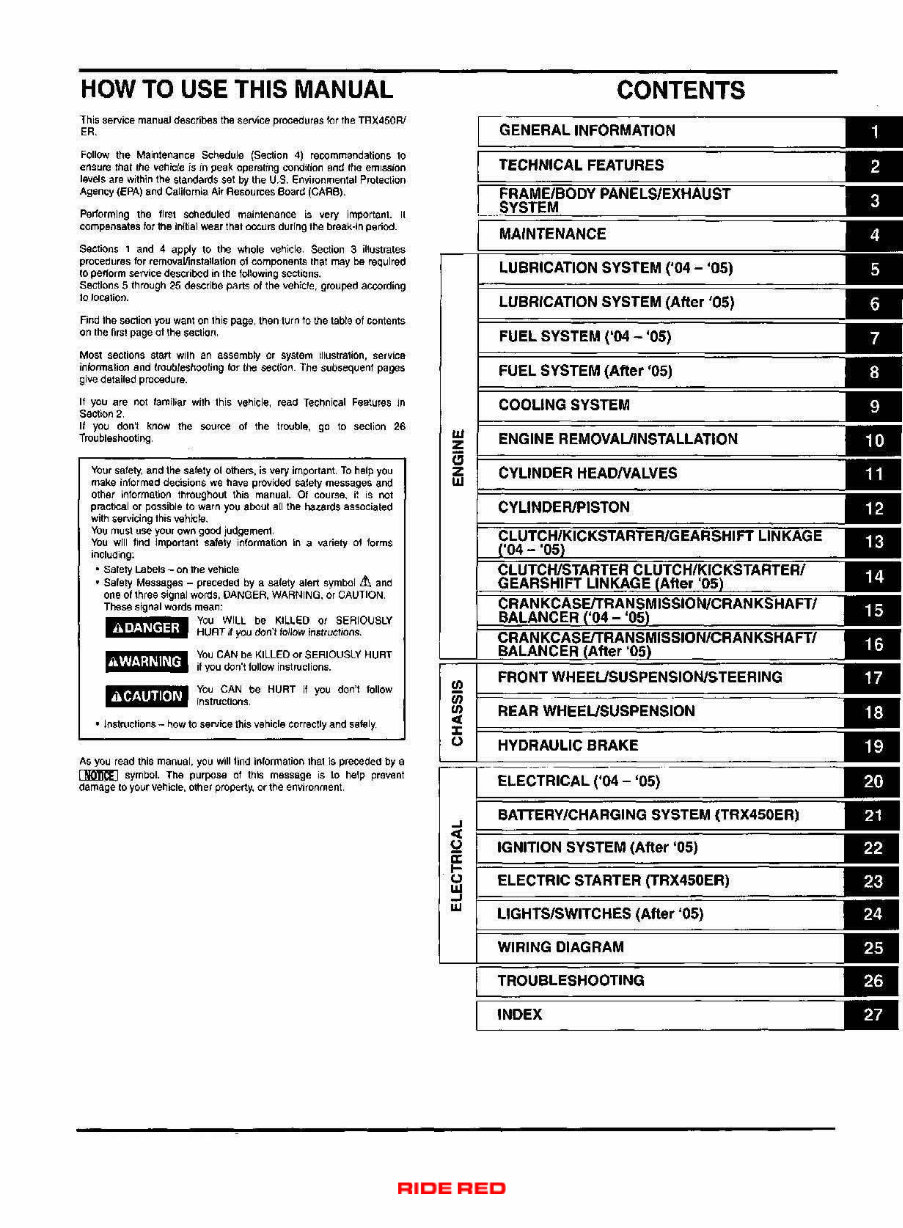
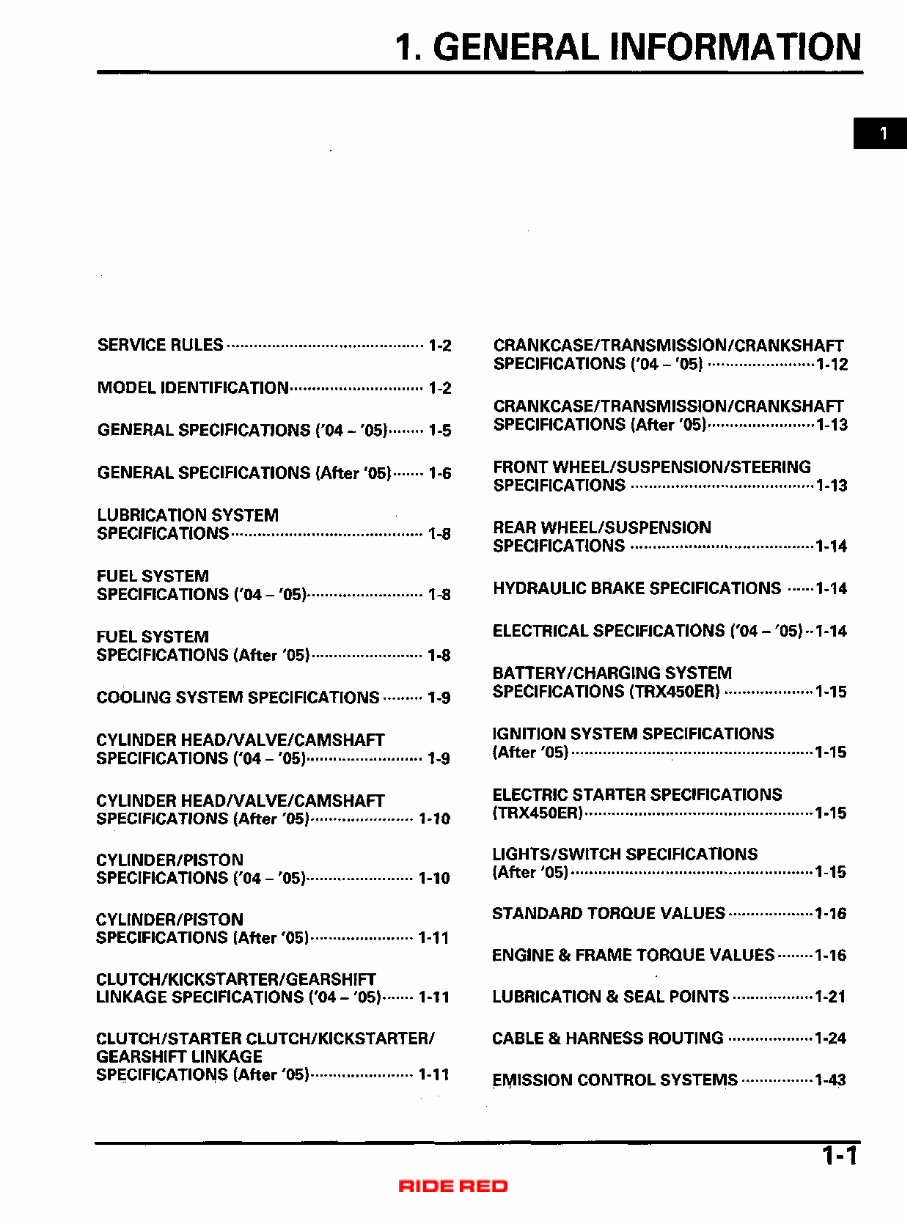
1. GENERAL INFORMATION SERVICE RULES 1-2 MODEL IDENTIFICATION 1-2 GENERAL SPECIFICATIONS ('04 - '05) 1-5 GENERAL SPECIFICATIONS (After '05) 1-6 LUBRICATION SYSTEM SPECIFICATIONS 1-8 FUEL SYSTEM SPECIFICATIONS ('04-'05) 1-8 FUEL SYSTEM SPECIFICATIONS (After '05) 1-8 COOLING SYSTEM SPECIFICATIONS 1-9 CYLINDER HEAD/VALVE/CAMSHAFT SPECIFICATIONS ( ' 0 4 - ' 0 5 ) - 1-9 CYLINDER HEAD/VALVE/CAMSHAFT SPECIFICATIONS (After '05) 1-10 CYLINDER/PISTON SPECIFICATIONS ('04-'05) 1-10 CYLINDER/PISTON SPECIFICATIONS (After '05) 1-11 CLUTCH/KICKSTARTER/GEARSHIFT LINKAGE SPECIFICATIONS ('04- '05) 1-11 CLUTCH/STARTER CLUTCH/KICKSTARTER/ GEARSHIFT LINKAGE SPECIFICATIONS (After '05) 1-11 CRANKCASE/TRANSMISSION/CRANKSHAFT SPECIFICATIONS ('04 - '05) 1-12 CRANKCASE/TRANSMISSION/CRANKSHAFT SPECIFICATIONS (After '05) 1-13 FRONT WHEEL/SUSPENSION/STEERING SPECIFICATIONS 1-13 REAR WHEEL/SUSPENSION SPECIFICATIONS 1-14 HYDRAULIC BRAKE SPECIFICATIONS 1-14 ELECTRICAL SPECIFICATIONS ('04 - '05) -1-14 BATTERY/CHARGING SYSTEM SPECIFICATIONS (TRX450ER) 1-15 IGNITION SYSTEM SPECIFICATIONS (After'05) • 1-15 ELECTRIC STARTER SPECIFICATIONS (TRX450ER) 1-15 LIGHTS/SWITCH SPECIFICATIONS (After'05) 1-15 STANDARD TORQUE VALUES 1-16 ENGINE & FRAME TORQUE VALUES 1-16 LUBRICATION & SEAL POINTS 1-21 CABLE & HARNESS ROUTING 1-24 EMISSION CONTROL SYSTEMS 1-43 1-1
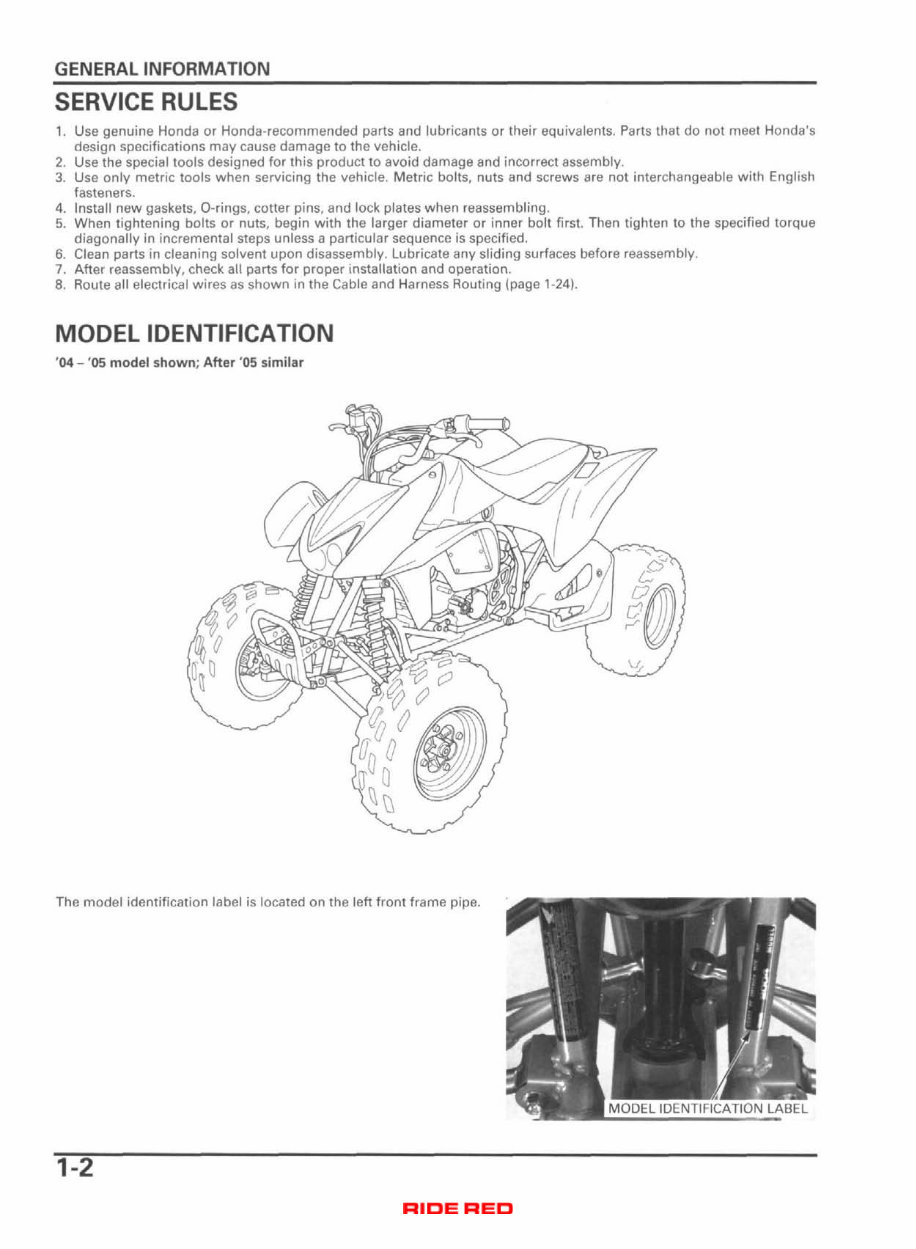
GENERAL INFORMATION SERVICE RULES 1. Use genuine Honda or Honda-recommended parts and lubricants or their equivalents. Parts that do not meet Honda's design specifications may cause damage to the vehicle. 2. Use the special tools designed for this product to avoid damage and incorrect assembly. 3. Use only metric tools when servicing the vehicle. Metric bolts, nuts and screws are not interchangeable with English fasteners. 4. Install new gaskets, O-rings, cotter pins, and lock plates when reassembling. 5. When tightening bolts or nuts, begin with the larger diameter or inner bolt first. Then tighten to the specified torque diagonally in incremental steps unless a particular sequence is specified. 6. Clean parts in cleaning solvent upon disassembly. Lubricate any sliding surfaces before reassembly. 7. After reassembly, check all parts for proper installation and operation. 8. Route all electrical wires as shown in the Cable and Harness Routing (page 1-24). MODEL IDENTIFICATION '04 - '05 model shown; After '05 similar The model identification label is located on the left front frame pipe. MODEL IDENTIFICATION LABEL 1-2
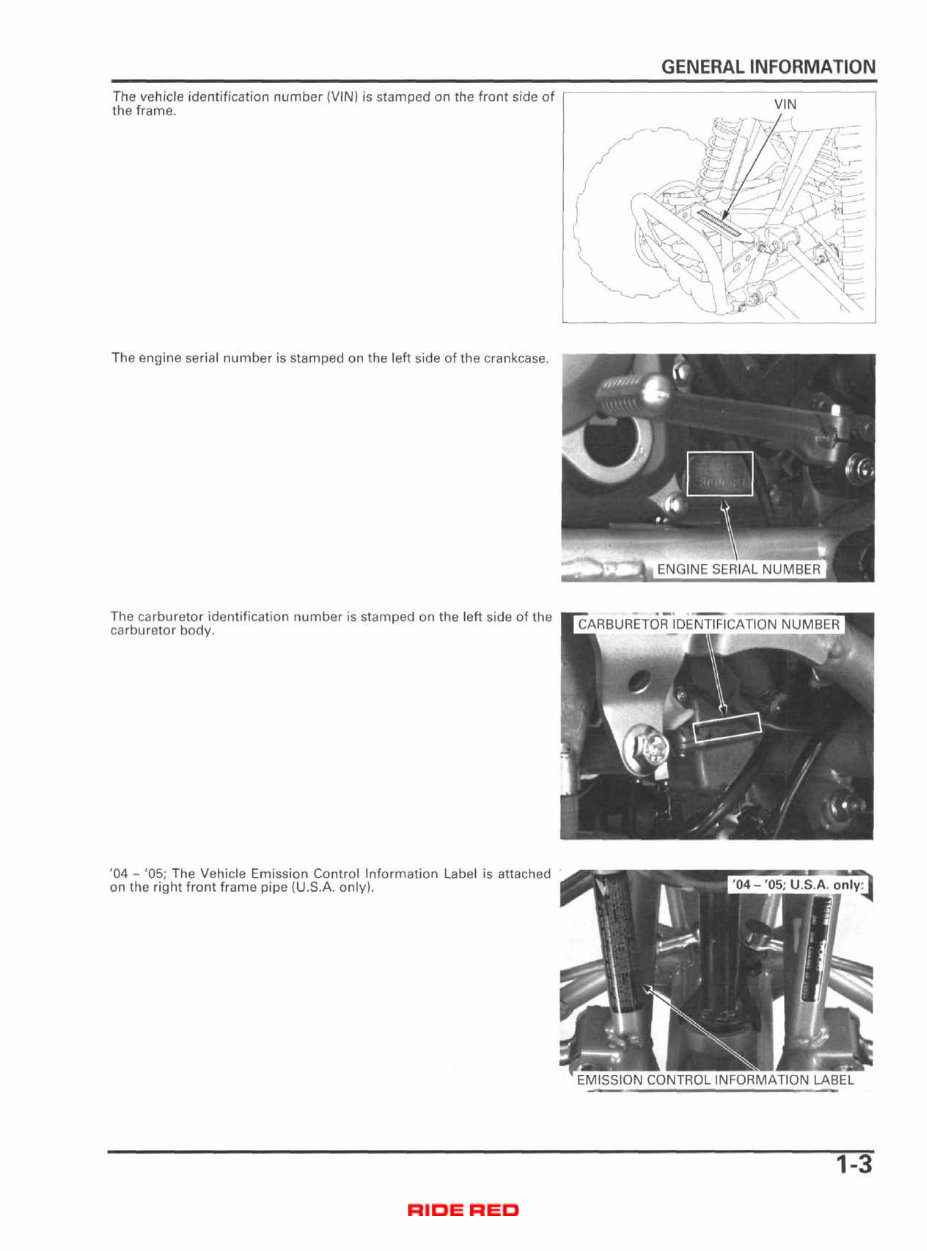
GENERAL INFORMATION The vehicle identification number (VIN) is stamped on the front side of the frame. The engine serial number is stamped on the left side of the crankcase. -- •T? jLi ENGINE SERIAL NUMBER The carburetor identification number is stamped on the left side of the BTT.r,,,, l nrTn^ carburetor bodv ^ LAnount i un '04 - '05; The Vehicle Emission Control Information Label is attached on the right front frame pipe (U.S.A. only). EMISSION CONTROL INFORMATION LABEL 1-3
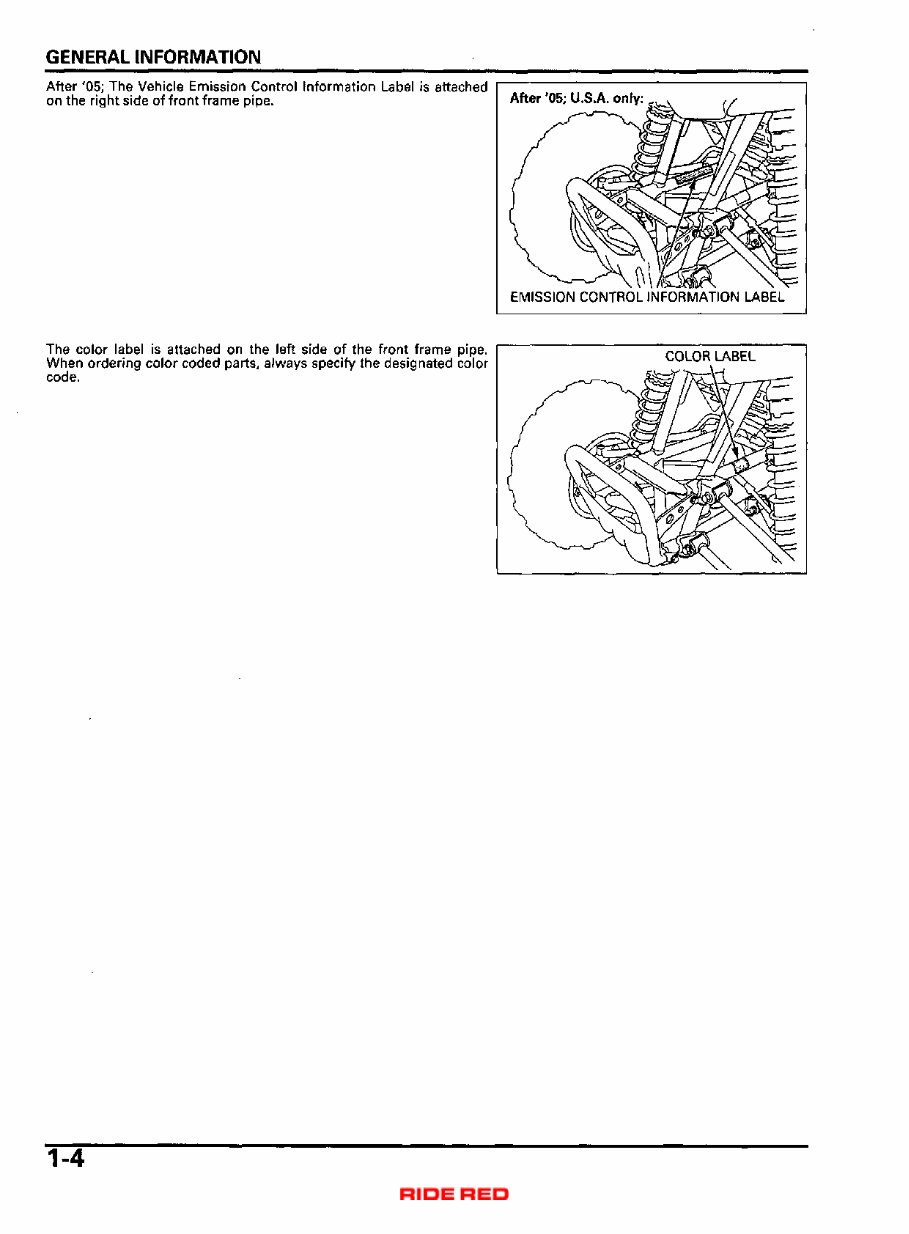
GENERAL INFORMATION After '05; The Vehicle Emission Control Information Label is attached on the right side of front frame pipe. After '05; U.S.A. only EMISSION CONTROL INFORMATION LABEL The color label is attached on the left side of the front frame pipe. When ordering color coded parts, always specify the designated color code. 1-4
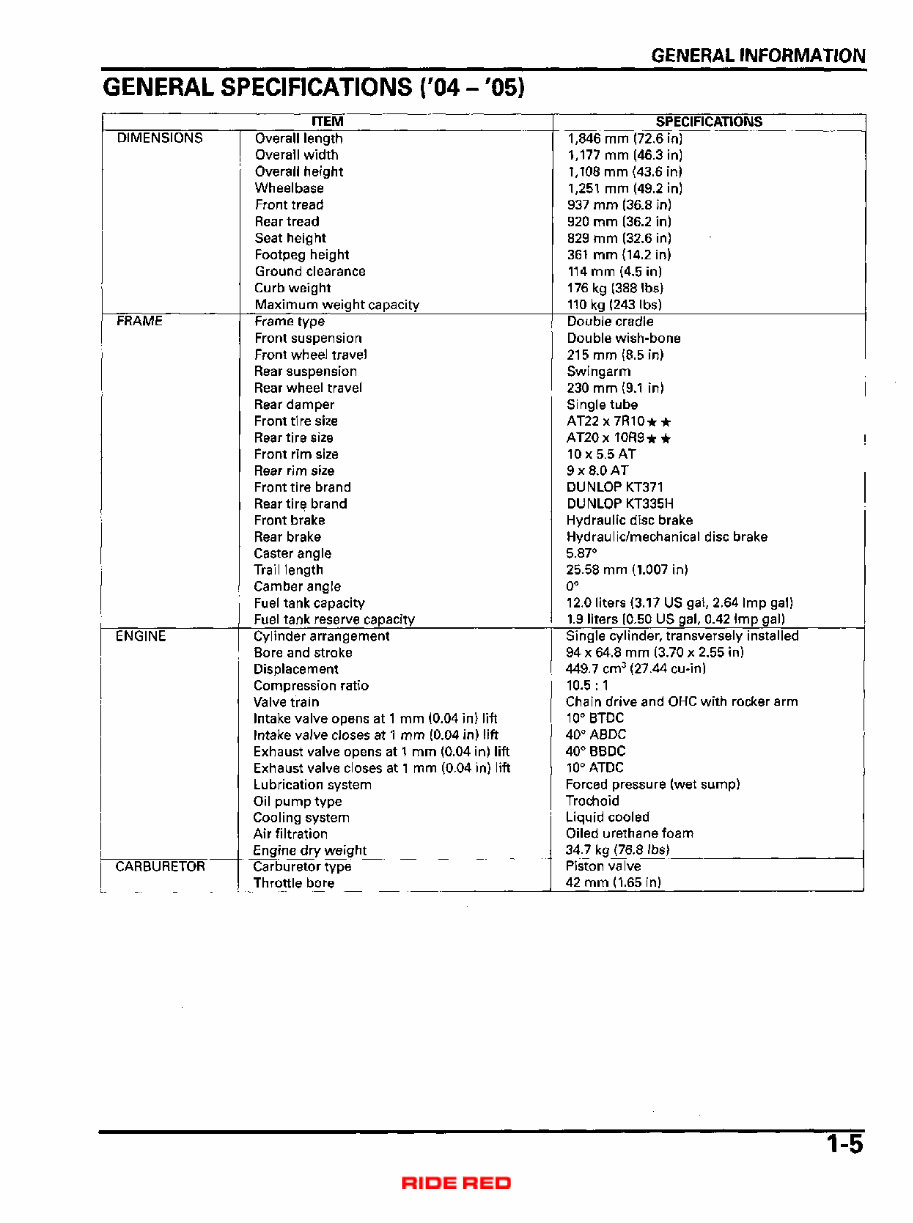
GENERAL INFORMATION GENERAL SPECIFICATIONS ('04 - '05) ITEM DIMENSIONS FRAME ENGINE CARBURETOR Overall length Overall width Overall height Wheelbase Front tread Rear tread Seat height Footpeg height Ground clearance Curb weight Maximum weight capacity Frame type Front suspension Front wheel travel Rear suspension Rear wheel travel Rear damper Front tire size Rear tire size Front rim size Rear rim size Front tire brand Rear tire brand Front brake Rear brake Caster angle Trail length Camber angle Fuel tank capacity Fuel tank reserve capacity Cylinder arrangement Bore and stroke Displacement Compression ratio Valve train Intake valve opens at 1 mm (0.04 in) lift Intake valve closes at 1 mm (0.04 in) lift Exhaust valve opens at 1 mm (0.04 in) lift Exhaust valve closes at 1 mm (0.04 in) lift Lubrication system Oil pump type Cooling system Air filtration Engine dry weight Carburetor type Throttle bore SPECIFICATIONS 1,846 mm (72.6 in) 1,177 mm (46.3 in) 1,108 mm (43.6 in) 1,251 mm (49.2 in) 937 mm (36.8 in) 920 mm (36.2 in) 829 mm (32.6 in) 361 mm (14.2 in) 114 mm (4.5 in) 176 kg (388 lbs) 110 kg (243 lbs) Double cradle Double wish-bone 215 mm (8.5 in) Swingarm 230 mm (9.1 in) Single tube AT22x7R10** AT20x10R9** 10x5.5 AT 9 x 8.0 AT DUN LOP KT371 DUN LOP KT335H Hydraulic disc brake Hydraulic/mechanical disc brake 5.87° 25.58 mm (1.007 in) 0° 12.0 liters (3.17 US gal, 2.64 Imp gal) 1.9 liters (0.50 US gal, 0.42 Imp gal) Single cylinder, transversely installed 94x64.8 mm (3.70x2.55 in) 449.7 cm 3 (27.44 cu-in) 10.5 : 1 Chain drive and OHC with rocker arm 10° BTDC 40° ABDC 40° BBDC 10° ATDC Forced pressure (wet sump) Trochoid Liquid cooled Oiled urethanefoam 34.7 kg (76.8 lbs) Piston valve 42 mm (1.65 in) 1-5
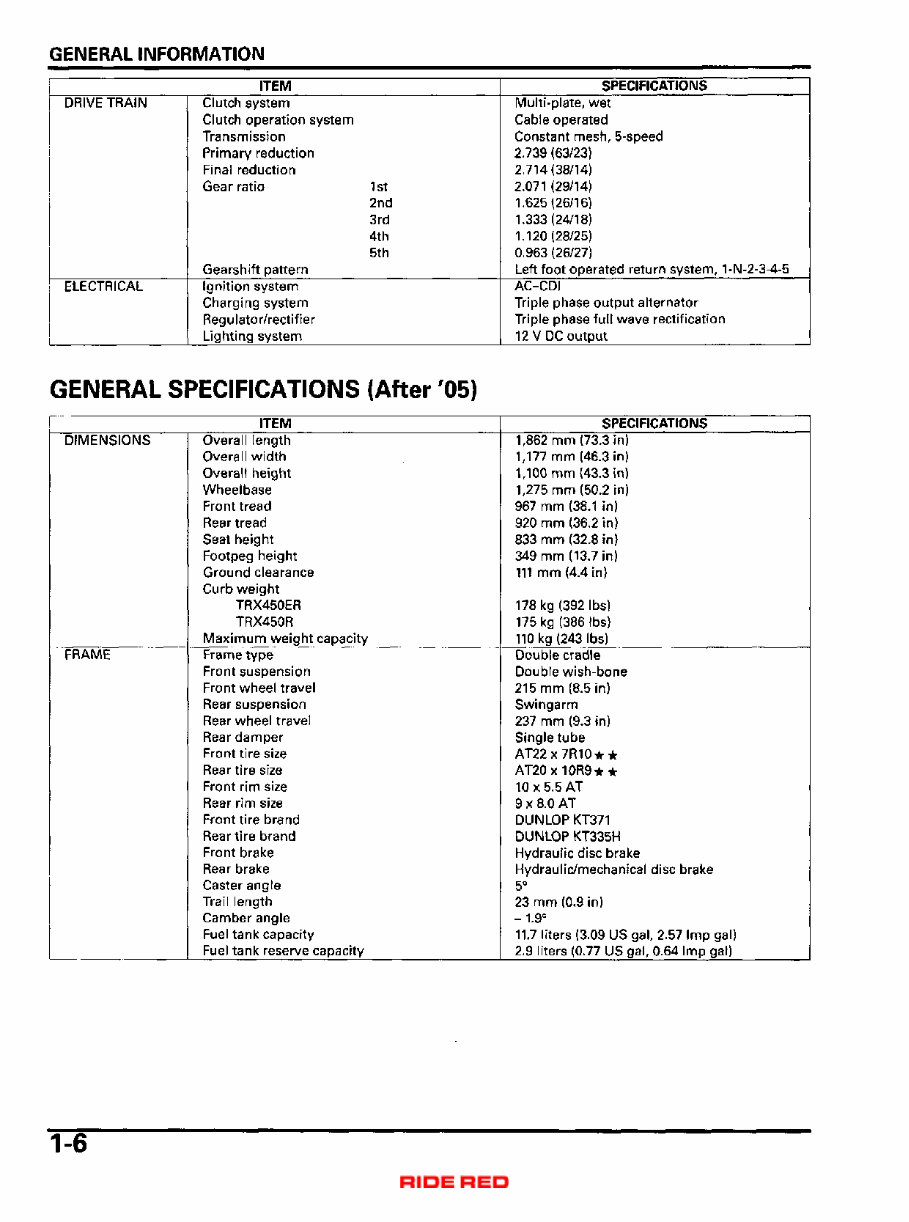
GENERAL INFORMATION ITEM DRIVE TRAIN ELECTRICAL Clutch system Clutch operation system Transmission Primary reduction Final reduction Gearratio 1st 2nd 3rd 4th 5th Gearshift pattern Ignition system Charging system Regulator/rectifier Lighting system SPECIFICATIONS Multi-plate, wet Cable operated Constant mesh, 5-speed 2.739 (63/23) 2.714(38/14) 2.071 (29/14) 1.625(26/16) 1.333(24/18) 1.120(28/25) 0.963 (26/27) Left foot operated return system, 1-N-2-3-4-5 AC-CDI Triple phase output alternator Triple phase full wave rectification 12 V DC output GENERAL SPECIFICATIONS (After '05) ITEM DIMENSIONS FRAME Overall length Overall width Overall height Wheelbase Front tread Rear tread Seat height Footpeg height Ground clearance Curb weight TRX450ER TRX450R Maximum weight capacity Frame type Front suspension Front wheel travel Rear suspension Rear wheel travel Rear damper Front tire size Rear tire size Front rim size Rear rim size Front tire brand Rear tire brand Front brake Rear brake Caster angle Trail length Camber angle Fuel tank capacity Fuel tank reserve capacity SPECIFICATIONS 1,862 mm (73.3 in) 1,177 mm (46.3 in) 1,100 mm (43.3 in) 1,275 mm (50.2 in) 967 mm (38.1 in) 920 mm (36.2 in) 833 mm (32.8 in) 349 mm (13.7 in) 111 mm (4.4 in) 178 kg (392 lbs) 175 kg (386 lbs) 110 kg (243 lbs) Double cradle Double wish-bone 215 mm (8.5 in) Swingarm 237 mm (9.3 in) Single tube AT22x7R10** AT20x10R9** 10x5.5 AT 9 x 8.0 AT DUNLOP KT371 DUNLOP KT335H Hydraulic disc brake Hydraulic/mechanical disc brake 5° 23 mm (0.9 in) -1.9° 11.7 liters (3.09 US gal, 2.57 Imp gal) 2.9 liters (0.77 US gal, 0.64 Imp gal) 1-6
This manual contains comprehensive service and repair information for the 2004-2009 Honda Trx450r Trx450er Atv. It covers a wide range of topics including wiring, machine rebuilding, electrical diagrams, service procedures, and fluid capacities.
The complete service repair manual for the 2004-2009 Honda Trx450r Trx450er Atv is available for download. It is the same resource that dealers use to fix ATVs and covers topics such as engine, transmission, chassis, lighting, steering, seats system, clutch, suspension, locks, brakes, lubrication, electrical, frame fuel system, battery, and more.
This professional quality manual provides step-by-step procedures and detailed illustrations to guide you through any task you may need to perform on your ATV. It offers the best resources available, saving you money on repair bills and helping you maintain your vehicle.
Instead of getting grease on an expensive paper manual, you can print out the section you need and discard it when finished. Alternatively, you can print entire manuals and store them in 3-ring binders for reference. These manuals are in Adobe Acrobat format and are compatible with any computer.



 Lifetime Access




