

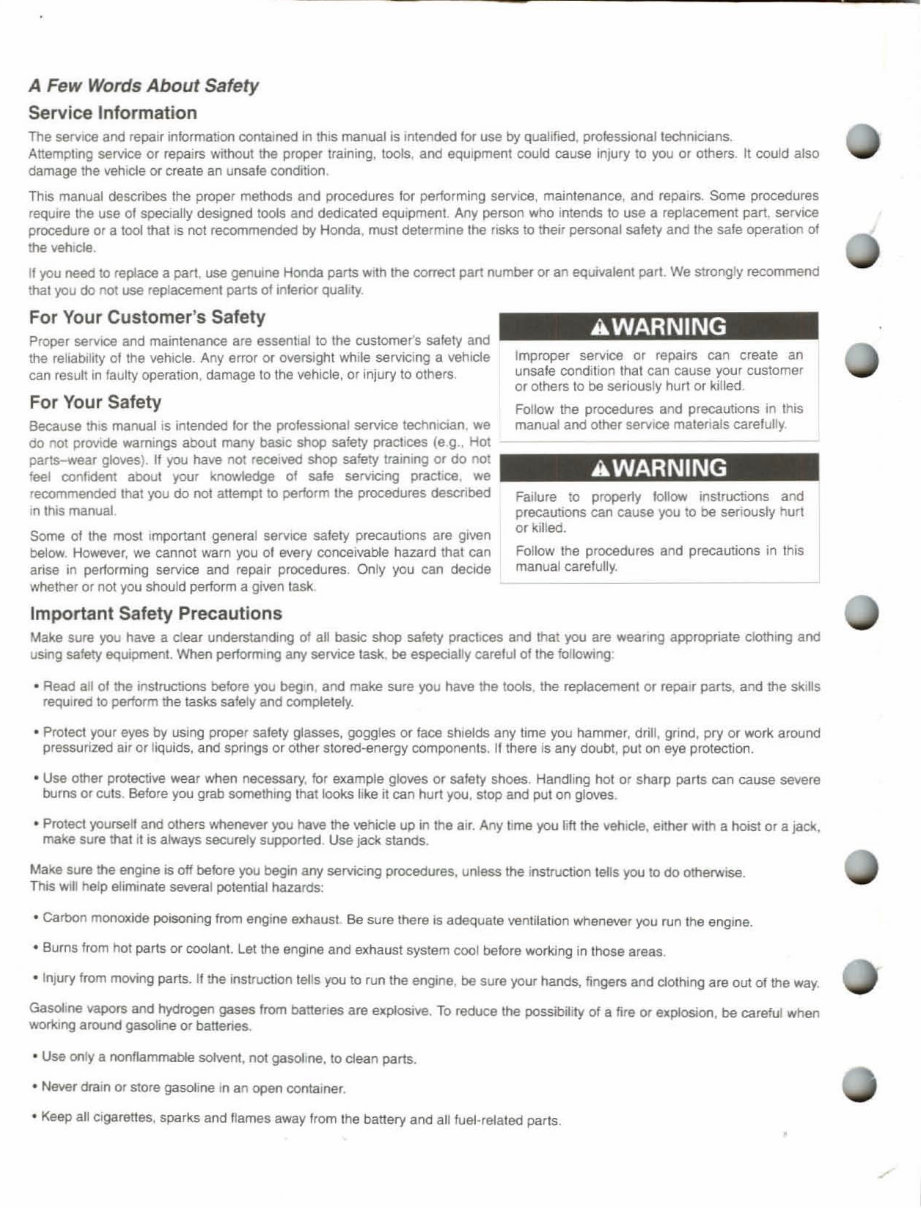
A Few Words About Safety
Service Information
The saNtee and repair information contained in thiS manual is intended for use by qualified, professional tectlmclans.
Attempllng service or repaIrs without the proper training, lools, and eqUipment could cause injury to you or others. It could also
damage the vehicle Of creale an unsafe condition.
This manual describes the proper methods and procedures for performing service, maintenance, and repairs. Some procedures
require the use 01 specialty designed tools and dedicated eqUipment Any person who Imends to use a replacement part, service
procedure or a 1001 thai IS not recommended by Honda, must determIne the rISks to their personal salety and the sale operahon of
the vehicle.
If you need to replace a part, use genuine Honda parts WIth the correct part number or an equivalent part. We strongly recommend
that you do not use replacement parts 01 interior quality
For Your Customer's Safety
Proper seNICe and maintenance are essential to the customer's safety and
the reliability of the vehICle. Any error or oversight while servicing a vehicle
can resuh in faulty operation, damage to the vehicle. or injury to others
For Your Safety
Because thiS manual IS Intended lor the professional service technICian we
do not provide warnings about many basic shop safety practices (e.g., Hot
parts-wear gloves). If you have not received shop safety training or do not
feel confident about your knowledge of sate servicing practice , we
recommended that you do not attempt to perform the procedures descnbed
In this manual
Some 01 the most Important general servICe salety precautions are given
below. However. we cannot warn you of f!N9ry conceivable hazard that can
arise in performing service and repair procedures. Only you can decide
whether or not you should perform a given task.
Important Safety Precautions
AWARNING
Improper servICe or repairs can create an
unsale condl\lon that can cause your customer
or others to be seriously hurt or killed
Follow the procedures and precautions in this
manual and other servICE! matenals carefully
AWARNING
Failure to properly IoIlow instructions and
precautions can cause you to be seriously hurt
or killed.
Follow the procedures and precautions in this
manual carefully.
Make sure you have a clear understanding of all basic shop safety praC\lces and that you are wearrng appropriate clothing and
using safety equipment. When performing any service task, be especially careful 01 the following·
• Read aU 01 the instructions before you begin and make sure you have the loc:Xs. the re~cemenl or repair parts. and the skills
required to perform the tasks salely and completely.
• Protect your eyes by USing proper salety glasses. goggles or face shields any time you hammer, drill. grind, pry or work around
pressurized air or liquids, and springs or other stored-energy components. II there IS any doubt, put on eye protection.
• Use other protective wear wnen necessary. for example gloves or safety shoes. Handling hot or sharp parts can cause severe
burns or cuts. Before you grab something that looks like it can hurt you. stop and put on gloves
• Protect )"Ourself and others whenever you have the vehicle up in the air. Any lime you bf1the Vehlde, either WIth a hoist or a jack.
make sure that It IS always securely supported Use}ack stands.
Make sure the engine is off before you begin arry serviclOg procedures, unless the rnstruction tells you to do otherwise.
This wdl help eliminate several potennal hazards:
• Carbon monoxide poisoning from engine exhaust Be sure there is adequate ventitallon whenever you run the engine.
• Burns from hot parts or coolant. lat Ihe engine and exhaust system cool before working in l hose areas
• InjUry from moving parts. JI the instruction tells you to run the engine. be sure your hands, fingers and dolhing are out of the way.
Gasoline vapors and hydrogen gases from battanes are explosive. To reduce the possibility of a fire or explosion, be careful when
wor1<Jng around gasoline or batteries.
• Use only a nonf\ammabie solvent. not gasoline. to clean parts.
• Never dram or store gasoline In an open CQfllamer.
• Keep all clgaretles. sparks and Ilames away from the battery and all fuel-related parts.
•
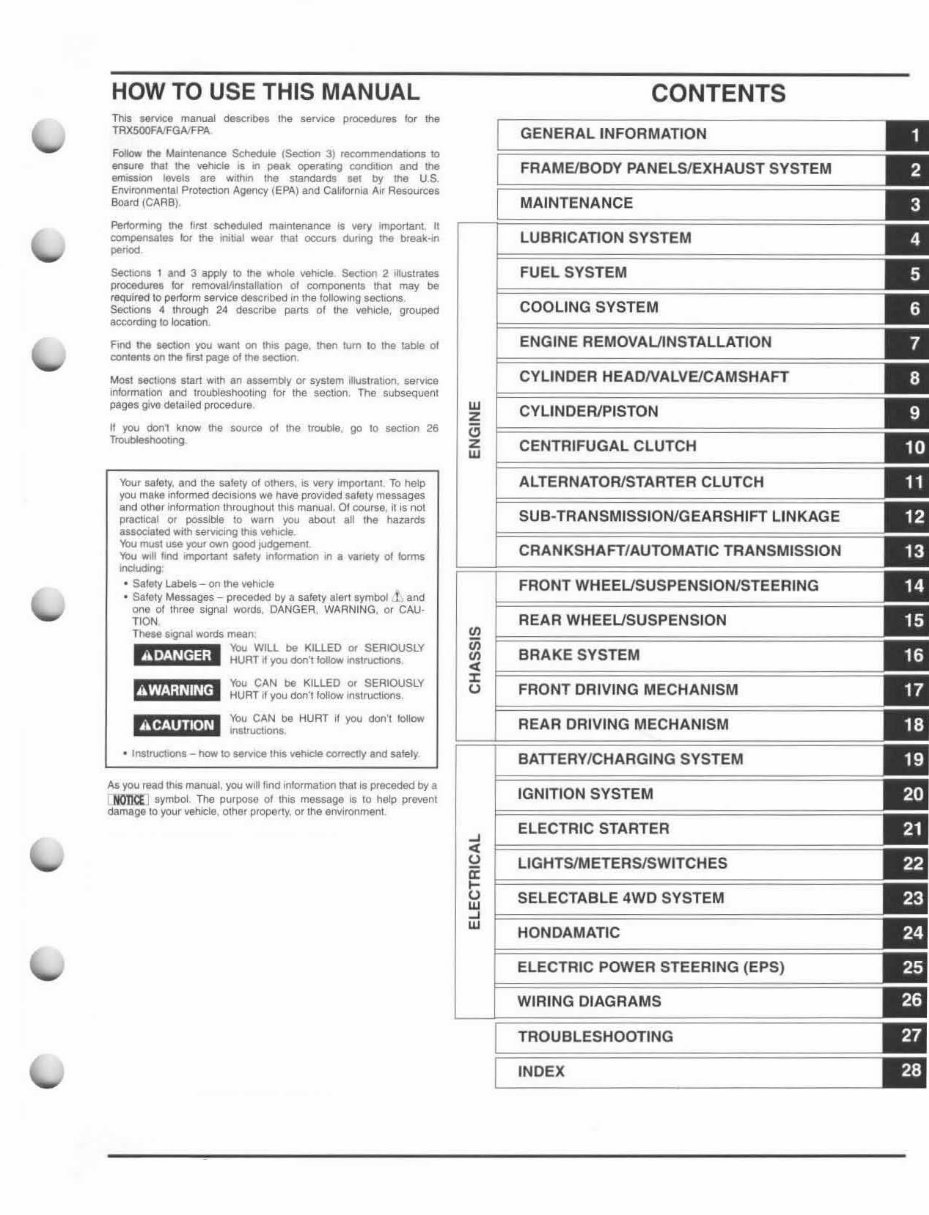
HOW TO USE THIS MANUAL
ThIrI seMce manual describet; the S8rv>Cf1 proe&durfl tor the
TRXSOOFAJFGAlFPA
Fellow IN Mall'llenanee Schedule (Secbon 3) reoommendabOnS 10
__ lllal thu vehoeIe IS on peak operating CXIOditJon and !he
IllTUS&IOr! IeveI5 are WIthin \he standards set by the U.S.
E rMfO(U'nel'ltal Prolectlon Agency (EPA) and Caltlo<nia Air Resources
Boord (CARB).
P8I1orming the flrst seheduled /TIalnUllmnc8 ~ very Important. II
compensates lor me inl1lBII wear thai OCCtlfll dunog the break",,"
.....
Sec1101'18 1 and 3 apply 10 !he whole I'&hK:Ie See\lOll 2 Illustrates
procedutM for removalllnslallau(Ul at componenl5 thai may be
required to p&rtorm servlce described in the follow~ 8eCI'OOS
SoctIMl 4 through 24 descnbe parts 01 the Y&I1!C1e. grouped
accordiog to location.
Find tile MdIon you _rn on thts page. then tum to the taole 01
COI\1e<ltl on the Iif5I page 01 Ina sectIOn
Mos t MctlOM Start WIth an assembly Of system illustration. serYlCft
In/Qrmalion ana troubleshoOllng for the sactlOn. The subsequent
pagH give 08lailed procedure
II you don' know the IiQl,llca 01 the IJOObIe, go 10 sectlOIl 26
T...-""
'rbc.I CAN be KILLED 01 SERIOUSLY
mWi'j l q' W' HURT II you don' tl olJow iI'lllructions
A$ you read IhI$ manual. you w,H lind InlormabQn lhal ~ preceded by.
LN01'fCE 1 symbol The purpose 01 \hIS message 18 to help prtMlllt
damage to your vehicle, OIh.er propl'llt)l. or the enviroomenl
w
z
13
z
w
III
iii
III
'"
J:
U
-'
'"
u
a:
...
u
w
-'
w
CONTENTS
GENERAL INFORMATION
FRAME/BODY PANELS/EXHAUST SYSTEM
MAINTENANCE
LUBRICATION SYSTEM
FUEL SYSTEM
COOLING SYSTEM
ENGINE REMOVAUINSTALLATION
CYLINDER HEADNALVE/CAMSHAFT
CYLlNDERIPISTON
CENTRIFUGAL CLUTCH
ALTERNATORISTARTER CLUTCH
SUB-TRANSMISSION/GEARSHIFT LINKAGE
CRANKSHAFT/AUTOMATIC TRANSMISSION
FRONT WHEEUSUSPENSION/STEERING
REAR WHEEUSUSPENSION
BRAKE SYSTEM
FRONT DRIVING MECHANISM
REAR DRIVING MECHANI SM
BATTERY/CHARGING SYSTEM
IGNITION SYSTEM
ELECTRIC STARTER
LIGHTS/METERS/SWITCHES
SELECTABLE 4WD SYSTEM
HONDAMATIC
ELECTRIC POWER STEERING (EPS)
WIRING DIAGRAMS
TROUBLESHOOTING
INDEX
•
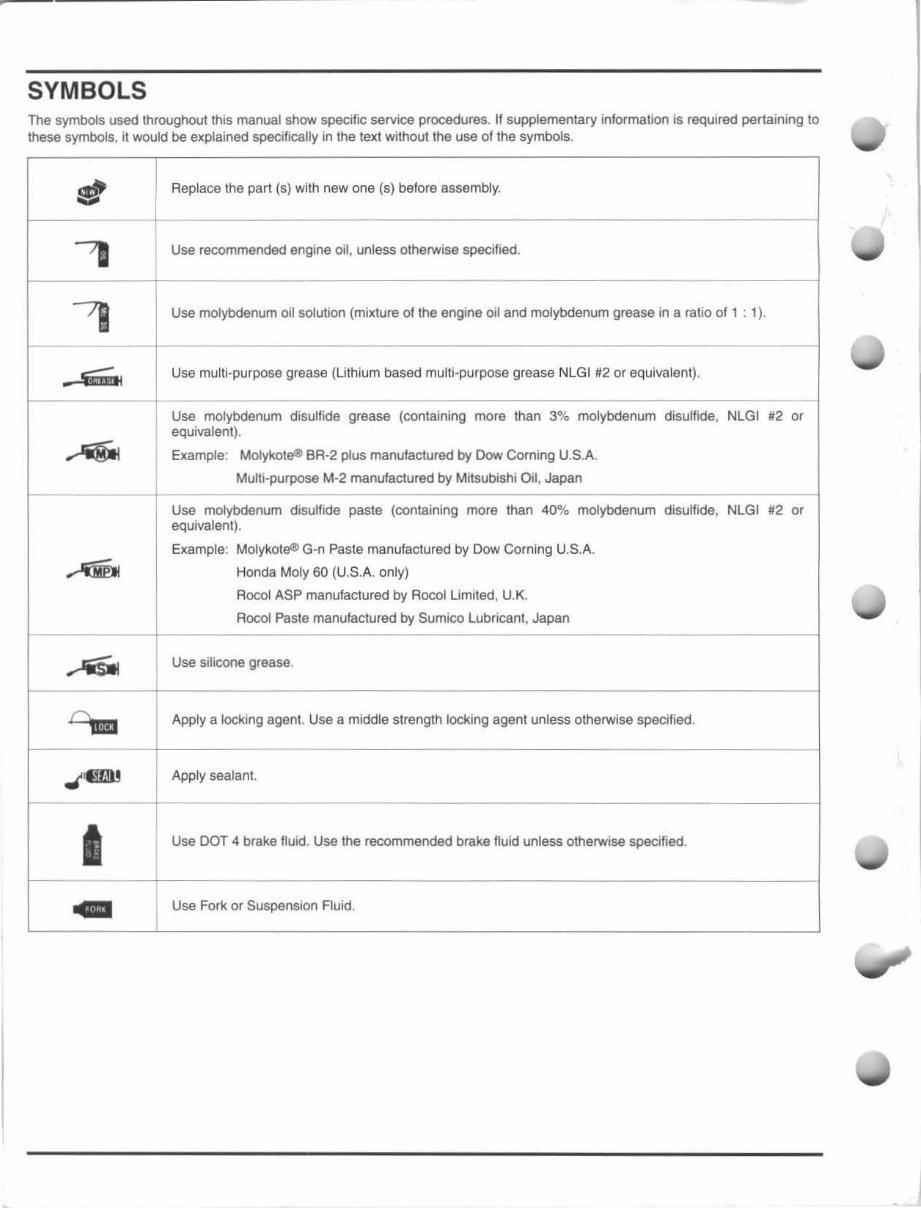
SYMBOLS
The symbols used throughout this manual show speciftc service procedures. If supplementary information is required pertaining to
these symbols, it would be explained specifically in the text without the use of the symbols.
fI
Replace the pari (s) with new one (5) before assembly.
'I
Use recommended engine oil, unless otherwise specified.
,
Use molybdenum oil solution (mixture of the engine oil and molybdenum grease in a ratio of 1 : 1) .
• .5iiiM+
Use multi-purpose grease (Lithium based multi-purpose grease NLGI 1I2 or equivalent).
Use molybdenum disulfide grease (containing more than 3% molybdenum disulfide, NlGI #2 or
equivalent) .
... Example: Molykote* BA-2 plus manufactured by Dow Corning U.S.A.
Multi-purpose M-2 manufactured by Milsubishi Oil, Japan
Use molybdenum disulfide paste (containing more than 40% molybdenum disulfide, NLGI #2 or
equiyalent).
Example: MOlykotelt G·n Paste manufactured by Dow Corning U.S.A.
.AID Honda Moly 60 (U.S.A. only)
Rocol ASP manufactured by Rocol Limited, U.K.
Rocol Paste manufactured by Sumico Lubricant, Japan
...-'iSiII
Use silicooe grease.
Dg
Apply a locking agent. Use a middle strength locking agent unless otherwise specified.
"Gilll
Apply sealant.
I
Use DOT 4 brake fluid. Use the recommended brake fluid unless otherwise specified.
-
I
I
..
Use Fork or Suspension Fluid.
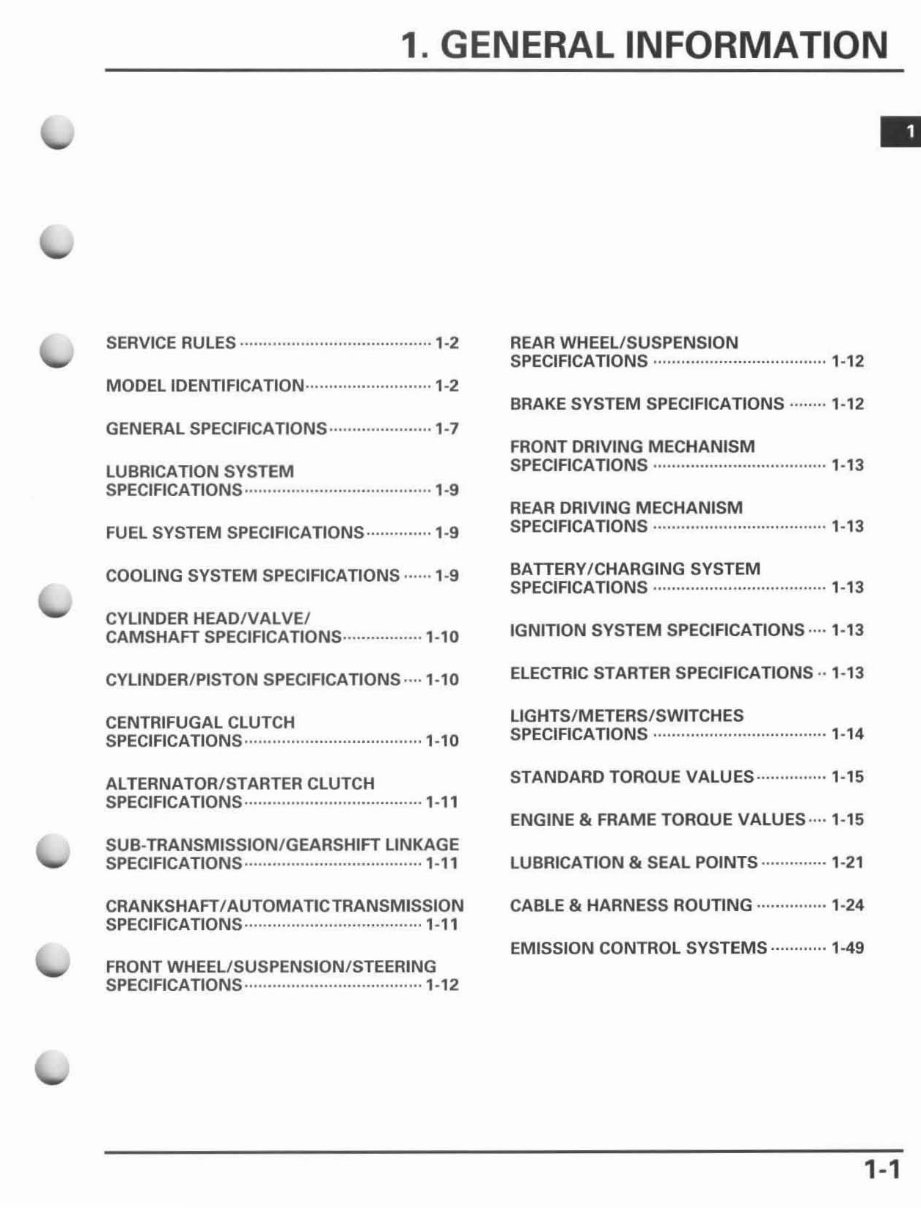
1. GENERAL INFORMATION
SERVICE RULES ············,,··,,········ ······· ··· ·· ··· ' -2
MODEL IDENTIFICATION ···,,······················ ' -2
GENERAL SPECIFICATI ONS ····· ····· ·· ·· ····· ··· ' -7
LUBRICATION SYSTEM
SPECiFiCATiONS ·· ······ ··········· ····················· ,-9
FUEL SYSTEM SPECIFICATIONS ·············· ' -9
COOLING SYSTEM SPECIFICATIONS ······ ' -9
CYLINDER HEADIVALVE/
CAMSHAFT SPECIFICATIONS ················· , -,O
CYLINDER/ PISTON SPECIFICATIONS ···· ' -,O
CENTRIFUGAL CLUTCH
SPECIFICATIONS ························· ·· ··········· , - '0
ALTERNATOR / STARTER CLUTCH
SPECIFICATIONS······················ ················ , -"
SUB-TRANSMISSION/ GEARSHIFT LINKAGE
SPECIFICATIONS ·,,··· ··· ····························· , -,,
CRANKSHAFT/AUTOMATIC TRANSMISSION
SPECIFICATIONS ······································ , -"
FRONT WHEEL/ SUSPENSION/STEERING
SPECIFICATIONS ·· ··· ················ ·· ··············· , -'2
REAR WHEEL/ SUSPENSION
SPECIFICATIONS ... ............... .. ... ........ .. .." ' -'2
BRAKE SYSTEM SPECIFICATIONS ........ '- '2
FRONT DRIVING MECHANISM
SPECIFICATIONS ... ... ....... ......... ............... '-'3
REAR DRIVING MECHANISM
SPECIFICATIONS ................... .... ...... ........ '- '3
BATIERY/CHARGING SYSTEM
SPECIFICATIONS .............. ... .................... '-'3
IGNITION SYSTEM SPECIFICATIONS .... '-'3
ELECTRIC STARTER SPECIFICATIONS ··' - '3
LIGHTS / METERS/ SWITCHES
SPECIFICATIONS ························ ··· ····",,·· ' -'4
STANDARD TORQUE VALUES ··············· '-'5
ENGINE & FRAME TORQUE VALUES ···· ' - '5
LUBRICATION & SEAL POINTS ·············· ' -2'
CABLE & HARNESS ROUTING .. .... .. ....... '-24
EMISSION CONTROL SYSTEMS .. .. ........ '-49
1-1
GENERAL INFORMATION
SERVICE RULES
1. Use genuine Honda or Honda-recommended parts and lubricants or their equivalents. Parts that don't meet Honda's
design specifications may cause damage to the vehicle.
2. Use the special toots designed for this product to avoid damage and incorrect assembly.
3. Use only metric tools when servicing the vehicle. Metric bolts, nuts and screws are not interchangeable with English
fasteners .
4. Install new gaskets, O-rings, coner pins, and lock plates when reassembling.
5. When tightening bolts or nuts, begin with the larger diameter or inner bolt first. Then tighten to the specified torque
diagonally in incremental steps unless a particular sequence is specified.
6. Clean parts in cleaning solvent upon disassembly. Lubricate any sliding surfaces before reassembly.
7. After reassembly. check all parts for prop er installation and operation.
S. Route all electrical wires as show in the Cable and Harne ss Routing (page ' -24 ).
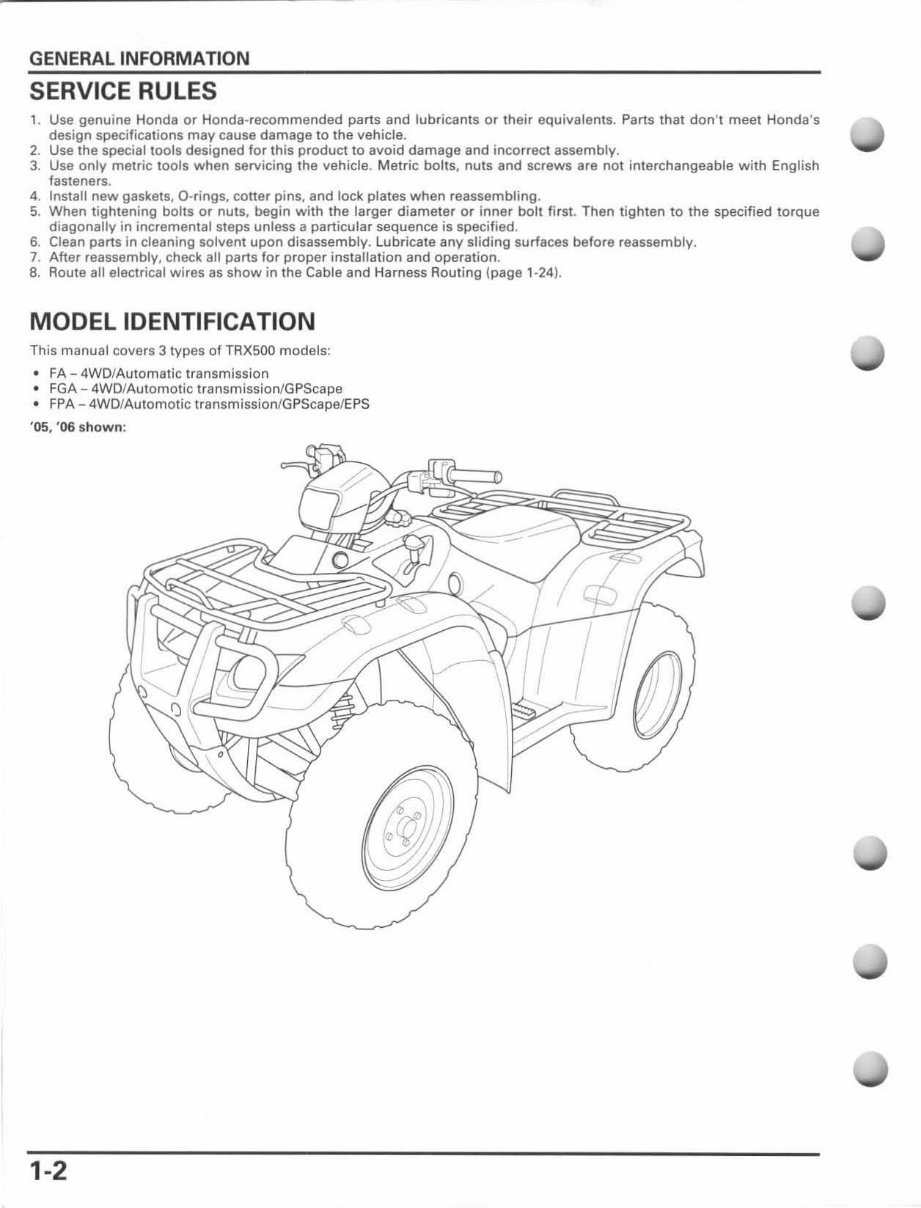
MODEL IDENTIFICATION
This manual covers 3 types of TRX500 models:
• FA - 4WD/Automatic transmission
• FGA - 4WD/ Automotic transmission/GPScape
• FPA - 4WD/ Automotic transmission/GPScape/EPS
'05, ' 06 shown:
1-2
GENERAL INFORMATION
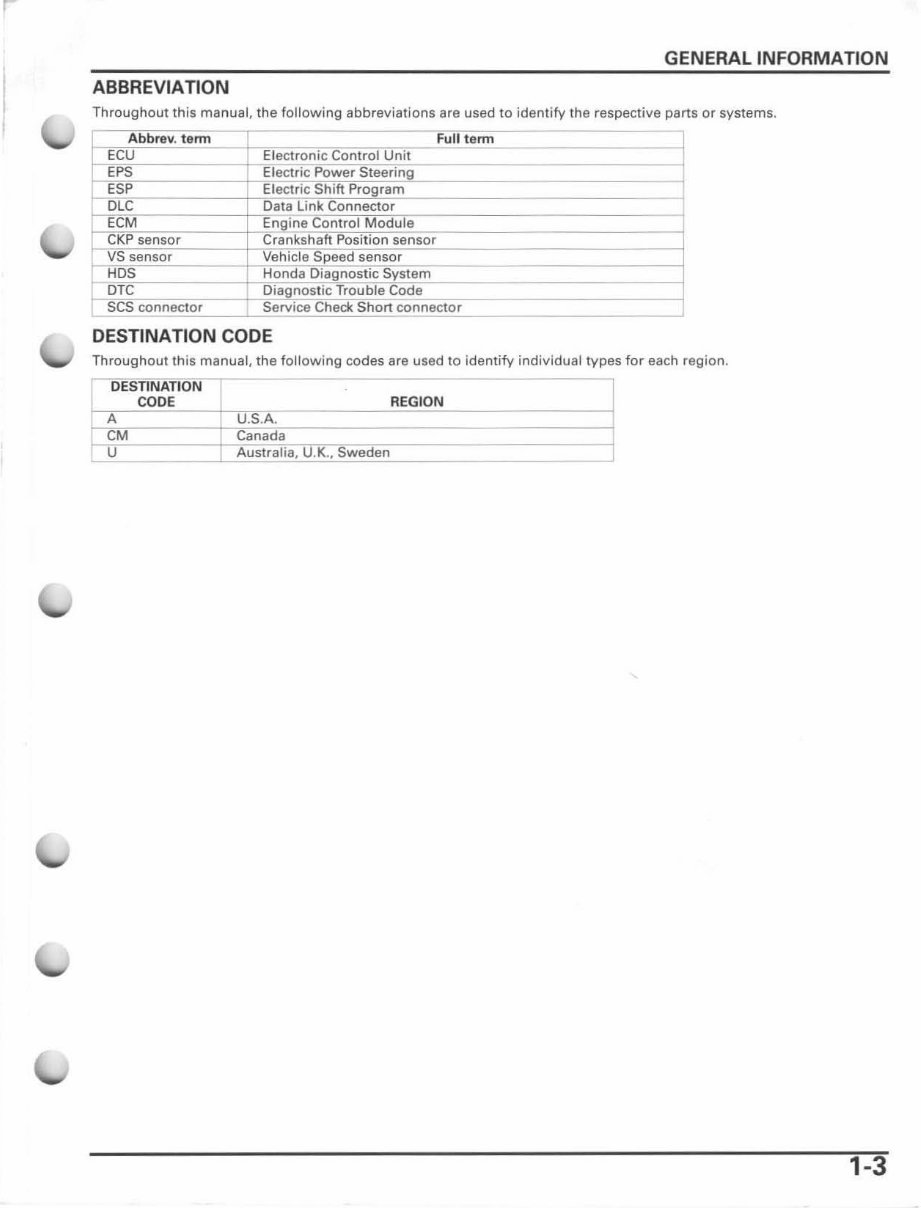
ABBREVIATION
Throughout this manual, the following abb reviations are used to identify the respective parts or systems.
DESTINATION CODE
Throughout this manual, the following codes are used to identify individual types for each r egio n.
1-3
GENERAL INFORMATION
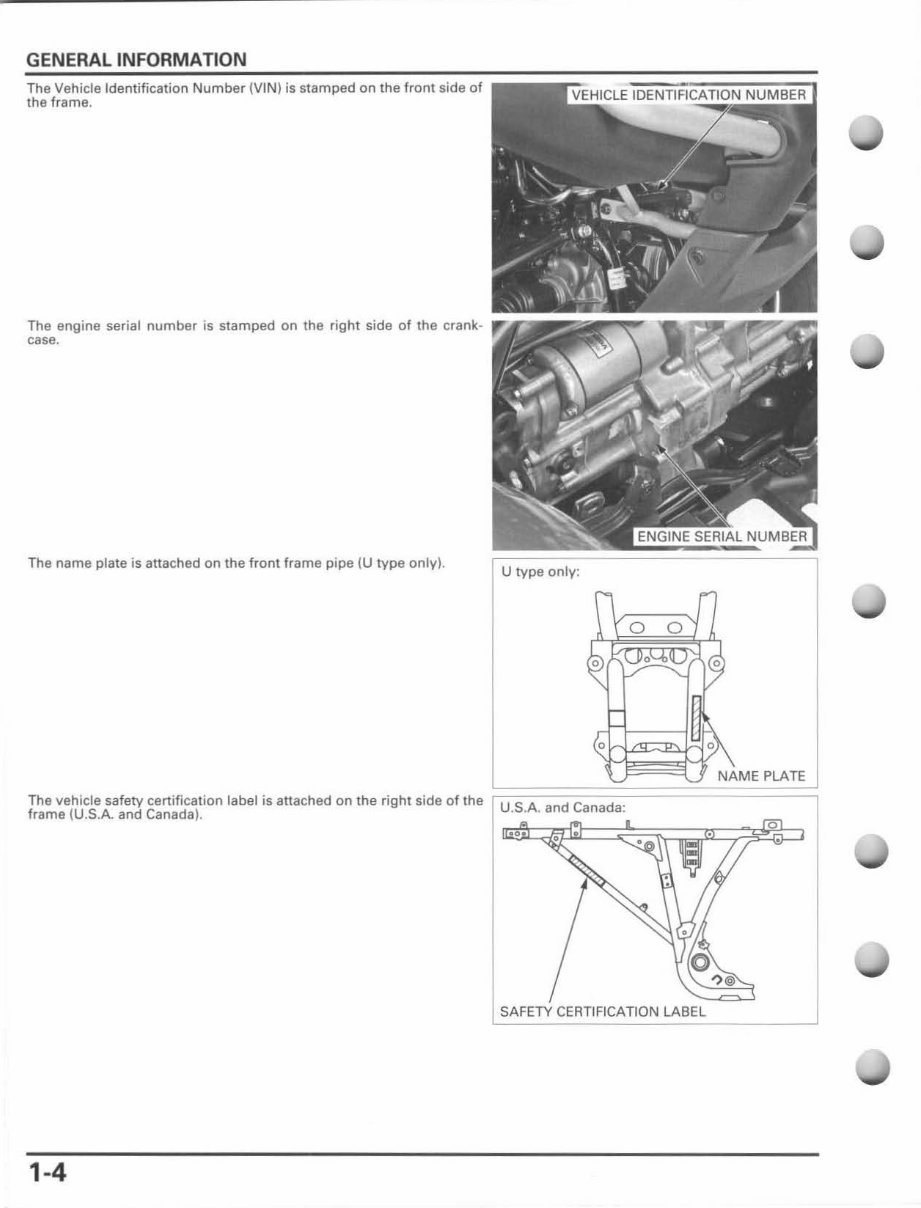
The Vehicle Identification Number (VI N) is stamped on the front side of
the frame.
The engine serial number is stamped on the right side of the crank-
case.
The name plate is attached on the front frame pipe (U type only).
U type only:
I ~~==~~~~~~~~~~~ P ~LA~TE ~
The vehicle safety certification label is attached on the right side of the ~
frame (U.s.A. and Canada). U.S.A. and Canada:
CERTIFICATION LABEl _____ -'
1-4
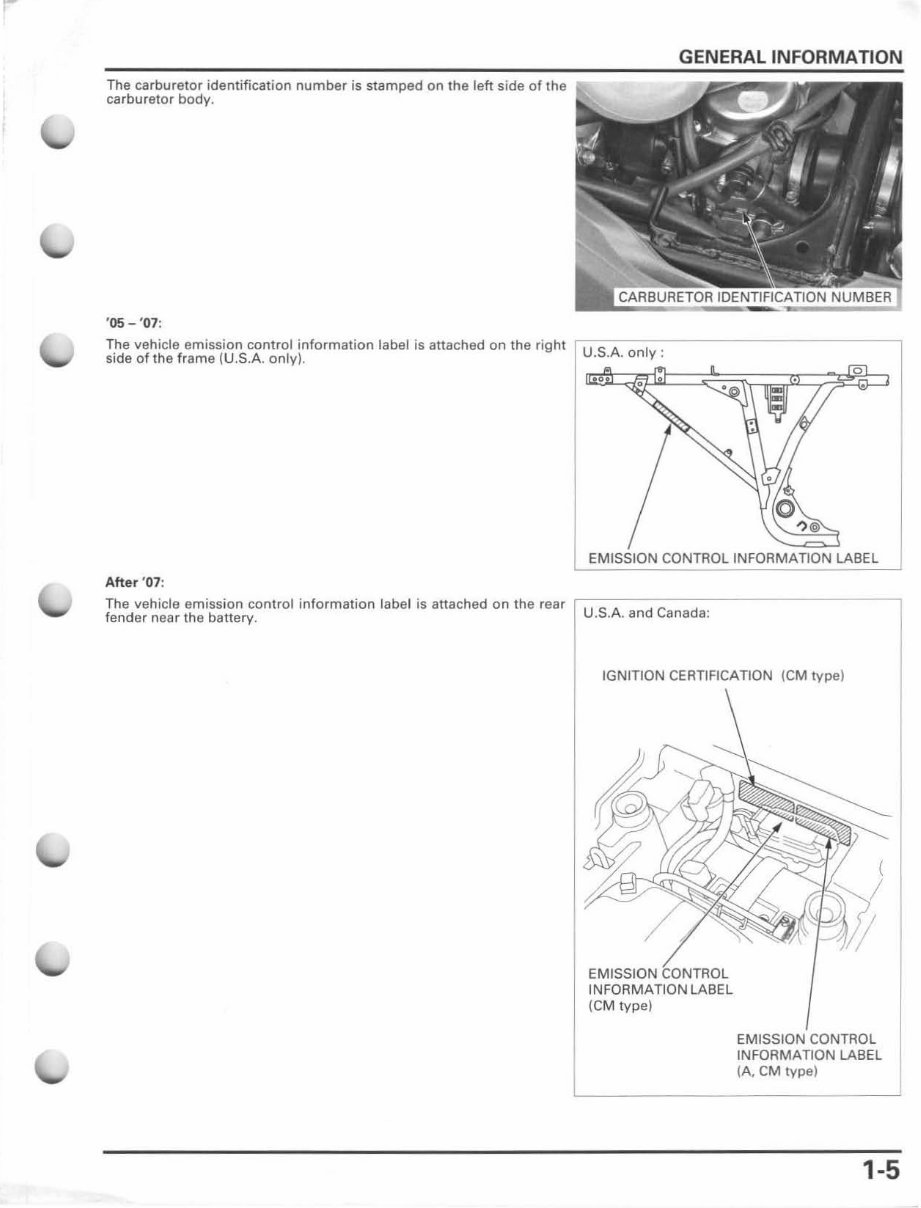
The ca rbur etor identification number is stamped on the left side of the
carburetor body.
'05 - '07:
GENERAL INFORMATION
The vehicle emission control information label is attached on the right
side of the frame (U.S.A. only). U.S.A. only:
~~~~p
CONTROL LABEL
After '07:
The vehicle emiss ion contro l information label is attached on the rear ,-----------------,
fender near the banery. U.S.A. and Canada:
IGNITION CERTIFICATION (eM type)
EMISSION rnNTRn,
INFORMATION LABEL
(eM type)
EMISSI:ON·CONTROl
INFORMATION LABEL
(A, eM type )
1-5
GENERAL INFORMATION
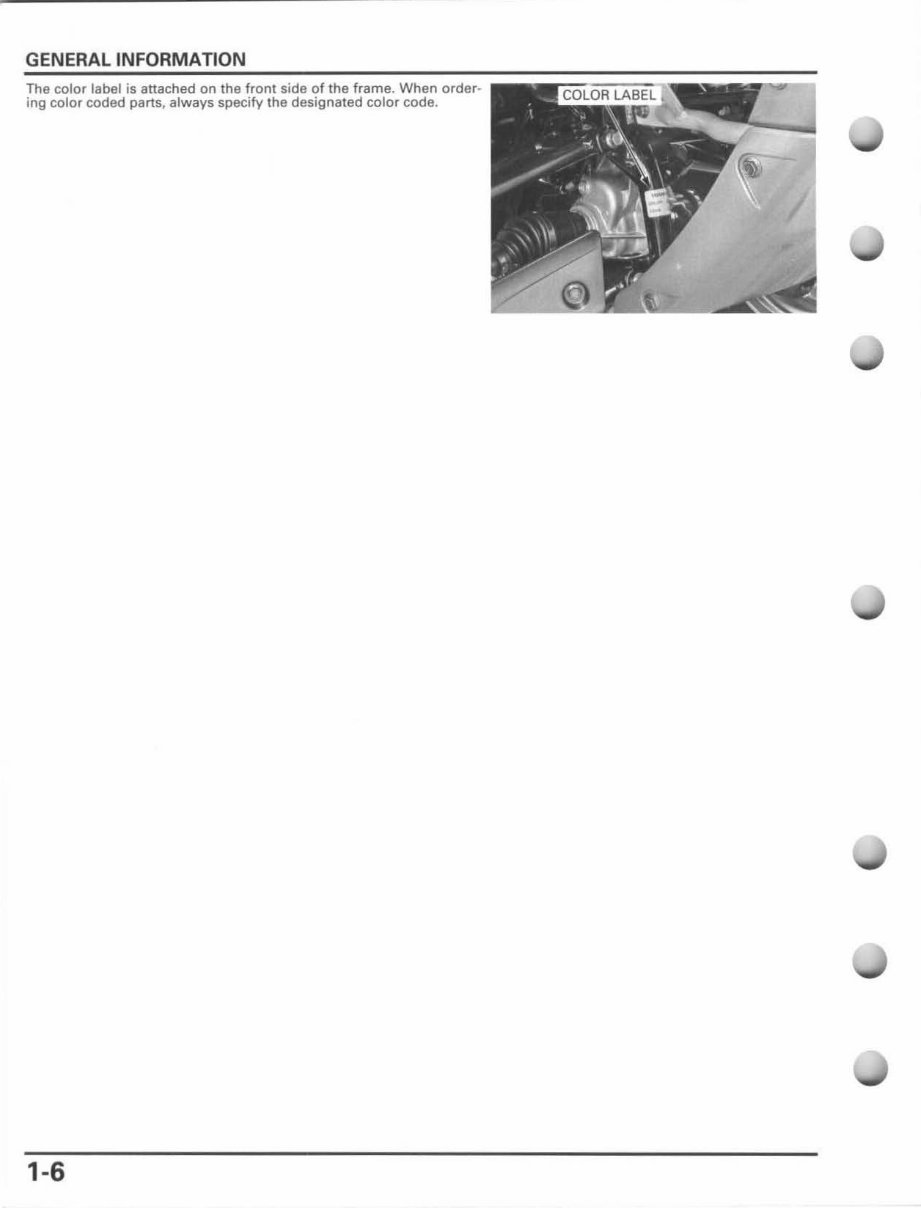
The color label is attached on the front side of the frame. When order-
ing color coded parts, always specify the designated color code.
1-6
You're Reading a Preview
What's Included?
 Lifetime Access
Fast Download Speeds
Online & Offline Access
Access PDF Contents & Bookmarks
Full Search Facility
Print one or all pages of your manual
$33.99
HONDA TRX500FPA FOURTRAX FOREMAN RUBICON GPSCAPE POWER STEERING Service Repair Manual 2005-2012
Viewed 96 Times Today

What's Included?
Lifetime Access
Fast Download Speeds
Online & Offline Access
Access PDF Contents & Bookmarks
Full Search Facility
Print one or all pages of your manual
$33.99

Secure transaction
What's Included?
Lifetime Access
Fast Download Speeds
Online & Offline Access
Access PDF Contents & Bookmarks
Full Search Facility
Print one or all pages of your manual
Description
Get your vehicle repair done today with the comprehensive service and repair manual. This professional quality workshop manual provides step-by-step instructions, detailed diagrams, and expert tips for efficiently completing any repair job. It covers the entire vehicle and is used by professional mechanics, making it an invaluable resource for both professionals and DIY enthusiasts.
Key features of this manual:
- Highly detailed exploded pictures and diagrams
- Easy to use and navigate
- Instant access with no shipping costs
- Printable for convenience
- Compatible with PC and MAC
Don't wait for shipping - get instant access to this essential manual today. Accepted payment methods include Paypal and all major credit/debit cards. Click the button above to get started!
All rights reserved. Designated trademarks and brands are the property of their respective owners.


