
 Service Repair Manual (Free Preview)")
2006-2011 Honda Rincon 680 (TRX680FA / TRX680FGA) Service Repair Manual (Free Preview)
What's Included?
Fast Download Speeds
Online & Offline Access
Access PDF Contents & Bookmarks
Full Search Facility
Print one or all pages of your manual

HOW TO USE THIS MANUAL
A Few Words About Safety
Service Information
The service and repair Information contained in this manual IS intended for use by qualified, professional lectmiclans. Attempting
service or repairs Without the proper training, lools, and equipment could cause injury to you or others. It could also damage the
vehicle or create an unsafe condition
This manual descnbes the proper methods and procedures lor performing service, maintenance and repairs. Some procedures
require the use of specially designed tools and dedicated equipmenl. Any person who Intends to use a replacement part. service
procedure or a loollhat IS nol recommended by Honda, must determine the risks to their personal safety and the safe operation of
the vehicle
Jf you need to replace a part use Honda Genuine parts With the correct part number or an equivalent part. We strongly recommend
that you do not use replacement parts of infenor quality.
For Your Customer's Safety
Proper service and maintenance are essential to the customer's safety and the reliability of Ihe vehicle. Any ermr or oversight while
servicing a vehicle can result In faulty operation, damage to the vehicle, or injUry to others.
For Your Safety
AWARNING
serviCe and maintenance can create an unsafe
condition that can cause your customer to be seri-
ously hurt or killed
Follow the procedures and precautions in this
manual and olher service materials carefully.
Because this manual is Intended for the profeSSional service technician, we do not proVide warnings about many baSIC shop safety
praclices (e.g .• Hal parts-wear gloves). If you have nol received shop safety training or do not feel confident about your knowledge
of safe servicing practice, we recommend that you do nol attempt to perform the procedures described in this manual.
Some of the most important general service safety precaullOns are given below However, we cannot warn you of every
conceivable hazard that can anse in performing service or repair procedures. Only you can decide whether or not you should
perform a given task.
AWARNING
Failure to properly follow instructions and precau-
tions can cause you to be seriously hurt or killed.
Follow Ihe procedures and precautions in this
manual carefully
Important Safety Precautions
Make sure you have a clear understanding of all baSIC shop safely practices and that you are wearing appropriate clothing and
uSing safety equipment. When performing any service task. be especially careful of the following:
Read all of the instructions before you begin, and make sure you have the lools, the replacement or repair parts, and the skills
required to perform the tasks safely and completely.
Protect your eyes by uSing proper safely glasses, goggles or face shields any time you hammer, dnll, grind, pry or work around
pressurized air or liquids. and springs or other stored-energy components If Ihere is any doubt. put on eye protection.
Use other protectIVe wear when necessary, for example gloves or safety shoes. Handling hot Of sharp parts can cause severe
burns or cuts Before you grab something that looks like it can hurt you. stop and put on gloves.
Protect yourself and others whenever you have Ihe vehide up In the air Any time you lift Ihe vehicle, eIther with a hoist or a jack,
make sure that it is always securely supported Use Jack stands.
Make sure the engine is off before you begin any servicing procedures. unless the instruction tells you 10 do otherwise ThiS will
help eliminate several potentIal hazards:
CarbOn monoxide poisoning from engine exhaust Be sure there is adequate ventilation whenever you run the engine
• Bums from hot parts or coolant. Let the engine and exhaust system cool before working in those areas.
• Injury from moving parts If the instruction tells you to run the engine, be sure your hands fingers and clothing are oot of the way.
Gasoline vapors and hydrogen gases from battenes are explosive. To reduce the possibility of a fire or explosion, be careful when
working around gasoline or battenes
Use only a nonnammable solvenl, nol gasoline, to clean parts
Never dram or store gasoline In an open contamer.
Keep all cigarettes, sparks and names away from the battery and all fuel-related parts.
,
-
HOW TO USE THIS MANUAL
How To Use This Manual
This manual describes the service procedures for the TRX680FA and TRX680FGA.
Sections 1 and 4 apply to the whole vehicle. Section 3 illustrates procedures for removallinstallation of components thai may be
required to perform service described in the following sections.
Section 5 through 23 descnbe parts of the vehicle, grouped according to location.
Follow the Maintenance Schedule recommendations to ensure thai the vehicle Is in peak operating condition.
Performing the first scheduled maintenance is very Important. It compensates for the initial wear that occurs during the break-In
period .
Fincllhe section you want, then turn to the table of contents on the first page of the section.
Most sections start with an assembly or system illustration, service information and troubleshoohng for the section. The subsequent
pages give detailed procedure
If you are not familiar with this vehicle, read Techntcal Features In Section 2.
If you don't know the source of the trouble, go to Troubleshooting section 25.
Your safety. and the safety of others, Is very important. To help you make informed decisions we have provided safety
messages and other information throughout this manual Of course, it is not practical or possible to warn you about all the
hazards associated with servicing this vehicle.
You must use your own good judgement.
You will find important safety information in a vaflety of forms Including:
Safety labels - on the vehicle
• Safety Messages - preceded by a safety alert symbol ! and one of three signal words, DANGER. WARNING. or CAUTION.
These signal words mean:
e·nWH9i' You WILL be KILLED or SERIOUSLY HURT if you don't follow instructions.
mwJ;@@il you CAN be KILLED or SERIOUSLY HURT if you don't follow instructions.
t1jtM
1
U[.g' You CAN be HURT if you don't follow instructions
• Instructions - how to service this vehicle correclly and safely.
As you read this manual, you will find information thai is preceded by a NOllCE symboL The purpose of thiS message is to help
prevent damage to your vehicle, other property, or the enVifonment.
Date of Issue: June, 2014
HOW TO USE THIS MANUAL
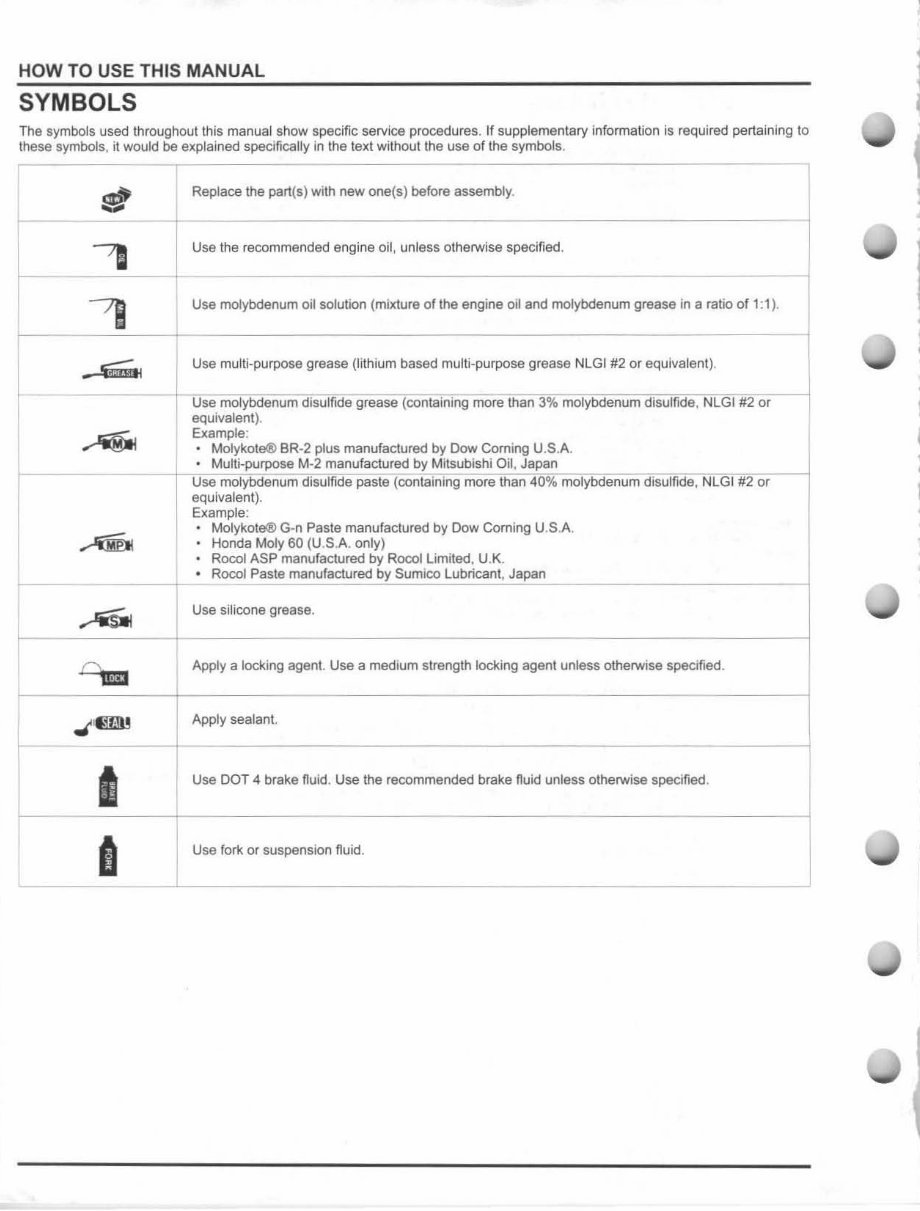
SYMBOLS
The symbols used throughout this manual show specific service procedures. If supplementary information is required pertaining to
these symbols, it would be explained specificaUy in the text without the use of the symbols.
l . -$iW
Replace the part(s) with new ona(s) before assembly.
Use the recommended engine oil, unless otherwise specified.
j
Use molybdenum oil solution (mixture of the engine oil and molybdenum grease in a ratio of 1:1).
1
Use multi-purpose grease (lithium based multi-purpose grease NLGt #2 or equivalent).
1
Use molybdenum disulfide grease (containing more than 3~%~m ;;;;; ol ;;; ybd""e~0~u~m""d" is~ u"lfi~ de ~.'N"L ~G C;- 1 ' '' 2 ,-;; o, ;- -j
equivalent ).
Example:
• Molykote® BR-2 plus manufactured by Dow Corning U.SA
• Multi-purpose M-2 manufactured by Mitsubishi Oil, Japan
Use molybdenum disulfide paste (con~t~al~0~ io ~ g~m~o~,~e~t~ha~0:?':i4~O% iZ-; m ~o ~l~ ybdM.e~0~ u ~m "" di ;; s~ ul" fi" de ~.' N ~LnGOI~'ii'2,-o~, ;--1
equivalent),
Example:
~, Molykole® G-n Paste manufactured by Dow Corning U.S.A.
~ Honda Moly 60 (U.S.A. only)
Rocol ASP manufactured by Rocol Limited, U.K.
L: __ -=- -- , --r---'- R ~ OCOI Paste manufactured by Sumico Lubricant, Japan
I ...... ,... . U,. ,iliooo. g,ease.
r-
1IiD
Apply a locking agent. Use a medium strength locking agent unless otherwise specified.
Apply sealant.
Use DOT 4 brake fluid. Use the recommended brake fluid unless otherwise specified.
Use fork or suspension fluid.
1
z
~
0-
W
>
ii:
o
o
z
"
w
z
(5
z
w
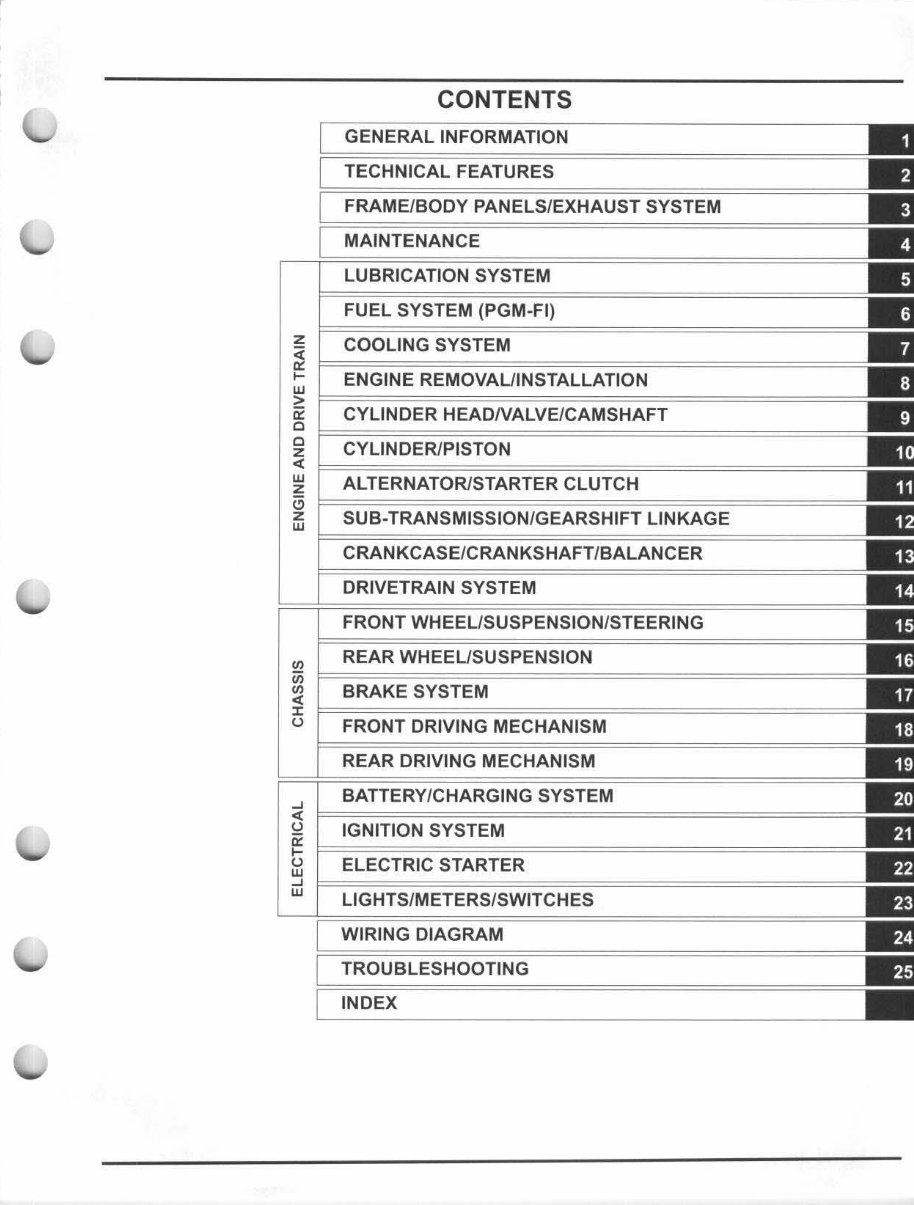
CONTENTS
GENERAL INFORMATION
TECHNICAL FEATURES
FRAME/BODY PANELS/EXHAUST SYSTEM
MAINTENANCE
LUBRICATION SYSTEM
FUEL SYSTEM (PGM-FI)
COOLING SYSTEM
ENGINE REMOVAUINSTALLATION
CYLINDER HEADNALVE/CAMSHAFT
CYLINDER/PISTON
ALTERNATOR/STARTER CLUTCH
SUB-TRANSMISSION/GEARSHIFT LINKAGE
CRANKCASE/CRANKSHAFT/BALANCER
DRIVETRAIN SYSTEM
FRONT WHEEUSUSPENSION/STEERING
'" REAR WHEEL/SUSPENSION
iii
'" BRAKE SYSTEM
~ F=~~~~~~~~~~==================~
U FRONT DRIVING MECHANISM
REAR DRIVING MECHANISM
BATTERY/CHARGING SYSTEM
~ F=========================================
U IGNITION SYSTEM
ii: F=~~~~~~========================
t ELECTRIC STARTER
~ F=~==~~==~~~==~====================
LIGHTS/METERS/SWITCHES
WIRING DIAGRAM
TROUBLESHOOTING
INDEX
MEMO
SERVICE RULES ··· ................................ 1-2
MODEL IDENTIFICATION· ............ .. ........ 1-3
GENERAL SPECIFICATIONS ············· ····· 1-5
LUBRICATION SYSTEM
SPECIFICATIONS """""""""""" " """ "1 -8
FUEL SYSTEM (PGM-FI)
SPECIFICATIONS """"""""""" " """"" 1-8
COOLING SYSTEM SPECIFICATIONS"" " 1-8
CYLINDER HEADNALVE/CAMSHAFT
SPECiFiCATIONS······· ........................ .. . 1-9
CYLINDER/PISTON SPECIFICATIONS ··· ··1-9
ALTERNATOR/STARTER CLUTCH
SPECIFICATIONS " " "" """" """"" " """ 1-9
SUB-TRANSMISSION/GEARSHIFT LINKAGE
SPECiFiCATIONS ································ 1- 10
CRANKCASE/CRANKSHAFT/BALANCER
SPECIFICATIONS, .................... .. ....... .. 1-10
DRIVETRAIN SYSTEM
SPECiFiCATIONS· ···· ·· ························· 1-10
FRONT WHEEUSUSPENSION/STEERING
SPECiFiCATIONS ······· ·· ·· ·· ·· ················· 1-10
1. GENERAL INFORMATION
REAR WHEEUSUSPENSION
SPECiFiCATIONS··················· ·· ··········· 1-10
BRAKE SYSTEM SPECIFICATIONS ... .... 1-11
FRONT DRIVING MECHANISM
SPECiFiCATiONS ································ 1-11
REAR DRIVING MECHANISM
SPECiFiCATIONS······ ·· ·············· ·· ······ ·· 1-11
BATIERY/CHARGING SYSTEM
SPECiFiCATIONS······ ··········· ··············· 1-11
IGNITION SYSTEM SPECIFICATIONS .. .. 1-12
ELECTRIC STARTER
SPECiFiCATIONS···· · ··························· 1-12
LIGHTS/METERS/SWITCHES
SPECiFiCATIONS ································ 1-12
STANDARD TORQUE VALUES ············· 1-13
ENGINE & FRAME TORQUE VALUES ···· 1-13
LUBRICATION & SEAL POINTS ············ 1-19
CABLE & HARNESS ROUTING ·· ......... .. 1-22
EMISSION CONTROL SYSTEMS ..... .. .... 1-57
1·1
GENERAL INFORMATION
SERVICE RULES
1. Use Honda genuine or Honda-recommended parts and lubricants or their equivalents. Parts that do not meet Honda's design
specifications may cause damage to the vehicle.
2. Use the special tools designed for this product to avoid damage and incorrect assembly.
3. Use only melric lools when servicing the vehicle. Metric bolls, nuts and screws are not interchangeable with EngliSh fasteners.
4. Install new gaskets, O-rings. cotter pins, and lock plates when reassembling.
5. When lightening bolls or nuts, begin with Ihe larger diameter or inner boll first. Then tighten to the specified torque diagonally in
incremental steps unless a particular sequence is specified .
6. Clean parts in cleaning solvent upon disassembly. lubricate any sliding surfaces before reassembly.
7. After reassembly, check all parts for proper installation and operation.
8. Route all electrical wires as show in the Cable and Harness Routing (page 1-22).
9. 00 not tow your ATV behind a car or other vehicle.
ABBREVIATION
Throughout this manual, the following abbrevialions are used 10 identify the respective parts or systems.
1·2
1
1
l
I
I
1
1
GENERAL INFORMATION
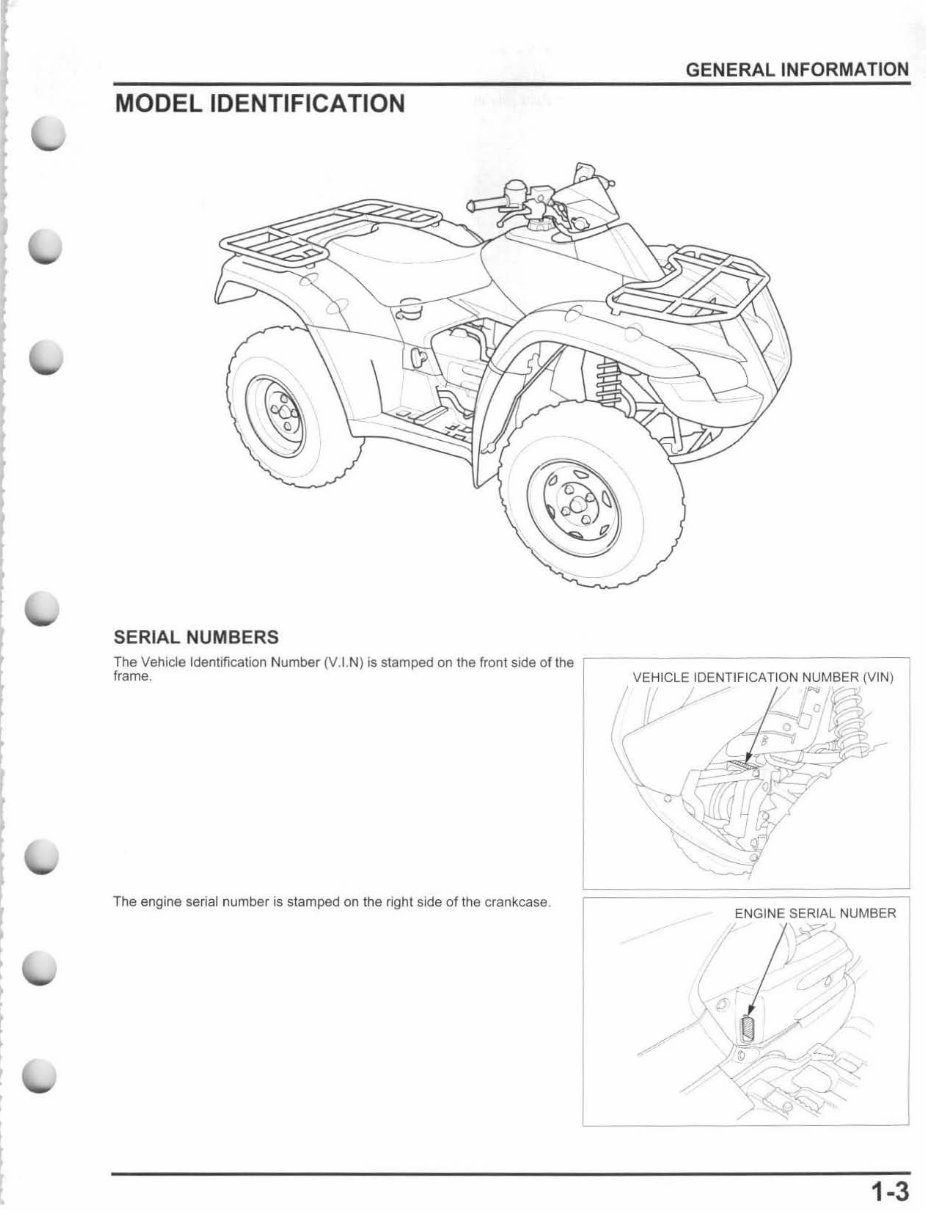
MODEL IDENTIFICATION
SERIAL NUMBERS
The Vehicle Identification Number (V.I .N) is stamped on the front side of the ,---- - -------------,
frame.
The engine serial number is stamped on the right side of the crankcase.
!
\
ENGINE SERIAL NUMBER
~
,
< ~~~
1-3
GENERAL INFORMATION
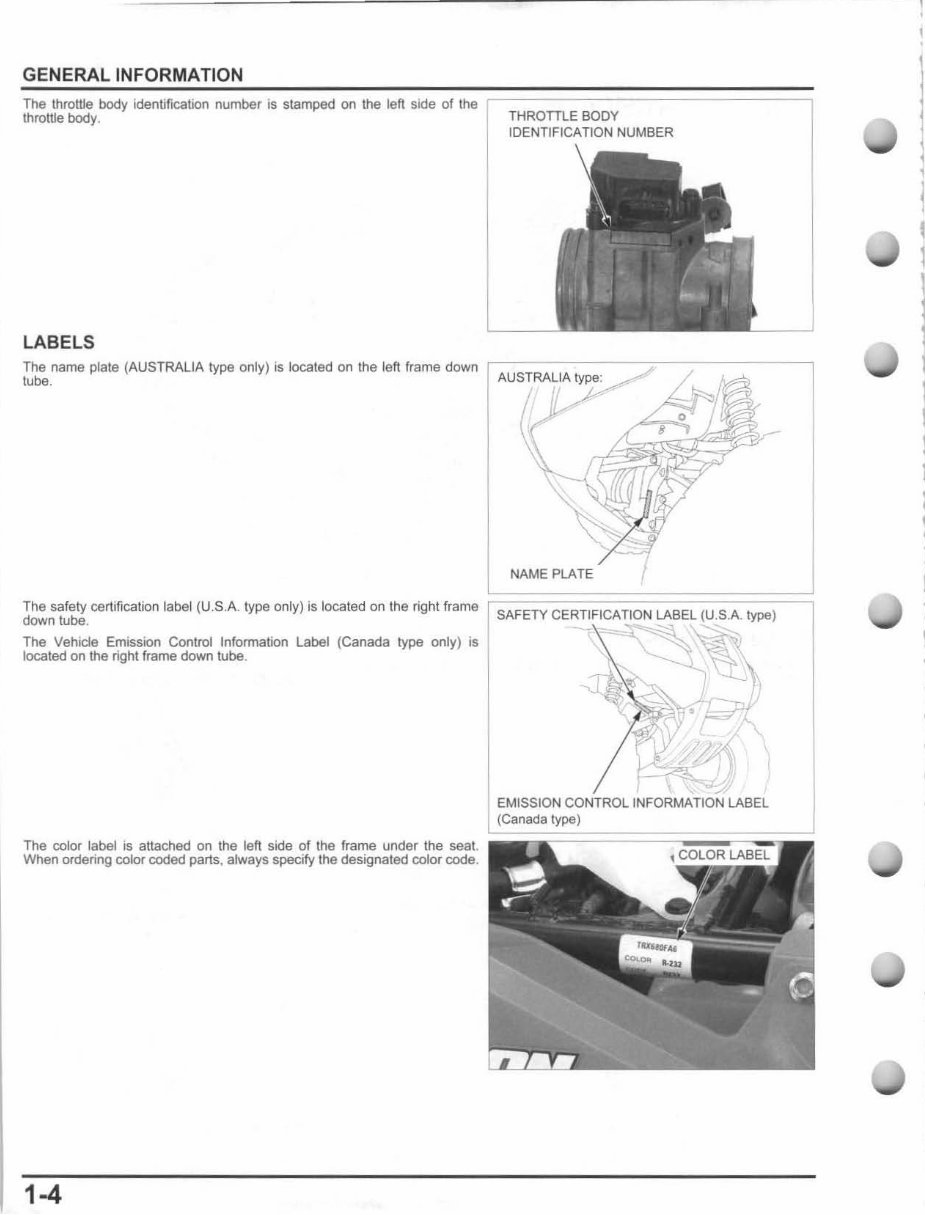
The throttle body identification number is stamped on the left side of the
throttle body.
LABELS
THROTTLE BODY
IDENTIFICATION NUMBER
The name plate (AUSTRALIA type only) is located on the left frame down ,----------;:----:------,
tube. AUSTRALIA type:
NAME PLATE
The safety certification label (U.S.A. type only) is located on the right frame ;:: S=A= FETY ==C =ER =T='=F= 'C =A=T= 'O =N=LA =B=E= l=(=U= .S= .A =.= type == ) =:::;
down tube.
- - '" ~~"~'
The Vehicle Emission Control Information label (Canada type only) is " ....., ....
located on the right frame down tUbe.
The color label is attached on the left side of the frame under the seat.
When ordering color coded parts, always specify the designated color code.
1-4
T!:::,>!' 1
~ r,0 ~rj/
" '"1 '"
~.y /~"
~
'"
EMISSION CONTROL INFORMATION LABEL
(Canada type)
1
1
l
I
1
You're Reading a Preview
What's Included?
Fast Download Speeds
Online & Offline Access
Access PDF Contents & Bookmarks
Full Search Facility
Print one or all pages of your manual
$30.99
$40.99
Viewed 18 Times Today


Secure transaction
What's Included?
Fast Download Speeds
Online & Offline Access
Access PDF Contents & Bookmarks
Full Search Facility
Print one or all pages of your manual
$30.99
$40.99
You can preview some pages by clicking the PREVIEW BUTTON located under the green button.
Models Covered:
- 2006 Honda TRX680FA FourTrax Rincon
- 2006 Honda TRX680FGA FourTrax Rincon GPScape
- 2007 Honda TRX680FA FourTrax Rincon
- 2007 Honda TRX680FGA FourTrax Rincon GPScape
- 2008 Honda TRX680FA FourTrax Rincon
- 2008 Honda TRX680FGA FourTrax Rincon GPScape
- 2009 Honda TRX680FA FourTrax Rincon
- 2009 Honda TRX680FGA FourTrax Rincon GPScape
- 2010 Honda TRX680FA FourTrax Rincon
- 2010 Honda TRX680FGA FourTrax Rincon
- 2011 Honda TRX680FA FourTrax Rincon
- 2011 Honda TRX680FGA FourTrax Rincon
Manual Contents:
- General Information
- Technical Features
- Frame / Body Panels / Exhaust System
- Maintenance
- Lubrication System
- Fuel System
- Cooling System
- Engine Removal / Installation
- Cylinder Head / Valve / Camshaft
- Cylinder / Piston
- Alternator / Starter Clutch
- Sub-transmission / Gearshift Linkage
- Crankcase / Crankshaft / Balancer
- Drive-train System
- Front Wheel / Suspension / Steering
- Rear Wheel / Suspension
- Brake System
- Front Driving Mechanism
- Rear Driving Mechanism
- Battery / Charging System
- Ignition System
- Electric Starter
- Lights / Meters / Switches
- Wiring Diagram
- Troubleshooting
- Index
Product Details:
- Total Pages: 567 pages
- File Format: .PDF
- Compatible: All Versions of Windows & Mac
- Printable: without any restriction
- Delivery: Link will appear on the checkout page after payment is complete
- Requirements: Adobe Reader
Thank you for visiting!


