

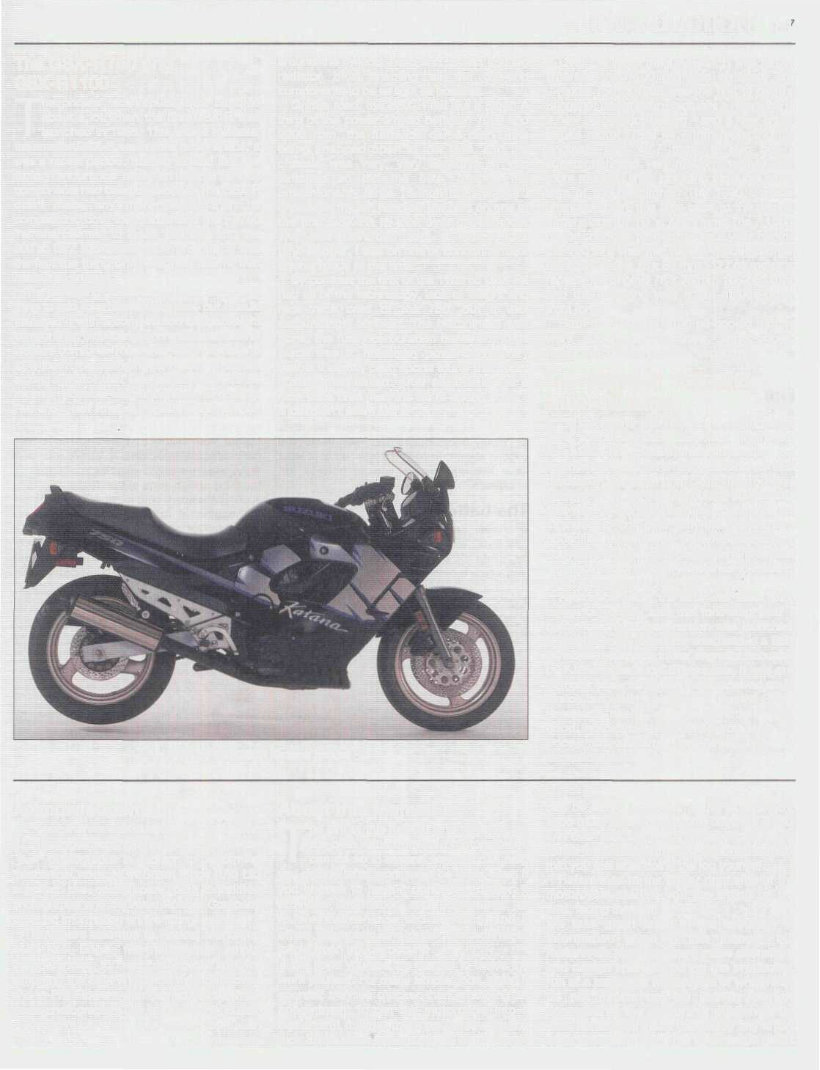
1990 1991 1992 1993 1994 1995 1996 1997 Suzuki GSX750F Katana models Factory Service Manual
What's Included?
Fast Download Speeds
Online & Offline Access
Access PDF Contents & Bookmarks
Full Search Facility
Print one or all pages of your manual
Introduction 0-7
The GSX-R750 and
GSX-R1100
T
he phrase race-replica was bandied
about a lot when the first GSX-R was
launched in 1985. This was a mistake,
the smaller GSX-R was not a race-replica, it
was a racer: period. It even looked like the
factory endurance racer on which various
components had been developed. The GSX-R
didn't make any more power than its
competitors, both the Suzuki and the F2750
Yamaha claimed to make 100 bhp and the
900 cc GPZ Kawasaki made 115 bhp, it was
the fact the thing only weighed 388 Ib that
made it so amazing.
The old saying goes that the most expensive
thing to add to a bike is lightness, but Suzuki
managed it with a combination of lightweight
components, oil cooling, and a decided lack of
creature comforts. The frame weighed only 18
Ib without the swinging arm and wrapped
around a motor that was pared down to the
minimum possible weight thanks to oil cooling.
Five-and-a-half litres of the stuff were pumped
around the cylinder head and cooled in a big
radiator thus enabling all the top-end
components to be as light as possible.
On the road, the GSX-R felt like a racer. A
third of the power arrived between 7000 and
9000 rpm, the flat-slide carbs didn't like
being snapped open at low revs, and the
chassis was very, very sensitive. If you
twitched so did the bike, despite the
unfashionably large 18-inch front wheel. I
once took my left hand off the bars on one of
the first GSX-Rs to look over my shoulder
and was rewarded with a lock-to-lock
tank-slapper. I was on one of London's major
arterial roads at the time...
By contrast the first of the 1100 cc GSX-Rs
had all of the technology, lack of weight and
race-track cred of the 750, but it was
astoundingly civilised. The twitchiness was
gone, the fussy carburation banished. In its
place was a massively powerful yet very
usable if slightly plain sports tourer that could
hustle when asked. After all, this is still a
race-track bred machine we're talking about -
it just didn't seem like it.
The GSX750F Katana model
Over the years the 750 GSX-R was tamed
whereas the 1100 got less civilised. The
J-model 750 of 1988 was the first to get the
Slingshot designation - actually a reference to
a new carburettor design - and a new short-
stroke motor (73 x 44.7 mm replacing the
original 70 x 48.7 mm). It also got a
substantial, and very modern, restyle with
more rounded lines including air ducts either
side of the headlights. The 1990 L-model
changed again, this time back to the original
dimensions of 70 x 48.7 mm. The 1100's
major changes tended to lag a year behind
the 750's. It was the 1989 K-model that got
the short-stroke 78 x 59 mm 1127 cc motor to
replace the original 76 x 78 mm 1052 cc lump
and the following year it got upside-down
front forks.
Both the 750 and 1100 oil-cooled motors
were superseded by new, water-cooled
designs in 1992 and 1993, respectively.
The GSX600F, 750F and
11 OOF (Katana)
R
iders who didn't need a cutting-edge
sportster also benefited from the
GSX-R's development, because the
engines were used in a new generation of GSX
models (Katanas in the US). The 750 was
sleeved down for the GSX600, a budget bike
that was deliberately built to a price and not
intended to compete with the Supersports
600s like the FZR or CBR. All-enveloping
bodywork hid the steel chassis and produced
an effect that one observer likened to a teapot
when it appeared in 1987.
Aesthetics aside, the GSX was astounding
value for money and the following year a
better looking 750 cc version was launched.
In late '87 the 1100 motor was used in a GSX
aimed at the sports tourer segment occupied
by FJ Yamahas and CBR Hondas. It was one
of those bikes that wasn't well received on its
launch but as time went on it, like the GSXs,
revealed itself as yet another very
good motorcycle. And when you took the
price into account they were seen as
exceptional bikes.
Acknowledgements
O
ur thanks are due to Joe Ortiz who
suggested and arranged many of the
photographs in addition to performing
mechanical work. NGK Spark Plugs (UK) Ltd
supplied the color spark plug condition
photographs and the Avon Rubber Company
provided information on tire fitting.
Thanks are also due to Redcat Marketing
and Kel Edge for supplying colour
transparencies, to Fred Furlong of Yeovil for
supplying the GSX-R1100 on the front cover,
and to Phil Flowers who carried out the front
cover photography. The introduction, "Suzuki
- Every Which Way" was written by Julian
Ryder.
About this Manual
T
he aim of this manual is to help you get
the best value from your motorcycle. It
can do so in several ways. It can help
you decide what work must be done, even if
you choose to have it done by a dealer; it
provides information and procedures for
routine maintenance and servicing; and it
offers diagnostic and repair procedures to
follow when trouble occurs.
We hope you use the manual to tackle the
work yourself. For many simpler jobs, doing it
yourself may be quicker than arranging an
appointment to get the motorcycle into a
dealer and making the trips to leave it and
pick it up. More importantly, a lot of money
can be saved by avoiding the expense the
shop must pass on to you to cover its labour
and overhead costs. An added benefit is the
sense of satisfaction and accomplishment
that you feel after doing the job yourself.
References to the left or right side of the
motorcycle assume you are sitting on the
seat, facing forward.
We take great pride in the accuracy of
information given in this manual, but
motorcycle manufacturers make alterations
and design changes during the production
run of a particular motorcycle of which they
do not inform us. No liability can be
accepted by the authors or publishers for
loss, damage or injury caused by any errors
in, or omissions from, the information given.
0-8 Safety first!
Professional mechanics are trained in safe
working procedures. However enthusiastic
you may be about getting on with the job at
hand, take the time to ensure that your safety
is not put at risk. A moment's lack of attention
can result in an accident, as can failure to
observe simple precautions.
There will always be new ways of having
accidents, and the following is not a
comprehensive list of all dangers; it is
intended rather to make you aware of the risks
and to encourage a safe approach to all work
you carry out on your bike.
Asbestos
• Certain friction, insulating, sealing and
other products - such as brake pads, clutch
linings, gaskets, etc. - contain asbestos.
Extreme care must be taken to avoid
inhalation of dust from such products since it
is hazardous to health. If in doubt, assume
that they do contain asbestos.
Fire
• Remember at all times that petrol is highly
flammable. Never smoke or have any kind of
naked flame around, when working on the
vehicle. But the risk does not end there - a
spark caused by an electrical short-circuit, by
two metal surfaces contacting each other, by
careless use of tools, or even by static
electricity built up in your body under certain
conditions, can ignite petrol vapour, which in
a confined space is highly explosive. Never
use petrol as a cleaning solvent. Use an
approved safety solvent.
• Always disconnect the battery earth
terminal before working on any part of the fuel
or electrical system, and never risk spilling
fuel on to a hot engine or exhaust.
• It is recommended that a fire extinguisher
of a type suitable for fuel and electrical fires is
kept handy in the garage or workplace at all
times. Never try to extinguish a fuel or
electrical fire with water.
Fumes
• Certain fumes are highly toxic and can
quickly cause unconsciousness and even
death if inhaled to any extent. Petrol vapour
comes into this category, as do the vapours
from certain solvents such as trichloro-
ethylene. Any draining or pouring of such
volatile fluids should be done in a well
ventilated area.
• When using cleaning fluids and solvents,
read the instructions carefully. Never use
materials from unmarked containers - they
may give off poisonous vapours.
• Never run the engine of a motor vehicle in
an enclosed space such as a garage. Exhaust
fumes contain carbon monoxide which is
extremely poisonous; if you need to run the
engine, always do so in the open air or at least
have the rear of the vehicle outside the
workplace.
• Always disconnect the battery groum
(earth) terminal before working on the fuel o
electrical systems (except where noted).
• If possible, loosen the filler plugs or cove
when charging the battery from an externa
source. Do not charge at an excessive rate o
the battery may burst.
• Take care when topping up, cleaning o'
carrying the battery. The acid electrolyte
evenwhen diluted, is very corrosive anc
should not be allowed to contact the eyes 01
skin. Always wear rubber gloves and goggles
or a face shield. If you ever need to prepare
electrolyte yourself, always add the acid
slowly to the water; never add the water to the
acid.
Electricity
The battery
• Never cause a spark, or allow a naked
light near the vehicle's battery. It will normally
be giving off a certain amount of hydrogen
gas, which is highly explosive.
• When using an electric power tool,
inspection light etc., always ensure that the
appliance is correctly connected to its plug
and that, where necessary, it is properly
grounded (earthed). Do not use such
appliances in damp conditions and, again,
beware of creating a spark or applying
excessive heat in the vicinity of fuel or fuel
vapour. Also ensure that the appliances meet
national safety standards.
• A severe electric shock can result from
touching certain parts of the electrical system,
such as the spark plug wires (HT leads), when
the engine is running or being cranked,
particularly if components are damp or the
insulation is defective. Where an electronic
ignition system is used, the secondary (HT)
voltage is much higher and could prove fatal.
identification numbers 0-9
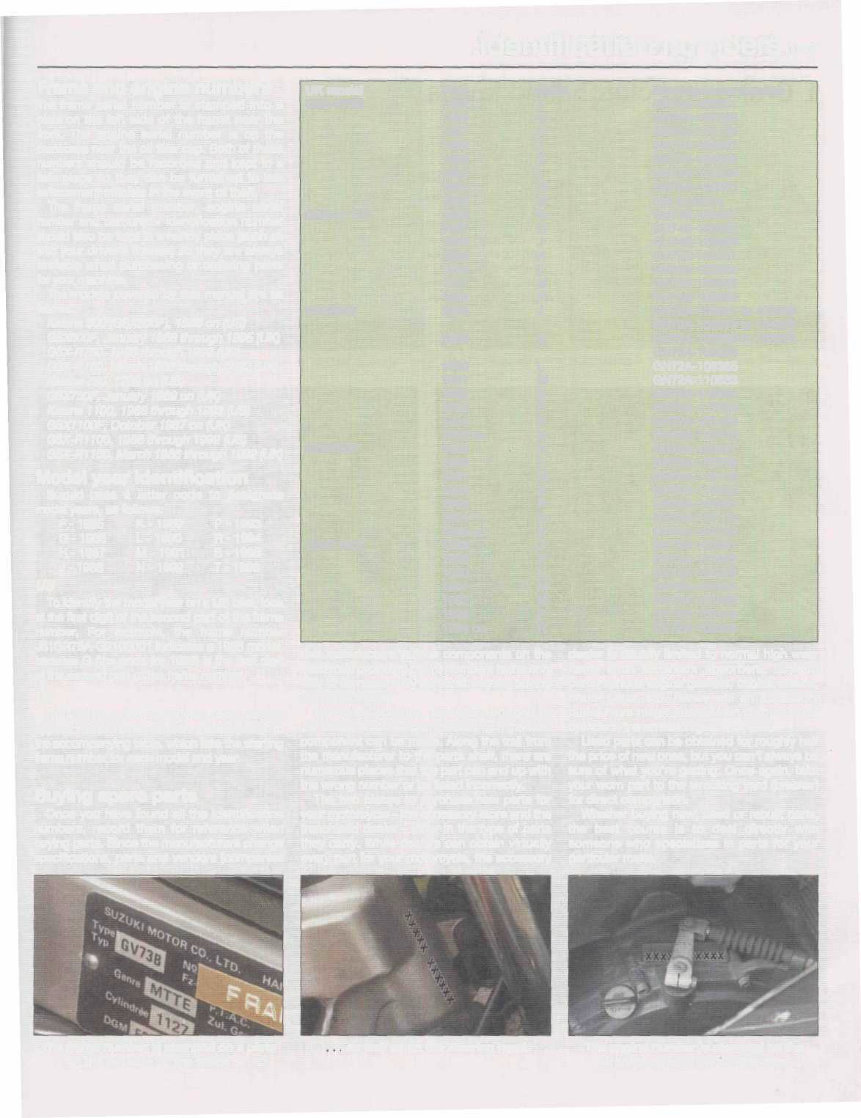
Frame and engine numbers
The frame serial number is stamped into a
plate on the left side of the frame near the
front. The engine serial number is on the
crankcase near the oil filler cap. Both of these
numbers should be recorded and kept in a
safe place so they can be furnished to law
enforcement officials in the event of theft.
The frame serial number, engine serial
number and carburetor identification number
should also be kept in a handy place (such as
with your driver's license) so they are always
available when purchasing or ordering parts
for your machine.
The models covered by this manual are as
follows:
Katana 600 (GSX600F), 1988 on (US)
GSX600F, January 1988 through 1995 (UK)
GSX-R750, 1986 through 1992 (US)
GSX-R750, March 1985 through 1992 (UK)
Katana 750, 1989 on (US)
GSX750F, January 1989 on (UK)
Katana 1100, 1988 through 1993 (US)
GSX1100F, October 1987 on (UK)
GSX-R1100, 1986 through 1992 (US)
GSX-R1100, March 1986 through 1992 (UK)
Model year identification
Suzuki uses a letter code to designate
model years, as follows:
F
G
H
J
-1985
-1986
- 1987
- 1988
K-
L-
M-
N-
1989
1990
1991
1992
P-
R-
S-
T-
1993
1994
1995
1996
US
To identify the model year on a US bike, look
at the first digit of the second part of the frame
number. For example, the frame number
JS1GR75A-G2100001 indicates a 1986 model,
because G (the code for 1986) is the first digit
of the second part of the frame number.
UK
On UK bikes, the model year code doesn't
appear in the frame number. Instead, refer to
the accompanying table, which lists the starting
frame number for each model and year.
Buying spare parts
Once you have found all the identification
numbers, record them for reference when
buying parts. Since the manufacturers change
specifications, parts and vendors (companies
UK model
GSX-R750
GSX-R1100
GSX600F
GSX750F
GSX1100F
Year
1985
1986
1987
1988
1989
1990
1991
1992
1986
1987
1988
1989
1990
1991
1992
1988
1989
1990
1991
1992
1993
1994
1995 on
1989
1990
1991
1992
1993
1994
1995 on
1988
1989
1990
1991
1992
1993
1994 on
Code
F
G
H
J
K
L
M
N
G
H
J
K
L
M
N
J
K
L
M
N
P
R
S
K
L
M
N
P
R
S
J
K
L
M
N
P
R
Starting frame number
GR75A-100001
GR75A-107368
GR75A-112130
GR77A-100001
GR77A-104392
GR7AA-100034
GR7AA-100001
Not available
GU74B-100001
GU74B-103282
GU74B-106265
GV73B-100001
GV73B-103392
GV73B-106082
GV73B-108660
GN72A-100001 to 103968
GN72A-103979 to 104098
GN72A-103969 to 103978
GN72A-104099
GN72A-106385
GN72A-110633
GN72A-115034
GN72A-118194
GN72A-121465
GN72A-123718
GR78A-100001
GR78A-105765
GR78A-113118
GR78A-119920
GR78A-125061
GR78A-131112
GR78A-134162
GV72A-100001
GV72A-101093
GV72A-101223
GV72A-101584
GV72A-101990
GV72D-101019
GV72A-102304
that manufacture various components on the
machine), providing the ID numbers is the only
way to be reasonably sure that you are buying
the correct parts.
Whenever possible, take the worn part to
the dealer so direct comparison with the new
component can be made. Along the trail from
the manufacturer to the parts shelf, there are
numerous places that the part can end up with
the wrong number or be listed incorrectly.
The two places to purchase new parts for
your motorcycle - the accessory store and the
franchised dealer - differ in the type of parts
they carry. While dealers can obtain virtually
every part for your motorcycle, the accessory
dealer is usually limited to normal high wear
items such as shock absorbers, tune-up
parts, various engine gaskets, cables, chains,
brake parts, etc. Rarely will an accessory
outlet have major suspension components,
cylinders, transmission gears, or cases.
Used parts can be obtained for roughly half
the price of new ones, but you can't always be
sure of what you're getting. Once again, take
your worn part to the wrecking yard (breaker)
for direct comparison.
Whether buying new, used or rebuilt parts,
the best course is to deal directly with
someone who specializes in parts for your
particular make.
The frame number is stamped on a plate
on the left side of the frame . . .
. as well as on the steering head The engine number is stamped on the
crankcase near the oil filler cap
0-10 Daily (pre-ride) checks
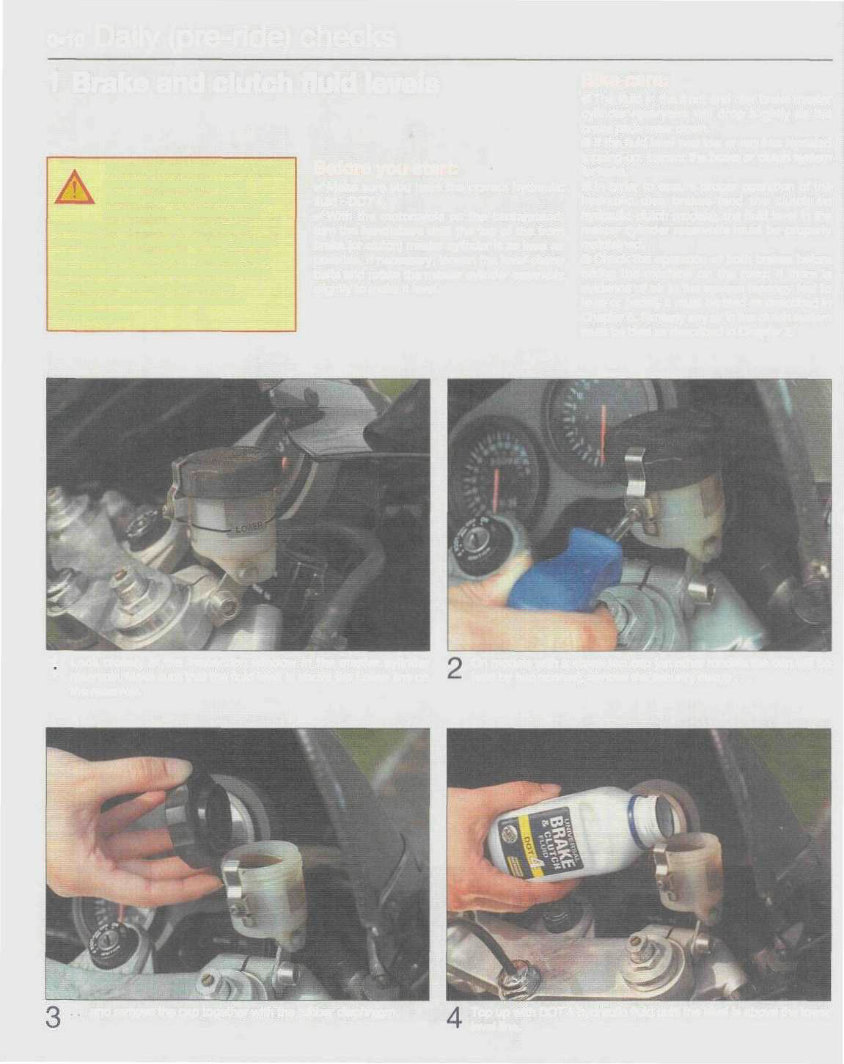
1 Brake and clutch fluid levels
Warning: Brake hydraulic fluid
can harm your eyes and
damage painted surfaces, so
use extreme caution when
handling and pouring it and cover
surrounding surfaces with rag. Do not
use fluid that has been standing open
for some time, as it absorbs moisture
from the air which can cause a
dangerous loss of braking/clutch
effectiveness.
Before you start:
• Make sure you have the correct hydraulic
fluid - DOT 4.
• With the motorcycle on the centerstand,
turn the handlebars until the top of the front
brake (or clutch) master cylinder is as level as
possible. If necessary, loosen the lever clamp
bolts and rotate the master cylinder assembly
slightly to make it level.
Bike care:
• The fluid in the front and rear brake master
cylinder reservoirs will drop slightly as the
brake pads wear down.
• If the fluid level was low or requires repeated
topping-up, inspect the brake or clutch system
for leaks.
• In order to ensure proper operation of the
hydraulic disc brakes (and the clutch on
hydraulic clutch models), the fluid level in the
master cylinder reservoirs must be properly
maintained.
• Check the operation of both brakes before
taking the machine on the road; if there is
evidence of air in the system (spongy feel to
lever or pedal), it must be bled as described in
Chapter 6. Similarly any air in the clutch system
must be bled as described in Chapter 2.
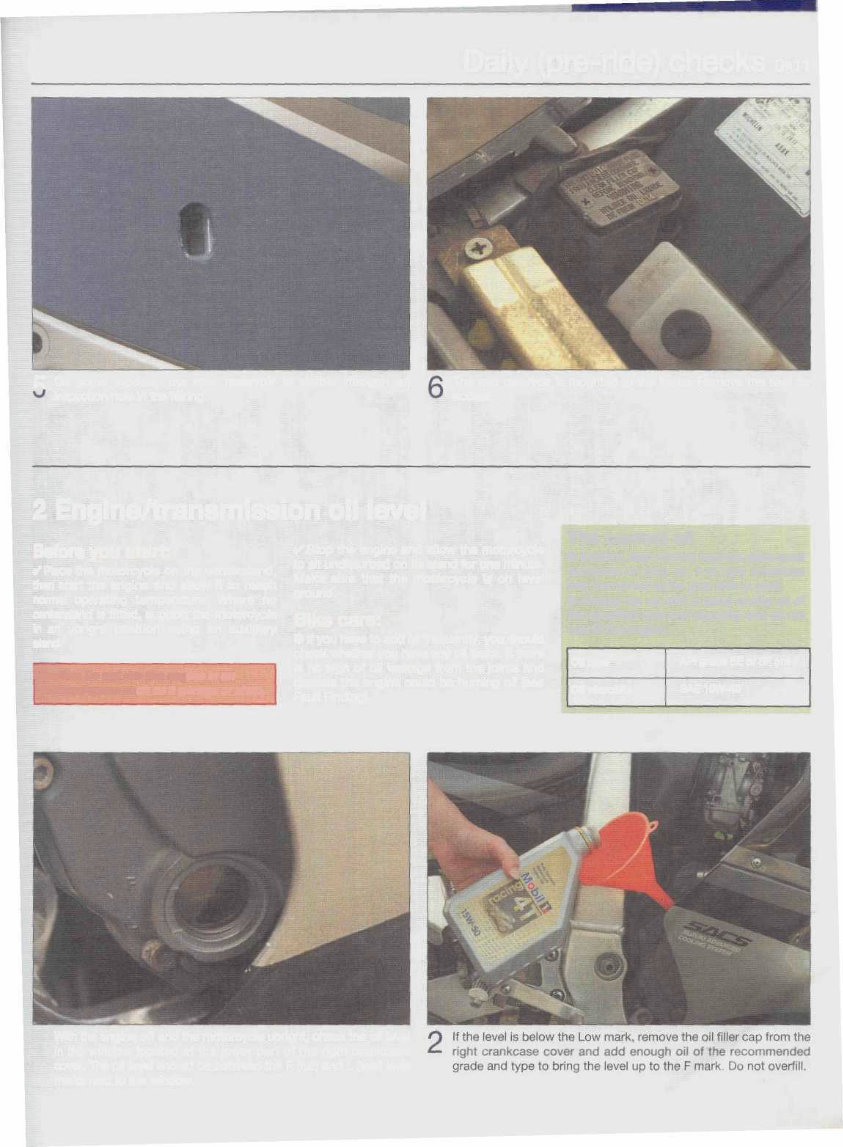
H Look closely at the inspection window in the master cylinder
' reservoir. Make sure that the fluid level is above the Lower line on
the reservoir.
On models with a screw top cap (on other models the cap will be
held by two screws), remove the security clamp . . .
. and remove the cap together with the rubber diaphragm. Top up with DOT 4 hydraulic fluid until the level is above the lower
level line.
Daily (pre-ride) checks 0-11
5 On some models, the rear reservoir is visible through an
inspection hole in the fairing.
The rear reservoir is mounted to the frame. Remove the seat for
access.
2 Engine/transmission oil level
Before you start:
• Place the motorcycle on the centerstand,
then start the engine and allow it to reach
normal operating temperature. Where no
centerstand is fitted, support the motorcycle
in an upright position using an auxiliary
stand.
f Caution: Do not run the engine in an
enclosed space such as a garage or shop.
• Stop the engine and allow the motorcycle
to sit undisturbed on its stand for one minute.
Make sure that the motorcycle is on level
ground.
Bike care:
• If you have to add oil frequently, you should
check whether you have any oil leaks. If there
is no sign of oil leakage from the joints and
gaskets the engine could be burning oil (see
Fault Finding).
The correct oil
• Modern, high-revving engines place great
demands on their oil. It is very important
that the correct oil for your bike is used.
• Always top up with a good quality oil of
the specified type and viscosity and do not
overfill the engine.
Oil type
Oil viscosity
API grade SE or SF (min)
SAE 10W-40
1
With the engine off and the motorcycle upright, check the oil level
in the window located at the lower part of the right crankcase
cover. The oil level should be between the F (full) and L (low) level
marks next to the window.
0-12 Daily (pre-ride) checks
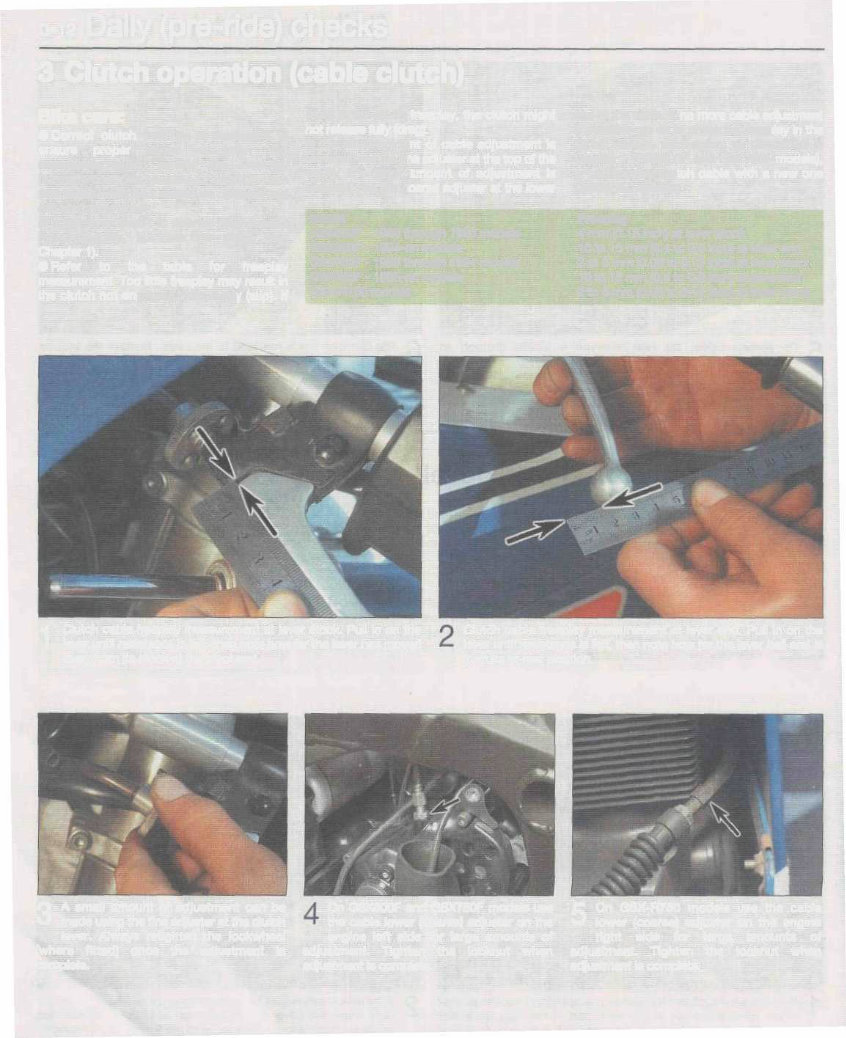
3 Clutch operation (cable clutch)
Bike care:
• Correct clutch freeplay is necessary to
ensure proper clutch operation and
reasonable clutch service life. Freeplay
normally changes because of cable stretch
and clutch wear, so it should be checked and
adjusted periodically.
• If the lever is stiff to operate and doesn;t
return quickly, lubricate the cable (see
Chapter 1).
• Refer to the table for freeplay
measurement. Too little freeplay may result in
the clutch not engaging completely (slip). If
there is too much freeplay, the clutch might
not release fully (drag).
• If a small amount of cable adjustment is
required, use the fine adjuster at the top of the
cable. If a large amount of adjustment is
required, use the coarse adjuster at the lower
Model
GSX600F -1988 through 1993 models
GSX600F - 1994-on models
GSX750F -1989 through 1994 models
GSX750F - 1995-on models
GSX-R750 models
end of the cable. If no more cable adjustment
is possible, go on to check the freeplay in the
clutch release mechanism as described in
Chapter 1 (GSX600F and GSX750F models),
or replace the clutch cable with a new one
(GSX-R750 models).
Freeplay
4 mm (0.16 inch) at lever stock
10 to 15 mm (0.4 to 0.6 inch) at lever end
2 to 3 mm (0.08 to 0.12 inch) at lever stock
10 to 15 mm (0.4 to 0.6 inch) at lever end
2 to 3 mm (0.08 to 0.12 inch) at lever stock
1
Clutch cable freeplay measurement at lever stock. Pull in on the
lever until resistance is felt, then note how far the lever has moved
away from its stock at the pivot end.
Clutch cable freeplay measurement at lever end. Pull in on the
lever until resistance is felt, then note how far the lever ball end is
from its at-rest position.
3
A small amount of adjustment can be
made using the fine adjuster at the clutch
lever. Always retighten the lockwheel
(where fitted) once the adjustment is
complete.
On GSX600F and GSX750F models use
the cable lower (coarse) adjuster on the
engine left side for large amounts of
adjustment. Tighten the locknut when
adjustment is complete.
5
On GSX-R750 models use the cable
lower (coarse) adjuster on the engine
right side for large amounts of
adjustment. Tighten the locknut when
adjustment is complete.
Daily (pre-ride) checks 0-13
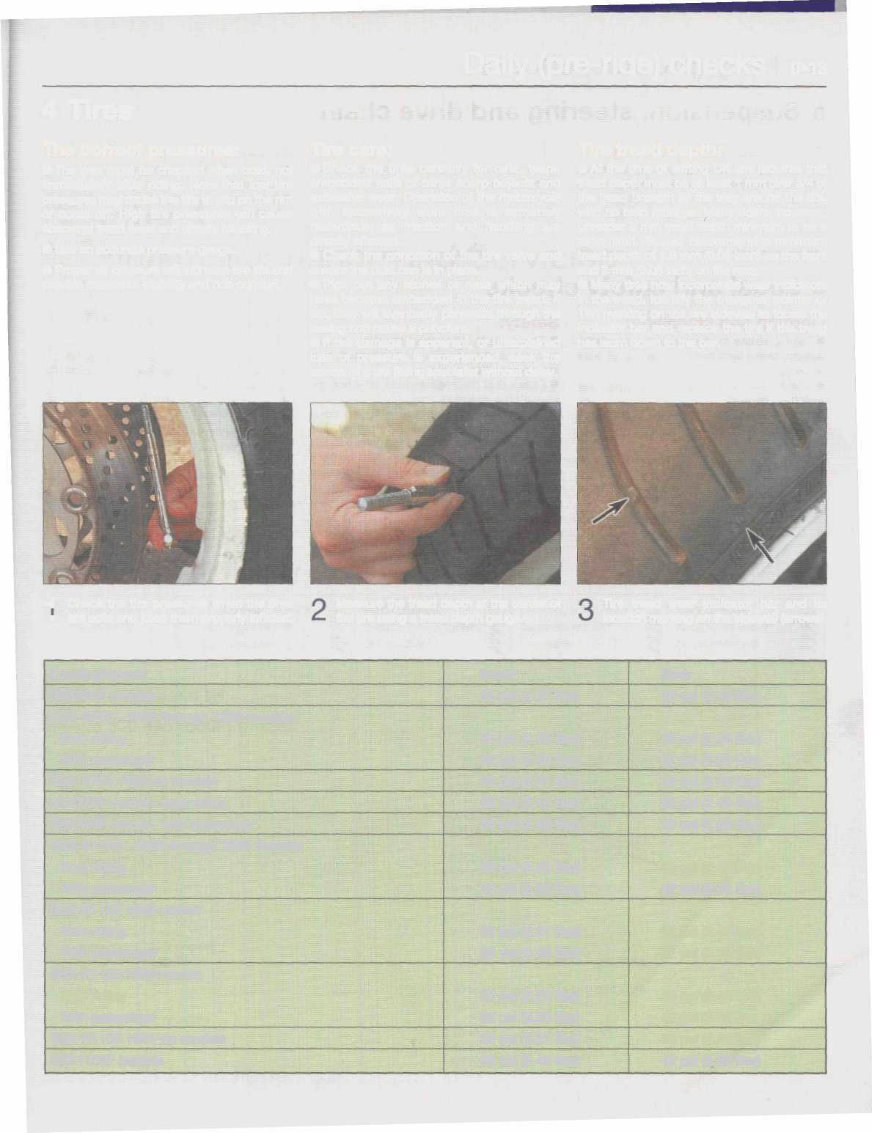
4 Tires
The correct pressures:
• The tires must be checked when cold, not
immediately after riding. Note that low tire
pressures may cause the tire to slip on the rim
or come off. High tire pressures will cause
abnormal tread wear and unsafe handling.
• Use an accurate pressure gauge.
• Proper air pressure will increase tire life and
provide maximum stability and ride comfort.
Tire care:
• Check the tires carefully for cuts, tears,
embedded nails or other sharp objects and
excessive wear. Operation of the motorcycle
with excessively worn tires is extremely
hazardous, as traction and handling are
directly affected.
• Check the condition of the tire valve and
ensure the dust cap is in place.
• Pick out any stones or nails which may
have become embedded in the tire tread. If
left, they will eventually penetrate through the
casing and cause a puncture.
• If tire damage is apparent, or unexplained
loss of pressure is experienced, seek the
advice of a tire fitting specialist without delay.
Tire tread depth:
• At the time of writing UK law requires that
tread depth must be at least 1 mm over 3/4 of
the tread breadth all the way around the tire,
with no bald patches. Many riders, however,
consider 2 mm tread depth minimum to be a
safer limit. Suzuki recommend a minimum
tread depth of 1.6 mm (0.06 inch) on the front
and 2 mm (0.08 inch) on the rear.
• Many tires now incorporate wear indicators
in the tread. Identify the triangular pointer or
TWI marking on the tire sidewail to locate the
indicator bar and replace the tire if the tread
has worn down to the bar.
A Check the tire pressures when the tires
• are cold and keep them properly inflated.
Measure the tread depth at the center of
the tire using a tread depth gauge.
Tire tread wear indicator bar and its
location marking on the sidewail (arrows).
Loading/speed
GSX600F models
GSX-R750 -1985 through 1989 models:
Solo riding
With passenger
GSX-R750 1990-on models
GSX750F model - solo riding
GSX750F model - with passenger
GSX-R1100 -1986 through 1988 models:
Solo riding
With passenger
GSX-R1100 1989 model:
Solo riding
With passenger
GSX-R1100 1990 model:
Solo riding
With passenger
GSX-R1100 1991 -on models
GSX11 OOF models
Front
33 psi (2.27 Bar)
36 psi (2,48 Bar)
36 psi (2.48 Bar)
33 psi (2.27 Bar)
36 psi (2.48 Bar)
36 psi (2.48 Bar)
36 psi (2.48 Bar)
36 psi (2.48 Bar)
33 psi (2.27 Bar)
36 psi (2.48 Bar)
32 psi (2.20 Bar)
32 psi (2.20 Bar)
33 psi (2.27 Bar)
36 psi (2.48 Bar)
Rear
36 psi (2.48 Bar)
36 psi (2.48 Bar)
42 psi (2.89 Bar)
36 psi (2.48 Bar)
36 psi (2.48 Bar)
42 psi (2.89 Bar)
36 psi (2.48 Bar)
42 psi (2.89 Bar)
36 psi (2.48 Bar)
42 psi (2.89 Bar)
36 psi (2.48 Bar)
42 psi (2.89 Bar
36 psi (2.48 Bar)
42 psi (2.89 Bar)
0-14 Daily (pre-ride) checks
5 Suspension, steering and drive chain
Suspension and steering: Drive chain:
• Make sure the steering operates smoothly, • Check front and rear suspension for • Make sure the drive chain isn't out of
without looseness and without binding. smooth operation, adjustment.
• Make sure the drive chain is adequately
lubricated.
6 Legal and safety checks
Lighting and signalling:
• Take a minute to check that the headlight,
taillight, brake light and turn signals all work
correctly.
• Check that the horn sounds when the
switch is operated.
• A working speedometer is a statutory
requirement in the UK.
Safety:
• Check that the throttle grip rotates
smoothly and snaps shut when released, in all
steering positions.
• Check that the engine shuts off when the
kill switch is operated.
• Check that sidestand return spring holds
the stand securely up when retracted. The
same applies to the centerstand (where fitted).
• Following the procedure in your owner's
manual, check the operation of the sidestand
switch.
Fuel:
• This may seem obvious, but check that you
have enough fuel to complete your journey. If
you notice signs of fuel leakage - rectify the
cause immediately.
• Ensure you use the correct grade fuel - see
Chapter 3 Specifications.
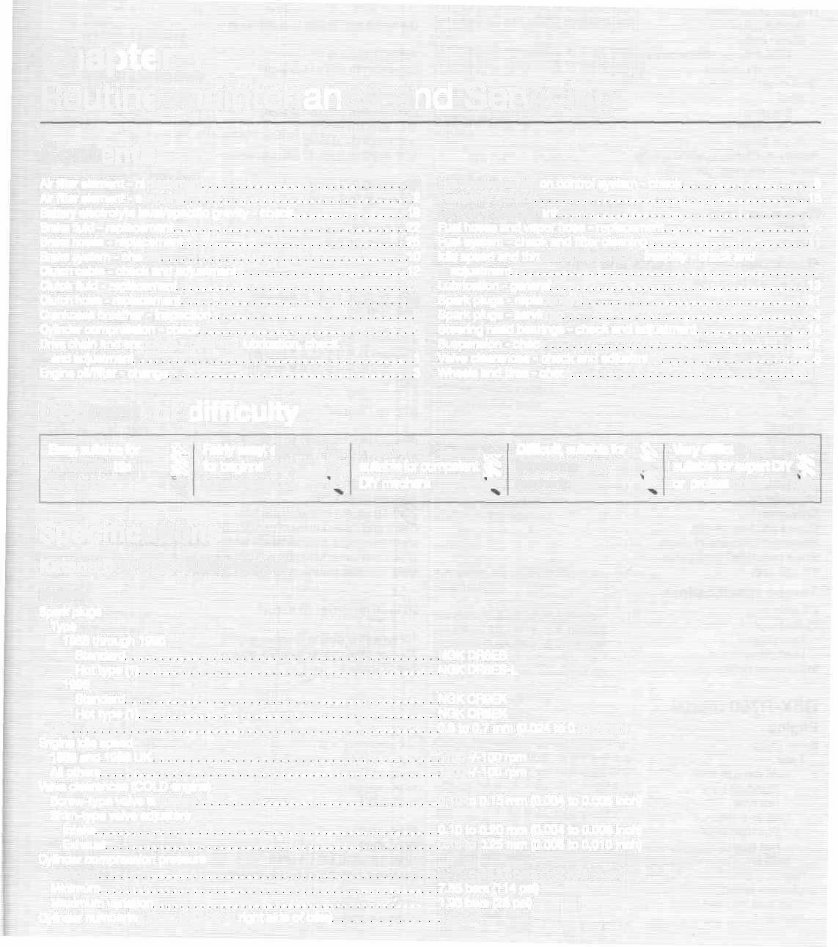
Chapter 1
Routine maintenance and Servicing
Contents
Air filter element - replacement 20
Air filter element - servicing 2
Battery electrolyte level/specific gravity - check 19
Brake fluid - replacement 22
Brake hoses - replacement 25
Brake system - checks 10
Clutch cable - check and adjustment 12
Clutch fluid - replacement 23
Clutch hose - replacement 26
Crankcase breather - inspection 9
Cylinder compression - check 6
Drive chain and sprockets - cleaning, lubrication, check
and adjustment 1
Engine oil/filter - change 3
Degrees of difficulty
Evaporative emission control system - check 8
Fasteners - check 18
Fork oil - replacement 16
Fuel hoses and vapor hose - replacement 24
Fuel system - check and filter cleaning 11
Idle speed and throttle operation/grip freeplay - check and
adjustment 7
Lubrication - general 13
Spark plugs - replacement 21
Spark plugs - servicing 4
Steering head bearings - check and adjustment 14
Suspension - check 17
Valve clearances - check and adjustment 5
Wheels and tires - check 15
Easy, suitable for §K
novice with little ^
experience g^
Fairly easy, suitable |k
for beginner with ^
some experience gS
Fairly difficult, ^,
suitable for competent ^
DIY mechanic gS
Difficult, suitable for ^
experienced DIY 3^
mechanic gS
Very difficult, ^
suitable for expert DIY 3^
or professional g^
Specifications
Katana 600 (GSX600F) model
Engine
Spark plugs
Type
1988 through 1995
Standard NGK DR8ES
Hot type (1) NGK DR8ES-L
1996
Standard NGK CR9EK
Hot type (1) NGK CR8EK
Gap 0.6 to 0.7 mm (0.024 to 0.028 inch)
Engine idle speed
1988 and 1989 UK 1100+/-100 rpm
All others 1300+/-100 rpm
Valve clearances (COLD engine)
Screw-type valve adjusters 0.10 to 0.15 mm (0.004 to 0.006 inch)
Shim-type valve adjusters
Intake 0.10 to 0.20 mm (0.004 to 0.008 inch)
Exhaust 0.15 to 0.25 mm (0.006 to 0.010 inch)
Cylinder compression pressure
Standard 9.78 to 14.67 bars (142 to 213 psi)
Minimum 7.85 bars (114 psi)
Maximum variation '' .... 1.93 bars (28 psi)
Cylinder numbering (from left side to right side of bike) 1 -2-3-4

1 1-2 Servicing Specifications
Katana 600 (GSX600F) model (continued)
Miscellaneous
Brake pad minimum thickness To limit line
Brake pedal height 45 mm (1.8 inch) below top of footpeg
Freeplay adjustments
Throttle cable 0.5 to 1.0 mm (0.020 to 0.040 inch)
Clutch cable
1988 through 1993 models 4 mm (0.16 inch)
1994-on models 10 to 15 mm (0.4 to 0.6 inch)
Drive chain
Slack
Standard 25 to 35 mm (1.0 to 1.4 inch)
Service limit 1.77 inch (45 mm)
21-pin length 319.4 mm (12.6 inch)
Battery electrolyte specific gravity 1.28 at 20 degrees C (68 degrees F)
Minimum tire tread depth (2)
Front 1.6 mm (0.060 inch)
Rear 2.0 mm (0.080 inch)
Tire pressures (cold)
Front 2.27 bars (33 psi)
Rear 2.48 bars (36 psi)
Recommended lubricants and fluids
Engine/transmission oil
Type API grade SE or SF (minimum)
Viscosity SAE10W-40
Capacity
With filter change 3.8 liters (4.0 US qt, 6.7 Imp pt)
Oil change only 3.6 liters (3.8 US qt, 6.3 Imp pt)
Engine overhaul 5.0 liters (5.3 US qt, 8.8 Imp pt)
Brake fluid DOT 4
Fork oil
Type SAE 10 - fork oil
Amount
1988 460 cc (15.5 US fl oz, 16.2 Imp fl oz)
1989 on 478 cc (16.1 US fl oz, 16.8 Imp fl oz)
Oil level
1988 134 mm (5.28 inch)
1989 on 100 mm (3.93 inch)
Drive chain 20W-50 engine oil (not chain lube)
Cables and lever pivots Chain and cable lubricant or 10W30 motor oil
Sidestand/centerstand pivots Medium-weight, lithium-based multi-purpose grease
Brake pedal/shift lever pivots Chain and cable lubricant or 10W30 motor oil
Throttle grip Multi-purpose grease or dry film lubricant
Torque specifications
Oil drain plug 20 to 25 Nm (18 to 25 ft-lbs)
Spark plugs
New plugs 1/2 turn after gasket touches engine
Used plugs 1/4 turn after gasket touches engine
Valve cover bolts See Chapter 2
GSX-R750 model
Engine
Spark plugs
Type
1985 through 1987
Standard type NGK D9EA
Hot type NGK D8EA
1988 and 1989
Standard type NGK JR9C
Hot type NGK JR8C
1990 on NGKCR10EK, NDU31ETR
Gap 0.6 to 0.7 mm (0.024 to 0.028 inch)
Engine idle speed
1985 through 1990 1100+/-100 rpm
1991 on 1200+/-100 rpm
You're Reading a Preview
What's Included?
Fast Download Speeds
Online & Offline Access
Access PDF Contents & Bookmarks
Full Search Facility
Print one or all pages of your manual
$27.99
Viewed 75 Times Today


Secure transaction
What's Included?
Fast Download Speeds
Online & Offline Access
Access PDF Contents & Bookmarks
Full Search Facility
Print one or all pages of your manual
$27.99
This manual covers the following Suzuki Motorcycle Models:
- GSX750F Katana_1990-1997_99500-37068-03E
Number of pages in file: 344
This complete owner's service manual covers all repair topics such as:
- General Information
- Periodic Maintenance
- Fuel System
- Cooling System
- Engine Top End
- Engine Lubrication System
- Engine Removal/Installation
- Crankshaft/Crankcase
- Transmission
- Wheels/Tires
- Final Drive
- Brakes
- Suspension
- Steering
- Frame
- Electrical System
- Troubleshooting
- Detailed Diagrams, illustrations, photos, exploded views and step-by-step Instructions Diagnostics and similar topics
File Format: PDF
Compatible: All Versions of Windows & Mac
Language: English
Requirements: Adobe Reader


