1. GENERAL INFORMATION 1-0 Bet & Win 250 1 __________________________________________________________________________________ __________________________________________________________________________________ __________________________________________________________________________________ __________________________________________________________________________________ __________________________________________________________________________________ GENERAL INFORMATION __________________________________________________________________________________ ENGINE SERIAL NUMBER--------------------------------------------- 1-1 SPECIFICATION---------------------------------------------------------- 1-2 SERVICE PRECAUTIONS----------------------------------------------- 1-3 TORQUE VALUES------------------------------------------------------- 1-7 TOOLS --------------------------------------------------------------------- 1-8 LUBRICATION POINTS------------------------------------------------- 1-9 CABLE & HARNESS ROUTING-----------------------------------------1-11 WIRING DIAGRAM-------------------------------------------------------------------1-16 TROUBLESHOOTING --------------------------------------------------1-17 1
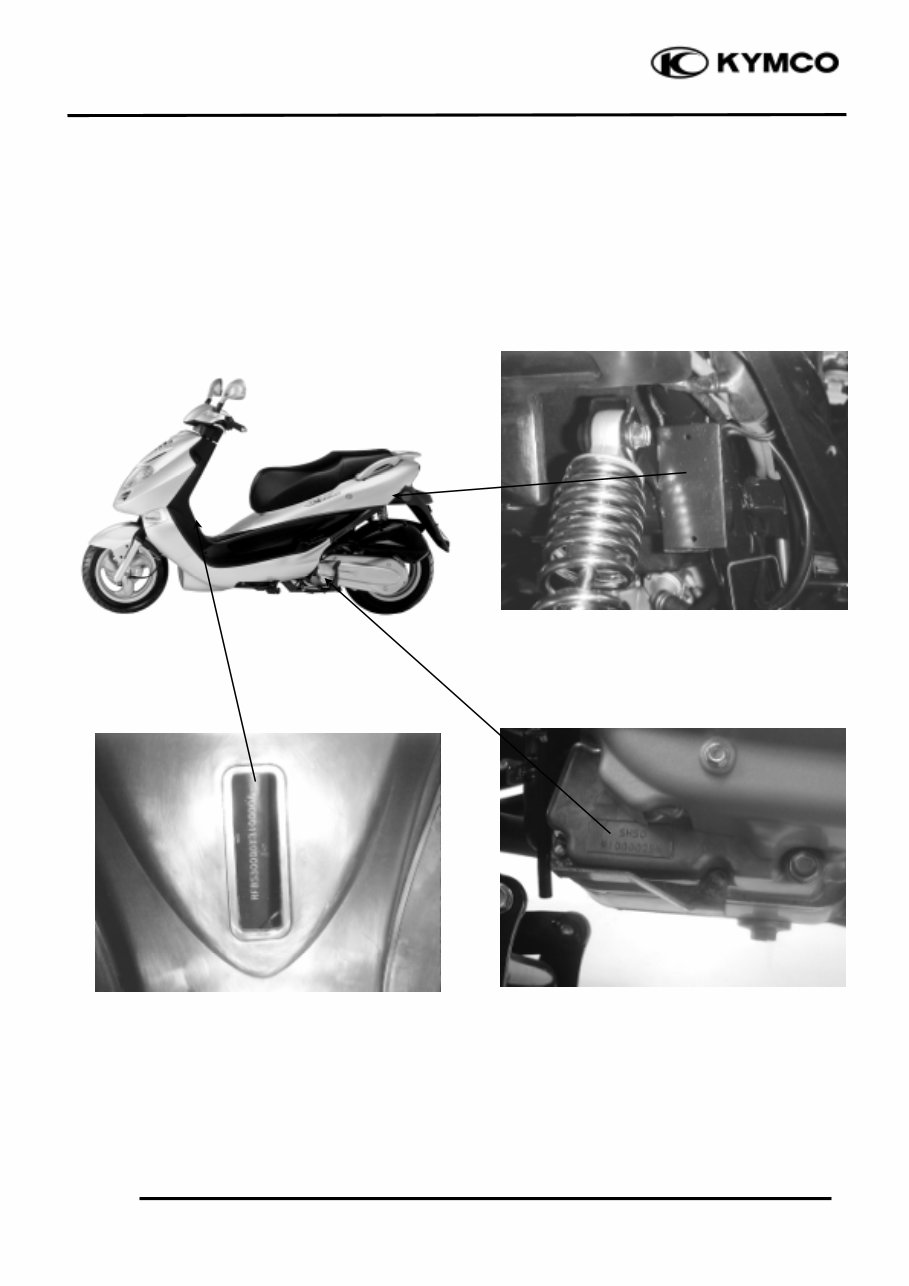
1. GENERAL INFORMATION 1-1 Bet & Win 250 SERIAL NUMBER Location of Engine Serial Number Location of Frame Serial Number Vehicle Identification Serial Number
1. GENERAL INFORMATION 1-2 Bet & Win 250 SPECIFICATIONS Name & Model No. SH50CA Motorcycle Name & Type B&W250 Overall length 2000mm Overall width 750mm Overall height 1140mm Wheel base 1435mm Engine type Water cooled 4-stroke, OHC engine Displacement 249.1cc Fuel Used 92# nonleaded gasoline Front wheel 65 Net weight (kg) Rear wheel 93 Total 158 Front wheel 86 Gross weight(kg) Rear wheel 127 Total 213 Front wheel 120/70-12 58P Rear wheel 140/70-12 65P Ground clearance 135mm Perform - Braking distance (m) 4m/30km/hr ance Min. turning radius 2350mm Starting system Starting motor Type Gasoline, 4-stroke Cylinder arrangement Single cylinder Combustion chamber type Semi-sphere Valve arrangement O.H.C. Bore x stroke (mm) 72.7 x 60 Compression ratio 10.3:1 Compression pressure (kg/cm_-rpm) 16.5±2 Max. output (kw/rpm) 13.82/7000 Max. torque (N.m/rpm) 21.75/5500 BTDC 8° Port Intake ABDC 42° timin g BBDC 33° Exhaust ATDC 1° Valve Intake 0.1 clearance (cold) Exhaust 0.1 Idle speed (rpm) 1450±50rpm Lubrication type Forced pressure & wet sump Oil pump type Inner/outer rotor type Oil filter type Full-flow filtration Oil capacity 1.1 liters Cooling Type Water cooling Air cleaner type & No Paper element, wet Fuel capacity 10.5 liters Type CVK Piston dia. 30 Venturi dia. 30 equivalent Throttle type Butterfly type Type CDI Ignition timing repeatedly Contact breaker Non-contact point type Spark plug NGK DPR7EA-9 Spark plug gap 0.9mm Battery Capacity 12V10AH Clutch Type Dry multi-disc clutch Type Non-stage transmission Operation Automatic centrifugal Type Type Two-stage reduction Reduction 1st 0.83~2.2 ratio 2nd 6.98 Front Caster angle Axle Connecting rod Tire pressure Front 2.00 (kg/cm_) Rear 2.25 Turning Left 45° angle Right 45° Brake system Front Disk brake type Rear Disk brake Suspension Front Telescope type Rear Double swing Shock absorber Front Telescope type Rear Double swing Frame type Under bone Tires Engine System Fuel System Carburetor Electrical Ignition System Power Drive System Transmis- sion Gear Reduction Gear Moving Device Damping Device
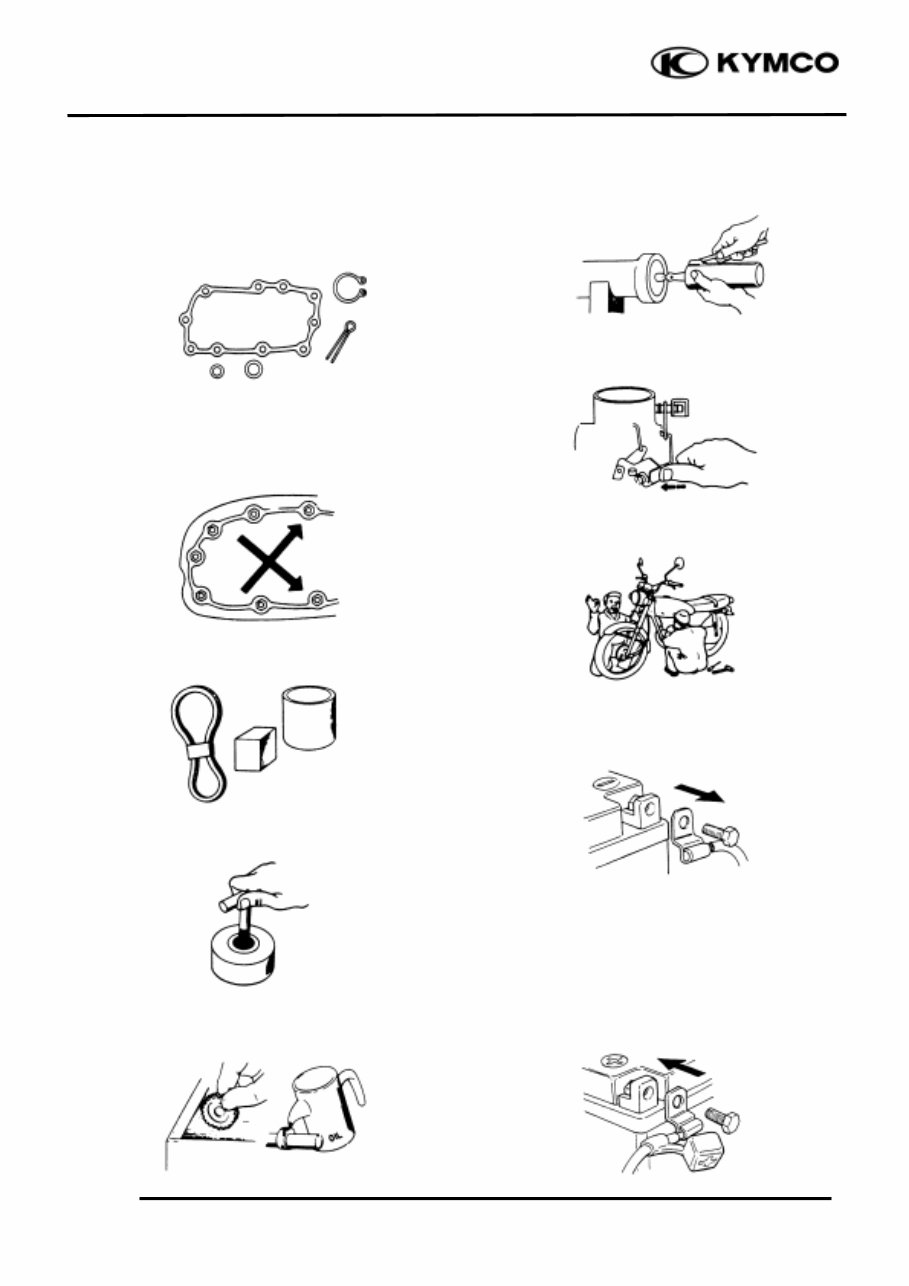
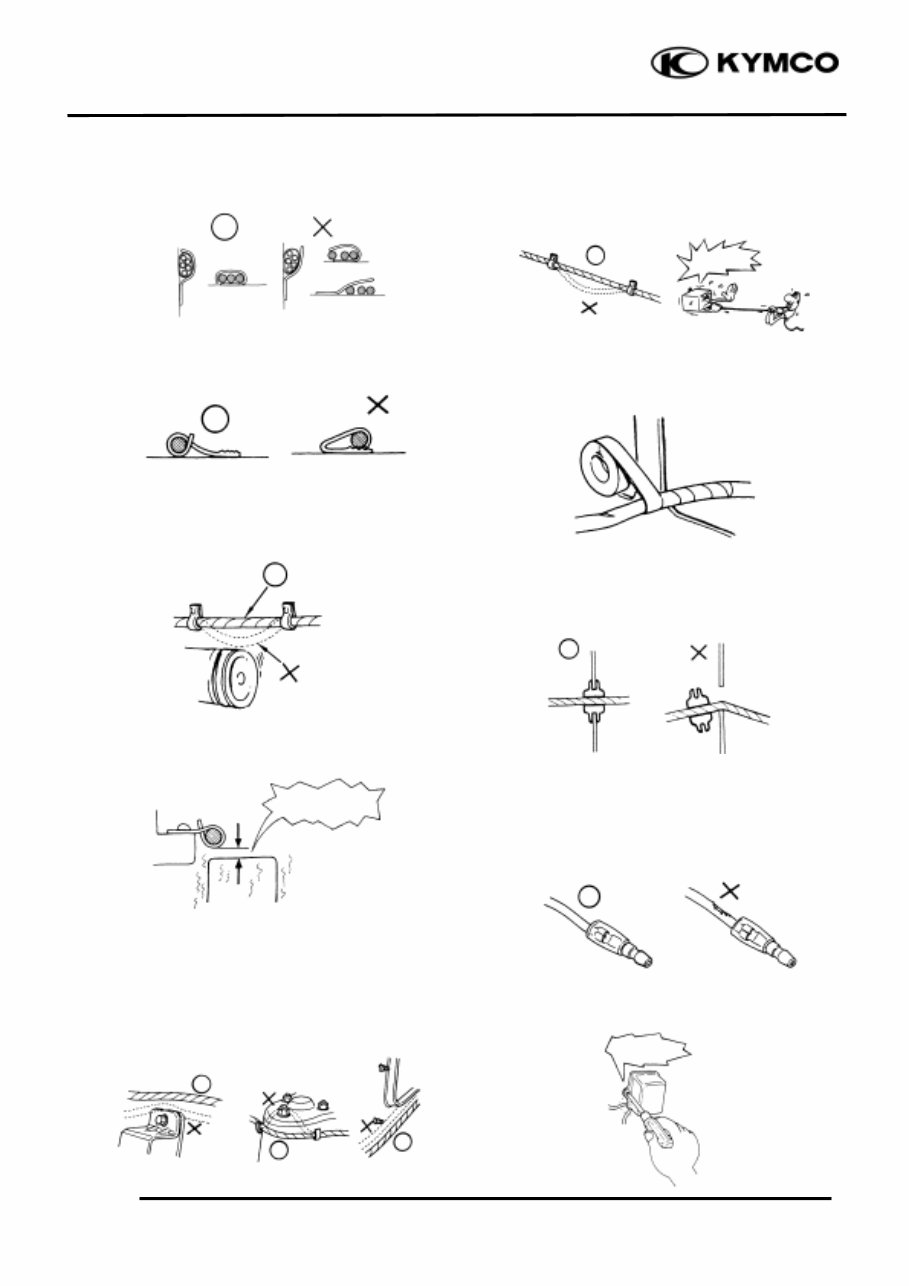
1. GENERAL INFORMATION 1-3 Bet & Win 250 SERVICE PRECAUTIONS n Make sure to install new gaskets, O-rings, circlips, cotter pins, etc. when reassembling. n When tightening bolts or nuts, begin with larger-diameter to smaller ones at several times, and tighten to the specified torque diagonally. n Use genuine parts and lubricants. n When servicing the motorcycle, be sure to use special tools for removal and installation. n After disassembly, clean removed parts. Lubricate sliding surfaces with engine oil before reassembly. n Apply or add designated greases and lubricants to the specified lubrication points. n After reassembly, check all parts for proper tightening and operation. n When two persons work together, pay attention to the mutual working safety. n Disconnect the battery negative (-) terminal before operation. n When using a spanner or other tools, make sure not to damage the motorcycle surface. n After operation, check all connecting points, fasteners, and lines for proper connection and installation. n When connecting the battery, the positive (+) terminal must be connected first. n After connection, apply grease to the battery terminals. n Terminal caps shall be installed securely.
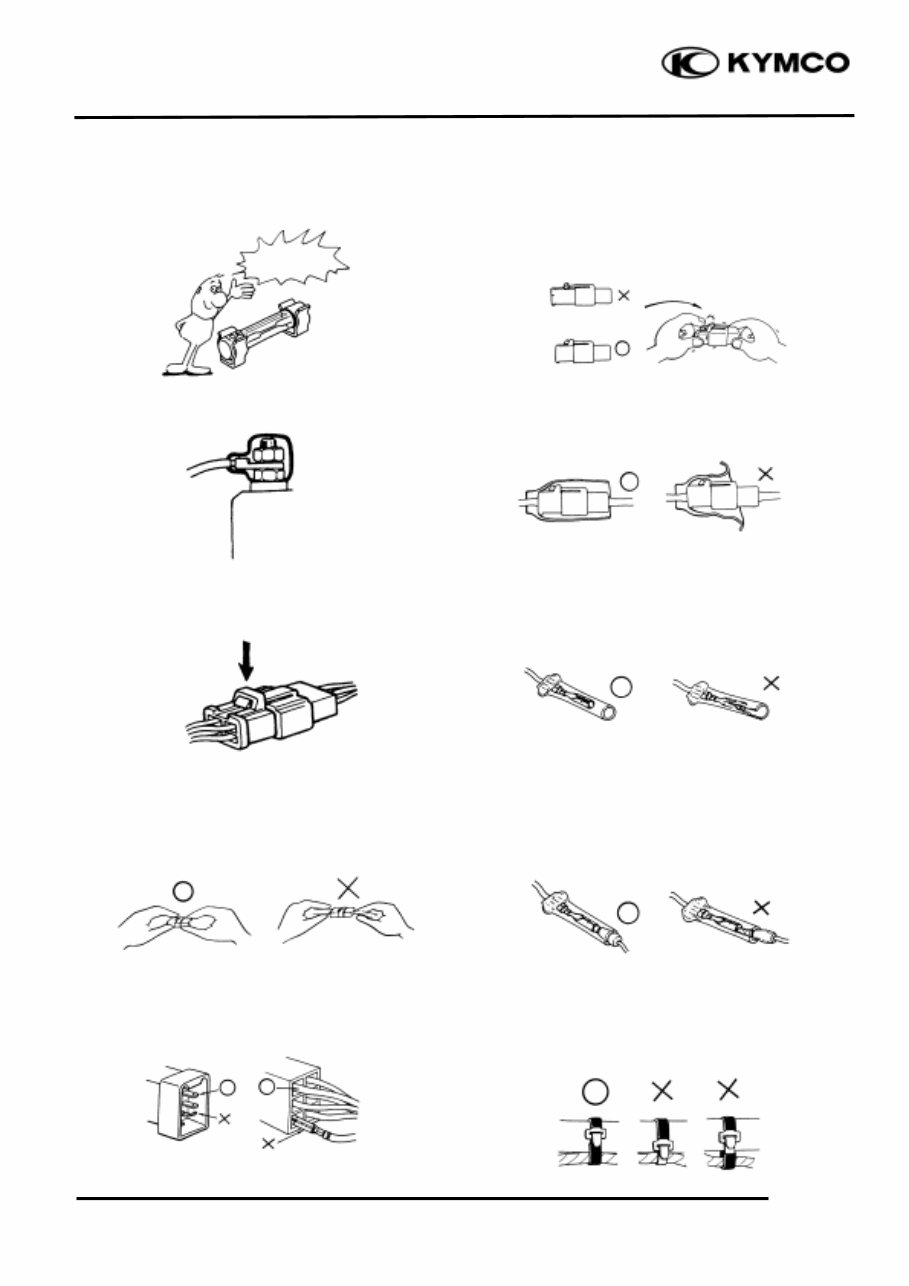
1. GENERAL INFORMATION 1-4 Bet & Win 250 n If the fuse is burned out, find the cause and repair it. Replace it with a new one according to the specified capacity. n After operation, terminal caps shall be installed securely. n When taking out the connector, the lock on the connector shall be released before operation. n Hold the connector body when connecting or disconnecting it. n Do not pull the connector wire. n Check if any connector terminal is bending, protruding or loose. n The connector shall be inserted completely. n If the double connector has a lock, lock it at the correct position. n Check if there is any loose wire. n Before connecting a terminal, check for damaged terminal cover or loose negative terminal. n Check the double connector cover for proper coverage and installation. n Insert the terminal completely. n Check the terminal cover for proper coverage. n Do not make the terminal cover opening face up. n Secure wire harnesses to the frame with their respective wire bands at the designated locations. Tighten the bands so that only the insulated surfaces contact the wire harnesses. Confirm Capacity
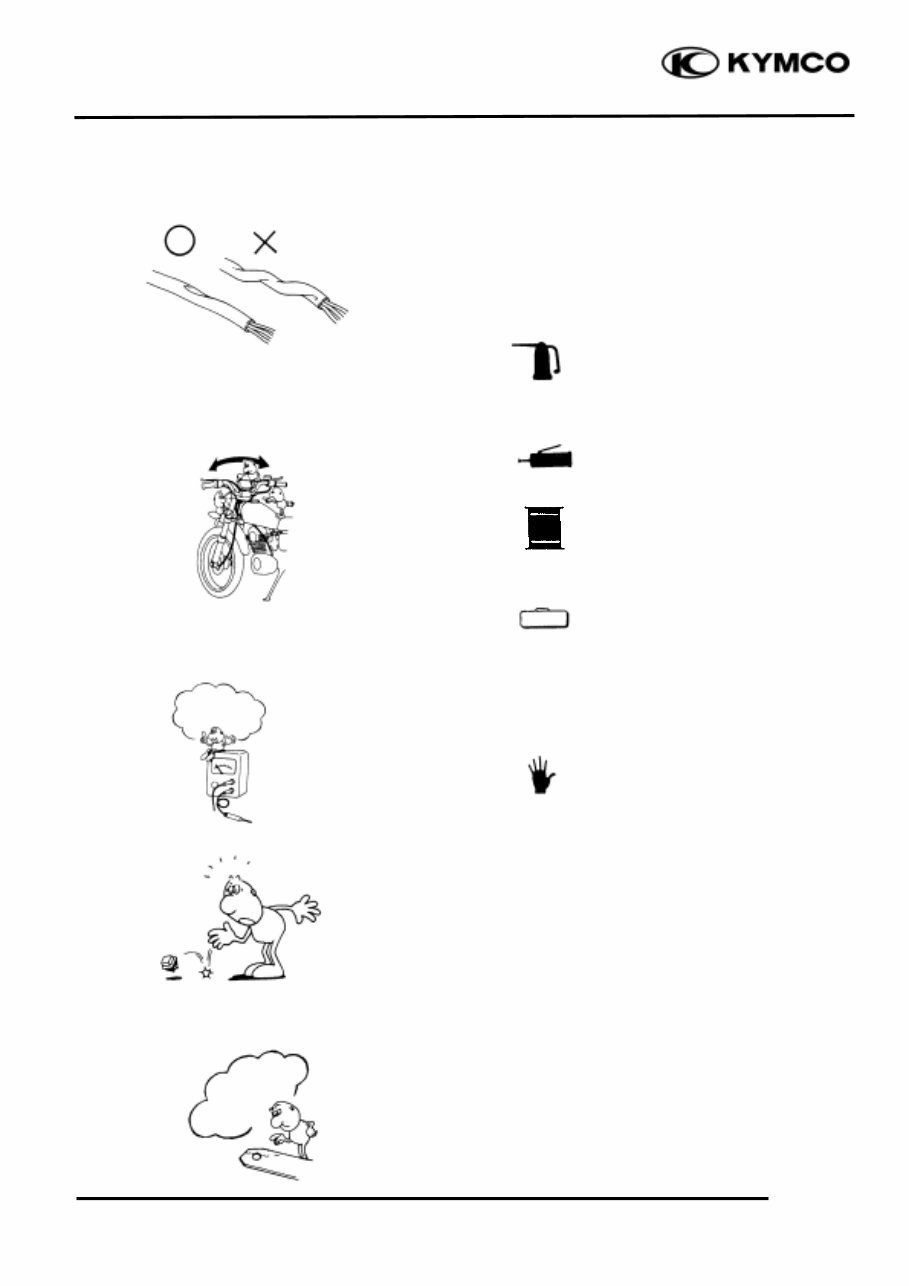
1. GENERAL INFORMATION 1-5 Bet & Win 250 n After clamping, check each wire to make sure it is secure. n Do not squeeze wires against the weld or its clamp. n After clamping, check each harness to make sure that it is not interfering with any moving or sliding parts. n When fixing the wire harnesses, do not make it contact the parts which will generate high heat. n Route wire harnesses to avoid sharp edges or corners. Avoid the projected ends of bolts and screws. n Route wire harnesses passing through the side of bolts and screws. Avoid the projected ends of bolts and screws. n Route harnesses so they are neither pulled tight nor have excessive slack. n Protect wires and harnesses with electrical tape or tube if they contact a sharp edge or corner. n When rubber protecting cover is used to protect the wire harnesses, it shall be installed securely. n Do not break the sheath of wire. n If a wire or harness is with a broken sheath, repair by wrapping it with protective tape or replace it. n When installing other parts, do not press or squeeze the wires. Do not pull too tightð No Contact Do not press or squeeze the wire
1. GENERAL INFORMATION 1-6 Bet & Win 250 n After routing, check that the wire harnesses are not twisted or kinked. n Wire harnesses routed along with handlebar should not be pulled tight, have excessive slack or interfere with adjacent or surrounding parts in all steering positions. n When a testing device is used, make sure to understand the operating methods thoroughly and operate according to the operating instructions. n Be careful not to drop any parts. n When rust is found on a terminal, remove the rust with sand paper or equivalent before connecting. n Symbols: The following symbols represent the servicing methods and cautions included in this service manual. : Apply engine oil to the specified points. (Use designated engine oil for lubrication.) : Apply grease for lubrication. : Transmission Gear Oil (90#) : Use special tool. : Caution : Warning Special Engine Oil Grease Gear Oil * Do you understand the instrument? Remove Rust∴
1. GENERAL INFORMATION 1-7 Bet & Win 250 TORQUE VALUES STANDARD TORQUE VALUES Item Torque (N-m) Item Torque (N-m) 5mm bolt, nut 6mm bolt, nut 8mm bolt, nut 10mm bolt, nut 12mm bolt, nut 4.9 9.8 21.6 34.3 53.9 5mm screw 6mm screw, SH bolt 6mm flange bolt, nut 8mm flange bolt, nut 10mm flange bolt, nut 3.9 8.8 11.8 26.5 39.2 Torque specifications listed below are for important fasteners. ENGINE Item Q‘ty Thread dia.(mm) Torque (N-m) Remarks Cylinder head bolt A Cylinder head bolt B Oil filter screen cap Exhaust muffler joint lock nut Cylinder head cap nut Valve adjusting lock nut Cam chain tensioner slipper bolt Oil bolt Clutch outer nut Clutch drive plate nut Flywheel nut Oil pump bolt Cylinder head cover bolt Spark plug Cam chain tensioner bolt Water pump impeller 2 2 1 2 4 2 1 1 1 1 1 2 4 1 1 1 8 8 30 8 8 5 6 12 12 12 14 5 6 10 6 8 8.9 8.9 14.7 8.8 24.5 8.8 8.8 12.7 53.9 53.9 58.8 3.9 11.8 17.2 11.8 11.8 Double end bolt Double end bolt Apply oil to threads Left hand threads FRAME Item Q‘ty Thread dia.(mm) Torque (N-m) Remarks Steering stem lock nut Front axle nut Rear axle nut Rear shock absorber upp er bolt Rear shock absorber lower bolt Front shock absorber lock bolt Engine hanger bolt 1 1 1 2 2 4 1 10 12 14 10 8 10 12 44.1 68.6 127.4 29.4 29.4 24.5 53.9 U-nut U-nut U-nut
1. GENERAL INFORMATION 1-9 Bet & Win 250 LUBRICATION POINTS ENGINE Lubrication Points Lubricant Valve guide/valve stem movable part Camshaft protruding surface Valve rocker arm friction surface Camshaft drive chain Cylinder lock bolt and nut Piston surroundings and piston ring grooves Piston pin surroundings Cylinder inside wall Connecting rod/piston pin hole Connecting rod big end Crankshaft Cranksahft one-way clutch movable part Oil pump drive chain Starter reduction gear engaging part Countershaft gear engaging part Final gear engaging part Bearing movable part O-ring face Oil seal lip •Genuine KYM CO Engine Oil (SAE15W-40) •API SE, SF or SG Egnine Oil Starter idle gear Friction spring movable part/shaft movable part Shaft movable grooved part Starter spindle movable part High-temperature resistant grease Starter one-way clutch threads Thread locking agent A.C. generator connector Transmission case breather tubee Adhesive
Upon purchasing this manual, you will receive a .PDF file containing an email contact. After contacting us, you will receive a reply with a link to access the manual for your Kymco BW250.
This comprehensive manual covers every aspect of your machine, providing detailed instructions for tasks ranging from an oil change to a transmission swap. With hundreds of pages, it includes numerous illustrations and easy-to-follow text to assist you. The manual also features a search function, allowing you to quickly find the information you need and print specific pages.
Designed as a Factory Service Repair Manual, it offers a step-by-step guide to maintaining and repairing your vehicle, equipping you with the knowledge that factory-trained technicians possess. By utilizing the insights within this manual, both professional mechanics and DIY enthusiasts can confidently make informed decisions about their machine's maintenance and repair needs.
Our commitment extends beyond delivering a high-quality service manual; we also provide exceptional customer service, ensuring your satisfaction with your purchase.