ENGLISH 2 INTRODUCTION » We would like to congratulate you on your purchase of a KTM motorcycle. You are now the owner of a state-of-the-art sport motorcycle that guarantees to bring you lots of fun and enjoyment, provided that you clean and maintain it appropriately. Before you go for your first ride, be sure to read this manual carefully and thoroughly in order to familiarize yourself with how to operate your new motorcycle and with its characteristics, even if this means that you will have to dedicate some of your valuable time to this task. Only by doing so will you learn how to tune your motorcycle to your specific needs and how to protect yourself against injury. Besides, this manual contains important information on motorcycle maintenance. At the time this manual was typeset, it was up-to-date with the latest state of this production series. It cannot be completely ruled out, however, that minor discrepancies may exist resulting from further design upgrades of these motorcycles.This manual is an important part of your motor- cycle and should be passed on to any subsequent owner in case you decide to sell it. We expressly point out that work marked with an asterisk in the chapter "Maintenance work on the chas- sis and engine" must be performed. If maintenance work should become necessary during a competition it should be performed by a trained mechanic. KTM strongly recommends that all service work to your KTM should be performed by a qualified KTM dealer. For your own safety, use KTM-approved parts and accessories only. KTM is not liable for damage that arises in connection with the use of other products. Take special care to follow the recommended run in, inspection, and maintenance intervals. Heeding these guidelines will significantly increase the life of your motorcycle. To ensure that all work to your KTM is performed properly and to avoid warranty conflicts, KTM recommends that you always have your KTM serviced by a recognized and qualified KTM dealer. Motorcycle driving is a wonderful sport and we hope that you will be able to enjoy it to the full. It may, however, involve potential problems for the environment or lead to conflicts with others. These problems or conflicts can be avoided if the motorcycle is used responsibly. To safeguard the future of motorcycle sports, make sure that you use the motorcycle in accordance with the law, show that you are environmen- tally conscious and respect the rights of others. We wish you a lot of fun when driving ! KTM-SPORTMOTORCYCLE AG 5230 MATTIGHOFEN, AUSTRIA Attachments: 1 spare parts manual chassis & engine
ENGLISH 3 IMPORTANT LIMITED WARRANTY AND LIMITED GUARANTEE INFORMATION » KTM sports motorcycles are designed and constructed to resist the usual wear and tear of normal use in competitions. The motorcycles comply with the regulations and categories currently in effect with the leading interna- tional motorcycle associations. The service, care and operating instructions for the engine and chassis specified in the owner's manual must be observed to ensure that the bike runs smoothly and to avoid premature wear. An improperly tuned chassis can lead to damage and breakage of the chassis components. The service work specified in the "Lubrication and Maintenance Schedule" must be performed and serv- ice records must be kept for warranty documentation. Lack of proper service and maintenance records or documentation could void warranty. The fuels and lubricants specified in the owner's manual or those of an equal quality must be used in accordance with the maintenance schedule. The warranty or guarantee shall become void for damage and consequential damage caused by manipu- lations or conversions to the motorcycle. The use of the motorcycle under extreme conditions, e.g. on extremely muddy and wet terrain, can lead to higher than average wear on components such as the drive train or the brakes. In this case it may become necessary to service or replace wear parts before the service limit specified in the maintenance schedule has been reached. This motorcycle is only authorized for public roads in the original homologated (throttled) version. Without this performance restriction (i.e. dethrottled), this motorcycle is only authorized to be driven off-road but not on public roads. The 625 SXC model is designed for off-road endurance competitions (Enduro) and not predominantly for motocross racing. The SMC models are only allowed on public roads in the original homologated (throttled) version. Without this performance restriction (i.e. dethrottled), these models are only allowed to be driven in Supermoto competitions but not on public roads. No warranty will be assumed if the bike is used in races or competitions. In accordance with the international quality management ISO 9001 standard, KTM uses quality assurance processes that lead to the highest possible product quality.
ENGLISH 5 SERIAL NUMBER LOCATIONS » Chassis number The chassis number is stamped on the right side of the steering head tube. Write this number into the relevant area on page 1. Engine number, engine type The engine number and engine type are stamped on the right hand side of the engine below the chain sprocket. Write this number into the relevant area on page 1.
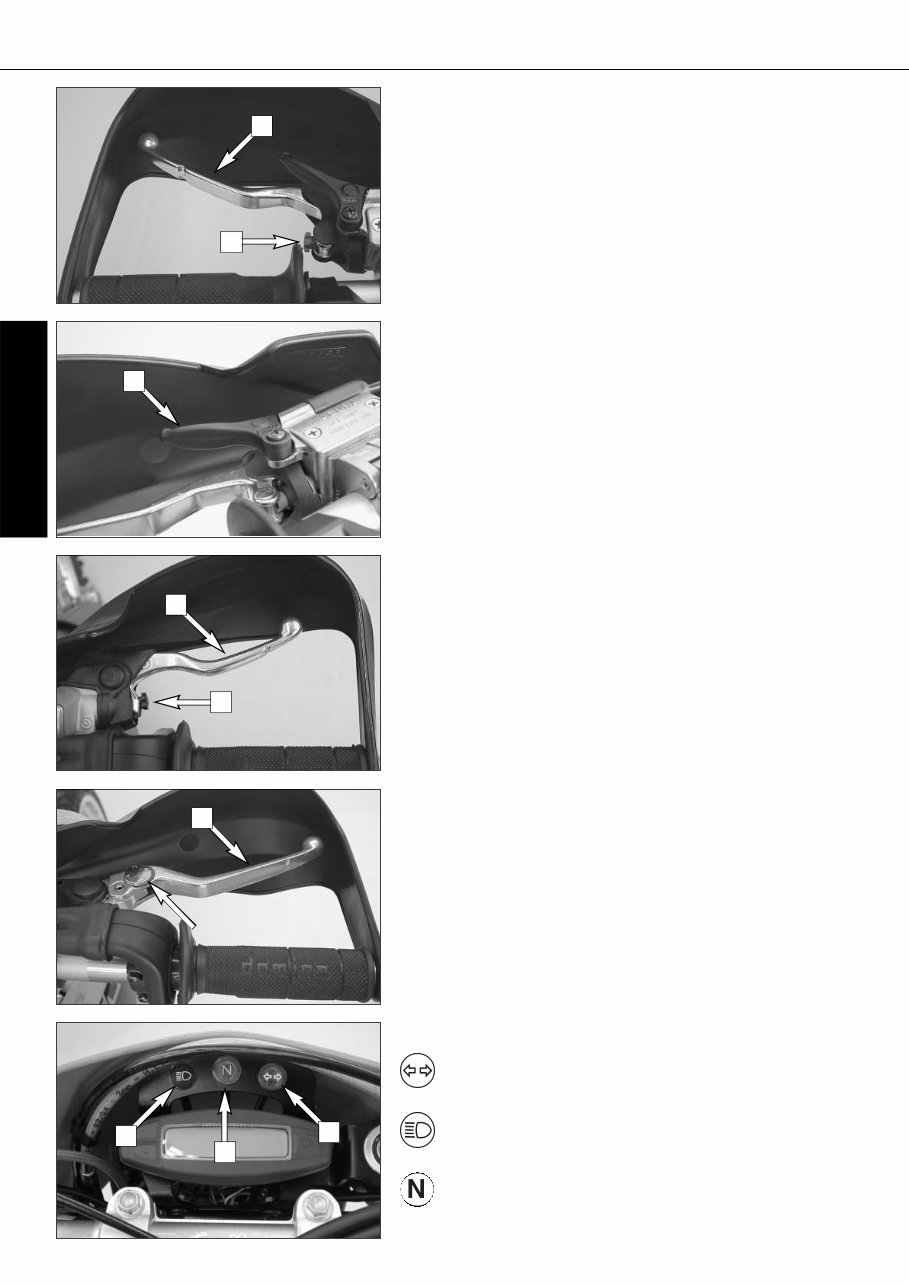
ENGLISH 6 OPERATION INSTRUMENTS » Clutch lever The clutch lever [1] is located on the left side of the handlebar. The adjust- ing screw [A] is used to change the original position of the clutch lever (see maintenance work on chassis and engine). Hand decompression lever The hand decompression lever [2] is only used in two special cases: a) When the engine stalled. It is possible that the starter motor is not able to crank the engine on the next attempt. This is due to the fact that the automatic decompressor doesn’t work properly. If this happens, pull the manual decompression lever and start again. Afterwards normal starting will be possible. b) When you want to push the motorcycle. While pushing, pull the hand decompression lever to make it easier to get the engine going. Hand brake lever (SXC) The hand brake lever [3] is mounted on the handlebars on the right and actu- ates the front wheel brake. The adjusting screw [B] can be used to change the basic position of the hand brake lever (see "Maintenance"). Hand brake lever (SMC) The hand brake lever [3] is mounted on the right side of the handlebar. The basic position of the handbrake lever can be changed in 4 steps (see Maintenance work). Indicator lamps The green control lamp [4] flashes when the indicator is working in the same rhythm as the flashing indicator. The blue control lamp [5] lights up when the high beam is on. The green indicator lamp [6] lights up when the neutral gear is selected. 1 A 2 B 3 4 5 6 3
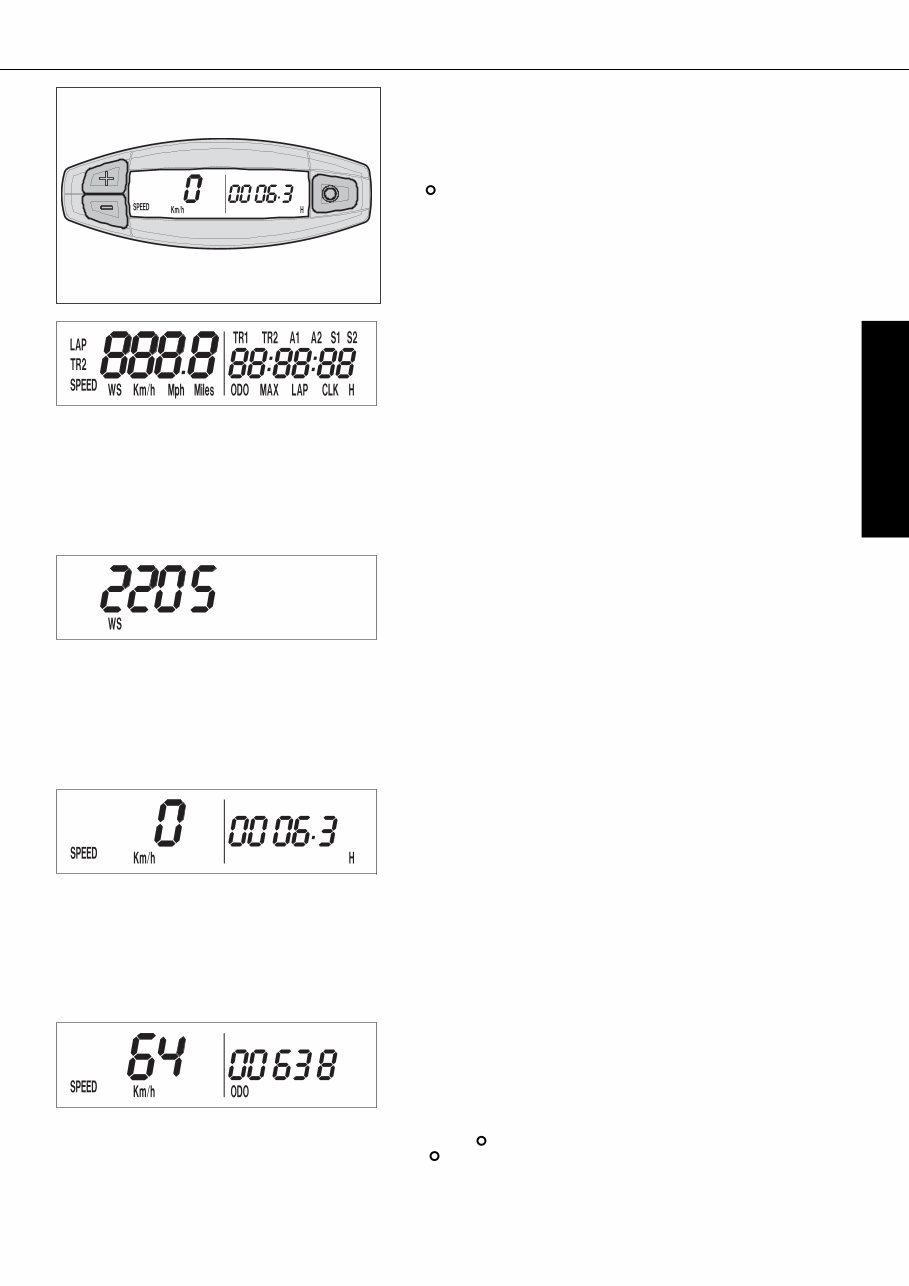
ENGLISH 7 OPERATION INSTRUMENTS » Electronic speedometer The display in the electronic speedometer is activated as soon as you press a button on the speedometer or an impulse is received from the wheel sen- sor. The display lights up when the engine is running. The display is cleared if no button is pressed for 1 minute or no impulse is received from the wheel sensor. The button is used to change between display modes. The + and – buttons are used to control various functions. TEST All of the display segments briefly light up for the display function test. WS (wheel size) The display changes and the circumference of the front wheel is briefly dis- played in millimeters (2205 mm corresponds to a front wheel circumference of 21" with production tires). Afterwards the display will return to the previous display mode. SPEED display mode / H (service hours) Only the SPEED / H and SPEED / ODO display modes are activated in the condition at delivery. SPEED/H is displayed whenever the display is activated and the front wheel is not turning. It automatically changes to the SPEED/ODO display mode as soon as the front wheel starts turning. SPEED displays the speed. H displays the engine's service hours. The service hour counter starts to count as soon as you start the engine. The displayed figure cannot be changed. Service intervals are indicated in service hours for some KTM offroad motor- cycles, making the service hour counter a very practical function. SPEED / ODO display mode (odometer) The SPEED/ODO mode displays the speed and the total distance traveled. The display automatically changes to the SPEED/H display mode when the front wheel stops turning. + button no function – button no function briefly press button changes to the next display mode hold button 3 secs. changes to the next display mode The electronic speedometer has a number of display modes (functions) that you can also activate (reveal) (see: Activating and deactivating display modes).
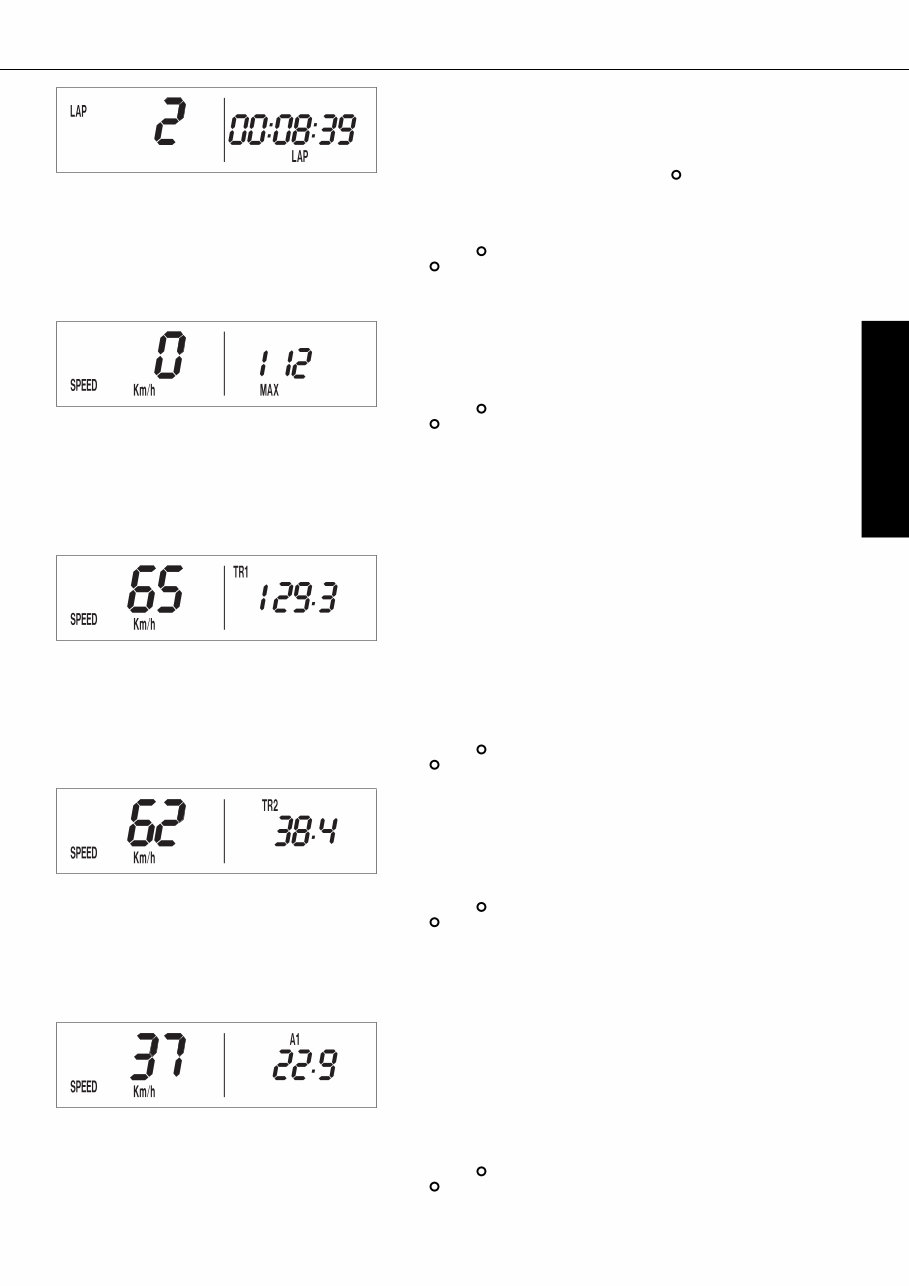
ENGLISH 8 OPERATION INSTRUMENTS » Activating and deactivating display modes In the display mode SPEED/H, press and hold the button for 3 seconds to access the SETUP menu. The active functions will be displayed. The blink- ing function can be activated by pressing the + button and deactivated by pressing the – button. Press and hold the button 3 seconds to store the settings. If no button is pressed for 20 seconds, the setting will be stored automati- cally and the display will return to the SPEED/H mode. + button activates the blinking display – button deactivates the blinking display briefly press button changes to the next display without changing any settings hold button 3 secs. starts the SETUP stores the settings and changes to the SPEED/H mode The following display modes can be activated: TR1 tripmaster 1 TR2 tripmaster 2 A1 average speed 1 A2 average speed 2 S1 stop watch 1 S2 stop watch 2 CLK clock LAP lap time MAX maximum speed KMH/MPH display in kilometers or miles (see: Kilometers or miles) If you have activated all of the display modes, they will be displayed in the following order: SPEED/H, SPEED/CLK, SPEED/LAP, LAP/LAP, SPEED/MAX, SPEED/ODO, SPEED/TR1, SPEED/TR2, SPEED/A1, SPEED/A2, SPEED/S1, SPEED/S2 SPEED / CLK (time) display mode CLK displays the time in hours, minutes and seconds. + button no function – button no function briefly press button changes to the next display mode hold button 3 secs. set the clock menu To set the clock, see „Setting the clock“. SPEED / LAP (lap time) display mode You can use the manual stop watch to stop and store up to 10 lap times, which you can view in the LAP/LAP display mode (see below). LAP displays the lap times in hours, minutes and seconds. + button Starts and stops the stop watch, lap time is not reset to 0 – button Stops the stop watch, stores the lap time and restarts the stop watch again. The time is reset to 0. A total of 10 lap times can be stored. If the lap time con- tinues to run after you press the - button, all 10 mem- ory locations are occupied.To clear all of the stored lap times, hold the button for 3 seconds in the SPEED/LAP mode.Up to 10 lap times can be stored in this way. briefly press button Changes to the next display mode.If no lap time is stored or the motorcycle is driving, the LAP/LAP mode will be skipped. hold button 3 secs. Clears all LAP figures
ENGLISH 9 OPERATION INSTRUMENTS » LAP / LAP display mode (to view lap times) The LAP/LAP display mode will only be shown if lap times have been stored and the front wheel has stopped. It will display the lap number and the stopped lap time in hours, minutes and seconds. Press the + button to access the next lap time. To clear all of the stored lap times, hold the button for 3 seconds in the SPEED/LAP mode. + button changes to the next lap time – button no function briefly press button changes to the next display mode hold button 3 secs. changes to the next display mode SPEED / MAX display mode (maximum speed) MAX displays the maximum speed traveled and is always active. + button no function – button no function briefly press button changes to the next display mode hold button 3 secs. clears the MAX figure SPEED / TR1 display mode (tripmaster 1) The TR1 tripmaster is always active and counts to 999.9. It is used to meas- ure the length of a trip or the distance between 2 refueling stops. TR1 is linked to A1 (average speed 1). The calculation of these figures is acti- vated by the first impulse received from the wheel sensor (when the front wheel starts to turn) and stops 3 seconds after the last impulse is received (when the front wheel has stopped). The TR1, A1 and S1 figures are automatically cleared after passing 999.9. + button no function – button no function briefly press button changes to the next display mode hold button 3 secs. clears the TR1, S1, A1 figures SPEED / TR2 display mode (tripmaster 2) The tripmaster 2 is always active and counts to 999.9. Contrary to TR1, the displayed figure can be changed using the + and – buttons. This is a very use- ful function for trips taken according to a roadbook. + button increases the TR2 figure – button decreases the TR2 figure briefly press button changes to the next display mode hold button 3 secs. clears the TR2 figure SPEED / A1 display mode (average speed 1) A1 shows the average speed based on the TR1 (tripmaster 1) and S1 (stop watch 1) figures. The calculation of this figure is activated by the first impulse received from the wheel sensor and stops 3 seconds after the last impulse is received. + button no function – button no function briefly press button changes to the next display mode hold button 3 secs. clears the TR1, S1, A1 figures
This is the complete official full factory service repair manual for KTM 625 SXC 1998-2005. This manual is actual genuine repair service factory manuals, not third-party manuals. It will guide you through the fundamentals of maintaining and repairing, step-by-step, to teach you what the factory-trained technicians already know by heart. The manual covers:
KTM 625 SXC 1998-2005 Engine Identification
General Precautions
Maintenance Check List
Check and Maintenance
Special Tools
Engine Body
Fuel System
Troubleshooting
Servicing Specifications
Tightening Torques
Disassembling and Servicing
Cooling System
Fuel Filter
Electrical System
Alternator
Regulator
Wiring Diagrams
The KTM 625 SXC 1998-2005 Factory Service Repair Manual contains all necessary illustrations, diagrams, and specifications to guide the mechanic through any repair procedure. It also contains an advanced troubleshooting guide to help diagnose and correct any problem. This highly detailed manual contains everything you will ever need to repair, maintain, rebuild, refurbish, or restore your vehicle. All diagnostic and repair procedures are covered in great detail.
The manual also makes it easy to diagnose and repair problems with your machine's electrical system. Troubleshooting and electrical service procedures are combined with detailed wiring diagrams for ease of use. This service manual is fully printable, and you can print the entire manual or just the pages you need. It is compatible with all PC-based Windows operating systems and Mac. No need to pay for shipping and wait for the overpriced paper textbook or CD-ROM to arrive via snail mail.
You will be able to do all of the servicing yourself with this manual. It provides detailed substeps, notes, cautions, and warnings throughout each chapter, as well as numbered instructions to guide you through every repair procedure step by step. The manual also includes detailed illustrations, drawings, and photos to guide you through every procedure.
With this manual, you can easily find what you need using the search function and then print out only the pages you need. This is the KTM 625 SXC 1998-2005 service manual you have been waiting for. Incredibly detailed, step-by-step instructions and photos will guide you through all service, maintenance, repairs, and tuning.
Product Details:
File Format: .PDF
Language: English
Printable: Without any restriction
Delivery: Link will appear on the checkout page after payment is complete
Requirements: Adobe Reader
Save on shop labor costs and have the convenience of accessing the information you need at any time. This manual is a wealth of indispensable information for any serious owner.