TABLE OF CONTENTS 2 TABLE OF CONTENTS MEANS OF REPRESENTATION ............................................ 4 IMPORTANT INFORMATION ................................................ 5 VIEW OF VEHICLE............................................................... 7 View of the vehicle from the left front (example) ................. 7 View of the vehicle from the right rear (example) ................ 8 LOCATION OF SERIAL NUMBERS ........................................ 9 Chassis number ............................................................... 9 Type label ....................................................................... 9 Engine number................................................................ 9 Fork part number............................................................. 9 Shock absorber part number ............................................. 9 CONTROLS ....................................................................... 10 Clutch lever .................................................................. 10 Hand brake lever ........................................................... 10 Short circuit button ....................................................... 10 Throttle grip .................................................................. 10 Fuel tap........................................................................ 11 Opening the filler cap .................................................... 11 Closing the filler cap ...................................................... 11 Choke........................................................................... 11 Shift lever ..................................................................... 12 Kickstarter .................................................................... 12 Foot brake lever............................................................. 12 Plug-in stand ................................................................ 13 GENERAL TIPS AND HINTS ON PUTTING INTO OPERATION...................................................................... 14 Advice on first use ......................................................... 14 Running in the engine.................................................... 15 Preparing the vehicle for difficult operating conditions ...... 15 Preparations for riding on dry sand .................................. 15 Preparations for riding on wet sand ................................. 16 Preparations for riding on wet and muddy surfaces ........... 17 Preparations for riding at high temperatures and riding slowly ........................................................................... 18 Preparations for riding at low temperatures and in snow .... 18 RIDING INSTRUCTIONS .................................................... 19 Checks before putting into operation ............................... 19 Starting ........................................................................ 19 Starting up ................................................................... 20 Shifting, riding .............................................................. 20 Braking ........................................................................ 20 Stopping, parking .......................................................... 21 Refueling...................................................................... 21 SERVICE SCHEDULE......................................................... 23 Important maintenance work that must be done in an authorized KTM workshop .............................................. 23 Important maintenance work to be carried out by an authorized KTM workshop (as additional order)................. 24 Important checks and maintenance work to be carried out by the rider ............................................................. 24 MAINTENANCE WORK ON CHASSIS AND ENGINE .............. 26 Jacking up the motorcycle .............................................. 26 Removing the motorcycle from the work stand .................. 26 Checking the basic chassis setting with the rider's weight .......................................................................... 26 Compression damping of shock absorber.......................... 26 Adjusting the high-speed compression damping of the shock absorber .............................................................. 26 Adjusting the low-speed compression damping of the shock absorber .............................................................. 27 Adjusting the rebound damping of the shock absorber....... 28 Measuring the sag of the unloaded rear wheel .................. 28 Checking the static sag of the shock absorber .................. 29 Checking the riding sag of the shock absorber .................. 29 Adjusting the spring preload of the shock absorber x ...... 29 Adjusting the riding sag x............................................. 30 Removing the shock absorber x..................................... 30 Installing the shock absorber x ..................................... 31 Checking the basic setting of the fork .............................. 31 Adjusting the compression damping of the fork ................ 31 Adjusting the rebound damping of the fork....................... 32 Bleeding the fork legs .................................................... 32 Cleaning the dust boots of the fork legs ........................... 32 Loosening the fork protection.......................................... 33 Positioning the fork protection ........................................ 33 Checking the play of the steering head bearing ................. 33 Adjusting the play of the steering head bearing x............ 34 Removing the fork legs x .............................................. 34 Installing the fork legs x............................................... 35 Removing the fork protector x ....................................... 35 Installing the fork protector x ....................................... 35 Removing the lower triple clamp x ................................ 36 Installing the lower triple clamp x ................................. 36 Greasing the steering head bearing x ............................. 37 Removing the front fender .............................................. 37 Installing the front fender ............................................... 37 Removing the start number plate .................................... 37 Installing the start number plate ..................................... 38 Handlebar position ........................................................ 38 Adjusting the handlebar position x ................................ 38 Checking the play in the throttle cable............................. 39 Adjusting the play in the throttle cable x ....................... 39 Checking the chain for dirt ............................................. 39 Cleaning the chain......................................................... 39 Checking the chain tension ............................................ 40 Checking the rear sprocket/engine sprocket for wear ......... 40 Checking chain wear ...................................................... 40 Adjusting the chain tension ............................................ 41 Adjusting the chain guide x .......................................... 42 Checking the brake discs................................................ 42 Checking the free travel of the hand brake lever ............... 43 Adjusting the basic position of the hand brake lever.......... 43 Checking the front brake fluid level ................................. 43 Adding front brake fluid x ............................................ 44 Checking the front brake linings...................................... 44 Removing the front brake linings x ................................ 45 Installing the front brake linings x................................. 45 Changing the front brake linings x................................. 46 Checking the free play of the foot brake lever ................... 46 Adjusting the basic position of the foot brake lever x ...... 47 Checking the rear brake fluid level .................................. 47 Adding rear brake fluid x.............................................. 48 Checking the rear brake linings ....................................... 48 Removing the rear brake linings x ................................. 49 Installing the rear brake linings x .................................. 49 Changing the rear brake linings x .................................. 50 Removing the front wheel x .......................................... 50 Installing the front wheel x ........................................... 51 Removing the rear wheel x ........................................... 52 Installing the rear wheel x ............................................ 52 Checking the tire condition............................................. 53 Checking the tire air pressure ......................................... 54 Checking the spoke tension ............................................ 54
TABLE OF CONTENTS 3 Ignition curve plug connection ........................................ 54 Changing the ignition curve ............................................ 55 Engine characteristic - auxiliary spring (250 SX)............... 55 Engine characteristic - adjusting the auxiliary spring x (250 SX) ...................................................................... 55 Removing the seat ......................................................... 56 Mounting the seat ......................................................... 56 Removing the fuel tank x ............................................. 56 Installing the fuel tank x .............................................. 57 Cooling system .............................................................. 58 Checking the antifreeze and coolant level ........................ 58 Checking the coolant level .............................................. 59 Draining the coolant x.................................................. 59 Refilling with coolant x ................................................ 60 Removing the main silencer............................................ 61 Installing the main silencer ............................................ 61 Glass fiber yarn filling of main silencer ............................ 61 Changing the glass fiber yarn filling of the main silencer x ................................................................... 61 Removing the glass fiber yarn filling of the main silencer x ................................................................... 62 Installing the glass fiber yarn filling of the main silencer x ................................................................... 62 Removing the air filter box lid ......................................... 62 Installing the air filter box lid.......................................... 62 Removing the air filter x............................................... 63 Installing the air filter x ............................................... 63 Cleaning the air filter x ................................................ 63 Adjusting the basic position of the clutch lever................. 64 Checking the fluid level of the hydraulic clutch ................ 64 Changing the hydraulic clutch fluid x ............................ 65 Checking the basic position of the shift lever.................... 66 Adjusting the basic position of the shift lever x .............. 66 Carburetor .................................................................... 66 Carburetor - adjusting the idle speed x .......................... 67 Emptying the carburetor float chamber x ....................... 68 Checking the gear oil level .............................................. 68 Changing the gear oil x ................................................ 69 Draining the gear oil x ................................................. 69 Refilling with gear oil x ................................................ 70 Adding gear oil x ......................................................... 70 TROUBLESHOOTING......................................................... 72 CLEANING........................................................................ 74 Cleaning the motorcycle ................................................. 74 STORAGE ......................................................................... 75 Storage......................................................................... 75 Putting into operation after storage ................................. 75 TECHNICAL DATA - ENGINE .............................................. 76 125 SX......................................................................... 76 150 SX......................................................................... 76 250 SX......................................................................... 77 Capacity - gear oil.......................................................... 77 Capacity - coolant .......................................................... 77 TECHNICAL DATA - ENGINE TIGHTENING TORQUES .......... 78 125 SX, 150 SX............................................................ 78 250 SX......................................................................... 78 TECHNICAL DATA - CARBURETOR ..................................... 80 125 SX......................................................................... 80 Carburetor - basic setting for sandy surfaces (125 SX) ...... 80 Carburetor configuration (125 SX) ................................... 81 150 SX......................................................................... 82 Carburetor - basic setting for sandy surfaces (150 SX) ...... 82 Carburetor configuration (150 SX) ................................... 83 250 SX......................................................................... 84 Carburetor - basic setting for sandy surfaces (250 SX) ...... 84 Carburetor configuration (250 SX) ................................... 85 TECHNICAL DATA - CHASSIS ............................................ 86 Tires ............................................................................ 86 Capacity - fuel............................................................... 86 TECHNICAL DATA - FORK.................................................. 87 125 SX, 150 SX............................................................ 87 250 SX......................................................................... 87 TECHNICAL DATA - SHOCK ABSORBER ............................. 88 125 SX, 150 SX............................................................ 88 250 SX......................................................................... 88 TECHNICAL DATA - TIGHTENING TORQUES FOR CHASSIS .......................................................................... 90 WIRING DIAGRAM ............................................................ 92 Wiring diagram.............................................................. 92 SUBSTANCES ................................................................... 94 AUXILIARY SUBSTANCES.................................................. 96 STANDARDS ..................................................................... 98 INDEX .............................................................................. 99
MEANS OF REPRESENTATION 4 Symbols used The symbols used are explained below. Indicates an expected reaction (e.g. of a work step or a function). Indicates an unexpected reaction (e.g. of a work step or a function). All work marked with this symbol requires specialist knowledge and technical understanding. In the interest of your own safety, have these jobs done in an authorized KTM workshop! There, your motorcycle will be serviced optimally by specially trained experts using the specialist tools required. Identifies a page reference (more information is provided on the specified page). Formats used The typographical and other formats used are explained below. Specific name Identifies a specific name. Name ® Identifies a protected name. Brand™ Identifies a brand available on the open market.
IMPORTANT INFORMATION 5 Use definition KTM sport motorcycles are designed and built to withstand the normal stresses and strains of competitive use. The motorcycles com- ply with currently valid regulations and categories of the top international motorsport organizations. Info The motorcycle must be used only in closed off areas remote from public road traffic. Maintenance A prerequisite for perfect operation and prevention of wear is that the engine and chassis maintenance and adjustment work described in the owner's manual are properly carried out. Poor adjustment and tuning of the engine and chassis can lead to damage and break- age of components. Using the motorcycle in difficult conditions such as on sand or very muddy or wet terrain can lead to above-average wear of compo- nents such as the transmission train or the brakes. For this reason, it may be necessary to service or replace worn parts before the limit specified in the service schedule is reached. Pay careful attention to the prescribed running-in period, inspection and maintenance intervals. If you observe these exactly, you will ensure a much longer service life for your motorcycle. Warranty The work prescribed in the service schedule must be carried out in an authorized KTM workshop only and confirmed in the customer's service record, since otherwise no warranty claims will be honored. No warranty claims can be considered for damage resulting from manipulations and/or alterations to the vehicle. Fuel, oils, etc. You should use the fuels, oils and greases according to specifications as listed in the owner's manual. Spare parts, accessories For your own safety, only use spare parts and accessory products that have been approved and/or recommended by KTM and have them installed by an authorized KTM workshop. KTM accepts no liability for other products and any resulting damage or loss. Certain spare parts and accessories are specified in parentheses in the descriptions. Your KTM dealer will be glad to advise you. You will find the current KTM PowerParts for your vehicle on the KTM website. International KTM Website: http://www.ktm.com Work rules Special tools are needed for certain tasks. They are not included with the vehicle but can be ordered under the number in parenthe- ses. E.g.: bearing puller (15112017000) When the vehicle is assembled, non-reusable parts (e.g., self-locking screws and nuts, gaskets, seal rings, O-rings, splints, lock wash- ers) must be replaced with new parts. Where thread lockers are used on screw connections (e.g., Loctite ® ), follow the instructions for use from the manufacturer. After disassembly, clean the parts that are to be reused and check them for damage and wear. Replace damaged or worn parts. After you complete the repair or maintenance work, check the roadworthiness of the vehicle. Transport Note Danger of damage The parked vehicle can roll away or fall over. – Always place the vehicle on a firm and even surface. Note Fire hazard Some vehicle components become very hot when the vehicle is operated. – Do not park the vehicle near flammable or explosive substances. Do not place objects on the vehicle while it is still warm from being run. Always let the vehicle cool first. – Switch off the engine. – Turn handle of the fuel tap to the OFF position. (Figure B00003-10 p. 11) – Use straps or other suitable devices to secure the motorcycle against accidents or falling over.
IMPORTANT INFORMATION 6 Environment Motorcycling is a wonderful sport and we naturally hope that you can enjoy it to the full. However, it is a potential problem for the environment and can lead to conflicts with other persons. But if you use your motorcycle responsibly, you can ensure that such prob- lems and conflicts do not have to occur. To protect the future of motorcycle sport, make sure that you use your motorcycle legally, dis- play environmental consciousness, and respect the rights of others. Notes/warnings Pay close attention to the notes/warnings. Info Various information and warning labels are affixed to the vehicle. Do not remove information/warning labels. If they are miss- ing, you or others may not recognize potential hazards and may therefore be injured. Grades of risks Danger Identifies a danger that will immediately and invariably lead to fatal or serious permanent injury if the appropriate measures are not taken. Warning Identifies a danger that is likely to lead to fatal or serious injury if the appropriate measures are not taken. Note Identifies a danger that will lead to considerable machine and material damage if the appropriate measures are not taken. Warning Identifies a danger that will lead to environmental damage if the appropriate measures are not taken. Owner's manual – It is important that you read this owner's manual carefully and completely before making your first trip. It contains information and tips that will assist you in operating and handling your motorcycle properly. Only then will you learn how to adjust the motorcycle to your own requirements and how to protect yourself from injury. The owner's manual also contains important information on ser- vicing the motorcycle. – The owner's manual is an important component of the motorcycle and should be handed over to the new owner if the vehicle is sold.
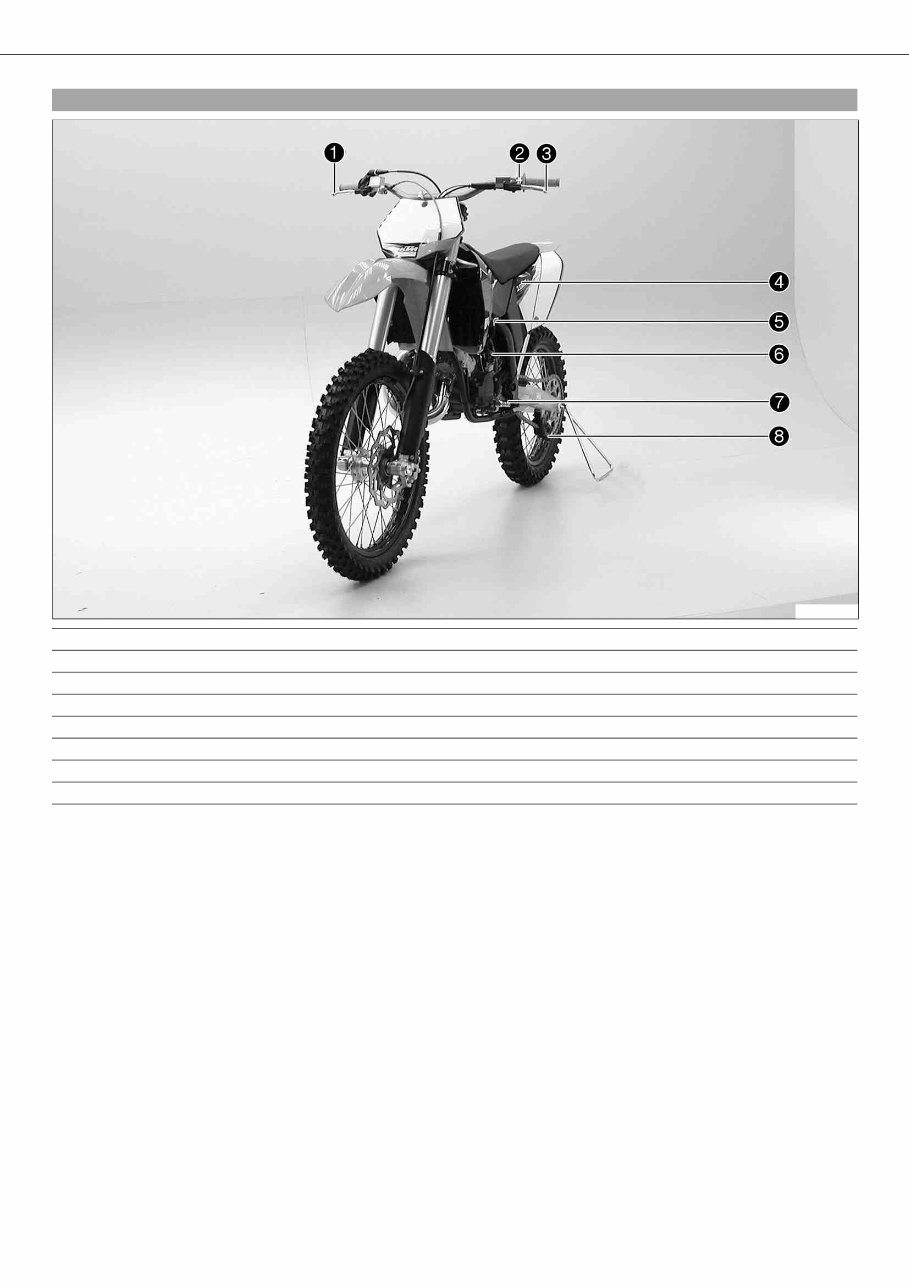
VIEW OF VEHICLE 7 3.1 View of the vehicle from the left front (example) B00010-10 1 Hand brake lever 2 Short circuit button 3 Clutch lever 4 Air filter box lid 5 Fuel tap 6 Choke button 7 Shift lever 8 Chain guide
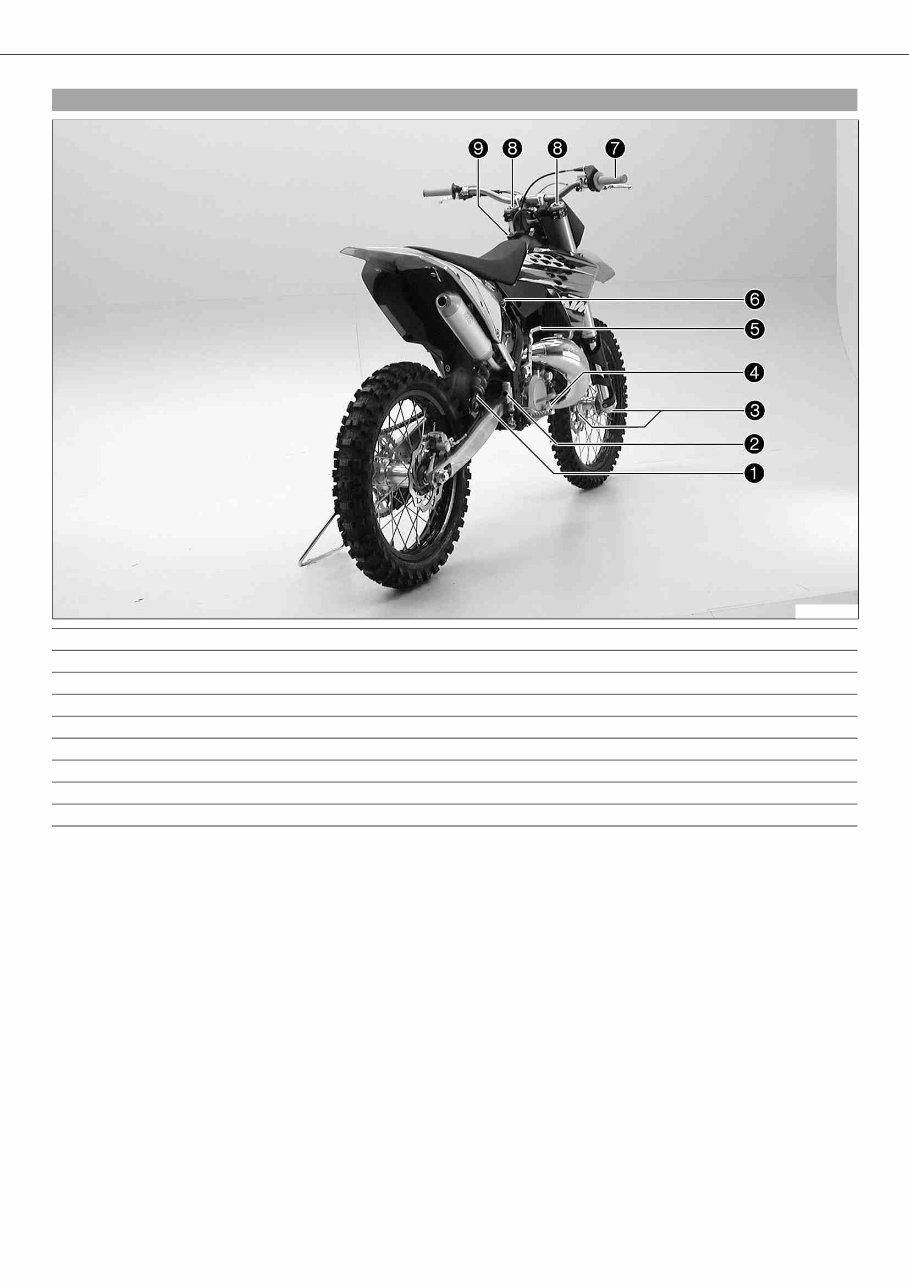
VIEW OF VEHICLE 8 3.2 View of the vehicle from the right rear (example) B00014-10 1 Shock absorber rebound adjustment 2 Level viewer for brake fluid, rear 3 Fork rebound adjustment 4 Foot brake lever 5 Kickstarter 6 Shock absorber compression adjustment 7 Throttle grip 8 Fork compression adjustment 9 Filler cap
This professional technical manual contains service, maintenance, and troubleshooting information for your KTM 300 MXC 2004 2005, covering All Models/Engines/Trim/Transmissions Types. This top quality 2004-2005 KTM 300 MXC Service & Repair Manual is COMPLETE and INTACT as should be without any MISSING/CORRUPT part or pages. It is the SAME manual used in the local service/repair shop. KTM 300 MXC 2004 2005 manual is guaranteed to be fully functional to save your precious time.
Original KTM 300 MXC 2004 2005 Workshop Service Repair Manual is a Complete Informational Book. At the click of a mouse you have access to the most comprehensive diagnostic, repair and maintenance information as used by professional technicians.
Written by the manufacturers, KTM 300 MXC 2004 2005 original workshop manual contain hundreds of pages of diagrams and detailed information for specific vehicle or equipment repair. KTM 300 MXC 2004 2005 Original Service Manual, Wiring Diagrams and Bulletins are the most accurate and complete available.
The KTM 300 MXC 2004 2005 service manual includes pictures and easy to follow directions on what tools are needed and how the repair is performed. Just imagine how much you can save by doing simple repairs yourself. You can save anywhere from hundreds if not thousands of dollars in repair bills by using this KTM 300 MXC 2004 2005 repair manual / service manual. Many people buy this KTM 300 MXC 2004 2005 service manual just to have it around for when the inevitable happens. Sooner or later, maintenance will need to be performed. Be prepared for it when it happens by simply purchasing this KTM 300 MXC 2004 2005 service manual for later use! See below for a list of items that most of our manuals cover. Some manuals actually cover more items that are not even listed!
KTM 300 MXC 2004 2005 ENGINE IDENTIFICATION
KTM 300 MXC 2004 2005 GENERAL PRECAUTIONS
KTM 300 MXC 2004 2005 MAINTENANCE CHECK LIST
KTM 300 MXC 2004 2005 CHECK AND MAINTENANCE
KTM 300 MXC 2004 2005 SPECIAL TOOLS
KTM 300 MXC 2004 2005 ENGINE BODY
KTM 300 MXC 2004 2005 FUEL SYSTEM
KTM 300 MXC 2004 2005 TROUBLESHOOTING
KTM 300 MXC 2004 2005 SERVICING SPECIFICATIONS
KTM 300 MXC 2004 2005 TIGHTENING TORQUES
KTM 300 MXC 2004 2005 DISASSEMBLING AND SERVICING
KTM 300 MXC 2004 2005 COOLING SYSTEM
KTM 300 MXC 2004 2005 FUEL FILTER
KTM 300 MXC 2004 2005 ELECTRICAL SYSTEM
KTM 300 MXC 2004 2005 ALTERNATOR
KTM 300 MXC 2004 2005 REGULATOR
KTM 300 MXC 2004 2005 WIRING DIAGRAM
PLUS A LOT MORE INFO!!!
Whether it is a service manual or repair manual having them in an electronic format is a huge advantage over having a book since there is no getting oil or dirty hands on them. You can simply print of the desired section of your 2004-2005 KTM 300 MXC Service & Repair Manual from your PC and throw away once you have completed the repair or service.
Really isn't any difference between a paper manual you'd buy in stores or a manual KTM 300 MXC 2004 2005 you from the Internet. In some cases, it's the same manual. In other cases, it may be the factory manual, which can't be found in stores. Whether using a paper manual or manual, you'll find the same features in both. This manual KTM 300 MXC 2004 2005 includes, step-by-step repair procedures, critical specifications, illustrations or pictures, maintenance, disassembly, assembly, cleaning and reinstalling procedures, and much more. The biggest difference between a paper manual and this manual KTM 300 MXC 2004 2005, is you can the version straight to your computer in just seconds and fix your problems now for KTM 300 MXC 2004 2005.
With this Professional Quality, highly detailed KTM 300 MXC 2004 2005 Service Repair Workshop Manual you will be able to work on your vehicle with the absolute best resources available, which will save you a lot of money in repair costs and will also help you to look after your KTM 300 MXC 2004 2005.
In this 2004-2005 KTM 300 MXC Service & Repair Manual you can find:
Detailed substeps expand on repair procedure information
Notes, cautions and warnings throughout each chapter pinpoint critical information.
Numbered instructions guide you through every repair procedure step by step.
Bold figure number help you quickly match illustrations with instructions.
Detailed illustrations, drawings and photos guide you through every procedure.
Enlarged inset helps you identify and examine parts in detail.
Numbered table of contents easy to use so that you can find the information you need fast.
This 2004-2005 KTM 300 MXC Service & Repair Manual also makes it easy to diagnose and repair problems with your machines electrical system.
Troubleshooting and electrical service procedures are combined with detailed wiring diagrams for ease of use.
Product Details:
File Format:
Language: English
Specifications: Full Printable
Zoom IN/OUT: YES
Delivery:Instant !!
Requirements: Adobe Reader & Win
Compatible: All Versions of Windows & Mac
INSTANT means NO SHIPPING COST or WAITING FOR THE BOOK OR CD TO ARRIVE IN THE MAIL