TABLE OF CONTENTS 2 TABLE OF CONTENTS 1 MEANS OF REPRESENTATION ..................................... 6 1.1 Symbols used ................................................... 6 1.2 Formats used.................................................... 6 2 SAFETY ADVICE........................................................... 7 2.1 Repair Manual .................................................. 7 2.2 Safety advice .................................................... 7 2.3 Degrees of risk and symbols ............................... 7 2.4 Work rules ........................................................ 7 3 IMPORTANT INFORMATION ......................................... 8 3.1 Guarantee, warranty .......................................... 8 3.2 Operating and auxiliary substances ..................... 8 3.3 Spare parts, accessories .................................... 8 3.4 Figures ............................................................ 8 4 SERIAL NUMBERS ...................................................... 9 4.1 Chassis number/type label ................................. 9 4.2 Key number ...................................................... 9 4.3 Engine number ................................................. 9 5 MOTORCYCLE ........................................................... 10 5.1 Raising the motorcycle with the rear wheel stand ............................................................. 10 5.2 Taking the motorcycle off of the rear wheel stand ............................................................. 10 5.3 Raising the motorcycle with the front wheel stand ............................................................. 10 5.4 Taking the motorcycle off of the front wheel stand ............................................................. 11 5.5 Raising the motorcycle with the work stand ....... 11 5.6 Removing the motorcycle from the work stand ... 12 5.7 Starting.......................................................... 13 5.8 Starting the motorcycle to make checks ............ 14 6 FORK, TRIPLE CLAMP ............................................... 15 6.1 Cleaning the dust boots of the fork legs............. 15 6.2 Removing fork legs .......................................... 15 6.3 Installing the fork legs ..................................... 17 6.4 Disassembling the fork legs.............................. 20 6.5 Checking the fork legs ..................................... 22 6.6 Assembling the fork legs .................................. 23 6.7 Removing the lower triple clamp....................... 24 6.8 Installing the lower triple clamp ....................... 27 6.9 Checking the steering head bearing play............ 29 6.10 Adjusting the steering head bearing play ........... 30 7 HANDLEBAR, CONTROLS........................................... 32 7.1 Checking the play in the throttle cable .............. 32 7.2 Adjusting the play in the throttle cable.............. 32 7.3 Checking the clutch lever play .......................... 32 7.4 Adjusting the clutch cable play ........................ 33 8 SHOCK ABSORBER, SWINGARM ................................ 34 8.1 Adjusting the spring preload of the shock absorber ......................................................... 34 8.2 Removing the shock absorber ........................... 34 8.3 Installing the shock absorber............................ 35 8.4 Removing the spring........................................ 36 8.5 Installing the spring ........................................ 36 9 EXHAUST .................................................................. 38 9.1 Removing the exhaust manifold ........................ 38 9.2 Installing the exhaust manifold ........................ 39 9.3 Removing the main silencer ............................. 40 9.4 Installing the main silencer .............................. 42 10 AIR FILTER ............................................................... 44 10.1 Removing the air filter ..................................... 44 10.2 Installing the air filter...................................... 44 11 FUEL TANK, SEAT, TRIM ........................................... 45 11.1 Opening the filler cap ...................................... 45 11.2 Closing the filler cap ....................................... 45 11.3 Removing the seat .......................................... 45 11.4 Mounting the seat ........................................... 46 11.5 Removing the passenger seat ........................... 46 11.6 Mounting the passenger seat ............................ 46 11.7 Removing the fuel tank cover ........................... 46 11.8 Installing the fuel tank cover ............................ 49 11.9 Removing the fuel tank.................................... 51 11.10 Installing the fuel tank .................................... 53 11.11 Removing the front spoiler ............................... 54 11.12 Fitting front spoiler ......................................... 54 11.13 Dismounting the front fender ........................... 55 11.14 Installing the front fender ................................ 55 11.15 Checking the fuel pressure............................... 56 11.16 Changing the fuel filter .................................... 57 11.17 Replacing the fuel pump ................................. 58 12 WHEELS ................................................................... 60 12.1 Checking the tire air pressure ........................... 60 12.2 Checking the tire condition .............................. 60 12.3 Checking the brake discs ................................. 61 12.4 Front wheel .................................................... 61 12.4.1 Removing the front wheel ............................ 61 12.4.2 Installing the front wheel ............................. 62 12.4.3 Removing the brake disc of the front brake.... 63 12.4.4 Installing the brake disc of the front brake .... 64 12.5 Rear wheel ..................................................... 64 12.5.1 Removing the rear wheel ............................. 64 12.5.2 Installing the rear wheel .............................. 65 12.5.3 Removing the brake disc of the rear brake ..... 66 12.5.4 Installing the brake disc of the rear brake...... 67 12.5.5 Checking the chain tension .......................... 68 12.5.6 Adjusting the chain tension ......................... 68 12.5.7 Checking the chain, rear sprocket, and engine sprocket .......................................... 69 12.5.8 Cleaning the chain ...................................... 72 12.5.9 Checking the rear hub rubber dampers.......... 73 13 WIRING HARNESS, BATTERY ..................................... 74 13.1 Removing the battery ...................................... 74 13.2 Installing the battery ....................................... 74 13.3 Disconnecting the negative cable of the battery ........................................................... 75 13.4 Reconnecting the negative cable of the battery ........................................................... 75 13.5 Recharging the battery .................................... 75 13.6 Checking the charging voltage .......................... 76 13.7 Changing the fuses of individual power consumers...................................................... 77 14 BRAKE SYSTEM ........................................................ 79 14.1 Checking the front brake linings ....................... 79 14.2 Changing the front brake linings ....................... 79 14.3 Checking the brake fluid level of the front brake ............................................................. 82 14.4 Adding front brake fluid................................... 83 14.5 Changing the front brake fluid .......................... 83 14.6 Checking the rear brake linings ........................ 86 14.7 Changing the rear brake linings ........................ 86 14.8 Checking the free travel of foot brake lever ........ 89 14.9 Adjusting the free travel of the foot brake lever .............................................................. 89 14.10 Checking the rear brake fluid level .................... 90
TABLE OF CONTENTS 3 14.11 Adding rear brake fluid .................................... 90 14.12 Changing the rear brake fluid ........................... 91 15 LIGHTING SYSTEM, INSTRUMENTS ........................... 94 15.1 Setting kilometers or miles............................... 94 15.2 Adjusting the shift speed RPM 1 ...................... 94 15.3 Adjusting the shift speed RPM 2 ...................... 94 15.4 Setting the time .............................................. 95 15.5 Resetting the service interval display ................ 95 15.6 Checking the headlight setting ......................... 95 15.7 Adjusting the headlight range........................... 96 15.8 Changing the parking light bulb........................ 97 15.9 Changing the headlight bulb ............................ 98 16 ENGINE .................................................................. 100 16.1 Removing the engine ..................................... 100 16.2 Installing the engine...................................... 103 16.3 Engine disassembly ....................................... 108 16.3.1 Preparations (125 Duke) ........................... 108 16.3.2 Draining the engine oil (125 Duke) ............. 108 16.3.3 Removing the chain securing guide (125 Duke) ...................................................... 109 16.3.4 Removing the valve cover (125 Duke) ......... 109 16.3.5 Removing the spark plug (125 Duke) .......... 109 16.3.6 Removing the clutch cover (125 Duke) ....... 109 16.3.7 Setting the engine to ignition top dead center (125 Duke) .................................... 110 16.3.8 Removing the starter motor (125 Duke) ...... 110 16.3.9 Removing the timing chain tensioner (125 Duke) ...................................................... 111 16.3.10 Removing the camshaft (125 Duke)............ 111 16.3.11 Removing the cylinder head (125 Duke) ..... 112 16.3.12 Removing the piston (125 Duke) ................ 112 16.3.13 Removing the water pump wheel (125 Duke) ...................................................... 113 16.3.14 Removing the alternator cover (125 Duke) ...................................................... 114 16.3.15 Removing the rotor (125 Duke) .................. 114 16.3.16 Removing the starter drive (125 Duke)........ 115 16.3.17 Removing the balancer shaft drive wheel (125 Duke) .............................................. 115 16.3.18 Removing the gear position sensor (125 Duke) ...................................................... 116 16.3.19 Removing the spacer (125 Duke) ............... 117 16.3.20 Removing the clutch basket (125 Duke) ..... 117 16.3.21 Removing the primary gear (125 Duke) ....... 118 16.3.22 Removing the oil pump (125 Duke) ............ 118 16.3.23 Removing the shift shaft (125 Duke) .......... 119 16.3.24 Removing the shift drum locating (125 Duke) ...................................................... 119 16.3.25 Removing the locking lever (125 Duke) ....... 119 16.3.26 Removing the oil filter (125 Duke) ............. 119 16.3.27 Removing the left engine case (125 Duke) ...................................................... 120 16.3.28 Removing the shift rails (125 Duke) ........... 121 16.3.29 Removing the shift drum (125 Duke) .......... 121 16.3.30 Removing the shift forks (125 Duke) .......... 121 16.3.31 Removing the transmission shafts (125 Duke) ...................................................... 121 16.3.32 Removing the balancer shaft (125 Duke) .... 122 16.3.33 Removing the crankshaft (125 Duke) .......... 122 16.3.34 Preparations (200 Duke) ........................... 122 16.3.35 Draining the engine oil (200 Duke) ............. 122 16.3.36 Removing the chain securing guide (200 Duke) ...................................................... 123 16.3.37 Removing the valve cover (200 Duke) ......... 123 16.3.38 Removing the spark plug (200 Duke) .......... 123 16.3.39 Removing the clutch cover (200 Duke) ....... 123 16.3.40 Setting the engine to ignition top dead center (200 Duke) .................................... 124 16.3.41 Removing the starter motor (200 Duke) ...... 124 16.3.42 Removing the timing chain tensioner (200 Duke) ...................................................... 125 16.3.43 Removing the camshaft (200 Duke)............ 125 16.3.44 Removing the cylinder head (200 Duke) ..... 126 16.3.45 Removing the piston (200 Duke) ................ 126 16.3.46 Removing the water pump wheel (200 Duke) ...................................................... 127 16.3.47 Removing the alternator cover (200 Duke) ...................................................... 128 16.3.48 Removing the rotor (200 Duke) .................. 128 16.3.49 Removing the starter drive (200 Duke)........ 129 16.3.50 Removing the balancer shaft drive wheel (200 Duke) .............................................. 129 16.3.51 Removing the gear position sensor (200 Duke) ...................................................... 130 16.3.52 Removing the spacer (200 Duke) ............... 131 16.3.53 Removing the clutch basket (200 Duke) ..... 131 16.3.54 Removing the primary gear (200 Duke) ....... 132 16.3.55 Removing the oil pump (200 Duke) ............ 132 16.3.56 Removing the shift shaft (200 Duke) .......... 133 16.3.57 Removing the shift drum locating (200 Duke) ...................................................... 133 16.3.58 Removing the locking lever (200 Duke) ....... 133 16.3.59 Removing the oil filter (200 Duke) ............. 133 16.3.60 Removing the left engine case (200 Duke) ...................................................... 134 16.3.61 Removing the shift rails (200 Duke) ........... 135 16.3.62 Removing the shift drum (200 Duke) .......... 135 16.3.63 Removing the shift forks (200 Duke) .......... 135 16.3.64 Removing the transmission shafts (200 Duke) ...................................................... 135 16.3.65 Removing the balancer shaft (200 Duke) .... 136 16.3.66 Removing the crankshaft (200 Duke) .......... 136 16.4 Work on individual parts ................................ 136 16.4.1 Work on the left section of the engine case (125 Duke) .............................................. 136 16.4.2 Work on the right section of the engine case (125 Duke) ....................................... 137 16.4.3 Changing the shaft seal ring of the water pump (125 Duke) ..................................... 137 16.4.4 Removing the main bearing (125 Duke) ...... 138 16.4.5 Checking the radial play of the lower conrod bearing (125 Duke) ........................ 139 16.4.6 Changing the conrod bearing (125 Duke) .... 140 16.4.7 Changing the balancer shaft bearing (125 Duke) ...................................................... 141 16.4.8 Changing the camshaft bearing (125 Duke) ...................................................... 141 16.4.9 Work on the cylinder head (125 Duke) ........ 142 16.4.10 Checking the cylinder head (125 Duke) ...... 143 16.4.11 Checking/measuring the cylinder (125 Duke) ...................................................... 143 16.4.12 Checking the piston ring end gap (125 Duke) ...................................................... 144 16.4.13 Checking/measuring the piston (125 Duke) ...................................................... 144 16.4.14 Checking the piston/cylinder mounting clearance (125 Duke)................................ 145
TABLE OF CONTENTS 4 16.4.15 Checking the oil pump (125 Duke) ............. 145 16.4.16 Checking the oil pressure regulator valve (125 Duke) .............................................. 145 16.4.17 Checking the clutch (125 Duke)................. 146 16.4.18 Preassembling the clutch (125 Duke) ......... 147 16.4.19 Checking the shift mechanism (125 Duke) ...................................................... 148 16.4.20 Preassembling the shift shaft (125 Duke) ... 149 16.4.21 Disassembling the main shaft (125 Duke) ...................................................... 149 16.4.22 Dismantling the countershaft (125 Duke) .... 150 16.4.23 Checking the transmission (125 Duke)........ 150 16.4.24 Assembling the main shaft (125 Duke) ....... 151 16.4.25 Assembling the countershaft (125 Duke) .... 152 16.4.26 Checking the timing assembly (125 Duke) ...................................................... 154 16.4.27 Changing the stator (125 Duke) ................. 154 16.4.28 Checking the electric starter drive (125 Duke) ...................................................... 155 16.4.29 Checking the freewheel (125 Duke) ............ 156 16.4.30 Work on the left section of the engine case (200 Duke) .............................................. 156 16.4.31 Work on the right section of the engine case (200 Duke) ....................................... 157 16.4.32 Changing the shaft seal ring of the water pump (200 Duke) ..................................... 157 16.4.33 Removing the main bearing (200 Duke) ...... 158 16.4.34 Checking the radial play of the lower conrod bearing (200 Duke) ........................ 159 16.4.35 Changing the conrod bearing (200 Duke) .... 160 16.4.36 Changing the balancer shaft bearing (200 Duke) ...................................................... 161 16.4.37 Changing the camshaft bearing (200 Duke) ...................................................... 161 16.4.38 Work on the cylinder head (200 Duke) ........ 162 16.4.39 Checking the cylinder head (200 Duke) ...... 163 16.4.40 Checking/measuring the cylinder (200 Duke) ...................................................... 163 16.4.41 Checking the piston ring end gap (200 Duke) ...................................................... 164 16.4.42 Checking/measuring the piston (200 Duke) ...................................................... 164 16.4.43 Checking the piston/cylinder mounting clearance (200 Duke)................................ 165 16.4.44 Checking the oil pump (200 Duke) ............. 165 16.4.45 Checking the oil pressure regulator valve (200 Duke) .............................................. 165 16.4.46 Checking the clutch (200 Duke)................. 166 16.4.47 Preassembling the clutch (200 Duke) ......... 167 16.4.48 Checking the shift mechanism (200 Duke) ...................................................... 168 16.4.49 Preassembling the shift shaft (200 Duke) ... 169 16.4.50 Disassembling the main shaft (200 Duke) ...................................................... 169 16.4.51 Dismantling the countershaft (200 Duke) .... 170 16.4.52 Checking the transmission (200 Duke)........ 170 16.4.53 Assembling the main shaft (200 Duke) ....... 171 16.4.54 Assembling the countershaft (200 Duke) .... 172 16.4.55 Checking the timing assembly (200 Duke) ...................................................... 174 16.4.56 Changing the stator (200 Duke) ................. 174 16.4.57 Checking the electric starter drive (200 Duke) ...................................................... 175 16.4.58 Checking the freewheel (200 Duke) ............ 176 16.5 Engine assembly ........................................... 176 16.5.1 Installing the crankshaft (125 Duke) .......... 176 16.5.2 Installing the balancer shaft (125 Duke) ..... 176 16.5.3 Installing the transmission shafts (125 Duke) ...................................................... 177 16.5.4 Installing the shift forks (125 Duke) ........... 177 16.5.5 Installing the shift drum (125 Duke)........... 177 16.5.6 Installing the shift rails (125 Duke) ............ 178 16.5.7 Installing the left engine case (125 Duke) ...................................................... 178 16.5.8 Installing the oil filter (125 Duke) .............. 179 16.5.9 Installing the locking lever (125 Duke) ....... 179 16.5.10 Installing the shift drum locating (125 Duke) ...................................................... 179 16.5.11 Installing the shift shaft (125 Duke) ........... 180 16.5.12 Installing the oil pump (125 Duke) ............. 180 16.5.13 Installing the primary gear (125 Duke)........ 181 16.5.14 Installing the clutch basket (125 Duke) ...... 181 16.5.15 Installing the spacer (125 Duke) ................ 182 16.5.16 Installing the gear position sensor (125 Duke) ...................................................... 182 16.5.17 Installing the balancer shaft drive wheel (125 Duke) .............................................. 183 16.5.18 Installing the starter drive (125 Duke) ........ 184 16.5.19 Installing the rotor (125 Duke) ................... 185 16.5.20 Installing the alternator cover (125 Duke) ... 185 16.5.21 Installing the water pump cover (125 Duke) ...................................................... 185 16.5.22 Installing the piston (125 Duke)................. 186 16.5.23 Installing the cylinder head (125 Duke) ...... 187 16.5.24 Installing the camshafts (125 Duke) ........... 188 16.5.25 Installing the timing chain tensioner (125 Duke) ...................................................... 189 16.5.26 Checking the valve clearance (125 Duke) .... 190 16.5.27 Adjusting the valve clearance (125 Duke) ... 190 16.5.28 Installing the starter motor (125 Duke) ....... 190 16.5.29 Installing the clutch cover (125 Duke) ........ 191 16.5.30 Installing the spark plug (125 Duke)........... 191 16.5.31 Installing the valve cover (125 Duke) .......... 192 16.5.32 Installing the chain securing guide (125 Duke) ...................................................... 192 16.5.33 Installing the oil screen (125 Duke)............ 192 16.5.34 Removing the engine from the engine assembly stand (125 Duke) ....................... 193 16.5.35 Installing the crankshaft (200 Duke) .......... 193 16.5.36 Installing the balancer shaft (200 Duke) ..... 193 16.5.37 Installing the transmission shafts (200 Duke) ...................................................... 194 16.5.38 Installing the shift forks (200 Duke) ........... 194 16.5.39 Installing the shift drum (200 Duke)........... 194 16.5.40 Installing the shift rails (200 Duke) ............ 195 16.5.41 Installing the left engine case (200 Duke) ...................................................... 195 16.5.42 Installing the oil filter (200 Duke) .............. 196 16.5.43 Installing the locking lever (200 Duke) ....... 196 16.5.44 Installing the shift drum locating (200 Duke) ...................................................... 196 16.5.45 Installing the shift shaft (200 Duke) ........... 197 16.5.46 Installing the oil pump (200 Duke) ............. 197 16.5.47 Installing the primary gear (200 Duke)........ 198 16.5.48 Installing the clutch basket (200 Duke) ...... 198 16.5.49 Installing the spacer (200 Duke) ................ 199
TABLE OF CONTENTS 5 16.5.50 Installing the gear position sensor (200 Duke) ...................................................... 199 16.5.51 Installing the balancer shaft drive wheel (200 Duke) .............................................. 200 16.5.52 Installing the starter drive (200 Duke) ........ 201 16.5.53 Installing the rotor (200 Duke) ................... 202 16.5.54 Installing the alternator cover (200 Duke) ... 202 16.5.55 Installing the water pump cover (200 Duke) ...................................................... 202 16.5.56 Installing the piston (200 Duke)................. 203 16.5.57 Installing the cylinder head (200 Duke) ...... 204 16.5.58 Installing the camshafts (200 Duke) ........... 205 16.5.59 Installing the timing chain tensioner (200 Duke) ...................................................... 206 16.5.60 Checking the valve clearance (200 Duke) .... 207 16.5.61 Adjusting the valve clearance (200 Duke) ... 207 16.5.62 Installing the starter motor (200 Duke) ....... 207 16.5.63 Installing the clutch cover (200 Duke) ........ 208 16.5.64 Installing the spark plug (200 Duke)........... 208 16.5.65 Installing the valve cover (200 Duke) .......... 209 16.5.66 Installing the chain securing guide (200 Duke) ...................................................... 209 16.5.67 Installing the oil screen (200 Duke)............ 209 16.5.68 Removing the engine from the engine assembly stand (200 Duke) ....................... 210 17 SHIFT MECHANISM ................................................. 211 17.1 Adjusting the shift lever ................................. 211 18 WATER PUMP, COOLING SYSTEM ............................ 212 18.1 Draining the coolant ...................................... 212 18.2 Filling/bleeding the cooling system ................. 212 18.3 Checking the antifreeze and coolant level ........ 213 18.4 Checking the coolant level ............................. 214 19 LUBRICATION SYSTEM............................................ 216 19.1 Oil circuit ..................................................... 216 19.2 Checking the engine oil level .......................... 216 19.3 Checking the engine oil pressure .................... 216 19.4 Changing the engine oil and oil filter, cleaning the oil screen................................... 218 19.5 Adding engine oil .......................................... 219 20 IGNITION SYSTEM................................................... 220 20.1 Alternator - checking the stator winding .......... 220 21 TECHNICAL DATA .................................................... 221 21.1 Engine ......................................................... 221 21.1.1 125 Duke ................................................ 221 21.1.2 200 Duke ................................................ 221 21.2 Engine tolerance, wear limits ......................... 222 21.2.1 125 Duke ................................................ 222 21.2.2 200 Duke ................................................ 223 21.3 Engine tightening torques .............................. 223 21.4 Capacities .................................................... 224 21.4.1 Engine oil ................................................ 224 21.4.2 Coolant .................................................... 224 21.4.3 Fuel ........................................................ 224 21.5 Chassis ........................................................ 225 21.6 Electrical system........................................... 225 21.7 Tires ............................................................ 226 21.8 Fork............................................................. 226 21.9 Shock absorber ............................................. 226 21.10 Chassis tightening torques ............................. 226 22 CLEANING/PROTECTIVE TREATMENT ....................... 229 22.1 Cleaning the motorcycle ................................ 229 22.2 Checks and maintenance steps for winter operation...................................................... 230 23 STORAGE ................................................................ 231 23.1 Storage ........................................................ 231 23.2 Preparing for use after storage........................ 231 24 SERVICE SCHEDULE ............................................... 232 24.1 Service schedule ........................................... 232 25 WIRING DIAGRAM ................................................... 234 25.1 Page 1 of 9 (Duke EU/MAL) ........................... 234 25.2 Page 2 of 9 (Duke EU/MAL) ........................... 236 25.3 Page 3 of 9 (Duke EU/MAL) ........................... 238 25.4 Page 4 of 9 (Duke EU/MAL) ........................... 240 25.5 Page 5 of 9 (Duke EU/MAL) ........................... 242 25.6 Page 6 of 9 (Duke EU/MAL) ........................... 244 25.7 Page 7 of 9 (Duke EU/MAL) ........................... 246 25.8 Page 8 of 9 (Duke EU/MAL) ........................... 248 25.9 Page 9 of 9 (Duke EU/MAL) ........................... 250 25.10 Page 1 of 8 (Duke COL) ................................. 252 25.11 Page 2 of 8 (Duke COL) ................................. 254 25.12 Page 3 of 8 (Duke COL) ................................. 256 25.13 Page 4 of 8 (Duke COL) ................................. 258 25.14 Page 5 of 8 (Duke COL) ................................. 260 25.15 Page 6 of 8 (Duke COL) ................................. 262 25.16 page 7 of 8 (Duke COL) ................................. 264 25.17 Page 8 of 8 (Duke COL) ................................. 266 26 SUBSTANCES ......................................................... 268 27 AUXILIARY SUBSTANCES ........................................ 270 28 SPECIAL TOOLS ...................................................... 272 29 STANDARDS ........................................................... 281 INDEX ............................................................................ 282
1 MEANS OF REPRESENTATION 6 1.1 Symbols used The meaning of specific symbols is described below. Indicates an expected reaction (e.g. of a work step or a function). Indicates an unexpected reaction (e.g. of a work step or a function). Indicates a page reference (more information is provided on the specified page). Indicates information with more details or tips. Indicates the result of a testing step. Denotes a voltage measurement. Denotes a current measurement. Denotes a resistance measurement. 1.2 Formats used The typographical formats used in this document are explained below. Proprietary name Identifies a proprietary name. Name ® Identifies a protected name. Brand™ Identifies a trademark.
2 SAFETY ADVICE 7 2.1 Repair Manual Read this Repair Manual carefully and thoroughly before beginning work. It contains useful information and tips that will help you repair and maintain your vehicle. This manual assumes that the necessary special KTM tools and KTM workplace and workshop equipment are available. 2.2 Safety advice A number of safety instructions need to be followed to operate the vehicle safely. Therefore, read this manual carefully. The safety instructions are highlighted in the text and are referred to at the relevant passages. Info The vehicle has various information and warning labels at prominent locations. Do not remove information/warning labels. If they are missing, you or others may not recognize dangers and may therefore be injured. 2.3 Degrees of risk and symbols Danger Identifies a danger that will immediately and invariably lead to fatal or serious permanent injury if the appropriate measures are not taken. Warning Identifies a danger that is likely to lead to fatal or serious injury if the appropriate measures are not taken. Caution Identifies a danger that may lead to minor injuries if the appropriate measures are not taken. Note Identifies a danger that will lead to considerable machine and material damage if the appropriate measures are not taken. Warning Identifies a danger that will lead to environmental damage if the appropriate measures are not taken. 2.4 Work rules Special tools are necessary for certain tasks. The tools are not contained in the vehicle but can be ordered under the number in paren- theses. E.g.: bearing puller (15112017000) During assembly, non-reusable parts (e.g. self-locking screws and nuts, seals and seal rings, O-rings, pins, lock washers) must be replaced by new parts. In some instances, a thread locker (e.g. Loctite ® ) is required. The manufacturer instructions for use must be followed. After disassembly, clean the parts that are to be reused and check them for damage and wear. Change damaged or worn parts. After you complete the repair or service work, check the operating safety of the vehicle.
3 IMPORTANT INFORMATION 8 3.1 Guarantee, warranty The work prescribed in the service schedule must be carried out by an authorized KTM workshop only and confirmed in the customer's Service & Warranty Booklet and in the KTM dealer.net; otherwise, all warranty claims will be void. No warranty claims can be consid- ered for damage resulting from manipulations and/or alterations to the vehicle. Additional information on the guarantee or warranty and the procedures involved can be found in the Service & Warranty Booklet. 3.2 Operating and auxiliary substances Warning Environmental hazard Improper handling of fuel is a danger to the environment. – Do not allow fuel to get into the ground water, the ground, or the sewage system. Use the operating and auxiliary substances (such as fuel and lubricants) as specified in the manual. 3.3 Spare parts, accessories Only use spare parts and accessories approved and/or recommended by KTM. KTM accepts no liability for other products and any resulting damage or loss. The current KTM PowerParts for your vehicle can be found on the KTM website. International KTM Website: http://www.ktm.com 3.4 Figures The figures contained in the manual may depict special equipment. In the interest of clarity, some components may be shown disassembled or may not be shown at all. It is not always necessary to dis- assemble the component to perform the activity in question. Please follow the instructions in the text.
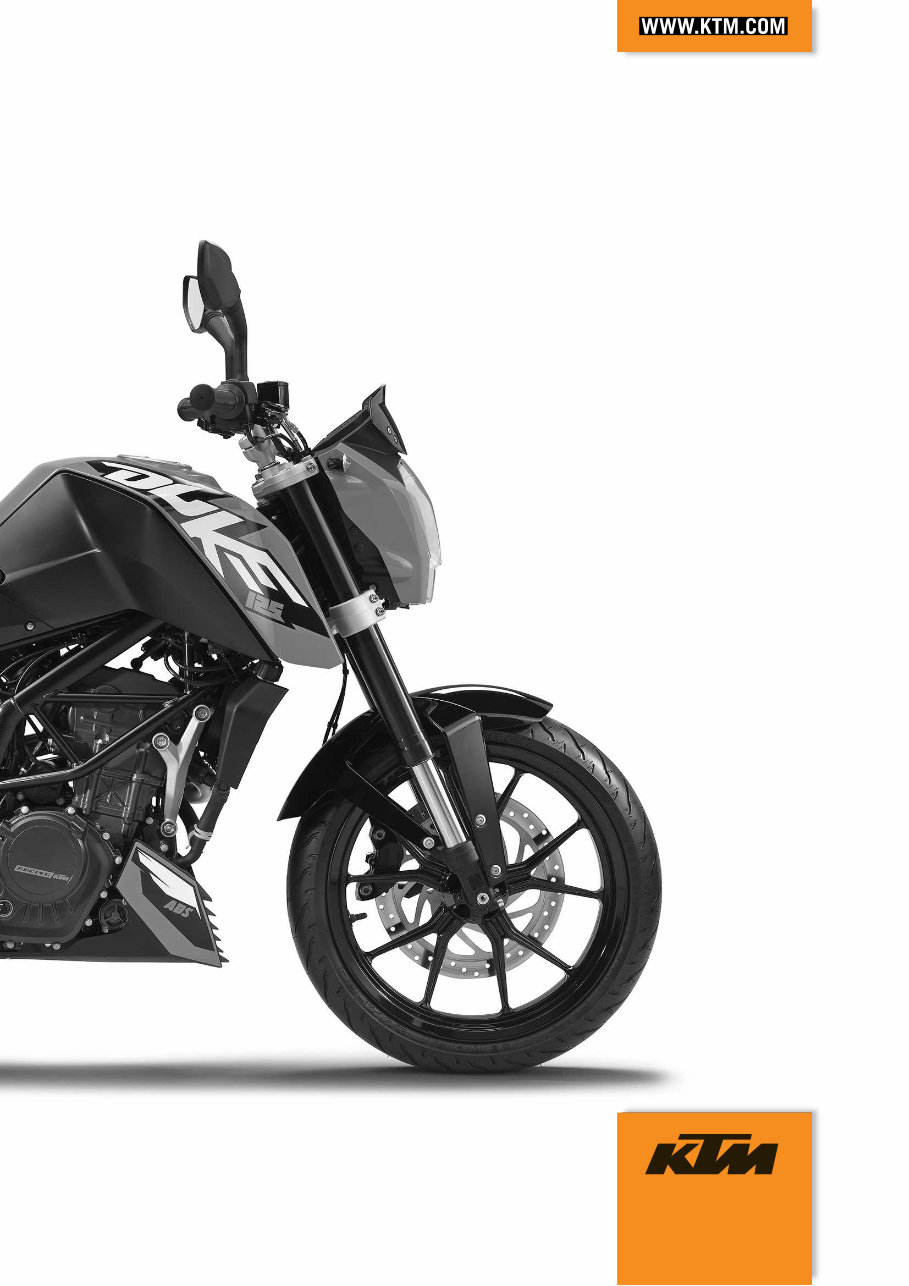
Thank you for considering this comprehensive Workshop Service Repair Manual for the KTM 125 Duke EU & DE 2011-2012.
This manual is an invaluable resource covering every Service & Repair Procedure required, making it ideal for professional mechanics and DIY enthusiasts alike.
With easy-to-follow step-by-step instructions and detailed pictures, this manual enables you to save significantly on repair costs by undertaking the work yourself.
Upon purchase, the manual is yours to keep forever. You have the flexibility to print individual pages, chapters, or the entire manual. Additionally, it can be conveniently accessed on your tablet or smartphone.
All Models/Engines/Trim/Transmissions Types are comprehensively covered in this manual.
From A-Z, this high-quality Service Repair Workshop Manual encompasses every repair procedure, ensuring that every aspect of servicing and repairs is addressed.
Compatible with all PC & MAC Computers, tablets, and mobile phones, this downloadable manual requires only adobe reader, which is commonly pre-installed. If not available, it can be easily obtained for free.
Upon payment via Visa, MasterCard, or PayPal, the manual will be instantly emailed to the address provided during checkout, ensuring prompt access.
Customer Satisfaction Guaranteed.
Recently Viewed
5,521,897Happy Clients
2,594,462eManuals
1,120,453Trusted Sellers
15Years in Business
Price:
Actual Price:
KTM 125 Duke EU & DE Complete Workshop Service Repair Manual 2011 2012