REPARATURANLEITUNG REPAIR MANUAL MANUEL DE REPARATION “ 04 Edition 2004 Downloaded from www.Manualslib.com manuals search engine
PREFACE This manual contains detailed instructions on repairing the engine. It was prepared according to the state of the art for this model series. We reserve the right to make modifications based on technical progress without making the respective corrections in this repair manual. This manual does not contain a description of general shop or working methods. It does not include safety rules generally observed in workshops and is based on the assumption that the work is performed by a mechanic who has completed his vocational training. Please read the entire manual before starting to work. WARNING: failing to observe these instructions can be dangerous to life and limb. CAUTION: failing to observe these instructions may damage the motorcycle/engine components or impair the motorcycle's traffic safety. NOTE: provides useful information. Only use ORIGINAL HUSABERG SPARE PARTS if parts need to be replaced. The engine will only continue to operate safely if the prescribed service work is performed regularly and professionally. Subject to changes in construction and design. C by HUSABERG All rights reserved Downloaded from www.Manualslib.com manuals search engine
Downloaded from www.Manualslib.com manuals search engine
INDEX A B C D E F G H I J K L M N GENERAL INFORMATION DISMOUNTING AND MOUNTING THE ENGINE DISASSEMBLING THE ENGINE SERVICING THE INDIVIDUAL PARTS ASSEMBLING THE ENGINE ELECTRIC SYSTEM FUEL SYSTEM TROUBLESHOOTING TECHNICAL SPECIFICATIONS PERIODIC MAINTENANCE SCHEDULE WIRING DIAGRAMS Downloaded from www.Manualslib.com manuals search engine
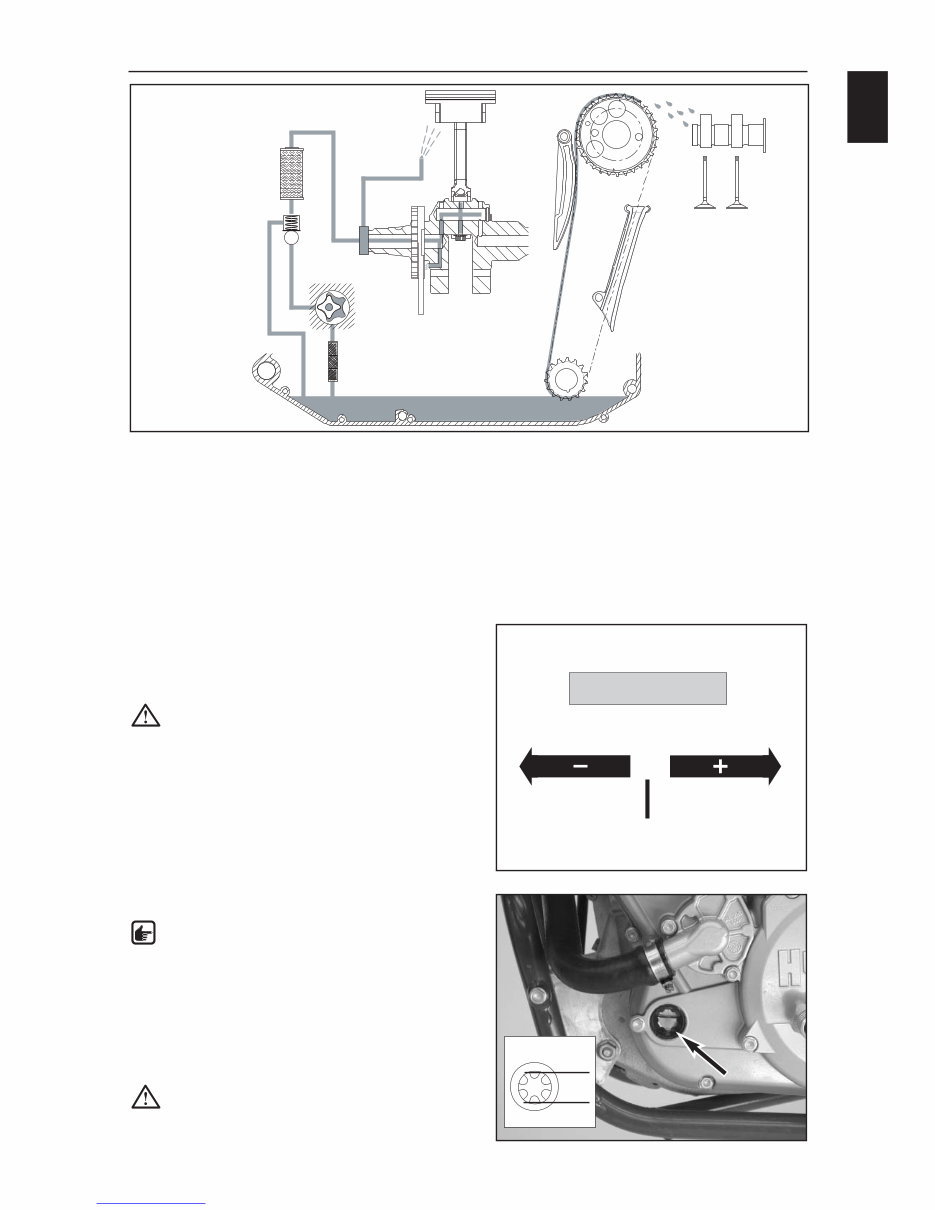
ENGINE OIL Only use fully synthetic brand-name engine oils (e.g.: Motorex Power Synt. 4T) that meet or exceed the Jaso T903 MA quality requirements (information on the can). CAUTION: not enough engine oil or low-quality oil will lead to premature engine wear. CHECKING THE ENGINE OIL LEVEL NOTE: the engine oil level can be checked when the engine is cold or warm. – Place the motorcycle on a level surface (not on the side stand). If the engine is cold, the engine oil should be visible at the lower edge (A) of the inspection glass. If the engine is warm, the engine oil should reach the upper edge (B) of the inspection glass. Add engine oil if necessary. CAUTION: not enough engine oil or low-quality oil will lead to premature engine wear. – Check the engine for leakage. GENERAL INFORMATION A 1 A B 0°C 10W/50 5W/40 JASO T903 MA TEMPERATURE OIL CIRCUIT DESCRIPTION: The oil pump (1) draws the engine oil from the oil sump through the oil screen (2) and pumps it past the pressure relief valve (3) to the oil filter (4). It continues to the crankshaft (5), partly branching off through a hole to lubricate and cool the piston (6) and the piston pin bearing. Once through the crankshaft, the engine oil is pumped to the conrod bearing (7) and branches off again to the bearings in the balance weight (8). The camshaft (9) is lubricated by the engine oil which is transported to the cylinder head by the timing chain (10). On the downward movement of the piston, engine oil is pressed from the crankcase through the diaphragm valve (not depicted) to the transmission and shift mechanism. 1 2 3 4 6 5 8 7 9 10 Downloaded from www.Manualslib.com manuals search engine
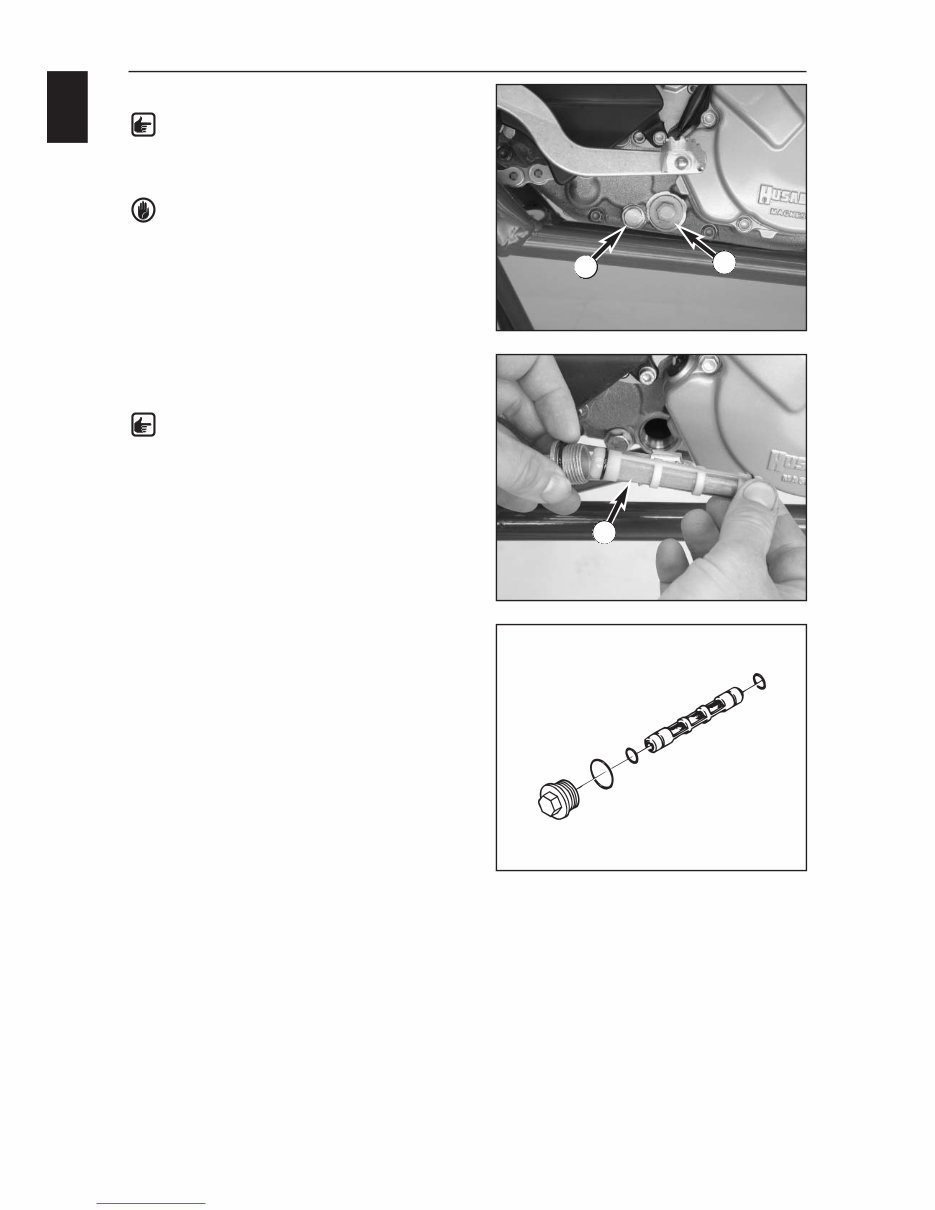
CHANGING THE ENGINE OIL NOTE: Replace the oil screen and the oil filter when you change the engine oil. Change the engine oil when the engine is at operating temperature. WARNING: the engine oil will be very hot when the engine is at operating temperature – be careful not to burn yourself. – Place the motorcycle on a level surface, remove the plug (1) and allow the oil to drain into a suitable vessel. – Thoroughly clean the plug (with the magnet). – After the oil is completely drained, clean the sealing area, mount the plug with a new seal ring and tighten to 20 Nm. CLEANING THE OIL SCREEN NOTE: the oil screen (3) is located in the plug with the hexagon drive (2) next to the oil drain plug on the right side of the engine. – Dismount the plug with the oil screen, thoroughly clean the parts and blow clean with compressed air. – Check the O-rings (4) for damage and replace if necessary. – Insert the oil screen in the plug, mount and tighten the plug to 15 Nm. GENERAL INFORMATION A 2 1 2 3 4 4 Downloaded from www.Manualslib.com manuals search engine
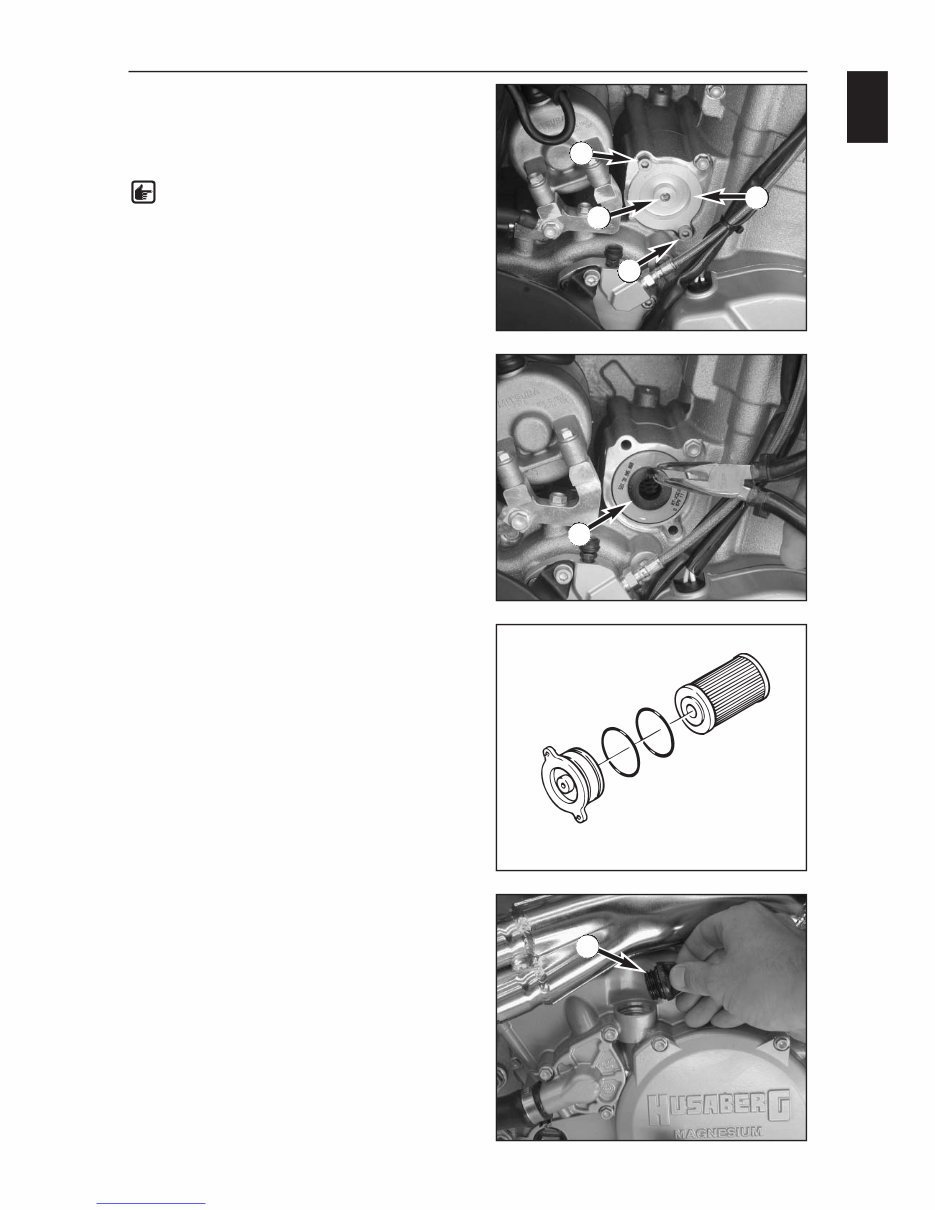
GENERAL INFORMATION A 3 CHANGING THE OIL FILTER – Place a suitable vessel under the engine to allow the oil to drain. – Remove both bolts (1) and screw an M6 bolt in the center hole (2) of the oil filter cover. NOTE: only tighten the bolt by hand, otherwise you will damage the oil filter cover. – Pull the oil filter cover (3) out of the hole with the bolt M6 and remove the bolt. – Use pliers to pull the oil filter element (4) from the housing. – Clean the oil filter cover, the sealing areas on the O-rings and the engine case. check the O-rings (5) in the oil filter cover for damage and replace if necessary. – Lay the motorcycle down and fill the oil filter housing approx. half-full with engine oil. Insert the oil filter in the housing. – Grease the O-rings in the oil filter cover and mount the cover. Mount the bolts and tighten to 6 Nm. – Place the motorcycle in an upright position again. – Unscrew the oil filler plug (6) and add 1 liter of fully synthetic engine oil (e.g.: Motorex Power Synt. 4T). – Start the engine and check all of the plugs and the oil filter cover for leakage. – Finally, check the engine oil level and correct if necessary. 1 1 2 3 4 6 5 5 Downloaded from www.Manualslib.com manuals search engine
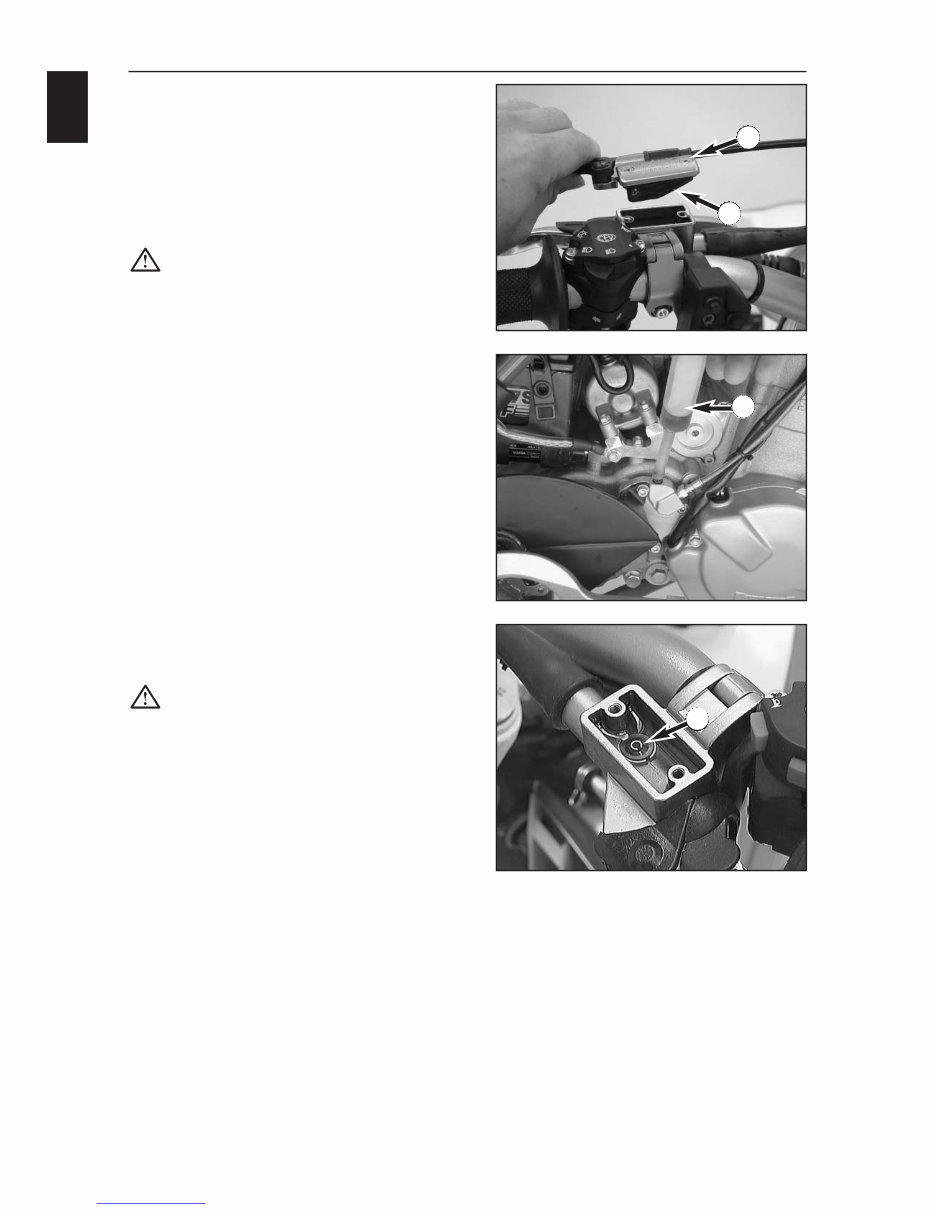
GENERAL INFORMATION A 4 CHECKING THE OIL LEVEL IN THE HYDRAULIC CLUTCH Remove the cover to check the oil level in the master cylinder of the clutch. Remove the screws (1) and lift off the cover together with the rubber boot (2). The oil level should be 4 mm below the upper edge when the master cylinder is in a horizontal position. If necessary, add SAE 10 biodegradable hydraulic oil (e.g.: Motorex clutch fluid 75). CAUTION: only fill SAE 10 biodegradable hydraulic oil into the master cylinder. Do not add brake fluid. BLEEDING THE CLUTCH To bleed, remove the cover on the master cylinder of the clutch. Remove the screws (1) and lift off the cover together with the rubber boot (2). Remove the vent nipple from the slave cylinder of the clutch. Mount the bleeder syringe (3) filled with SAE 10 biodegradable hydraulic oil (e.g.: Motorex clutch fluid 75). Continue to add oil until the oil runs out of the hole (A) in the master cylinder without bubbles. Make sure the oil does not overflow. CAUTION: after bleeding the clutch, check the oil level in the master cylinder. Only fill SAE 10 biodegradable hydraulic oil (e.g.: Motorex clutch fluid 75) into the master cylinder. Do not use brake fluid or mix with mineral hydraulic oil. 1 2 3 A Downloaded from www.Manualslib.com manuals search engine
GENERAL INFORMATION A 5 Clean the motorcycle regularly to retain the beauty of the plastic parts. Use warm water with a commercial detergent and a sponge. Coarse dirt can be removed with a soft water jet. CAUTION: never clean the motorcycle with a power washer or a high pressure jet. This will cause the water to reach the electric components, socket connectors, cables, bearings, carburetor, etc. and will cause these parts to malfunction or break. – Only use commercial detergents to clean the engine. Use a brush to clean any heavily soiled areas. – Before you start cleaning, close the exhaust pipe to prevent water from penetrating. – After cleaning the motorcycle thoroughly with a soft water jet, dry with compressed air and a soft cloth. Drain the float chamber in the carburetor. Take a short ride until the engine reaches the operating temperature, applying the brakes while driving. The heat will cause the water to evaporate from the inaccessible engine and brake areas. – Slide back the protection covers on the handlebar instruments to allow water that has penetrated to evaporate. – After the motorcycle has cooled down, oil or grease all of the sliding and bearing points. Treat the chain with chain spray. Oil the fuel tap. – To prevent defects in the electric system, apply contact spray to the emergency stop switch, the short-circuit button, the light switch and the socket connector. If the motorcycle is used during the winter where roads will be spread with salt, precautions must be taken to protect the motorcycle against the aggressive road salt. – Clean the motorcycle thoroughly and allow to dry after each ride. – Treat the engine, carburetor, swing arm and all other bare or galvanized parts (except the brake disks) with a wax-based anti-corrosion agent. WARNING: do not allow any anti-corrosion agent to get on the brake disks since this will significantly reduce the braking effect. CAUTION: clean the motorcycle with cold water and dry thoroughly after driving on salted roads. If your motorcycle is to be immobilized for a longer period of time, proceed as follows: – Clean the motorcycle thoroughly. – Change the engine oil, the short and the long oil filter (old engine oil contains aggressive impurities). – Check the quantity of antifreeze and coolant. – Allow the engine to warm up, close the fuel tap and wait until the engine stalls. Open the drain plug on the float chamber to allow any remaining fuel to drain. – Remove the spark plug and fill approx. 5 cm 3 of engine oil into the cylinder through the spark plug hole. Actuate the kickstarter 10 times to distribute the engine oil over the cylinder wall and mount the spark plug again. – Set the piston in the compression position to close the valves. – Drain the fuel from the tank into a suitable vessel. – Check the tire air pressure. – Oil the bearing points on the control levers, footrests, chain, etc. – Dismount and charge the battery. – The storage site should be dry and not have any extreme fluctuations in the temperature. – Cover the motorcycle with a permeable cover or blanket. Do not use impermeable material since it will not allow any moisture to escape and cause corrosion. CAUTION: Do not briefly run the engine of an immobilized motorcycle since the engine will not become warm enough and any vapor produced during the combustion process will condense and cause corrosion. STARTING UP AFTER IMMOBILIZATION – Connect the charged battery (check for correct polarity). – Fill fresh fuel into the tank. – Inspect the motorcycle as you would before each start-up (see Driving Instructions) – Go on a short, cautious test ride CLEANING PRESERVATION FOR WINTER OPERATION STORAGE Downloaded from www.Manualslib.com manuals search engine
You're Reading a Preview
What's Included?
Lifetime Access
Fast Download Speeds
Online & Offline Access
Access PDF Contents & Bookmarks
Full Search Facility
Print one or all pages of your manual
$32.99
Husaberg 450 500 550 650 Service Repair Manual 2004-2007
Get comprehensive professional service repair manuals (workshop manuals & parts catalogues) for Husaberg 450, 500, 550, 650 models from 2004 to 2007. These manuals cover all the essential information for vehicle maintenance and repair, making them invaluable for both professional mechanics and DIY enthusiasts.
The manuals feature detailed explanations of major repair topics, accompanied by hundreds of photos, diagrams, and illustrations that guide you through the disassembly and reassembly procedures. Step-by-step instructions simplify each job, while specifications provide details on fluid capacities, timing positions, tolerance limits, wiring schematics, maintenance schedules, and more.
Designed as professional documents specific to the mentioned model range, these manuals are akin to those used by local dealers/mechanics. By utilizing the information and knowledge contained in these manuals, you can save significant amounts of money by performing tasks yourself, rather than relying on costly professional services.
These manuals are available in .PDF format, compatible with all versions of Windows and Mac computers that have the latest version of Adobe Reader installed. The user-friendly format allows for easy navigation and printing of specific chapters or the entire manual, without the risk of damaging an expensive physical copy during workshop procedures.
Upon electronic payment, the manual is immediately accessible, eliminating the need to wait for shipping. Rest assured of a safe and easy transaction, and buy with total confidence.
File Format: .PDF
Requirements: Latest version of Adobe Reader
Compatibility: All versions of Windows & Mac computers






 Lifetime Access




