

General Motors/Chrysler NV4500 5-Speed Manual Transmission Service & Repair Manual
What's Included?
Fast Download Speeds
Online & Offline Access
Access PDF Contents & Bookmarks
Full Search Facility
Print one or all pages of your manual
NV4500 TRANSMISSION SERVICE
DAN GUARINO
TM1003
4X4 TECHNICAL MANUAL
4x4 Tech Inc. Roberts, Montana U.S.A.
www.4x4techinfo.com
COPYRIGHT © 2005-2006 4X4 TECH INC.
UNAUTHORIZED REPRODUCTION OR DUPLICATION PROHIBITED
4X4 TECH INC.

Copyright © 2005-2006 by 4x4 Tech Incorporated. Roberts, Montana
All Rights Reserved. No part of this publication may be reproduced in any way without the ex-
press written permission of 4x4 Tech Inc..
Published by Clear Creek Publishing
Printed version is printed and Bound in the United States of America
Electronic Compact Disc version is recorded in the United States of America

Table of Contents
Disassembly 1
Inspection 23
Expanded Views 26
Gear and Shaft Guide 32
Small Parts Illustrated Guide 35
Assembly 40
Shift Cover Service 72
Torque King® Installation 85
Shop Notes 93
Specifications 98
Frequently Asked Questions 99
Fifth Gear Failures and Solutions 102
Catastrophic Manual Transmission Failures 110
Install Tips for Dodge 1994-2002 113
Special Tool List 115

This manual is intended as an aide to performing a
specific service procedure. It is not a replacement for
vehicle manufacturer service manuals.
Working on vehicles and vehicle components is dan-
gerous. It has certain inherent risks, including serious
bodily injury and death. This manual is not a substi-
tute for common sense, experience, and careful prepa-
ration. You are responsible for taking appropriate
safety precautions before and during working on your
vehicle or vehicle components. If you do not already
know how to safely work on your vehicle, please have
the work done by a professional automotive techni-
cian.
Copyright © 2005-2006 4x4 Tech Inc. All Rights Reserved. www.4x4techinfo.com
Copyright © 2005-2006 4x4 Tech Inc. All Rights Reserved. www.4x4techinfo.com
Copyright © 2005-2006 4x4 Tech Inc. All Rights Reserved. www.4x4techinfo.com
Before starting disassembly, drain the oil by removing the lowest bolt from ei-
ther PTO cover (Early models have a drain plug on the right side).
Clean off accumulated dirt, grease and grime from exterior of transmission.
Support the transmission in a holding fixture or place on a sturdy work bench.
Have a table or cart next to your work area that you can lay out the parts you re-
move from the transmission.
Check to make sure you have the proper tools on hand.
DISASSEMBLY
1
Copyright © 2005-2006 4x4 Tech Inc. All Rights Reserved. www.4x4techinfo.com
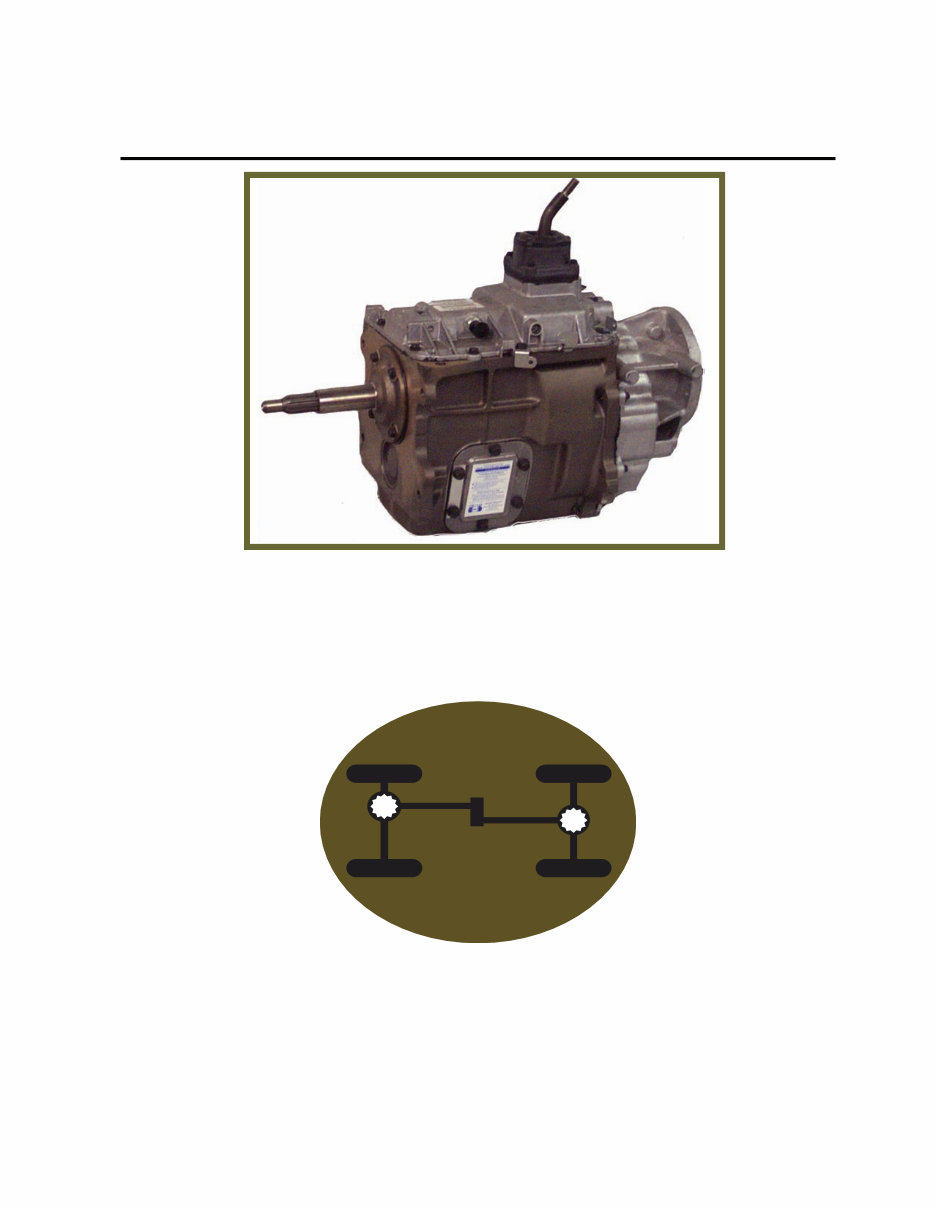
The original conception of the NV4500 called for 3 ratio options plus a 6 speed, double
overdrive version. Only the medium and wide ratio 5 speed ever saw production. Dodge
used the medium ratio NV4500 from 1992 to 2004 and in a few 2005 trucks. GM used the
wide ratio from 1992-1994, then switched to the medium ratio for 1995. A number of de-
sign changes were made over the years to improve function and minimize noise, vibration,
and harshness. The last production vehicles to use the NV4500 were the 2007 Chevy Silver-
ado Classic and 2007 GMC Sierra Classic trucks with the MW3 transmission option.
ABOUT THE TRANSMISSION YOU ARE ABOUT TO SERVICE
Copyright © 2005-2006 4x4 Tech Inc. All Rights Reserved. www.4x4techinfo.com
Copyright © 2005-2006 4x4 Tech Inc. All Rights Reserved. www.4x4techinfo.com
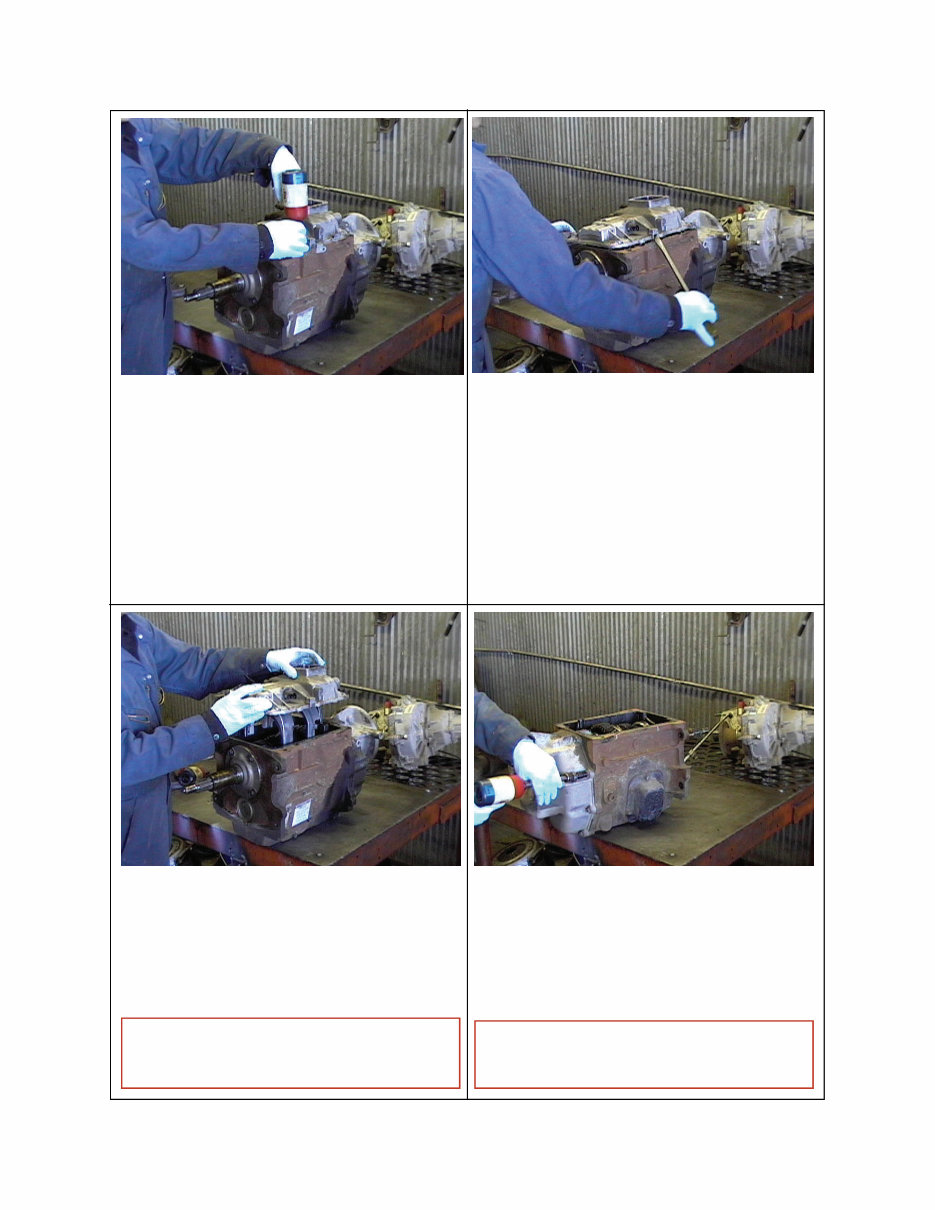
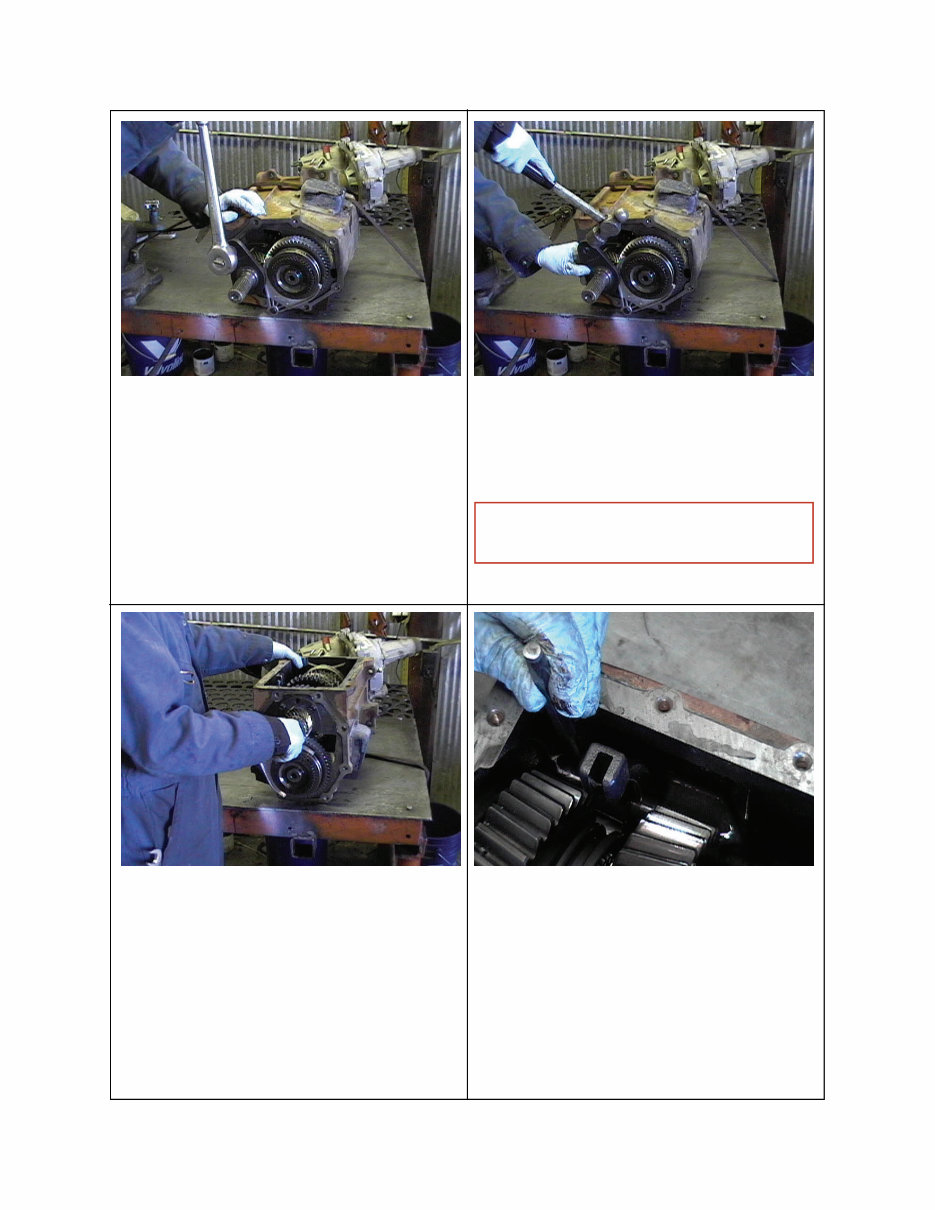
Use a ½” socket to remove the 10 top
cover bolts. Be sure to keep track of
the position and orientation of each of
the top cover clips.
Tool Recommendation:
½” Socket
Ratchet or impact wrench
Insert a suitable tool into the square
pry notches in the top cover, and pry
up cover assembly.
Tool Recommendation:
Prybar or other suitable tool
Remove cover assembly.
Position the transmission on the bench
so a drain pan can be placed under the
rear housing.
Remove the rear cover bolts.
Tool Recommendation:
QT1020 12 point impact socket
Universal Joint and 6” Extension
2
Copyright © 2005-2006 4x4 Tech Inc. All Rights Reserved. www.4x4techinfo.com
Copyright © 2005-2006 4x4 Tech Inc. All Rights Reserved. www.4x4techinfo.com
Copyright © 2005-2006 4x4 Tech Inc. All Rights Reserved. www.4x4techinfo.com
GM 4x2: Refer to Shop Note on page
95.
If the bolt heads are rounded off, refer
to Shop Note on page 95.
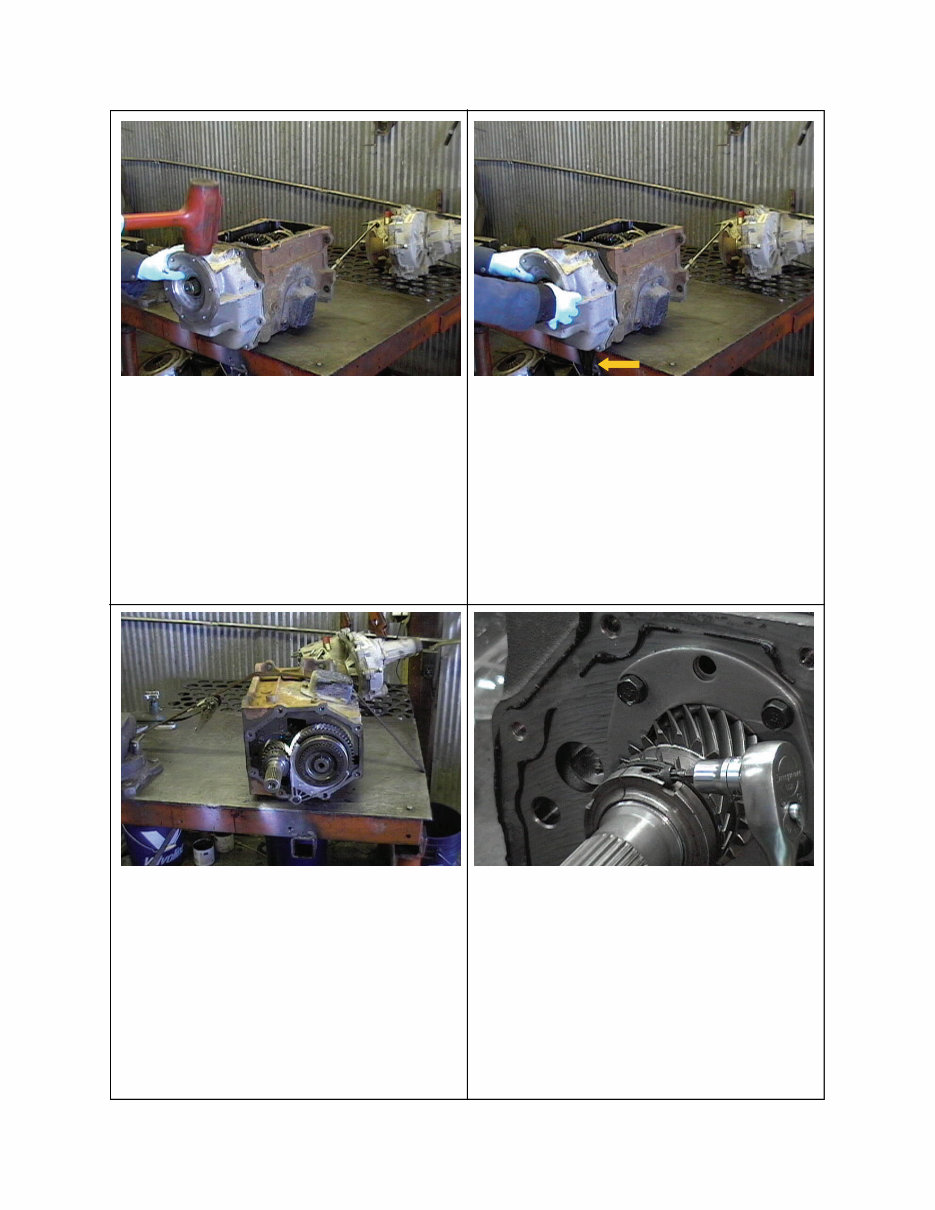
Use a soft-faced hammer to loosen the
sealant between the housing and trans-
mission case.
Tool Recommendation:
QT9018 5lb. Dead Blow Hammer
Pull the housing off the alignment
pins. (Arrow points to residual oil
draining from case. BE SURE to have
drain pan positioned to catch oil)
Secure the transmission to a sturdy
bench with a ratchet strap.
Tool Recommendation:
Nylon ratchet strap
Remove any lock or set screws from
the main shaft nut.
Dodge HD models with the crossbolt
(shown) require either a T27 Torx®
bit or 5/32” hex bit. Aftermarket nuts
use several different size set screws
depending upon manufacturer.
3
Copyright © 2005-2006 4x4 Tech Inc. All Rights Reserved. www.4x4techinfo.com
Copyright © 2005-2006 4x4 Tech Inc. All Rights Reserved. www.4x4techinfo.com
Copyright © 2005-2006 4x4 Tech Inc. All Rights Reserved. www.4x4techinfo.com
Place the correct mainshaft nut
wrench or socket on the main shaft
nut and remove the nut.
T2001: Dodge HD ½ drive
T2002: Dodge LD, GM w/damper
QT2028 GM 4x4 with damper
T2036 Dodge HD ¾ drive
See Tool List on page 115 for more details
If the nut won’t break free, you can hit
the wrench with a hammer.
Place the transmission upright. Drive out the 3/16” roll pin from the
cast iron 5th gear lug.
Tool Recommendation:
QT9300 3/16”x8” Punch
16 oz. Hammer
4
Copyright © 2005-2006 4x4 Tech Inc. All Rights Reserved. www.4x4techinfo.com
Copyright © 2005-2006 4x4 Tech Inc. All Rights Reserved. www.4x4techinfo.com
Copyright © 2005-2006 4x4 Tech Inc. All Rights Reserved. www.4x4techinfo.com
GM 4x4: Refer to Shop Note on page
95
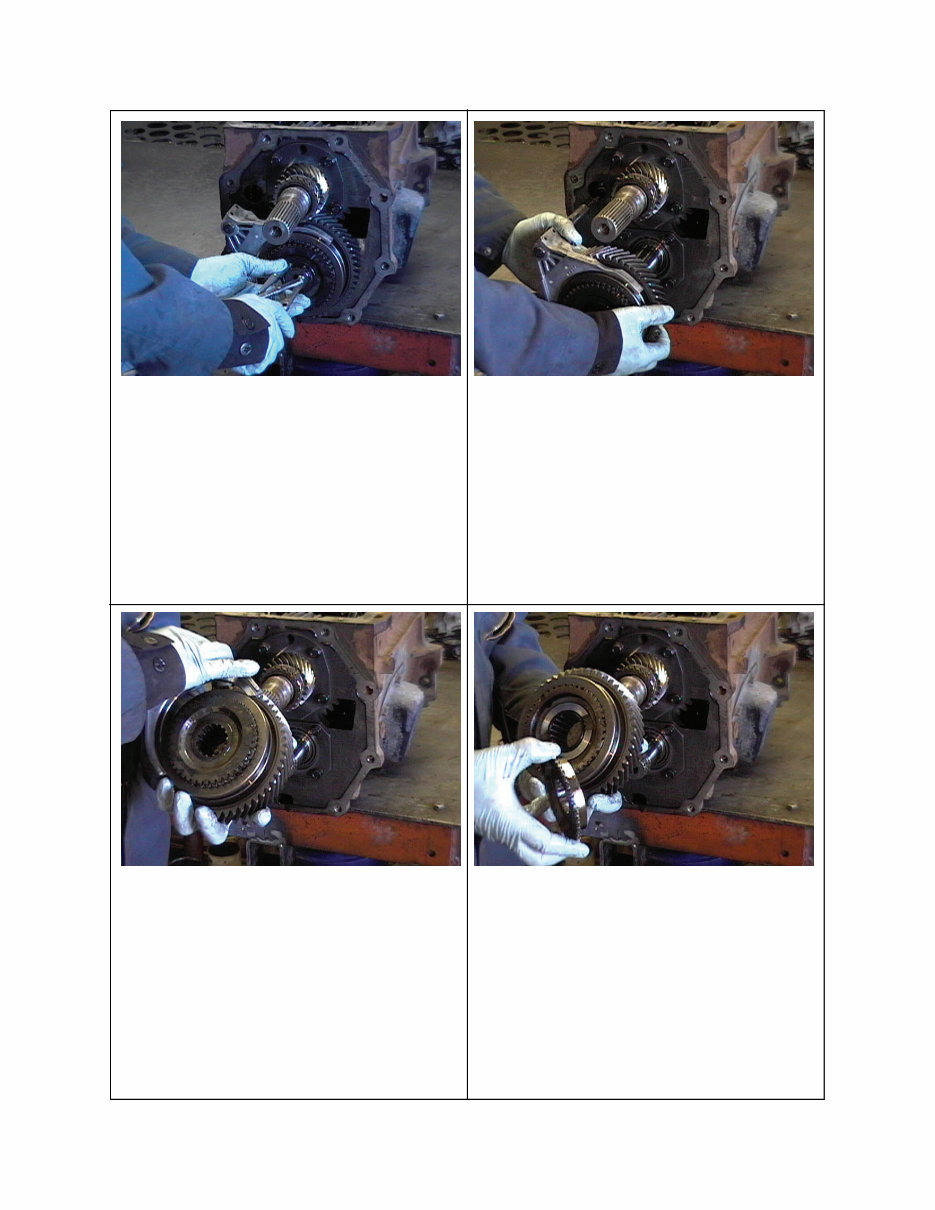
Remove the lock ring from the back
of the countershaft.
Tool Recommendation:
QT2030 Lock Ring Pliers
Carefully work the countershaft 5th
gear assembly off the countershaft.
Simultaneously work the inner cast
iron 5th gear shift lug off the shift rail.
Remove the 5th gear shift fork. Remove 5th gear clutch.
5
Copyright © 2005-2006 4x4 Tech Inc. All Rights Reserved. www.4x4techinfo.com
Copyright © 2005-2006 4x4 Tech Inc. All Rights Reserved. www.4x4techinfo.com
Copyright © 2005-2006 4x4 Tech Inc. All Rights Reserved. www.4x4techinfo.com
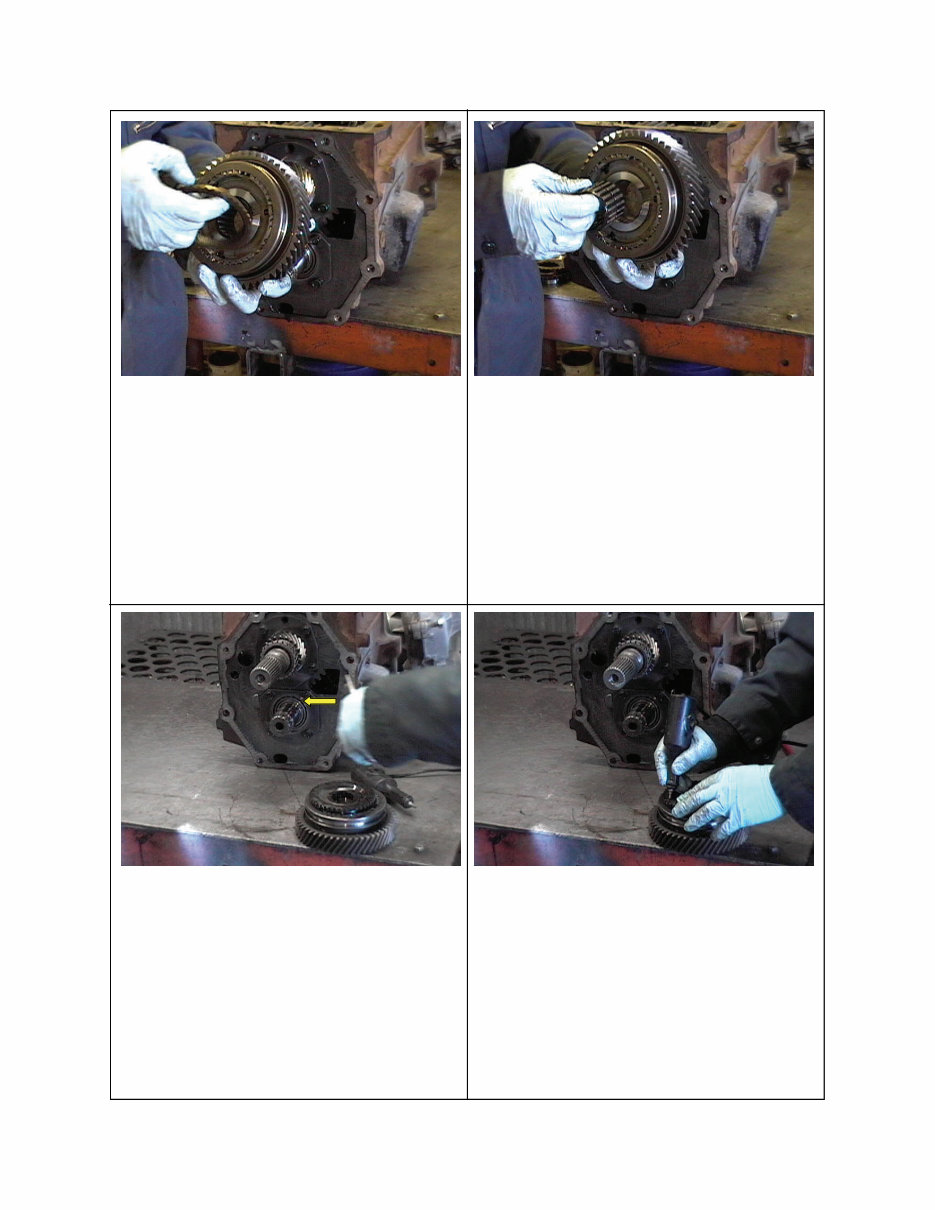
Remove the 5th gear synchronizer
ring.
Remove the 5th gear bearing.
Remove thrust washer locating pin
from countershaft.
Tool Recommendation:
Needle nose pliers
We recommend marking the matching
synchronizer and gear parts with an
engraving tool before further disas-
sembly.
Tool Recommendation:
Carbide tipped electric engraver
6
Copyright © 2005-2006 4x4 Tech Inc. All Rights Reserved. www.4x4techinfo.com
Copyright © 2005-2006 4x4 Tech Inc. All Rights Reserved. www.4x4techinfo.com
Copyright © 2005-2006 4x4 Tech Inc. All Rights Reserved. www.4x4techinfo.com
You're Reading a Preview
What's Included?
Fast Download Speeds
Online & Offline Access
Access PDF Contents & Bookmarks
Full Search Facility
Print one or all pages of your manual
$52.99
Viewed 20 Times Today


Secure transaction
What's Included?
Fast Download Speeds
Online & Offline Access
Access PDF Contents & Bookmarks
Full Search Facility
Print one or all pages of your manual
$52.99
Get the comprehensive NV4500 Manual Transmission Repair Service Workshop Shop Manual for detailed information on:
- Description
- Operation
- Diagnosis and Testing
- Removal
- Disassembly
- Cleaning
- Inspection
- Assembly
- Installation
- Specifications
- Special Tools
- Adapter Housing Seal - Removal and Installation
- Extension Housing Seal - Removal and Installation
- Shift Mechanism - Removal and Installation
- Shift Cover - Removal and Installation
This manual is valuable for both professional mechanics and DIY enthusiasts.


