

GM 4L60 / 4L60E Rebuild Procedures Manual
What's Included?
Fast Download Speeds
Online & Offline Access
Access PDF Contents & Bookmarks
Full Search Facility
Print one or all pages of your manual
GM 4L60E/4L60 (700R4)
Rebuild Procedures
Written by: Clifford McCormick

©2003 ATRA. All Rights Reserved. Printed in U. S. A.
iii 4L60E/4L60 Rebuild Procedures
Program Introduction…
The General Motors 4L60 (also known as the THM700R4) has been with us now
for over two decades and, along with the completely computer controlled 4L60E version,
has quickly become one of the most widely used late-model GM rear wheel drive
transmissions found in cars and lighter-duty pickup trucks. This unit’s time-tested
durability and wide gear ratio spread of from 3.06:1 to 0.70:1 make it the perfect unit for
a really wide range of different applications. Although many of the head or lead
rebuilders in today’s transmission shops ‘cut their teeth’ on this unit, many rebuild
technicians join our industry each year, and usually need to find their way through this
unit pretty quickly since it’s definitely one of the ‘bread-and-butter’ transmissions, one
that brings a lot of work into your shop. There may be parts of the rebuild process that
you are not very familiar with, or you may be new to this particular type of transmission.
In either case, you need some point of reference- something that will show you how to
proceed when you are not sure (or have no idea whatsoever), and that is exactly what this
book is designed to do.
You will not find a photocopied section out of a factory manual between these
covers. In fact, you will notice a substantial difference between the book you are holding
and any other books written on the subject. This is because, as this book was being
written, the author was rebuilding a 4L60E step by step as he was writing this book. This
helped assure that there would be no missing steps (and it was also real handy for taking
pictures along the way…). This book was written for transmission rebuilders by a
transmission rebuilder, in plain English rather than complex ‘factoreze’ terminology.
Although a 4L60E was used throughout most of these pages, the areas where the 4L60
procedures substantially differ from the 4L60E procedures or assemblies will have a
separate 4L60 section.
So, whether you’ve already done a few of the 4L60E units, or are about to tackle
your first one, this book will show you how to get through the sticky parts of a rebuild, as
well as the most thorough way to get through the job, start to finish.

©2003 ATRA. All Rights Reserved. Printed in U. S. A.
iv 4L60E/4L60 Rebuild Procedures

©2003 ATRA. All Rights Reserved. Printed in U. S. A.
v 4L60E/4L60 Rebuild Procedures
Table Of Contents
Unit Disassembly
Pump
Input Drum Disassembly
Input Drum Assembly
Reverse Drum
Gear Train
Case Preparation
Valve Body/Governor-4L60
Valve Body-4L60E
Unit Assembly
Page 1
Page 21
Page 49
Page 55
Page 73
Page 79
Page 91
Page 109
Page 128
Page 140
This program has been designed by the Automatic Transmission Rebuilders Association (ATRA) to be used by qualified automotive
transmission technicians. Since the circumstance of its use is beyond ATRA’s control, ATRA assumes no liability for the use of such
information or any damages incurred through its use and application. Nothing contained in this program is to be considered
contractual or providing some form of warranty on the part of ATRA. No part of this program should be construed as recommending
any procedure which is contrary to the vehicle manufacturer’s procedures. ATRA recommends that only certified automotive
technicians with experience in transmission diagnosis and repair perform the procedures in this program.
This program contains copyrighted material belonging to ATRA. No part of this program may be reproduced or used in any form by
any means- graphic, electronic or mechanical, including photocopying, recording, electronic, or information storage-and-retrieval
systems- without the express written permission from ATRA.
ATRA® and the ATRA® logo are registered trademarks of the Automatic Transmission Rebuilders Association.
Public exhibition or use of this material for group training or as part of a school curriculum, without the express written permission of
ATRA, is prohibited by law. For information on using this material for independent training programs, contact ATRA at (805) 604-
2000.
©2003 ATRA. All rights reserved. Printed in U.S.A.
©2003 ATRA. All Rights Reserved. Printed in U. S. A.
1 4L60E/4L60 Rebuild Procedures
Unit Disassembly
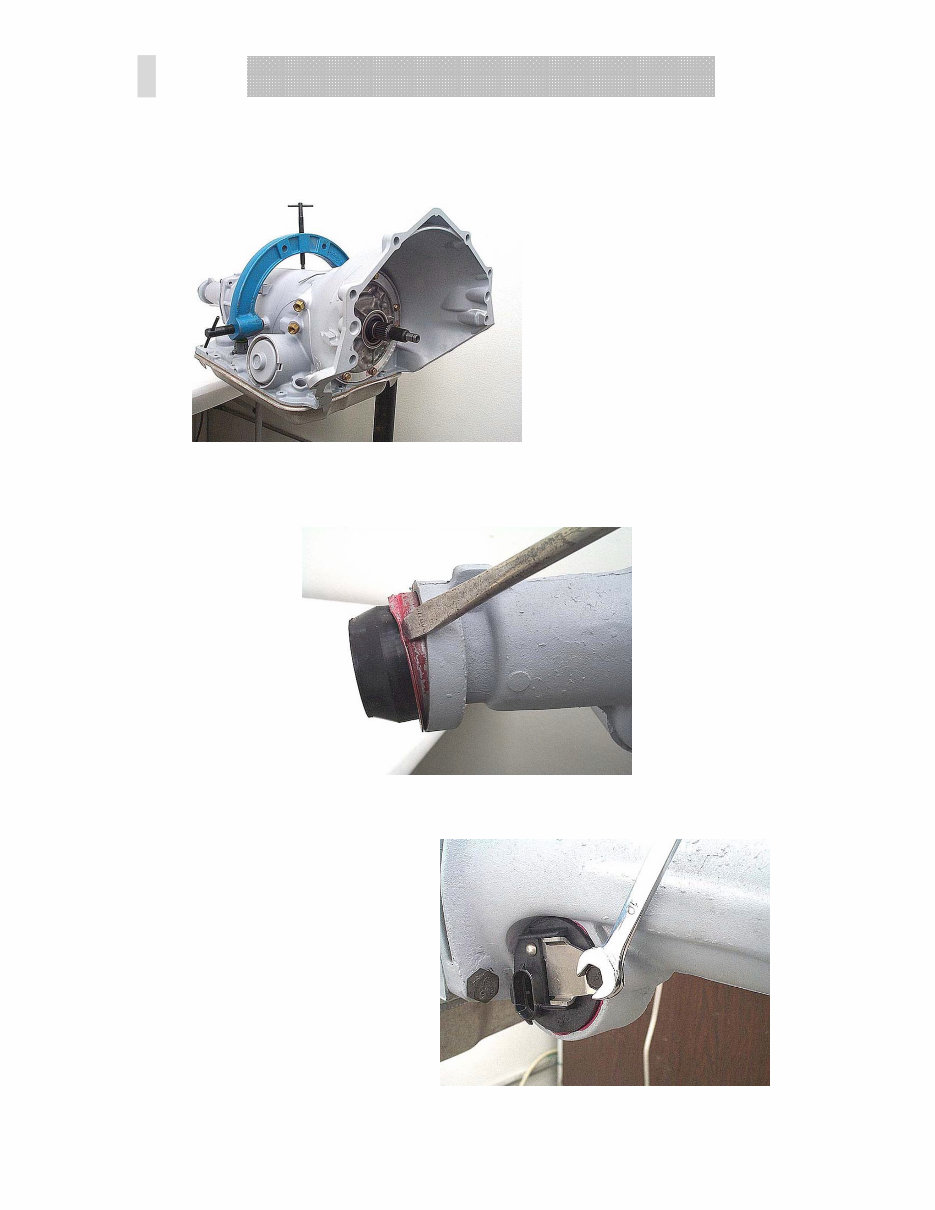
Step 1: Place the unit into the holding fixture, if available.
Step 2: Use a chisel or large screwdriver to remove the rear seal from the extension
housing.
Step 3: Remove the output speed sensor if it is still in the extension housing.
©2003 ATRA. All Rights Reserved. Printed in U. S. A.
2 4L60E/4L60 Rebuild Procedures
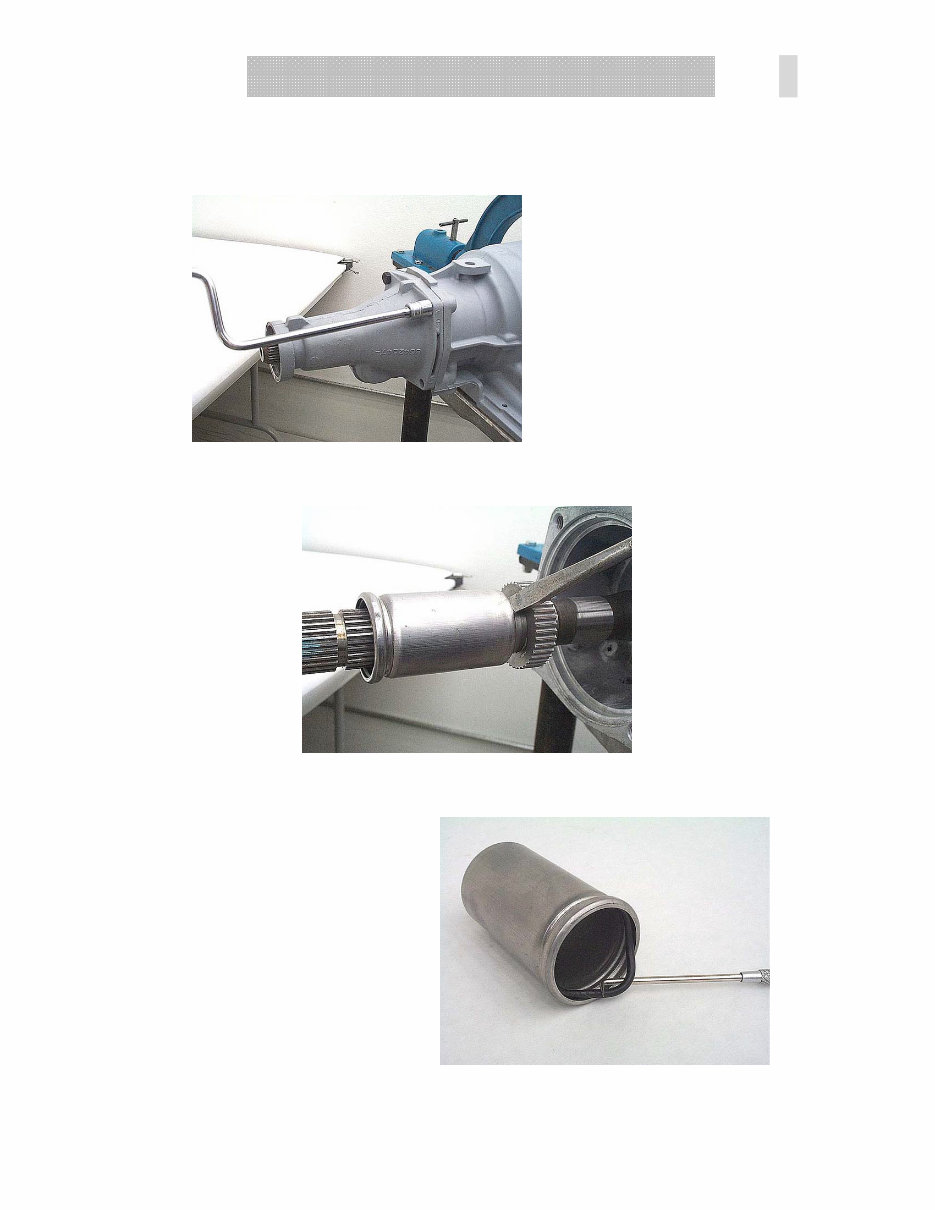
Step 4: Remove the extension housing, and housing-to-case rubber seal. Remove the
yoke seal from the output shaft if equipped by tapping on it gently with a large
screwdriver. Remove the o-ring from the yoke seal.
©2003 ATRA. All Rights Reserved. Printed in U. S. A.
3 4L60E/4L60 Rebuild Procedures
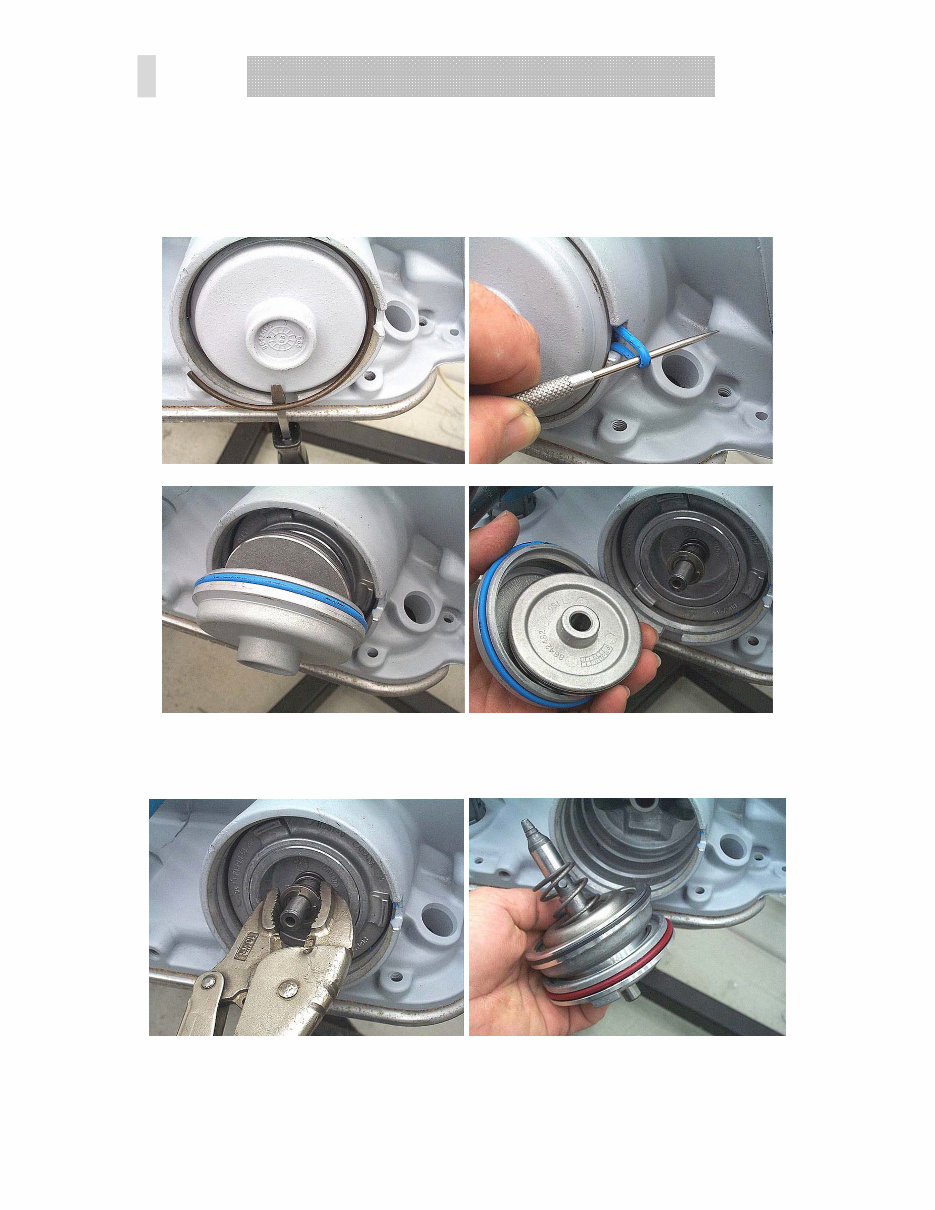
Step 5: Remove the servo cover snap ring. Pull the cover out until the servo cover o-ring
is in the snap ring groove. Pull the cover o-ring through the slot in the side of the servo
bore with a pick, and rotate the servo cover back and forth while pulling on the o-ring
until the o-ring breaks or the servo cover and 4
th
piston pop out of the bore. If the o-ring
breaks, remove it from the case and the cover and piston should pop right out of the case.
Step 6: Remove the rest of the servo components from the servo bore. If the servo
assembly appears stuck, carefully pull on the servo pin snap ring with a pair of pliers.
©2003 ATRA. All Rights Reserved. Printed in U. S. A.
4 4L60E/4L60 Rebuild Procedures
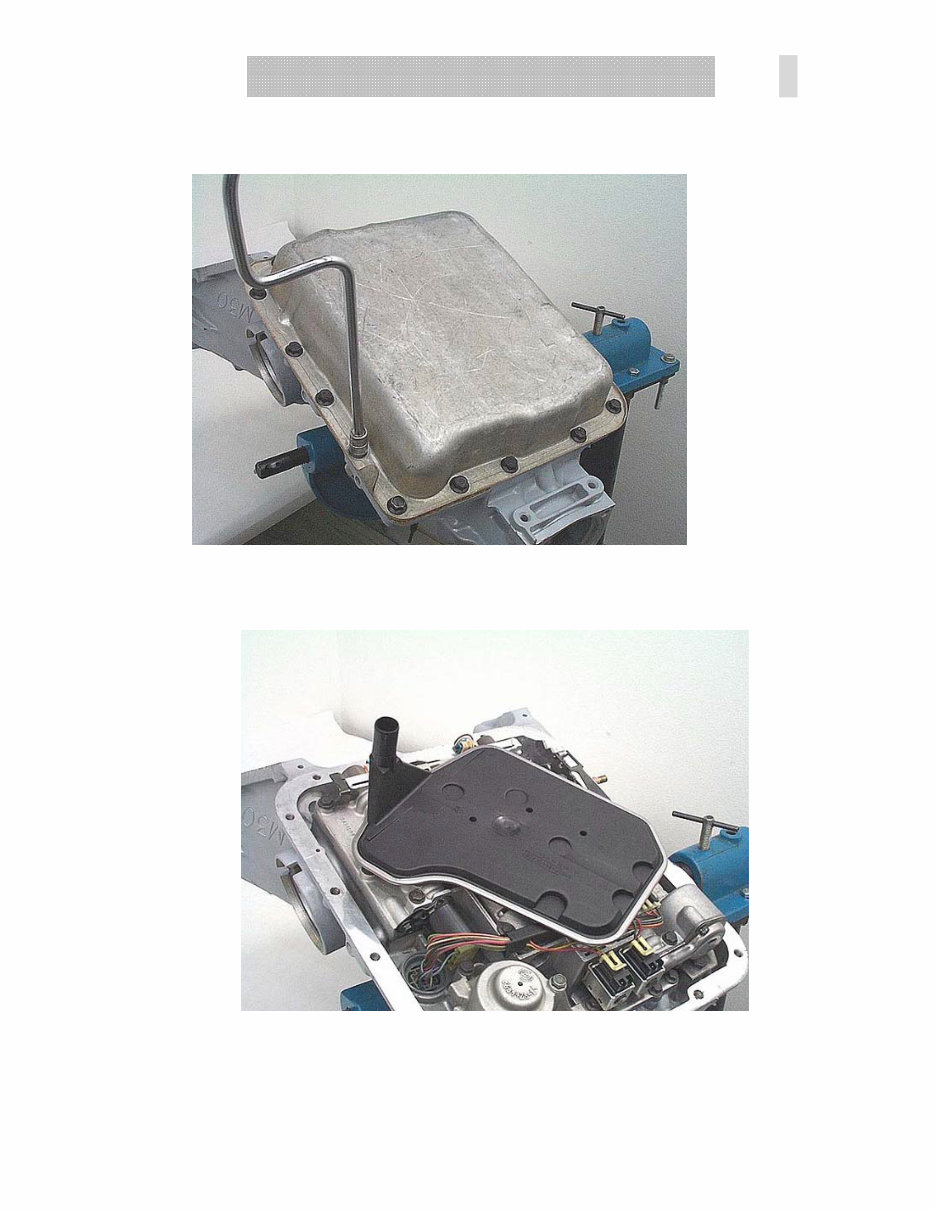
Step 7: Turn the unit over so that the pan is facing you. Remove the pan and pan gasket
from the bottom of the unit.
Step 8: Remove the filter by rotating it to loosen the filter neck from the seal, then
pulling the filter straight up.
©2003 ATRA. All Rights Reserved. Printed in U. S. A.
5 4L60E/4L60 Rebuild Procedures
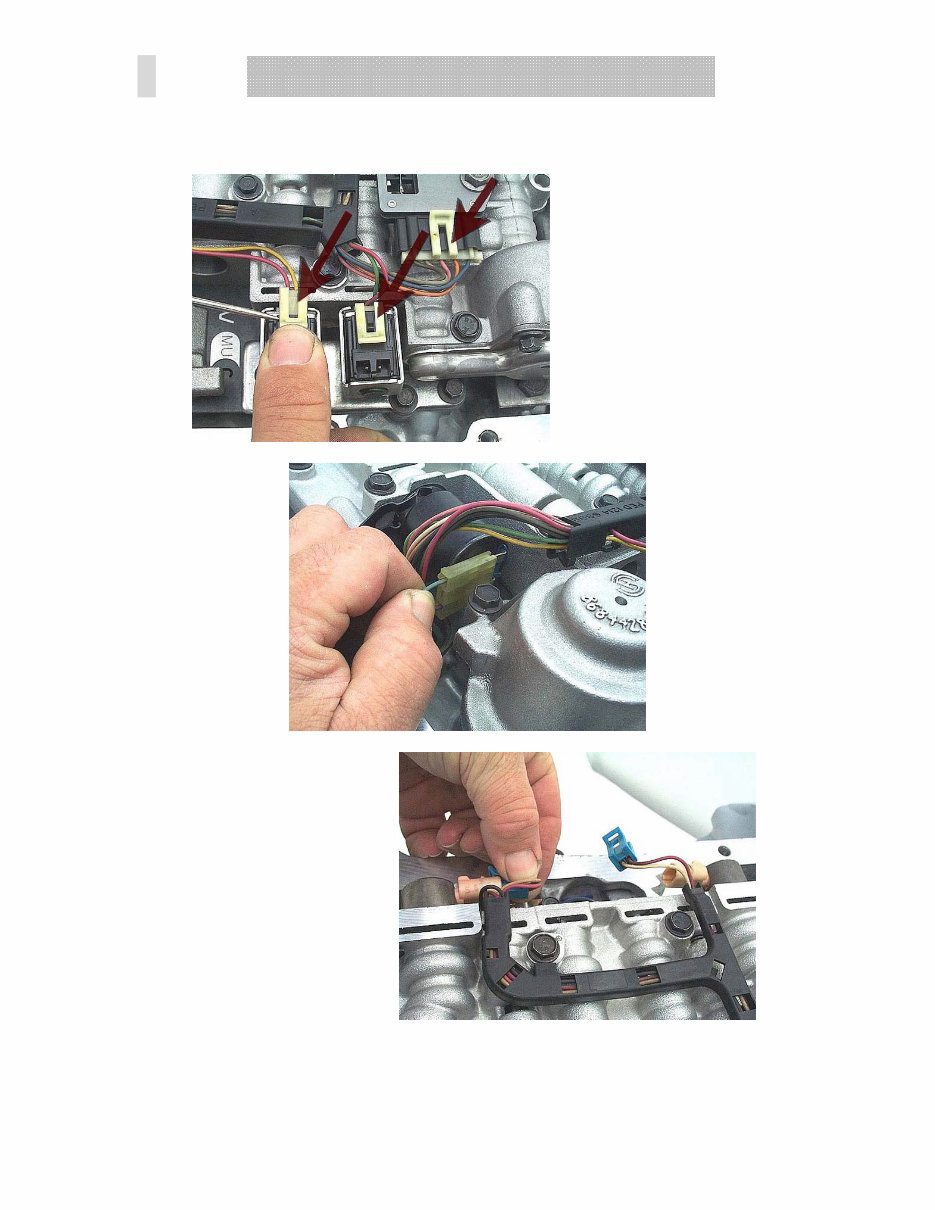
Step 9: Disconnect the electrical wiring from the solenoids and the pressure switch
assembly.
You're Reading a Preview
What's Included?
Fast Download Speeds
Online & Offline Access
Access PDF Contents & Bookmarks
Full Search Facility
Print one or all pages of your manual
$31.99
$41.99
Viewed 14 Times Today


Secure transaction
What's Included?
Fast Download Speeds
Online & Offline Access
Access PDF Contents & Bookmarks
Full Search Facility
Print one or all pages of your manual
$31.99
$41.99
- Contains service, maintenance, troubleshooting, and replacement procedures for the GM 4L60 / 4L60E transmission
- Includes step-by-step instructions, clear images, and exploded-view illustrations
- Enables anyone to safely and efficiently service and repair their transmission
- Provides every troubleshooting, repair, and replacement procedure by the manufacturer
- Features torque specs and everything needed to diagnose, repair, or overhaul the transmission
- Convenient digital format eliminates the need to flip through pages
- Compatible with various electronic devices including PC, Mac, Android, and Apple devices
- Can be printed for those who prefer a physical copy
- Language: English
- Requirements: Adobe Reader (free)


