SAFETY PRECAUTIONS MAINTENANCE AND REPAIR • When lifting parts or assemblies, make sure all slings, chains, or cables are correctly fastened, and that the load being lifted is balanced. Make sure the crane, cables, and chains have the capacity to support the weight of the load. • Do not lift heavy parts by hand, use a lifting mechanism. • Wear safety glasses. • DISCONNECT THE BATTERY CONNECTOR before doing any maintenance or repair on electric lift trucks. Disconnect the battery ground cable on internal combustion lift trucks. • Always use correct blocks to prevent the unit from rolling or falling. See HOW TO PUT THE LIFT TRUCK ON BLOCKS in the Operating Manual or the Periodic Mainte- nance section. • Keep the unit clean and the working area clean and orderly. • Use the correct tools for the job. • Keep the tools clean and in good condition. • Always use HYSTER APPROVED parts when making repairs. Replacement parts must meet or exceed the specifications of the original equipment manufacturer. • Make sure all nuts, bolts, snap rings, and other fastening devices are removed before using force to remove parts. • Always fasten a DO NOT OPERATE tag to the controls of the unit when making repairs, or if the unit needs repairs. • Be sure to follow the WARNING and CAUTION notes in the instructions. • Gasoline, Liquid Petroleum Gas (LPG), Compressed Natural Gas (CNG), and Diesel fuel are flammable. Be sure to follow the necessary safety precautions when handling these fuels and when working on these fuel systems. • Batteries generate flammable gas when they are being charged. Keep fire and sparks away from the area. Make sure the area is well ventilated. NOTE: The following symbols and words indicate safety information in this manual: WARNING Indicates a condition that can cause immediate death or injury! CAUTION Indicates a condition that can cause property damage!
Table of Contents Periodic Maintenance TABLE OF CONTENTS (Continued) Motor Brushes, General ............................................................................................................................ 27 Maintenance Procedures Every 1000 Hours or 6 Months ............................................................................... 42 Lift Chains ..................................................................................................................................................... 42 Forks............................................................................................................................................................... 42 Check Upper and Lower Bearings, Integral Sideshift Carriage ................................................................. 42 Maintenance Procedures Every 2000 Hours or Yearly .................................................................................... 43 Hydraulic System .......................................................................................................................................... 43 Change Filter for Hydraulic Oil ............................................................................................................... 43 Change Hydraulic Oil ............................................................................................................................... 44 Differential and Speed Reducer .................................................................................................................... 44 Service Brakes ............................................................................................................................................... 45 Contactors ...................................................................................................................................................... 45 Wheel Bearings .............................................................................................................................................. 45 Steer Wheels, Lubrication ........................................................................................................................ 45 Drive Wheels, Lubrication ........................................................................................................................ 45 Lift Chains ..................................................................................................................................................... 46 Replace Upper and Lower Bearings, Integral Sideshift Carriage .............................................................. 46 Steering Axle.................................................................................................................................................. 46 King Pins and Rod Ends (Steering Cylinders)......................................................................................... 46 Other Lubrication .......................................................................................................................................... 46 Battery Maintenance ......................................................................................................................................... 46 How to Charge Battery.................................................................................................................................. 46 How to Change Battery ................................................................................................................................. 48 General....................................................................................................................................................... 48 Change Battery, E1.50-3.20XM, E2.00XMS (E25-65XM and E25-65XM 2 ) Models Only...................... 48 Change J2.00-3.20XM (J40-60XM and J40-60XM 2 ) Battery .................................................................. 51 Lift and Tilt System Leak Check ...................................................................................................................... 53 Lift Cylinders Leak Check ............................................................................................................................ 53 Tilt Cylinders Leak Check ............................................................................................................................ 53 Safety Procedures When Working Near Mast .................................................................................................. 54 Lift Chain Adjustments ..................................................................................................................................... 56 PMT Circuit Check ............................................................................................................................................ 57 Welding Repairs ................................................................................................................................................. 58 Overhead Guard Changes ................................................................................................................................. 58 Wheels and Tire Maintenance........................................................................................................................... 59 Tires and Wheels, E1.50-3.20XM, E2.00XMS (E25-65XM and E25-65XM 2 ) ............................................. 59 Remove Wheels From Lift Truck .............................................................................................................. 59 Remove and Install Tire on Wheel ........................................................................................................... 59 Pneumatic Tires and Wheels J2.00-3.20XM (J40-60XM and J40-60XM 2 ) ................................................. 60 Remove Wheels From Lift Truck .............................................................................................................. 60 Remove Wheel From Pneumatic Tire....................................................................................................... 61 Install Wheel in Pneumatic Tire .............................................................................................................. 62 Install Three- or Four-Piece Wheel in Pneumatic Tire ........................................................................... 63 Add Air to Tires ......................................................................................................................................... 64 Wheels, Install ........................................................................................................................................... 64 Solid Rubber Tires on Pneumatic Wheels .................................................................................................... 65 Remove Wheels From Lift Truck .............................................................................................................. 65 Remove Solid Rubber Tire From Pneumatic Wheel ................................................................................ 65 Install Solid Rubber Tire on Pneumatic Wheel ....................................................................................... 67 Wheels, Install ........................................................................................................................................... 68 Solid Rubber Tire, Change ............................................................................................................................ 68 ii
Periodic Maintenance Table of Contents TABLE OF CONTENTS (Continued) Remove and Install Tire on Wheel ........................................................................................................... 68 Remove Wheel From Tire ......................................................................................................................... 70 Install Wheel in Tire ................................................................................................................................. 71 SIT Tire, Change ........................................................................................................................................... 72 Remove SIT Solid Tire From Wheel ......................................................................................................... 73 Install SIT Solid Tire on Wheel ................................................................................................................ 74 Adhesives and Sealants ..................................................................................................................................... 75 This section is for the following models: E1.50-1.75XM, E2.00XMS (E25-40XMS, E25-40XMS 2 ) [D114]; E2.00-3.20XM (E45-65XM, E45-65XM 2 ) [F108]; J2.00-3.20XM (J40-60XM, J40-60XM 2 ) [A216] iii
"THE QUALITY KEEPERS" HYSTER APPROVED PARTS
8000 SRM 552 General General WARNING Do not make repairs or adjustments unless you have both authorization and training. Repairs and adjustments that are not correct can make a dangerous operating condition. Do not operate a lift truck that needs repairs. Report the need for repairs immediately. If re- pair is necessary, put a DO NOT OPERATE tag in the operator’s area. Remove the key from the key switch. Disconnect the battery connec- tor. CAUTION Disposal of lubricants and fluids must meet lo- cal environmental regulations. Disposal of batteries must meet local environ- mental regulations. On lift trucks before XM 2 , when turning the key switch to the ON position, the Brush Wear Indicator and Motor Temperature Indicator will illuminate. On XM 2 lift trucks, there is no brush wear indicator, but the LCD screen will show a status code indicat- ing that the brushes need replacing as described in the Operating Manual. Contact your dealer if any LED Indicators do not illuminate during the check part of initial lift truck operation. This section contains a Maintenance Schedule and the instructions for maintenance and inspection. The Maintenance Schedule has time intervals for in- spection, lubrication, and maintenance. The time intervals are based on a normal operation. A nor- mal operation is considered to be one 8-hour shift per day in a relatively clean environment on an im- proved surface. Multiple shifts, dirty operating con- ditions, etc., will require a reduction in the recom- mended time periods in the Maintenance Schedule. Your dealer for Hyster lift trucks has the equipment and trained service personnel to do a complete pro- gram of inspection, lubrication, and maintenance. A regular program of inspection, lubrication, and main- tenance will help your lift truck provide more effi- cient performance and operate for a longer period of time. Some users have service personnel and equipment to do the inspection, lubrication, and maintenance shown in the Maintenance Schedule. Service Man- uals are available from your dealer for Hyster lift trucks to help users who do their own maintenance. SERIAL NUMBER DATA The serial number code for the lift truck is on the Nameplate. The code is also stamped on top of the rear bulkhead of the frame. It is on the bulkhead inside the right rear leg of the overhead guard. HOW TO MOVE DISABLED LIFT TRUCK How to Tow Lift Truck WARNING Use extra caution when towing a lift truck if any of the following conditions exist: • Brakes do not operate correctly. • Steering does not operate correctly. • Tires are damaged. • Traction conditions are bad. • The lift truck must be moved on a steep grade. If the steering pump motor does not operate, steering control of the lift truck can be slow and difficult. Do NOT tow the lift truck if there is no power. Poor traction can cause the dis- abled lift truck or towing vehicle to slide. Steep grades will require additional brake force to stop the lift truck. Never carry a disabled lift truck unless the lift truck MUST be moved and cannot be towed. The lift truck used to carry the disabled lift truck MUST have a rated capacity equal to or greater than the weight of the disabled lift truck. The capacity must be for a load center equal to half the width of the disabled lift truck. See the Nameplate of the disabled lift truck for the approximate total weight. The forks must extend the full width of the disabled lift truck. Put the weight center of the disabled lift truck on the load center of the forks. Do not damage the underside of the lift truck. 1. The towed lift truck must have an operator. 1
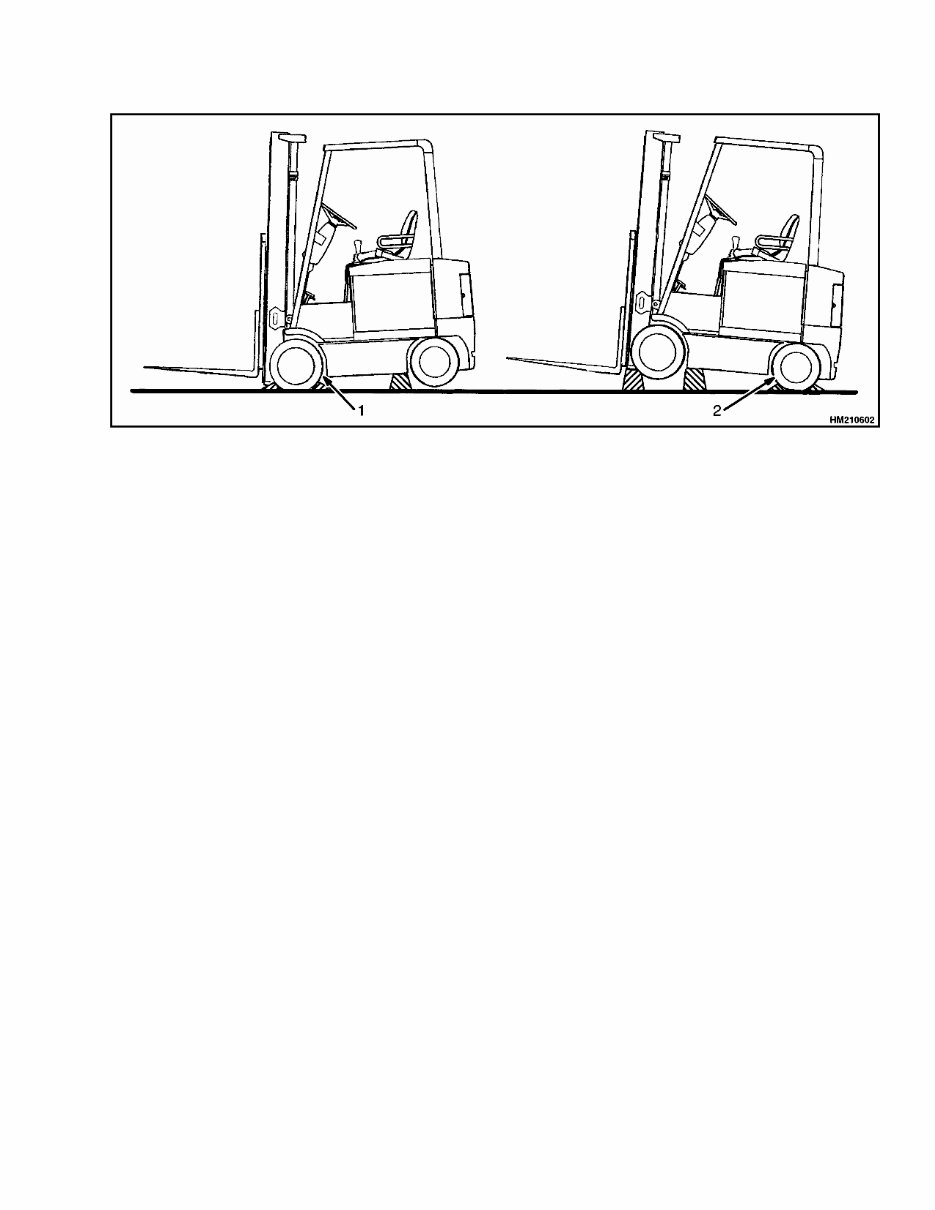
General 8000 SRM 552 2. Raise the carriage and forks approximately 300 mm (12 in.) from the surface. Install a chain to prevent the carriage and mast channels from moving. 3. Tow with another lift truck of equal or greater ca- pacity than the disabled lift truck. Install a load of approximately half-capacity on the forks of the lift truck that is being used to tow the disabled lift truck. The half-capacity load will increase the traction of the lift truck. Keep the load as low as possible. 4. Use a towing link made of steel that fastens to the tow pins in the counterweights of both lift trucks. 5. Release the parking brake. 6. Tow the lift truck slowly. HOW TO PUT LIFT TRUCK ON BLOCKS How to Raise Drive Tires WARNING The lift truck must be put on blocks for some types of maintenance and repair. The removal of the following assemblies will cause large changes in the center of gravity: mast, drive axle, battery, or counterweight. When the lift truck is put on blocks, put additional blocks in the following positions to maintain stability: a. Before removing the mast and drive axle, put blocks under the counterweight so the lift truck cannot fall backward. b. Before removing the counterweight, put blocks under the mast assembly so the lift truck cannot fall forward. The surface must be solid, even, and level when the lift truck is put on blocks. Make sure that any blocks used to support the lift truck are solid, one-piece units. NOTE: Some lift trucks have lifting eyes. These lift points can be used to raise the lift truck so that blocks can be installed. 1. Put blocks on each side (front and back) of the steering tires to prevent movement of the lift truck. See Figure 1. 2. Put the mast in a vertical position. Put a block under each outer mast channel. 3. Tilt the mast fully forward until the drive tires are raised from the surface. 4. Put additional blocks under the frame behind the drive tires. 5. If the hydraulic system will not operate, use a hydraulic jack under the side of the frame near the front. Make sure that the jack has a capacity equal to at least half the weight of the lift truck. See the Nameplate. How to Raise Steering Tires 1. Apply the parking brake. Put blocks on both sides (front and back) of the drive tires to pre- vent movement of the lift truck. See Figure 1. 2. Use a hydraulic jack to raise the steering tires. Make sure that the jack has a capacity of at least 2/3 of the total weight of the lift truck as shown on the Nameplate. 3. Put the jack under the steering axle or frame to raise the lift truck. Put blocks under the frame to support the lift truck. 2
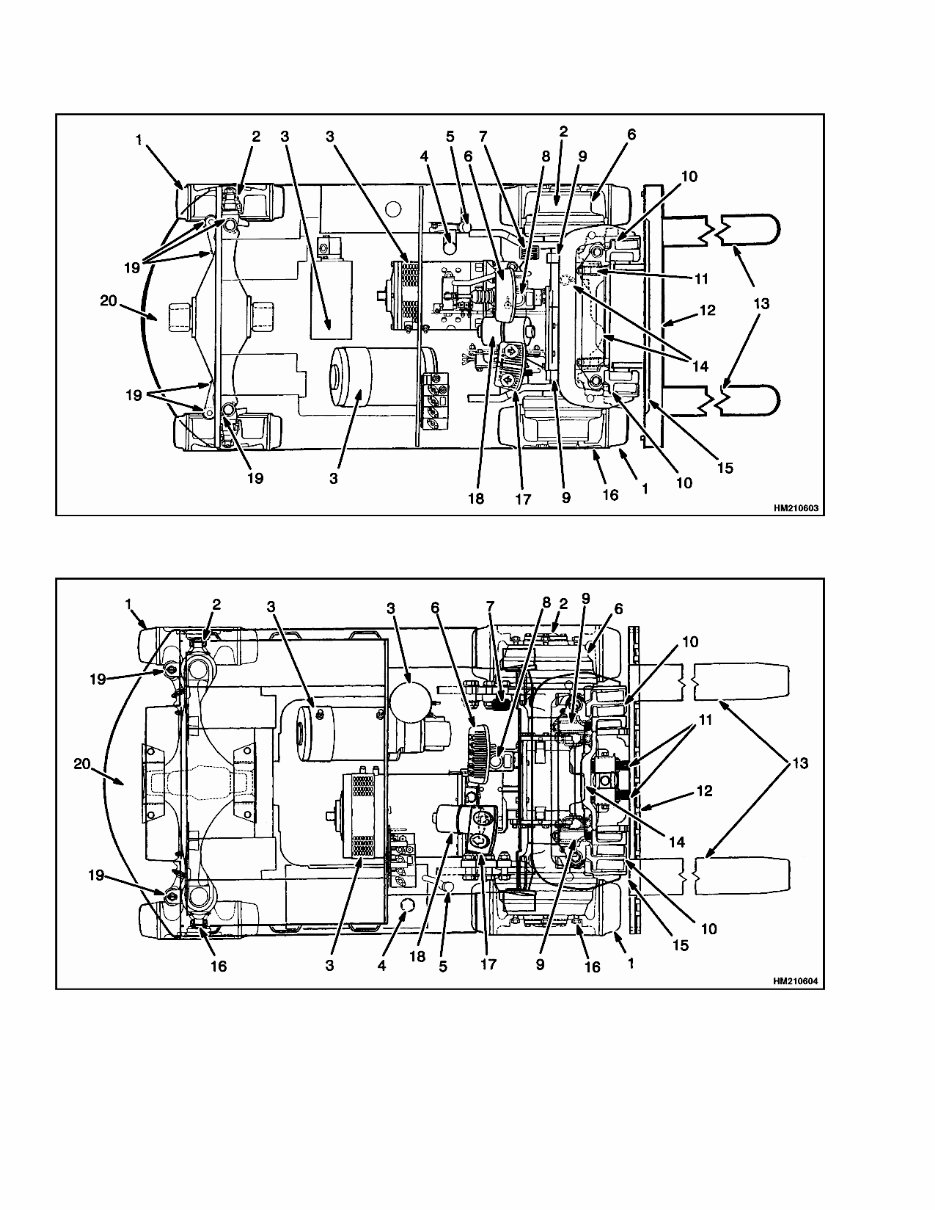
8000 SRM 552 Maintenance Schedule 1. DRIVE TIRES 2. STEERING TIRES Figure 1. Put Lift Trucks on Blocks Maintenance Schedule The Maintenance Schedule has two time periods. If the lift truck is operated less than eight hours each day, do maintenance at the 1-DAY, 6-WEEKS, 3-MONTHS, 6-MONTHS, and 1-YEAR periods. If the lift truck is operated more than eight hours each day, do maintenance at the periods shown in hours (8, 250, 500, 1000, 2000). The approximate locations of the items indicated in the Maintenance Schedule are shown in Figure 2, Figure 3, and Figure 4. The Maintenance Schedule, Table 1, has the max- imum service intervals for average conditions. In- spect and lubricate more frequently if the lift truck operates in dirty or difficult conditions. 3 HM210602
Get the Hyster F108 (E45XM E50XM E55XM E60XM E65XM (Pre-SEM)(Up to SN F10840W)) Forklift Service Repair Factory Manual for comprehensive maintenance and repair guidance. This electronic manual offers the advantage of zooming in on your computer for clear visibility, making it convenient for professional mechanics and DIY enthusiasts. The manual covers a range of models including E45XM, E50XM, E55XM, E60XM, and E65XM, providing detailed information on various components such as axle housing, brake system, electrical system, hydraulic system, steering system, and more. With step-by-step instructions, it enables easy and cost-effective repairs. The manual is available in PDF format and is compatible with all versions of Windows and Mac, making it accessible to a wide range of users.
Recently Viewed
5,521,897Happy Clients
2,594,462eManuals
1,120,453Trusted Sellers
15Years in Business
Price:
Actual Price:
Hyster F108 (E45XM E50XM E55XM E60XM E65XM (Pre-SEM)(Up to SN F10840W)) Forklift Service Repair Factory Manual INSTANT

(Up to SN F10840W)) Forklift Service Repair Factory Manual")