


Workshop Manual
AC
2(2)
Sterndrive
SX-M, SX-MTD
DP-SM, DP-SMTD, DP-SMTD1
Transom Shield
SX-M, SX-MLT, SX-MACLT,
SX-MHP, SX-MDA, SX-MDB
Sterndrive
Transom Shield


VPA 7743008 07-2003 1
General Information . . . . . . . . . . . . . . . . . . . 3
Transom Shield Assembly - SX-M . . . . . . . 17
Transom Shield Assembly SX-MHP . . . . . . 53
Upper Gear Housing . . . . . . . . . . . . . . . . . . 89
SX Lower Gearcase . . . . . . . . . . . . . . . . . . 145
DP-S Lower Gearcase . . . . . . . . . . . . . . . . 179
Sterndrive Removal and Installation . . . . 227
Trim/Tilt Hydraulic System . . . . . . . . . . . . 241
Propellers . . . . . . . . . . . . . . . . . . . . . . . . . . 259

2 VPA 7743008 07-2003
Notes
. . . . . . . . . . . . . . . . . . . . . . . . . . . . . . . . . . . . . . . . . . . . . . . . . . . . . . . . . . . . . . . . . . . . . . . . . . .
. . . . . . . . . . . . . . . . . . . . . . . . . . . . . . . . . . . . . . . . . . . . . . . . . . . . . . . . . . . . . . . . . . . . . . . . . . .
. . . . . . . . . . . . . . . . . . . . . . . . . . . . . . . . . . . . . . . . . . . . . . . . . . . . . . . . . . . . . . . . . . . . . . . . . . .
. . . . . . . . . . . . . . . . . . . . . . . . . . . . . . . . . . . . . . . . . . . . . . . . . . . . . . . . . . . . . . . . . . . . . . . . . . .
. . . . . . . . . . . . . . . . . . . . . . . . . . . . . . . . . . . . . . . . . . . . . . . . . . . . . . . . . . . . . . . . . . . . . . . . . . .
. . . . . . . . . . . . . . . . . . . . . . . . . . . . . . . . . . . . . . . . . . . . . . . . . . . . . . . . . . . . . . . . . . . . . . . . . . .
. . . . . . . . . . . . . . . . . . . . . . . . . . . . . . . . . . . . . . . . . . . . . . . . . . . . . . . . . . . . . . . . . . . . . . . . . . .
. . . . . . . . . . . . . . . . . . . . . . . . . . . . . . . . . . . . . . . . . . . . . . . . . . . . . . . . . . . . . . . . . . . . . . . . . . .
. . . . . . . . . . . . . . . . . . . . . . . . . . . . . . . . . . . . . . . . . . . . . . . . . . . . . . . . . . . . . . . . . . . . . . . . . . .
. . . . . . . . . . . . . . . . . . . . . . . . . . . . . . . . . . . . . . . . . . . . . . . . . . . . . . . . . . . . . . . . . . . . . . . . . . .
. . . . . . . . . . . . . . . . . . . . . . . . . . . . . . . . . . . . . . . . . . . . . . . . . . . . . . . . . . . . . . . . . . . . . . . . . . .
. . . . . . . . . . . . . . . . . . . . . . . . . . . . . . . . . . . . . . . . . . . . . . . . . . . . . . . . . . . . . . . . . . . . . . . . . . .
. . . . . . . . . . . . . . . . . . . . . . . . . . . . . . . . . . . . . . . . . . . . . . . . . . . . . . . . . . . . . . . . . . . . . . . . . . .
. . . . . . . . . . . . . . . . . . . . . . . . . . . . . . . . . . . . . . . . . . . . . . . . . . . . . . . . . . . . . . . . . . . . . . . . . . .
. . . . . . . . . . . . . . . . . . . . . . . . . . . . . . . . . . . . . . . . . . . . . . . . . . . . . . . . . . . . . . . . . . . . . . . . . . .
. . . . . . . . . . . . . . . . . . . . . . . . . . . . . . . . . . . . . . . . . . . . . . . . . . . . . . . . . . . . . . . . . . . . . . . . . . .
. . . . . . . . . . . . . . . . . . . . . . . . . . . . . . . . . . . . . . . . . . . . . . . . . . . . . . . . . . . . . . . . . . . . . . . . . . .
. . . . . . . . . . . . . . . . . . . . . . . . . . . . . . . . . . . . . . . . . . . . . . . . . . . . . . . . . . . . . . . . . . . . . . . . . . .
. . . . . . . . . . . . . . . . . . . . . . . . . . . . . . . . . . . . . . . . . . . . . . . . . . . . . . . . . . . . . . . . . . . . . . . . . . .
. . . . . . . . . . . . . . . . . . . . . . . . . . . . . . . . . . . . . . . . . . . . . . . . . . . . . . . . . . . . . . . . . . . . . . . . . . .
. . . . . . . . . . . . . . . . . . . . . . . . . . . . . . . . . . . . . . . . . . . . . . . . . . . . . . . . . . . . . . . . . . . . . . . . . . .
. . . . . . . . . . . . . . . . . . . . . . . . . . . . . . . . . . . . . . . . . . . . . . . . . . . . . . . . . . . . . . . . . . . . . . . . . . .
. . . . . . . . . . . . . . . . . . . . . . . . . . . . . . . . . . . . . . . . . . . . . . . . . . . . . . . . . . . . . . . . . . . . . . . . . . .
. . . . . . . . . . . . . . . . . . . . . . . . . . . . . . . . . . . . . . . . . . . . . . . . . . . . . . . . . . . . . . . . . . . . . . . . . . .
. . . . . . . . . . . . . . . . . . . . . . . . . . . . . . . . . . . . . . . . . . . . . . . . . . . . . . . . . . . . . . . . . . . . . . . . . . .
. . . . . . . . . . . . . . . . . . . . . . . . . . . . . . . . . . . . . . . . . . . . . . . . . . . . . . . . . . . . . . . . . . . . . . . . . . .
. . . . . . . . . . . . . . . . . . . . . . . . . . . . . . . . . . . . . . . . . . . . . . . . . . . . . . . . . . . . . . . . . . . . . . . . . . .
. . . . . . . . . . . . . . . . . . . . . . . . . . . . . . . . . . . . . . . . . . . . . . . . . . . . . . . . . . . . . . . . . . . . . . . . . . .
. . . . . . . . . . . . . . . . . . . . . . . . . . . . . . . . . . . . . . . . . . . . . . . . . . . . . . . . . . . . . . . . . . . . . . . . . . .
. . . . . . . . . . . . . . . . . . . . . . . . . . . . . . . . . . . . . . . . . . . . . . . . . . . . . . . . . . . . . . . . . . . . . . . . . . .
. . . . . . . . . . . . . . . . . . . . . . . . . . . . . . . . . . . . . . . . . . . . . . . . . . . . . . . . . . . . . . . . . . . . . . . . . . .
. . . . . . . . . . . . . . . . . . . . . . . . . . . . . . . . . . . . . . . . . . . . . . . . . . . . . . . . . . . . . . . . . . . . . . . . . . .
. . . . . . . . . . . . . . . . . . . . . . . . . . . . . . . . . . . . . . . . . . . . . . . . . . . . . . . . . . . . . . . . . . . . . . . . . . .

General Information
VPA 7743008 07-2003 3
General Information
Sterndrive Lubrication - SX Models . . . . . . . . . . . . . . 6
Adding Lubricant to Sterndrive . . . . . . . . . . . . . . . . . . . . . . . . 6
Sterndrive Oil Capacity . . . . . . . . . . . . . . . . . . . . . . . . . . . . . . 6
Draining and Filling Sterndrive . . . . . . . . . . . . . . . . . . . . . . . . 6
Sterndrive Lubrication - DP-S Models . . . . . . . . . . . . 8
Adding Lubricant to Sterndrive . . . . . . . . . . . . . . . . . . . . . . . . 8
Sterndrive Oil Capacity . . . . . . . . . . . . . . . . . . . . . . . . . . . . . . 8
Draining and Filling Sterndrive . . . . . . . . . . . . . . . . . . . . . . . . 8
Power Trim/Tilt-Fluid Level . . . . . . . . . . . . . . . . . . . . . . . . . . . 9
Off -Season Storage Preparations - All Models . . . . . 9
Painting . . . . . . . . . . . . . . . . . . . . . . . . . . . . . . . . . . . . . . . . . . . 9
Preparation for Boating After Storage . . . . . . . . . . . . . . . . . 10
Gimbal Bearing and Universal Joints Lubrication . . . . . . . 10
Recommendations For Antifouling Paints . . . . . . . . . . . . . . 11
Painting The Stern Drive With Antifouling Paint . . . . . . . . . 12
Paints For Stern drives . . . . . . . . . . . . . . . . . . . . . . . . . . . . . 12
Painting The Hull With Antifouling Paint . . . . . . . . . . . . . . . 12
Metric Conversion Chart . . . . . . . . . . . . . . . . . . . . . . . . . . . . 13
Periodic Maintenance Chart . . . . . . . . . . . . . . . . . . . . . . . . . 16
Safety Warnings Before working on any part of a Volvo Penta sterndrive, read the
section called Safety at the end of this manual.
1
Introduction This service manual is divided into sections concerning various systems and
assemblies. Refer to the Contents to locate the section covering the system or
assembly requiring service. Each section title page has an additional listing that
will describe the section’s contents in more detail. Be sure to read the Safety
Section at the end of this manual, and pay special attention to all safety warnings
as they appear throughout the text. Since models are subject to change at any time,
some photos may not depict actual product.

General Information
4 VPA 7743008 07-2003
Good Service Practice Service required for this product is generally one of three kinds:
• Normal care and maintenance - which includes putting a new
stern drive into operation, storing engines, lubrication, and care
under special operating conditions such as salt water and cold
weather.
• Operating malfunctions - due to improper engine or drive
mounting, propeller condition or size, boat condition, or the mal-
function of some part of the engine. This includes engine servic-
ing procedures to keep the engine in prime operating condition.
• Complete disassembly and overhaul - such as major service
or rebuilding a unit.
It is important to determine before disassembly just what the trouble is
and how to correct it quickly, with minimum expense to the owner.
When repairing an assembly, the most reliable way to ensure a good
job is to do a complete overhaul on that assembly, rather than just to
replace the bad part. Wear not readily apparent on other parts could
cause a malfunction soon after the repair job. Repair kits and seal kits
contain all the parts needed to ensure a complete repair, to eliminate
guesswork, and to save time.
Repair time can also be minimized by the use of special tools. Volvo
Penta Special Tools are designed to perform service procedures
unique to the product that cannot be completed using tools from other
sources. They also speed repair work to help achieve service flat rate
times. In some cases, the use of substitute tools can damage the part.
Note! Do not operate engine out of water even momentarily. If
operated in test tank, use proper test wheel. Failure to do
so can damage water pump, overheat engine, or allow
excessive engine RPM.
Preparation for Service Proper preparation is extremely helpful for efficient service work. A
clean work area at the start of each job will minimize tools and parts
becoming misplaced. Clean an engine that is excessively dirty before
work starts. Cleaning will occasionally uncover trouble sources. Obtain
tools, instruments and parts needed for the job before work is started.
Interrupting a job to locate special tools or repair kits is a needless
delay.
Use proper lifting and handling equipment. Working on stern drives without proper
equipment can cause damage and personal injury.
Always use clean fresh fuel when testing engines. Troubles can often
be traced to the use of old or dirty fuel.

General Information
VPA 7743008 07-2003 5
Service Policy It is a policy to provide dealers with service knowledge so they can
give professional service demanded by today’s consumer. The Volvo
Penta Training Centers, frequent mailing of Service Bulletins, Letters
and Promotions, Special Tools and this Service Manual represent our
continuing efforts to assist dealers in giving consumers the best and
most prompt service possible. If a service question does not appear to
be answered in this manual, you are invited to write to the Volvo Penta
Service Department for additional help. Always be sure to give
complete information, including engine model number and serial
number.
Be sure that you are familiar with the warranty statement supplied with
the product. If you have any questions, write the Volvo Penta Service
Department. If other than genuine Volvo Penta replacement
components or parts are used, subsequent warranty claims involving
that engine may be refused.
When a brand-name product or specific tool is called for, another item
may be used. However, the substitute must have equivalent
characteristics, including type, strength, and material. You must
determine if incorrect substitution could result in product malfunction
and personal injury to anyone. To avoid hazards, equivalent products
which are used must meet all current U.S. Coast Guard Safety
Regulations and ABYC standards.
Replacement Parts When replacement parts are required, always use genuine Volvo
Penta parts, or parts with equivalent characteristics,
including type, strength, and material. Failure to do so
may result in product malfunction and possible injury to
the operator and/or passengers.
Parts Catalogs Parts Catalogs contain exploded views showing the correct assembly
of all parts, as well as a complete listing of the parts for replacement.
These catalogs are helpful as a reference during disassembly and
reassembly, and are available from Volvo Penta Parts.
Special Service Tools Special service tools have been specially designed to simplify some of
the disassembly and assembly operations. These tools are illustrated
in this Service Manual, in many cases in actual use. All Volvo Penta
special tools can be ordered from Volvo Penta Parts. Individual
purchasers of Service Manuals must order Special Tools through an
authorized dealer.
General Information
6 VPA 7743008 07-2003
Product References, Illustrations &
Specifications
Volvo Penta reserves the right to make changes at anytime, without notice, in
specifications and models and also to discontinue models. The right is also reserved to
change any specifications or parts at any time without incurring any obligation to equip
same on models manufactured prior to date of such change. All information, illustrations
and specifications contained in this manual are based on the latest product information
available at the time of printing. The right is reserved to make changes at anytime
without notice.
All photographs and illustrations used in this manual may not depict actual models or
equipment, but are intended as representative views for reference only. The continuing
accuracy of this manual cannot be guaranteed.
Sterndrive Lubrication - SX Models
Adding Lubricant to Sterndrive
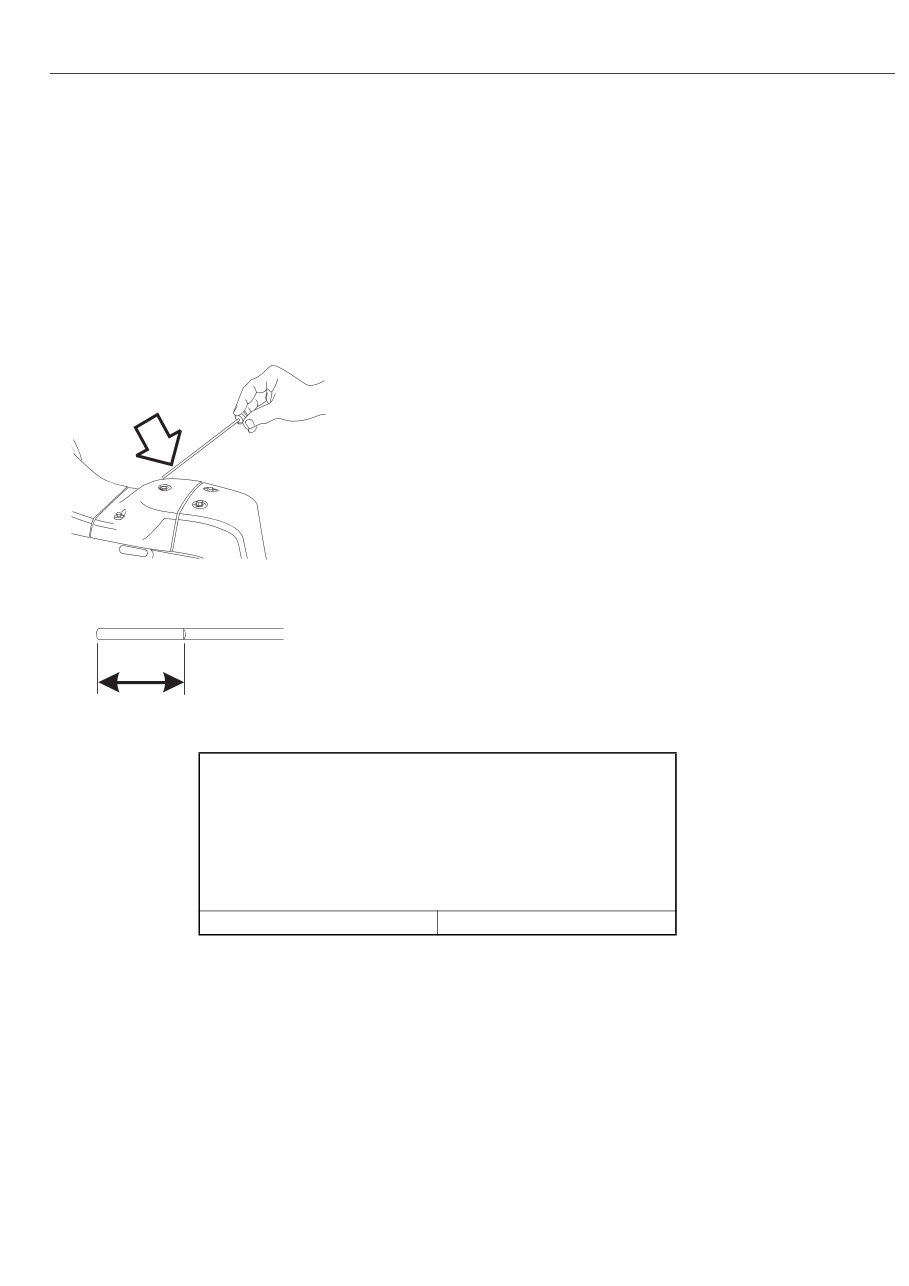
Occasionally check oil level in sterndrive. Screw dipstick
fully into hole. Remove and read oil level in reference to mark on
dipstick. If oil level is low, add oil through dipstick opening.
Add only enough lubricant to bring the oil level to the proper level somewhere in
the range on the dipstick.
Sterndrive Oil Capacity
Draining and Filling Sterndrive When a complete change of lubricant is required in the sterndrive,
proceed as follows:
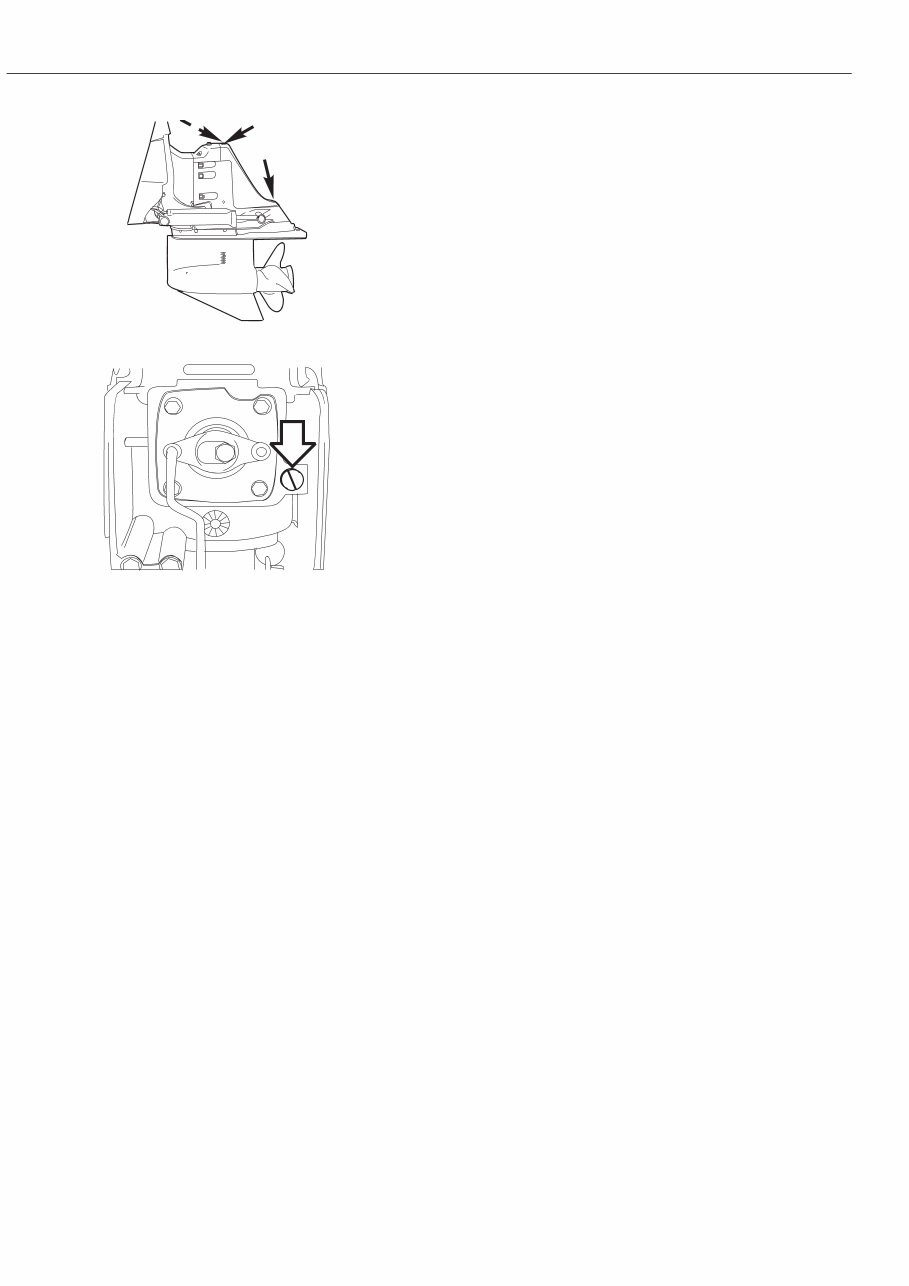
1. Place sterndrive in the run (full down) position. Place a
4 quart drain pan under lower gear case skeg to catch oil.
2. Remove oil drain plug (port side of lower gear case) and oil level
dipstick (top of sterndrive). Removing dipstick vents drive to
improve oil draining. Allow oil to drain completely.
34086
33836
Change Lubricant Every 100 Hours
or
Once Each season
Use
Volvo Penta Synthetic Gearcase Lubricant
or
Mobilube 1 SHC Fully Synthetic
SAE 75W-90 gear lubricant
All SX Models 71oz. (2100 cc)
General Information
VPA 7743008 07-2003 7
3. Remove three screws securing the shift link access cover to
access the oil level plug. Fill sterndrive with Volvo Penta Synthetic
Gearcase Lubricant SAE 75W-90 through oil drain plug hole. Fill
slowly to purge air.
4. Sterndrive is properly filled when the oil level appears at the oil
level plug hole. When filled to the proper level, install oil level dip-
stick and the oil level plug first to prevent excessive oil loss, then
the oil drain plug. Tighten oil level gauge, plug, and drain plug fin-
ger tight.
Note! Filling sterndrive too quickly may form air pockets that
will cause an inaccurate oil level reading. Running the
sterndrive with improper oil level will result in immediate
internal damage.
5. Check oil level with dipstick. Oil level must appear on the blade of
the dipstick. Add oil if required, through the dipstick hole See
“Adding Lubricant to Sterndrive” on page 8.
6. Tighten drain plug to 60-84 in. lb. (6,8-9,5 N•m). Tighten oil level
dipstick to 48-72 in. lb. (5,4-8,1 N•m)
7. Install shift link access cover and tighten screws to
108-132 in. lb. (12,2-14,9 N•m).
If lubricant has been completely changed, oil level must be rechecked
after unit has been run and trapped air purged. Improper oil level will
result in serious internal sterndrive damage. Add make-up oil through
dipstick opening to bring oil up to proper level.
VOLVO PENTA
42722
47117
General Information
8 VPA 7743008 07-2003
Sterndrive Lubrication - DP-S Models
Adding Lubricant to Sterndrive
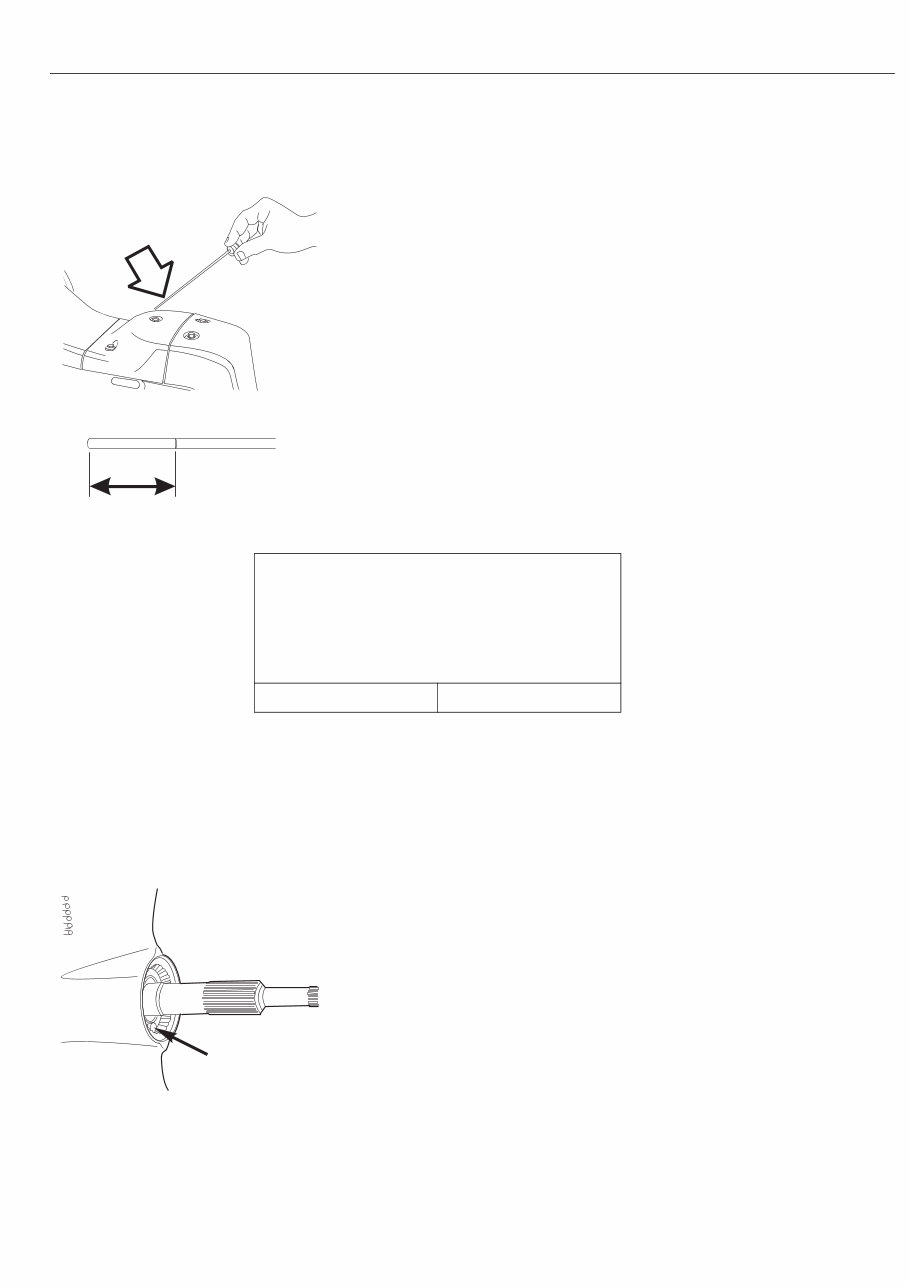
Occasionally check oil level in sterndrive. Screw dipstick fully into hole. Remove and
read oil level in reference to mark on dipstick. If oil level is low, add oil through dipstick
opening.
Add only enough lubricant to bring the oil level to the proper level somewhere in the
range on the dipstick.
Sterndrive Oil Capacity
Draining and Filling Sterndrive When a complete change of lubricant is required in the sterndrive,
proceed as follows:
1. Remove both propellers See “Propeller Removal and Installa-
tion - DP-S Models” on page 263.
2. Place sterndrive in the run (full down) position. Place a
4 quart drain pan under lower gear case skeg to catch oil.
3. Remove the oil drain plug (inside lower gear case) and the oil level
dipstick (top of sterndrive). Removing dipstick vents drive to
improve oil draining. Allow oil to drain completely.
34086
33836
Change Lubricant Every 100 Hours
or
Once Each Season Use
Volvo Penta Synthetic Gearcase Lubricant
or
Mobilube 1 SHC Fully Synthetic SAE 75W-90
gear lubricant
All DP-S Models 81 oz. (2400ml)
37260
You're Reading a Preview
What's Included?
Fast Download Speeds
Online & Offline Access
Access PDF Contents & Bookmarks
Full Search Facility
Print one or all pages of your manual
CA$58.99
Volvo Penta Sterndrive SX-M / DP-S Service & Repair Manual
Viewed 59 Times Today

What's Included?
Fast Download Speeds
Online & Offline Access
Access PDF Contents & Bookmarks
Full Search Facility
Print one or all pages of your manual
CA$58.99

Secure transaction
What's Included?
Fast Download Speeds
Online & Offline Access
Access PDF Contents & Bookmarks
Full Search Facility
Print one or all pages of your manual
Description
Volvo Penta Sterndrive SX-M / DP-S Service & Repair Manual
This complete service repair workshop manual is an essential resource for professional mechanics and DIY enthusiasts alike. It covers every service and repair procedure with easy-to-follow step-by-step instructions and detailed illustrations, allowing you to save money by performing repairs on your own.
Once downloaded, this manual is yours to keep forever. You can conveniently print out specific pages, chapters, or the entire manual. It is also compatible with tablets and smartphones, providing easy access to the information whenever needed.
Models Covered:
- All Models/Engines/Trim/Transmissions Types Are Covered
Contents:
- This high-quality service repair workshop manual covers all repair procedures from A to Z, ensuring that every repair and service procedure is comprehensively addressed.
Computer Requirements:
- This manual is compatible with all PC & MAC computers, tablets, and mobile phones. The only software required is Adobe Reader, which is typically pre-installed on most computers. If not available, it can be downloaded for free.
Instant Delivery:
- Upon payment confirmation via Visa, MasterCard, or PayPal, the manual will be instantly emailed to the address provided during checkout, ensuring prompt access to the valuable information.
Customer Satisfaction Guaranteed.


