

2001-2012 MerCruiser Alpha One (Gen II) Sterndrive Service & Repair Manual
What's Included?
Fast Download Speeds
Online & Offline Access
Access PDF Contents & Bookmarks
Full Search Facility
Print one or all pages of your manual
Number 14
Printed in U.S.A. 90-818177-3 APRIL 2001 2001, Mercury Marine
Sterndrive Units
Alpha One
Generation II
SERVICE
MANUAL

MerCruiser #14 Sterndrive Units
90-818177-3
MerCruiser #14 Sterndrive Units
90-818177-3

1
A
GENERAL INFORMATION SERVICE MANUAL NUMBER 14
90-818177--3 APRIL 2001 Page 1A-1
IMPORTANT INFORMATION
Section 1A - General Information
Table of Contents
How To Use This Manual 1A-2 . . . . . . . . . . . . .
Page Numbering 1A-2 . . . . . . . . . . . . . . . . .
Introduction 1A-3 . . . . . . . . . . . . . . . . . . . . . . . .
Special Product Information 1A-3 . . . . . . . .
Directional References 1A-3 . . . . . . . . . . . . . . .
Propeller Rotation 1A-4 . . . . . . . . . . . . . . . . . . .
Serial Number Locations and
Engine Designation Decal 1A-4 . . . . . . . . . . .
Sterndrive Unit Serial Number
Location 1A-5 . . . . . . . . . . . . . . . . . . . . . . . .
Decal Application 1A-5 . . . . . . . . . . . . . . . . . . .
Decal Removal 1A-5 . . . . . . . . . . . . . . . . . . .
Instructions for “Wet” Application 1A-5 . . .
Painting Procedures 1A-7 . . . . . . . . . . . . . . . . .
Cleaning & Painting Aluminum
Propellers & Gear Housings 1A-7 . . . . . . .
GENERAL INFORMATION SERVICE MANUAL NUMBER 14
Page 1A-2 90-818177--3 APRIL 2001
How To Use This Manual
This Manual is divided into sections which represent major components and systems.
Some sections are further divided into parts which more fully describe the component.
Sections and parts are listed at the front of this manual.
Page Numbering
Two number groups appear at the bottom of each page. Following is an example and
description.
a
b
c
d
e
f
g
a- Section Number
b- Section Part
c- Page Number
d- Manual Part Number
e- Revision Number
f- Month Printed
g- Year Printed
GENERAL INFORMATION SERVICE MANUAL NUMBER 14
90-818177--3 APRIL 2001 Page 1A-3
Introduction
This comprehensive overhaul and repair manual is designed as a service guide for the
Mercury MerCruiser models previously listed. It provides specific information, including
procedures for disassembly, inspection, assembly and adjustment, to enable dealers and
service mechanics to repair these products.
Before attempting repairs, it is suggested that the procedure be read to gain knowledge of
the methods and tools used and the cautions and warnings required for safety.
Special Product Information
During production of these models, special product improvements and changes have been
made to increase product reliability and performance. Such changes to a sterndrive
assembly component(s) are covered in the “Special Information” portion of the appropriate
sterndrive assembly section. (Refer to the section “Index”.) Serial number breaks are
provided, where applicable, for ease of identification.
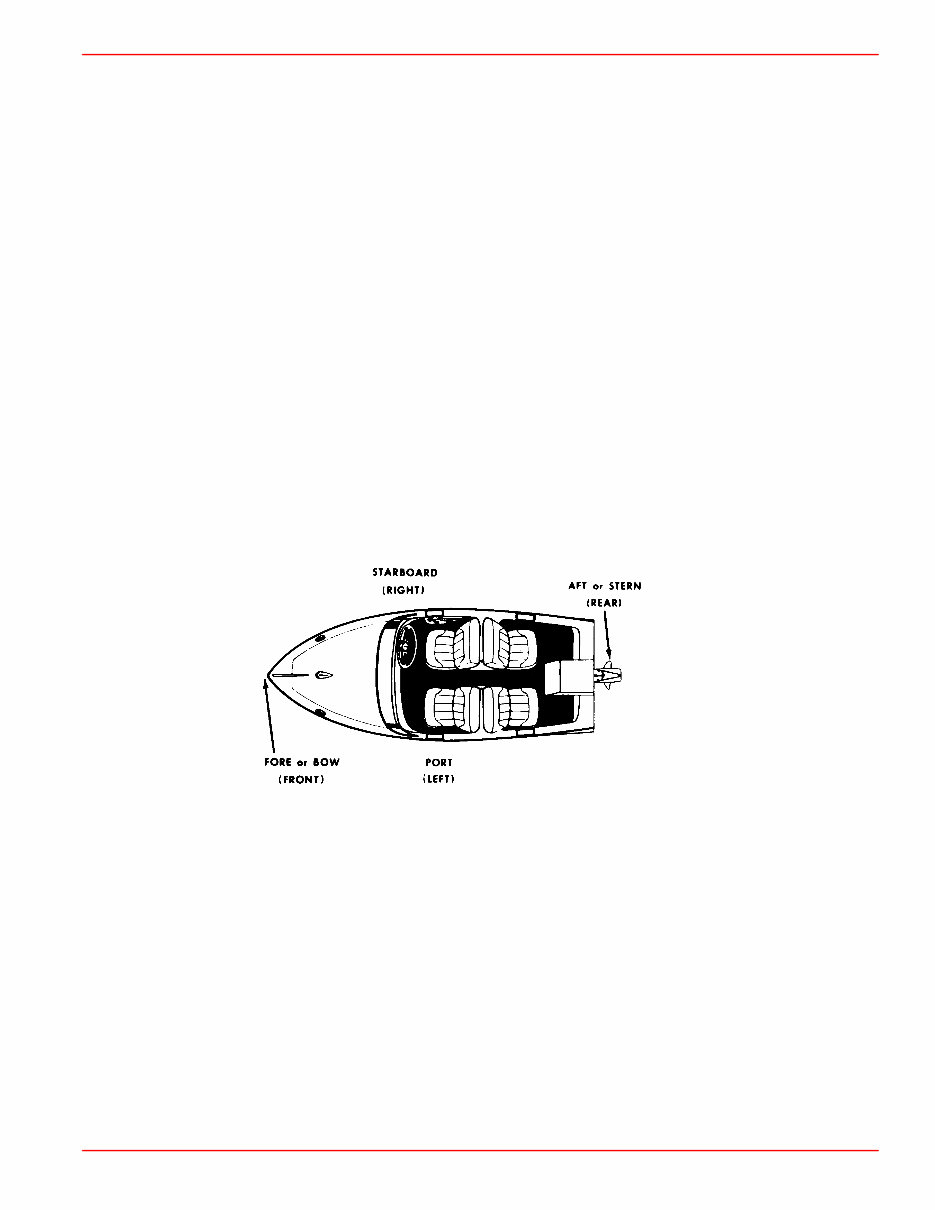
Directional References
Front of boat is bow; rear is stern. Starboard side is right side; port side is left side. In this
service manual, all directional references are given as they appear when viewing boat from
stern, looking toward bow.

GENERAL INFORMATION SERVICE MANUAL NUMBER 14
Page 1A-4 90-818177--3 APRIL 2001
Propeller Rotation
Propeller rotation for sterndrive can be right hand or left hand rotation as viewed from the
aft end of the propeller.
Right Hand Rotation Left Hand Rotation
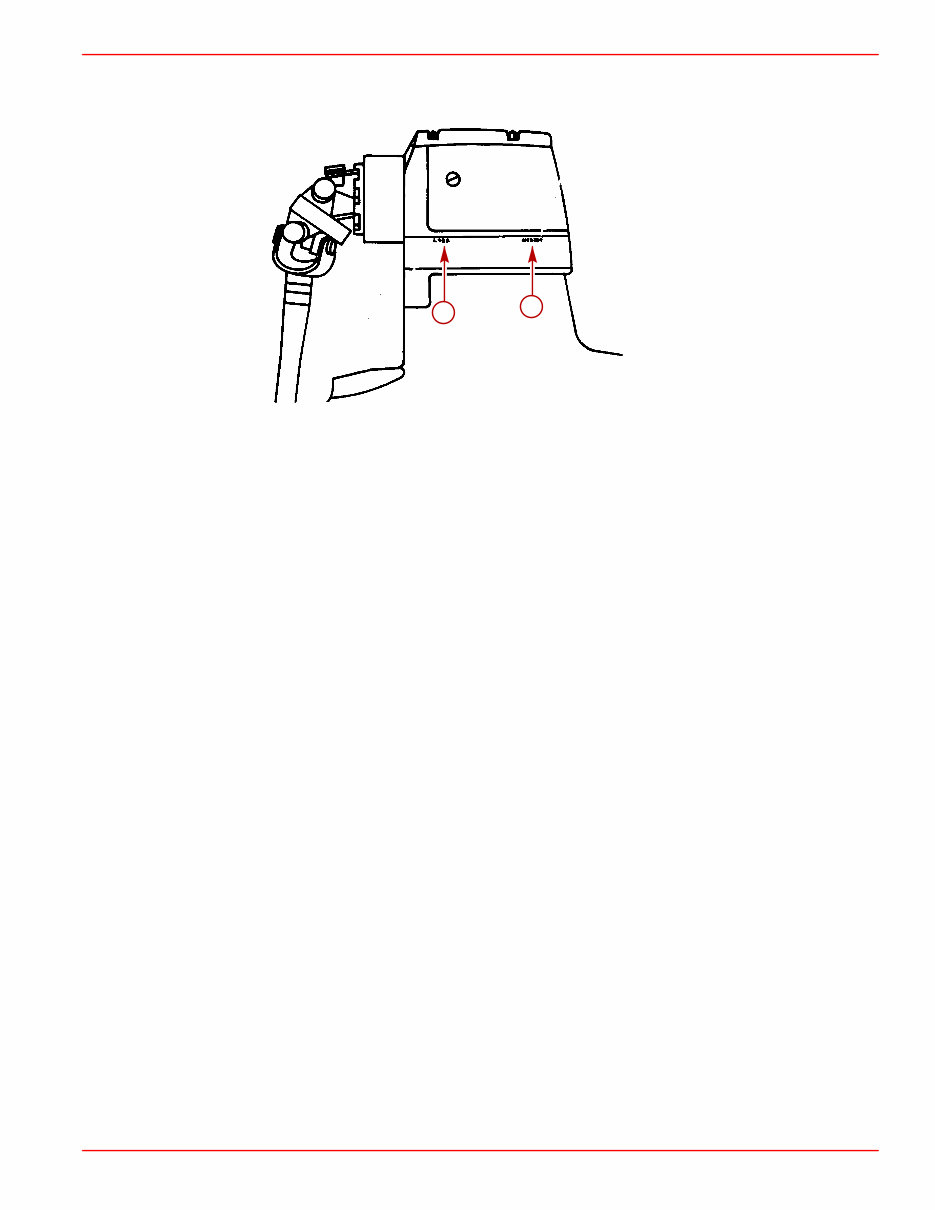
Serial Number Locations and Engine Designation Decal
22031
a
b
a- Transom Assembly Serial Number
b- Engine Designation Decal
GENERAL INFORMATION SERVICE MANUAL NUMBER 14
90-818177--3 APRIL 2001 Page 1A-5
Sterndrive Unit Serial Number Location
22026
b
a
Sterndrive Unit Serial Number Location - Port Decal
(Also Located Under Decal On Housing)
a- Sterndrive Unit Serial Number
b- Sterndrive Unit Gear Ratio
Decal Application
Decal Removal
1. Mark decal location before removal to assure proper alignment of new decal.
2. Carefully soften decal and decal adhesive with a heat gun or heat blower while removing
old decal.
3. Clean decal contact area with a 1:1 mixture of isopropyl alcohol and water.
4. Thoroughly dry decal contact area and check for a completely cleaned surface.
Instructions for “Wet” Application
NOTE: The following decal installation instructions are provided for a “Wet” installation. All
decals should be applied wet.
TOOLS REQUIRED
1. Plastic Squeegee*
2. Stick Pin
3. Dish Washing Liquid/Detergent without ammonia** “Joy” and “Drift” are compatible
for this process.
** Automotive Body Filler Squeegee
** Do not use a soap that contains petroleum based
solvents.

GENERAL INFORMATION SERVICE MANUAL NUMBER 14
Page 1A-6 90-818177--3 APRIL 2001
SERVICE TIP: Placement of decals using the “Wet” application will allow time to
position decal. Read entire installation instructions on this technique before
proceeding.
TEMPERATURE
IMPORTANT: Installation of vinyl decals should not be attempted while in direct
sunlight. Air and surface temperature should be between 60°F (15°C) and 100°F
(38°C) for best application.
SURFACE PREPARATION
IMPORTANT: Do not use a soap or any petroleum based solvents to clean application
surface.
Clean entire application surface with mild dish washing liquid and water. Rinse surface
thoroughly with clean water.
DECAL APPLICATION
1. Mix
1
/
2
ounce (16 ml) of dish washing liquid in one gallon (4 l) of cool water to use as
wetting solution.
NOTE: Leave protective masking, if present, on the face of decal until final steps of decal
installation. This will ensure that the vinyl decal keeps its shape during installation.
2. Place the decal face down on a clean work surface and remove the paper backing from
“adhesive side” of decal.
3. Using a spray bottle, flood the entire “adhesive side” of the decal with the pre-mixed
wetting solution.
4. Flood area where the decal will be positioned with wetting solution.
5. Position pre-wetted decal on wetted surface and slide into position.
6. Starting at the center of the decal, “lightly” squeegee out the air bubbles and wetting
solution with overlapping strokes to the outer edge of the decal. Continue going over the
decal surface until all wrinkles are gone and adhesive bonds to the cowl surface.
7. Wipe decal surface with soft paper towel or cloth.
8. Wait 10 - 15 minutes.
9. Starting at one corner, “carefully and slowly” pull the masking off the decal surface at
a 180° angle.
NOTE: To remove any remaining bubbles, pierce the decal at one end of the bubble with
stick pin and press out the entrapped air or wetting solution with your thumb (moving toward
the puncture).

GENERAL INFORMATION SERVICE MANUAL NUMBER 14
90-818177--3 APRIL 2001 Page 1A-7
Painting Procedures
Cleaning & Painting Aluminum Propellers & Gear Housings
WARNING
Avoid serious injury from flying debris. Avoid serious injury from airborne
particles. Use eye and breathing protection with proper ventilation.
PROPELLERS
1. Sand the entire area to be painted with 3M 120 Regalite Polycut or coarse Scotch-Brite,
disc or belts.
2. Feather edges of all broken paint edges. Try not to sand through the primer.
3. Clean the surface to be painted using PPG Industries DX330 Wax and Grease Remover
or equivalent (Xylene or M.E.K.).
4. If bare metal has been exposed, use Quicksilver’s Light Gray Primer.
5. Allow a minimum of 1 hour dry time and no more than 1 week before applying the finish
coat.
6. Apply the finish coat using Quicksilver’s EDP Propeller Black.
GEAR HOUSINGS
The following procedure should be used in refinishing gear housings. This procedure will
provide the most durable paint system available in the field. The materials recommended
are of high quality and approximate marine requirements. The following procedure will
provide a repaint job that compares with a properly applied factory paint finish. It is
recommended that the listed materials be purchased from a local Ditzler Automotive Finish
Supply Outlet. The minimum package quantity of each material shown is sufficient to
refinish several gear housings.
Procedure:
1. Wash gear housing with a muriatic acid base cleaner to remove any type of marine
growth, and rinse with water, if necessary.
2. Wash gear housing with soap and water, then rinse.
3. Sand blistered area with 3M 180 grit sandpaper or P180 Gold Film Disc to remove paint
blisters only. Feather edge all broken paint edges.
4. Clean gear housing thoroughly with (DX-330) wax and grease remover.
5. Spot repair surfaces where bare metal is exposed with (DX-503) alodine treatment.
IMPORTANT: Do not use any type of aerosol spray paints as the paint will not properly
adhere to the surface nor will the coating be sufficiently thick to resist future paint
blistering.
6. Mix epoxy chromate primer (DP-40) with equal part catalyst (DP-401) per
manufacturers instructions, allowing proper induction period for permeation of the
epoxy primer and catalyst.
IMPORTANT: Do not paint sacrificial zinc trim tab or zinc anode.
7. Cut out a cardboard “plug” for trim pump pocket to keep paint off of mating surface to
maintain good continuity circuitry between trim tab and gear housing.

GENERAL INFORMATION SERVICE MANUAL NUMBER 14
Page 1A-8 90-818177--3 APRIL 2001
8. Allow a minimum of one hour drying time and no more than one week before top coating
assemblies.
9. Use Ditzler Urethane DU9000 for Mercury Black and DU33414M for Sea Ray White.
Catalyze the colors with Ditzler DU5 catalyst mixed 1:1 ratio. Reduce with solvents per
Ditzler label.
CAUTION
Be sure to comply with instructions on the label for ventilation and respirators.
Using a spray gun, apply one half to one mil even thickness. Let dry, flash off for
five minutes and apply another even coat of one half to one mil film thickness. This
urethane paint will dry to the touch in a matter of hours, but will remain sensitive
to scratches and abrasions for a few days.
10. The type of spray gun used will determine the proper reduction ratio of the paint.
You're Reading a Preview
What's Included?
Fast Download Speeds
Online & Offline Access
Access PDF Contents & Bookmarks
Full Search Facility
Print one or all pages of your manual
$31.99
$41.99
Viewed 36 Times Today


Secure transaction
What's Included?
Fast Download Speeds
Online & Offline Access
Access PDF Contents & Bookmarks
Full Search Facility
Print one or all pages of your manual
$31.99
$41.99
- Complete Factory Service Repair Workshop Manual
- No Extra fees, No Expiry dates
Get the Service Repair Workshop Manual instantly on your computer, tablet, or smartphone. This Professional Manual covers all repairs, servicing, and troubleshooting procedures with detailed photos & diagrams. It is the same type of manual used by professional Mechanics and Technicians, containing step-by-step instructions, highly detailed exploded diagrams, and pictures to guide you through every job correctly.
FAQs:
- Q. Can I print out a page?
A. Yes, you can print out a single page or the entire manual, it's your choice. - Q. Can I use this Manual on more than one computer?
A. Yes, this Manual can be used on as many computers as required. - Q. Is this a trial or a limited version?
A. No, this is the FULL Manual without any limitations or trial periods and can be used for life. - Q. Will this Manual expire in 12 months or will I have to pay a renewal fee?
A. NO, Absolutely not! You can continue to use this Manual for life without the need to renew or pay any extra. - Q. Will this Manual work on Windows & MAC computers?
A. Yes, it is fully compatible with all Windows & All MAC Computers.
Thanks for looking at this item, please click on the Button.


