Qutboanls 1992-09 REPAIR MANUAL ALL 2-SnOKE & 4-SWOKE MODELS
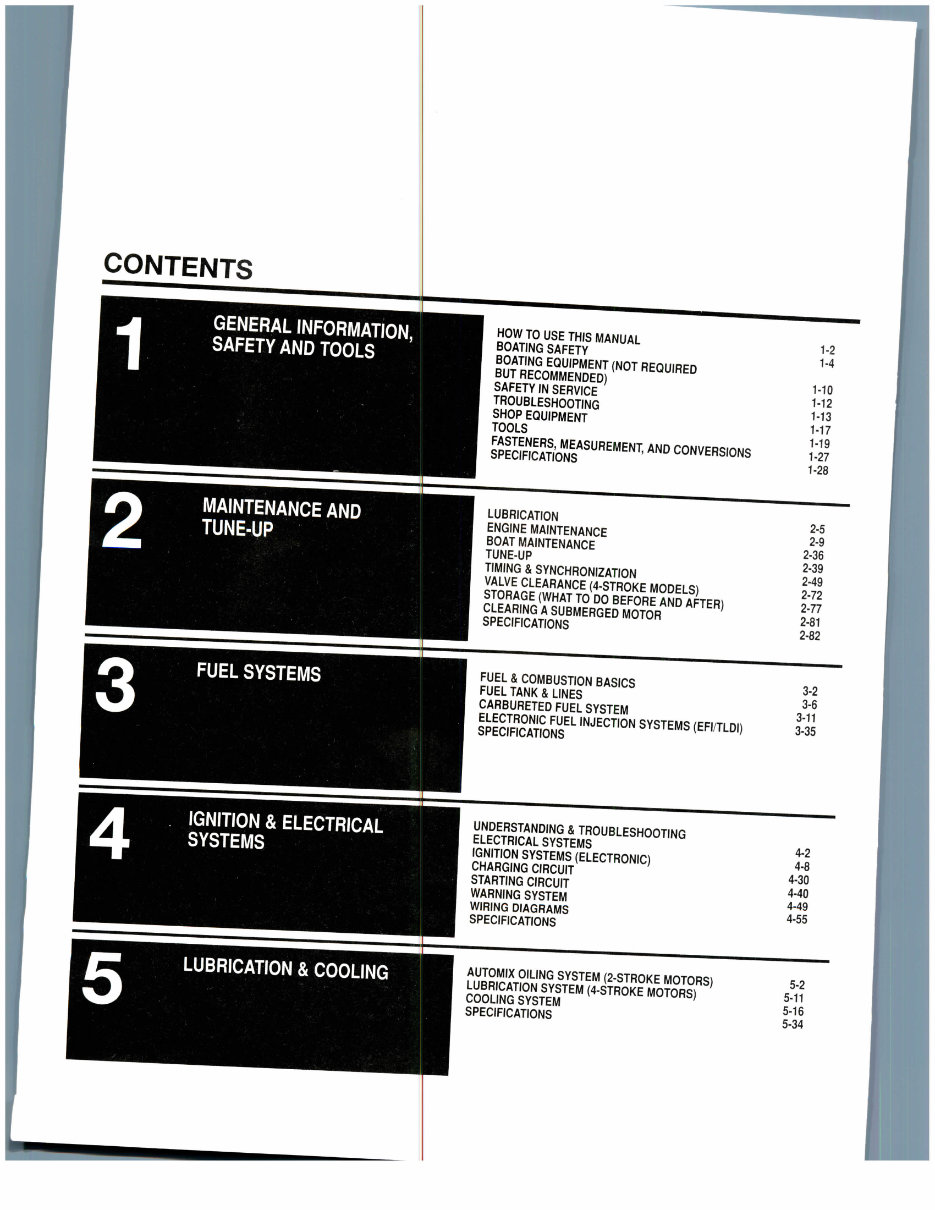
CONTENTS GENERAL INFORMATION, SAFETY AND TOOLS HOW TO USE THIS MANUAL 1-2 BOATING SAFETY 1-4 BOATING EQUIPMENT (NOT REQUIRED BUT RECOMMENDED) 1-tfl SAFETY IN SERVICE M2 TROUBLESHOOTING M3 SHOP EQUIPMENT M7 TOOLS 1-19 FASTENERS, MEASUREMENT, AND CONVERSIONS 1-27 SPECIFICATIONS 1-28 MAINTENANCE AND TUNE-UP LUBRICATION ENGINE MAINTENANCE BOAT MAINTENANCE TUNE-UP TIMING & SYNCHRONIZATION VALVE CLEARANCE (4-STROKE MODELS) STORAGE (WHAT TO DO BEFORE AND AFTER) CLEARING A SUBMERGED MOTOR SPECIFICATIONS 2-5 2-9 2-36 2-39 2-49 2-72 2-77 2-81 2-82 FUEL & COMBUSTION BASICS 3-2 FUEL TANK & LINES 3-6 CARBURETED FUEL SYSTEM 3-11 ELECTRONIC FUEL INJECTION SYSTEMS (EFI/TLDI) 3-35 SPECIFICATIONS IGNITION & ELECTRICAL SYSTEMS UNDERSTANDING & TROUBLESHOOTING ELECTRICAL SYSTEMS IGNITION SYSTEMS (ELECTRONIC) CHARGING CIRCUIT STARTING CIRCUIT WARNING SYSTEM WIRING DIAGRAMS SPECIFICATIONS 4-2 4-8 4-30 4-40 4-49 4-55 LUBRICATION & COOLING AUTOMIX OILING SYSTEM (2-STROKE MOTORS) LUBRICATION SYSTEM (4-STROKE MOTORS) COOLING SYSTEM SPECIFICATIONS 5-2 5-11 5-16 5-34
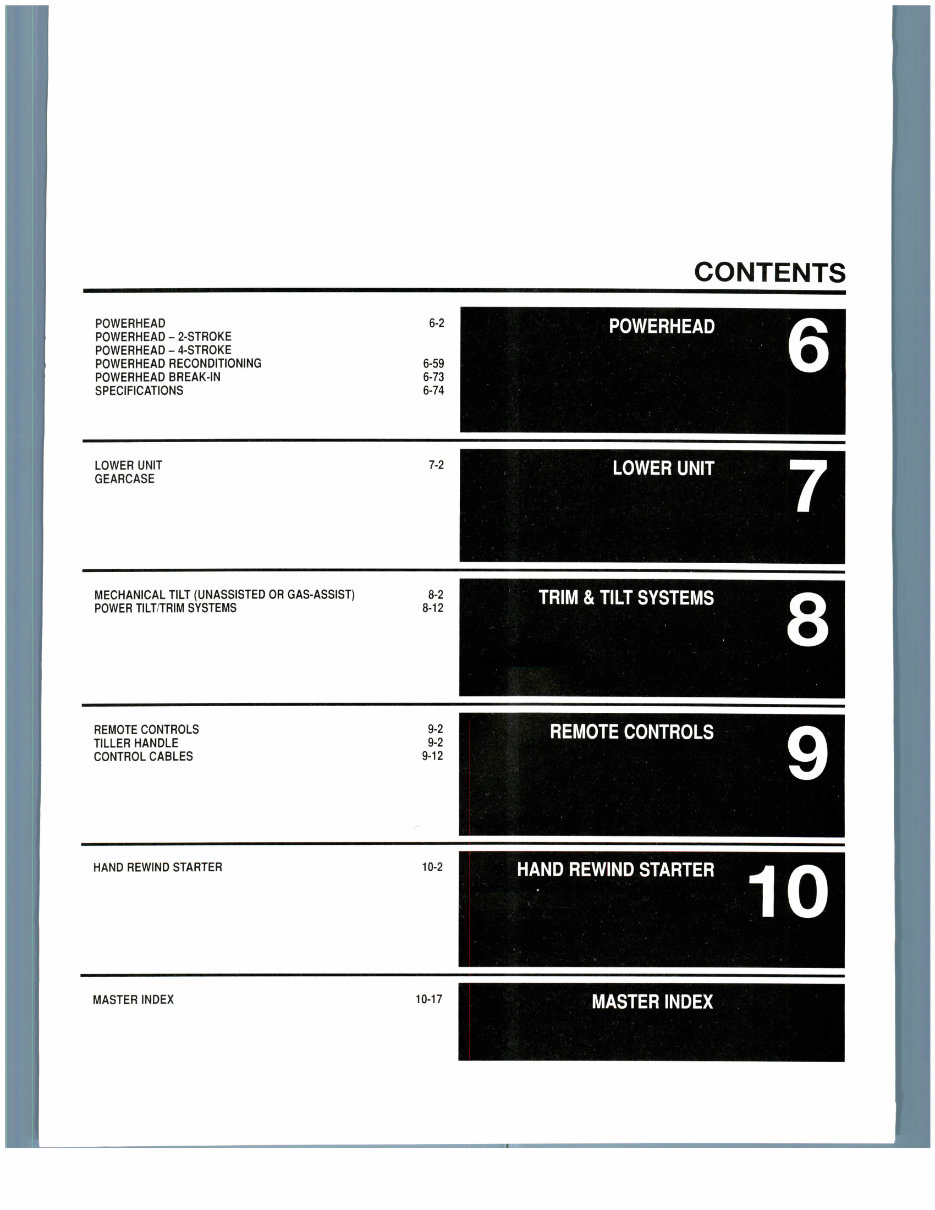
CONTENTS POWERHEAD POWERHEAD - 2-STROKE POWERHEAD - 4-STROKE POWERHEAD RECONDITIONING POWERHEAD BREAK-IN SPECIFICATIONS 6-2 6-59 6-73 6-74 LOWER UNIT GEARCASE 7-2 MECHANICAL TILT (UNASSISTED OR GAS-ASSIST) POWER TILT/TRIM SYSTEMS 8-2 8-12 TRIM & TILT SYSTEMS REMOTE CONTROLS TILLER HANDLE CONTROL CABLES 9-2 9-2 9-12 REMOTE CONTROLS HAND REWIND STARTER 10-2 HAND REWIND STARTER MASTER INDEX 10-17 MASTER INDEX
SAFETY NOTICE Proper service and repair procedures are vital to the safe, reliable operation of all marine engines, as well as the personal safety of those performing repairs. This manual outlines procedures for servicing and repairing engines and drive systems using safe, effective methods. The procedures contain many NOTES, CAUTIONS and WARNINGS which should be followed, along with standard procedures, to minimize the possibility of personal injury or improper service which could damage the vehicle or compromise its safety. It is important to note that repair procedures and techniques, tools and parts for servicing these engines, as well as the skill and experience of the individual performing the work, vary widely. It is not possible to anticipate all of the conceivable ways or conditions under which the engine may be serviced, or to provide cautions as to all possible hazards that may result. Standard and accepted safety precautions and equipment should be used during cutting, grinding, chiseling, prying, or any other process that can cause material removal or projectiles. Some procedures require the use of tools specially designed for a specific task. Before substituting another tool or procedure, you must be completely satisfied that neither your personal safety, nor the performance of the vessel, will be endangered. All procedures covered in this manual requiring the use of special tools will be noted at the beginning of the procedure by means of an OEM symbol Additionally, any procedure requiring the use of an electronic tester or scan tool will be noted at the beginning of the procedure by means of a DVOM symbol Although information in this manual is based on industry sources and is complete as possible at the time of publication, the possibility exists that some manufacturers made later changes which could not be included here. While striving for total accuracy, Seloc Publishing cannot assume responsibility for any errors, changes or omissions that may occur in the compilation of this data. We must therefore warn you to follow instructions carefully, using common sense. If you are uncertain of a procedure, seek help by inquiring with someone in your area who is familiar with these motors before proceeding. PART NUMBERS Part numbers listed in this reference are not recommendations by Seloc Publishing for any particular product brand name, simply iterations of the manufacturer's suggestions. They are also references that can be used with interchange manuals and aftermarket supplier catalogs to locate each brand supplier's discrete part number. SPECIAL TOOLS Special tools are recommended by the manufacturers to perform a specific job. Use has been kept to a minimum, but, where absolutely necessary, they are referred to in the text by the part number of the manufacturer if at all possible; and also noted at the beginning of each procedure with one of the following symbols: OEM or DVOM. The OEM symbol usually denotes the need for a unique tool purposely designed to accomplish a specific task, it will also be used, less frequently, to notify the reader of the need for a tool that is not commonly found in the average tool box. The DVOM symbol is used to denote the need for an electronic test tool like an ohmmeter, multi-meter or, on certain later engines, a scan tool. These tools can be purchased, under the appropriate part number, from your local dealer or regional distributor, or an equivalent tool can be purchased locally from a tool supplier or parts outlet. Before substituting any tool for the one recommended, read the SAFETY NOTICE at the top of this page. Providing the correct mix of service and repair procedures is an endless battle for any publisher of "How-To" information. Users range from first time do-it yourselfers to professionally trained marine technicians, and information important to one is frequently irrelevant to the other. The editors at Seloc Publishing strive to provide accurate and articulate information on all facets of marine engine repair, from the simplest procedure to the most complex. In doing this, we understand that certain procedures may be outside the capabilities of the average DIYer. Conversely we are aware that many procedures are unnecessary for a trained technician.
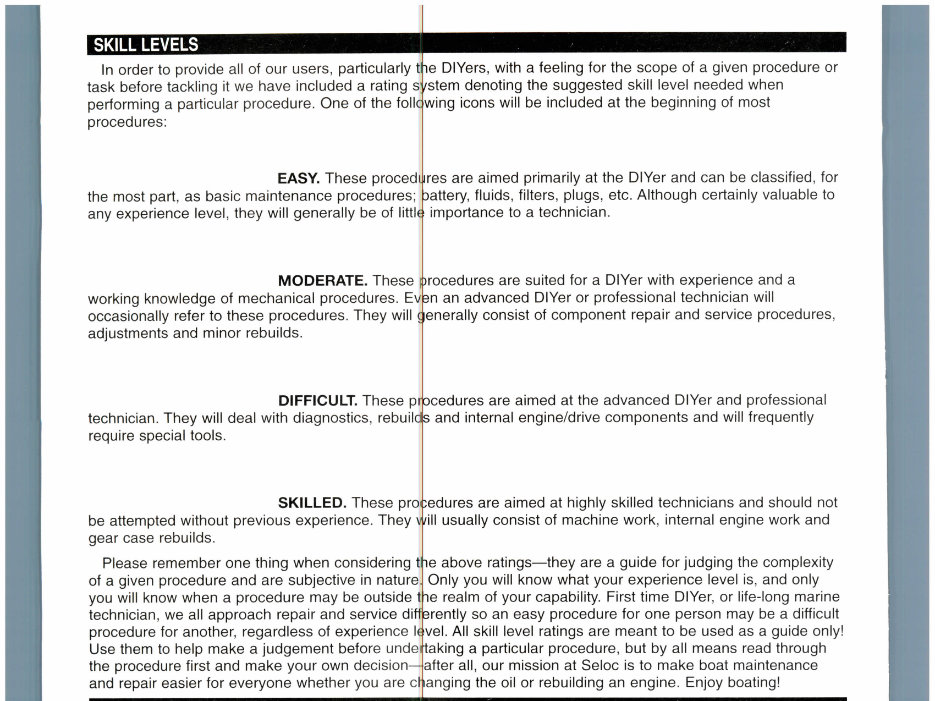
SKILL LEVELS In order to provide all of our users, particularly task before tackling it we have included a rating s performing a particular procedure. One of the foil procedures: EASY. These proced the most part, as basic maintenance procedures; any experience level, they will generally be of littl MODERATE. These working knowledge of mechanical procedures. Ev occasionally refer to these procedures. They will adjustments and minor rebuilds. DIFFICULT. These p technician. They will deal with diagnostics, rebuilc require special tools. le SKILLED. These pro be attempted without previous experience. They gear case rebuilds. Please remember one thing when considering t of a given procedure and are subjective in nature you will know when a procedure may be outside technician, we all approach repair and service differently procedure for another, regardless of experience I Use them to help make a judgement before unde the procedure first and make your own decision— and repair easier for everyone whether you are cl DIYers, with a feeling for the scope of a given procedure or /stem denoting the suggested skill level needed when wing icons will be included at the beginning of most ires are aimed primarily at the DIYer and can be classified, for oattery, fluids, filters, plugs, etc. Although certainly valuable to importance to a technician. )rocedures are suited for a DIYer with experience and a sn an advanced DIYer or professional technician will enerally consist of component repair and service procedures, ocedures are aimed at the advanced DIYer and professional s and internal engine/drive components and will frequently ;edures are aimed at highly skilled technicians and should not usually consist of machine work, internal engine work and ie above ratings—they are a guide for judging the complexity Only you will know what your experience level is, and only ie realm of your capability. First time DIYer, or life-long marine so an easy procedure for one person may be a difficult vel. All skill level ratings are meant to be used as a guide only! taking a particular procedure, but by all means read through after all, our mission at Seloc is to make boat maintenance anging the oil or rebuilding an engine. Enjoy boating! ALL RIGHTS RESERVED
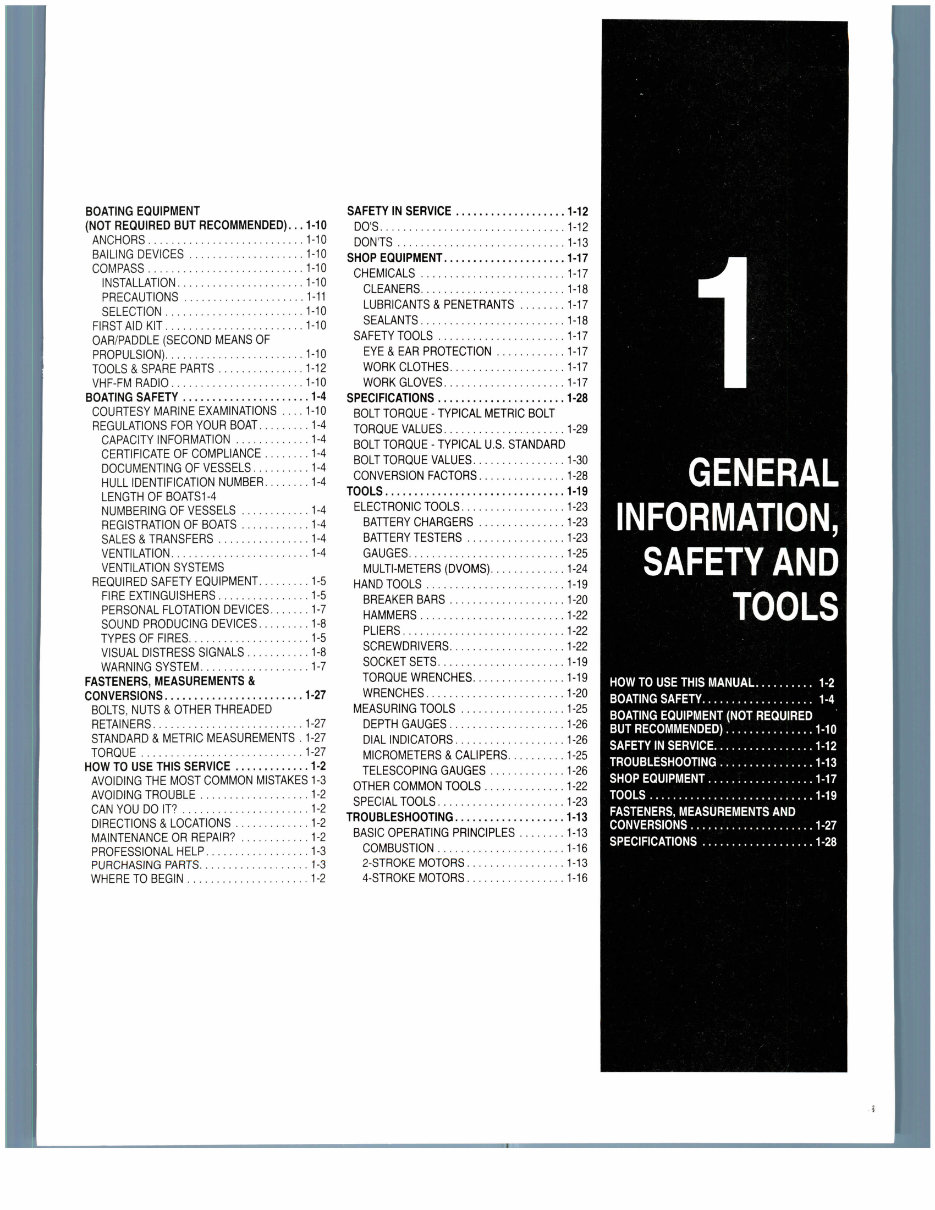
BOATING EQUIPMENT (NOT REQUIRED BUT RECOMMENDED)... 1-10 ANCHORS 1-10 BAILING DEVICES 1-10 COMPASS 1-10 INSTALLATION 1-10 PRECAUTIONS 1-11 SELECTION 1-10 FIRST AID KIT 1-10 OAR/PADDLE (SECOND MEANS OF PROPULSION) 1-10 TOOLS & SPARE PARTS 1-12 VHF-FM RADIO 1-10 BOATING SAFETY 1-4 COURTESY MARINE EXAMINATIONS .... 1-10 REGULATIONS FOR YOUR BOAT 1-4 CAPACITY INFORMATION 1-4 CERTIFICATE OF COMPLIANCE 1-4 DOCUMENTING OF VESSELS 1-4 HULL IDENTIFICATION NUMBER 1-4 LENGTHOFBOATS1-4 NUMBERING OF VESSELS 1-4 REGISTRATION OF BOATS 1-4 SALES & TRANSFERS 1-4 VENTILATION 1-4 VENTILATION SYSTEMS REQUIRED SAFETY EQUIPMENT 1-5 FIRE EXTINGUISHERS 1-5 PERSONAL FLOTATION DEVICES 1-7 SOUND PRODUCING DEVICES 1-8 TYPES OF FIRES 1-5 VISUAL DISTRESS SIGNALS 1-8 WARNING SYSTEM 1-7 FASTENERS, MEASUREMENTS & CONVERSIONS 1-27 BOLTS, NUTS & OTHER THREADED RETAINERS 1-27 STANDARD & METRIC MEASUREMENTS . 1-27 TORQUE 1-27 HOW TO USE THIS SERVICE 1-2 AVOIDING THE MOST COMMON MISTAKES 1-3 AVOIDING TROUBLE 1-2 CAN YOU DO IT? 1-2 DIRECTIONS & LOCATIONS 1-2 MAINTENANCE OR REPAIR? 1-2 PROFESSIONAL HELP 1-3 PURCHASING PARTS 1-3 WHERE TO BEGIN .. ..1-2 SAFETY IN SERVICE 1-12 DO'S 1-12 DONTS 1-13 SHOP EQUIPMENT 1-17 CHEMICALS 1-17 CLEANERS 1-18 LUBRICANTS & PENETRANTS 1-17 SEALANTS 1-18 SAFETYTOOLS 1-17 EYE & EAR PROTECTION 1-17 WORK CLOTHES 1-17 WORK GLOVES 1-17 SPECIFICATIONS 1-28 BOLT TORQUE - TYPICAL METRIC BOLT TORQUE VALUES 1-29 BOLT TORQUE - TYPICAL U.S. STANDARD BOLTTORQUE VALUES 1-30 CONVERSION FACTORS 1-28 TOOLS 1-19 ELECTRONIC TOOLS 1-23 BATTERY CHARGERS 1-23 BATTERY TESTERS 1-23 GAUGES 1-25 MULTI-METERS (DVOMS) 1-24 HAND TOOLS 1-19 BREAKER BARS 1-20 HAMMERS 1-22 PLIERS 1-22 SCREWDRIVERS 1-22 SOCKET SETS 1-19 TORQUE WRENCHES 1-19 WRENCHES 1-20 MEASURING TOOLS 1-25 DEPTH GAUGES 1-26 DIAL INDICATORS 1-26 MICROMETERS & CALIPERS 1-25 TELESCOPING GAUGES 1-26 OTHER COMMON TOOLS 1-22 SPECIAL TOOLS 1-23 TROUBLESHOOTING 1-13 BASIC OPERATING PRINCIPLES 1-13 COMBUSTION 1-16 2-STROKE MOTORS 1-13 4-STROKE MOTORS.. ..1-16 GENERAL INFORMATION, SAFETY AND TOOLS HOW TO USE THIS MANUAL 1-2 BOATING SAFETY 1-4 BOATING EQUIPMENT (NOT REQUIRED BUT RECOMMENDED) 1-10 SAFETY IN SERVICE 1-12 TROUBLESHOOTING 1-13 SHOP EQUIPMENT 1-17 TOOLS 1-19 FASTENERS, MEASUREMENTS AND CONVERSIONS 1-27 SPECIFICATIONS ...1-28
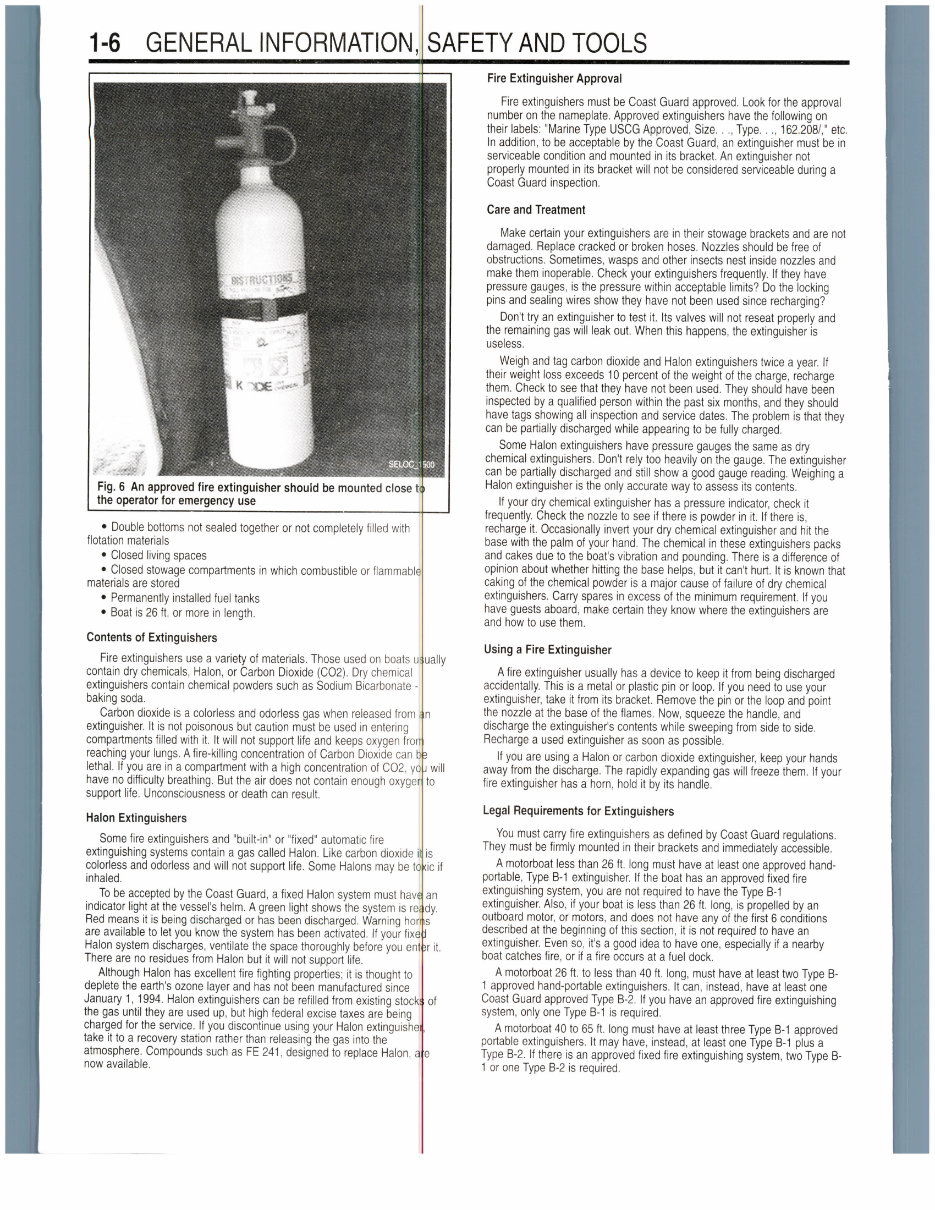
1-6 GENERAL INFORMATION SAFETY AND TOOLS Fig. 6 An approved fire extinguisher should be mounted the operator for emergency use • Double bottoms not sealed together or not completely filled with flotation materials • Closed living spaces • Closed stowage compartments in which combustible or flammable materials are stored • Permanently installed fuel tanks • Boat is 26 ft. or more in length. Contents of Extinguishers Fire extinguishers use a variety of materials. Those used on boats u contain dry chemicals, Halon, or Carbon Dioxide (C02). Dry chemical extinguishers contain chemical powders such as Sodium Bicarbonate - baking soda. Carbon dioxide is a colorless and odorless gas when released from extinguisher. It is not poisonous but caution must be used in entering compartments filled with it. It will not support life and keeps oxygen fror reaching your lungs. Afire-killing concentration of Carbon Dioxide can lethal. If you are in a compartment with a high concentration of C02, yc have no difficulty breathing. But the air does not contain enough oxyge support life. Unconsciousness or death can result. Halon Extinguishers Some fire extinguishers and "built-in" or "fixed" automatic fire extinguishing systems contain a gas called Halon. Like carbon dioxide colorless and odorless and will not support life. Some Halons may be tc inhaled. To be accepted by the Coast Guard, a fixed Halon system must hav indicator light at the vessel's helm. A green light shows the system is re Red means it is being discharged or has been discharged. Warning hot are available to let you know the system has been activated. If your fixe Halon system discharges, ventilate the space thoroughly before you en There are no residues from Halon but it will not support life. Although Halon has excellent fire fighting properties; it is thought to deplete the earth's ozone layer and has not been manufactured since January 1,1994. Halon extinguishers can be refilled from existing stock the gas until they are used up, but high federal excise taxes are being charged for the service. If you discontinue using your Halon extinguishe take it to a recovery station rather than releasing the gas into the atmosphere. Compounds such as FE 241, designed to replace Halon, i now available. ually <ic if dy. fit. of Fire Extinguisher Approval Fire extinguishers must be Coast Guard approved. Look for the approval number on the nameplate. Approved extinguishers have the following on their labels: "Marine Type USCG Approved, Size..., Type..., 162.208/," etc. In addition, to be acceptable by the Coast Guard, an extinguisher must be in serviceable condition and mounted in its bracket. An extinguisher not properly mounted in its bracket will not be considered serviceable during a Coast Guard inspection. Care and Treatment Make certain your extinguishers are in their stowage brackets and are not damaged. Replace cracked or broken hoses. Nozzles should be free of obstructions. Sometimes, wasps and other insects nest inside nozzles and make them inoperable. Check your extinguishers frequently. If they have pressure gauges, is the pressure within acceptable limits? Do the locking pins and sealing wires show they have not been used since recharging? Don't try an extinguisher to test it. Its valves will not reseat properly and the remaining gas will leak out. When this happens, the extinguisher is useless. Weigh and tag carbon dioxide and Halon extinguishers twice a year. If their weight loss exceeds 10 percent of the weight of the charge, recharge them. Check to see that they have not been used. They should have been inspected by a qualified person within the past six months, and they should have tags showing all inspection and service dates. The problem is that they can be partially discharged while appearing to be fully charged. Some Halon extinguishers have pressure gauges the same as dry chemical extinguishers. Don't rely too heavily on the gauge. The extinguisher can be partially discharged and still show a good gauge reading. Weighing a Halon extinguisher is the only accurate way to assess its contents. If your dry chemical extinguisher has a pressure indicator, check it frequently. Check the nozzle to see if there is powder in it. If there is, recharge it. Occasionally invert your dry chemical extinguisher and hit the base with the palm of your hand. The chemical in these extinguishers packs and cakes due to the boat's vibration and pounding. There is a difference of opinion about whether hitting the base helps, but it can't hurt. It is known that caking of the chemical powder is a major cause of failure of dry chemical extinguishers. Carry spares in excess of the minimum requirement. If you have guests aboard, make certain they know where the extinguishers are and how to use them. Using a Fire Extinguisher A fire extinguisher usually has a device to keep it from being discharged accidentally. This is a metal or plastic pin or loop. If you need to use your extinguisher, take it from its bracket. Remove the pin or the loop and point the nozzle at the base of the flames. Now, squeeze the handle, and discharge the extinguisher's contents while sweeping from side to side. Recharge a used extinguisher as soon as possible. If you are using a Halon or carbon dioxide extinguisher, keep your hands away from the discharge. The rapidly expanding gas will freeze them. If your fire extinguisher has a horn, hold it by its handle. Legal Requirements for Extinguishers You must carry fire extinguishers as defined by Coast Guard regulations. They must be firmly mounted in their brackets and immediately accessible. A motorboat less than 26 ft. long must have at least one approved hand- portable, Type B-1 extinguisher. If the boat has an approved fixed fire extinguishing system, you are not required to have the Type B-1 extinguisher. Also, if your boat is less than 26 ft. long, is propelled by an outboard motor, or motors, and does not have any of the first 6 conditions described at the beginning of this section, it is not required to have an extinguisher. Even so, it's a good idea to have one, especially if a nearby boat catches fire, or if a fire occurs at a fuel dock. A motorboat 26 ft. to less than 40 ft. long, must have at least two Type B- 1 approved hand-portable extinguishers. It can, instead, have at least one Coast Guard approved Type B-2. If you have an approved fire extinguishing system, only one Type B-1 is required. A motorboat 40 to 65 ft. long must have at least three Type B-1 approved portable extinguishers. It may have, instead, at least one Type B-1 plus a Type B-2. If there is an approved fixed fire extinguishing system, two Type B- 1 or one Type B-2 is required.
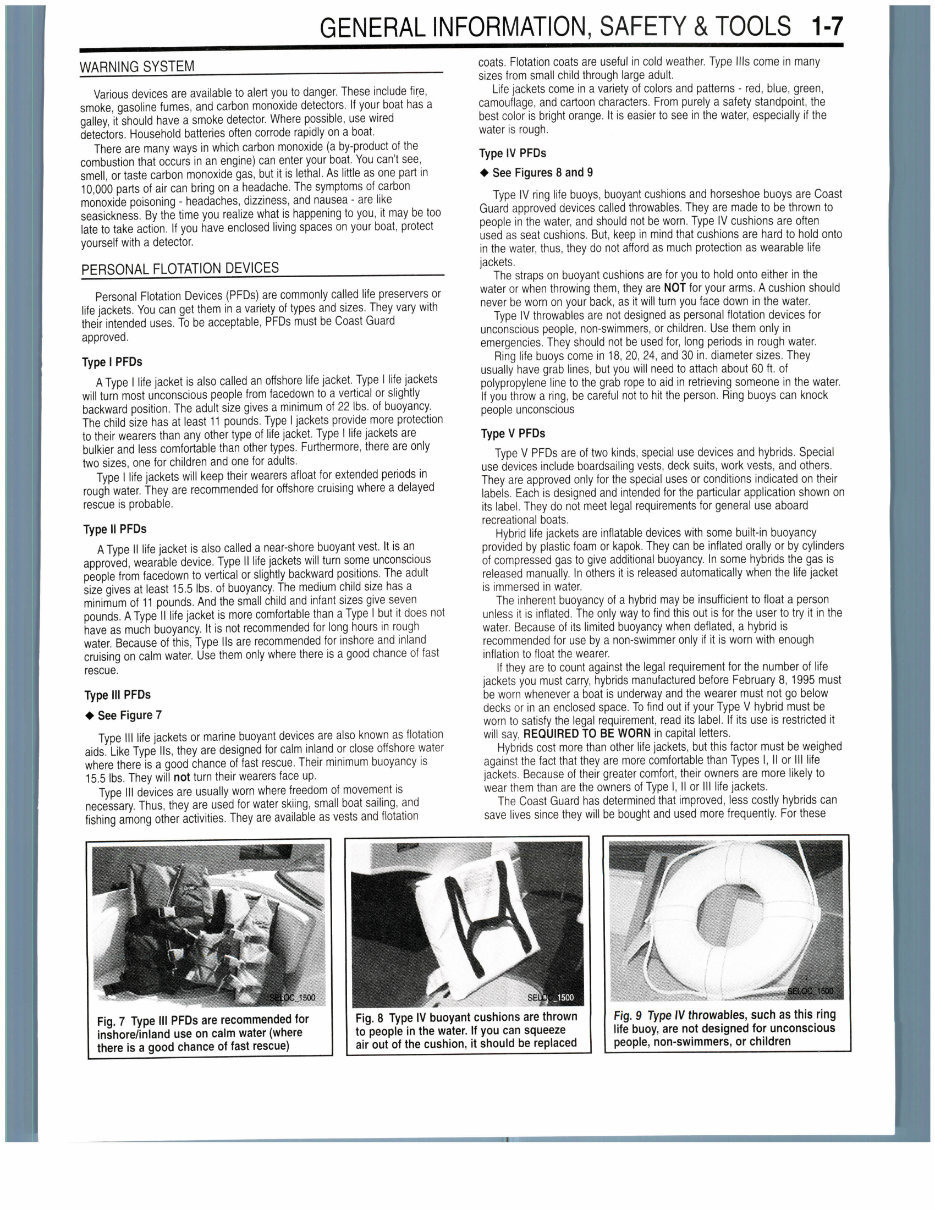
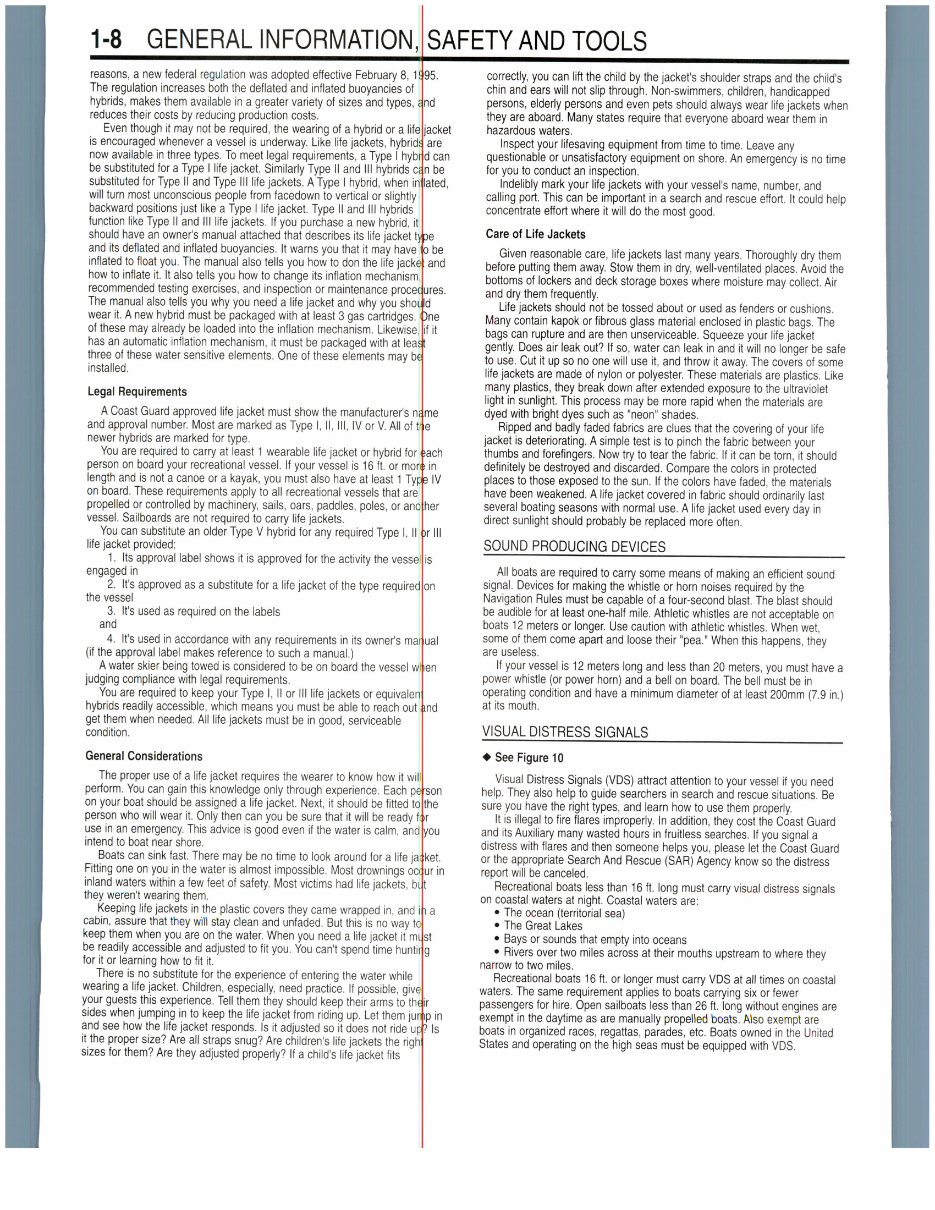
GENERAL INFORMATION, SAFETY & TOOLS 1-7 WARNING SYSTEM Various devices are available to alert you to danger. These include fire, smoke, gasoline fumes, and carbon monoxide detectors. If your boat has a galley, it should have a smoke detector. Where possible, use wired detectors. Household batteries often corrode rapidly on a boat. There are many ways in which carbon monoxide (a by-product of the combustion that occurs in an engine) can enter your boat. You can't see, smell, or taste carbon monoxide gas, but it is lethal. As little as one part in 10,000 parts of air can bring on a headache. The symptoms of carbon monoxide poisoning - headaches, dizziness, and nausea - are like seasickness. By the time you realize what is happening to you, it may be too late to take action. If you have enclosed living spaces on your boat, protect yourself with a detector. PERSONAL FLOTATION DEVICES Personal Flotation Devices (PFDs) are commonly called life preservers or life jackets. You can get them in a variety of types and sizes. They vary with their intended uses. To be acceptable, PFDs must be Coast Guard approved. Type I PFDs A Type I life jacket is also called an offshore life jacket. Type I life jackets will turn most unconscious people from facedown to a vertical or slightly backward position. The adult size gives a minimum of 22 Ibs. of buoyancy. The child size has at least 11 pounds. Type I jackets provide more protection to their wearers than any other type of life jacket. Type I life jackets are bulkier and less comfortable than other types. Furthermore, there are only two sizes, one for children and one for adults. Type I life jackets will keep their wearers afloat for extended periods in rough water. They are recommended for offshore cruising where a delayed rescue is probable. Type II PFDs A Type II life jacket is also called a near-shore buoyant vest. It is an approved, wearable device. Type II life jackets will turn some unconscious people from facedown to vertical or slightly backward positions. The adult size gives at least 15.5 Ibs. of buoyancy. The medium child size has a minimum of 11 pounds. And the small child and infant sizes give seven pounds. A Type II life jacket is more comfortable than a Type I but it does not have as much buoyancy. It is not recommended for long hours in rough water. Because of this, Type Us are recommended for inshore and inland cruising on calm water. Use them only where there is a good chance of fast rescue. Type III PFDs + See Figure 7 Type III life jackets or marine buoyant devices are also known as flotation aids. Like Type Us, they are designed for calm inland or close offshore water where there is a good chance of fast rescue. Their minimum buoyancy is 15.5 Ibs. They will not turn their wearers face up. Type III devices are usually worn where freedom of movement is necessary. Thus, they are used for water skiing, small boat sailing, and fishing among other activities. They are available as vests and flotation Fig. 7 Type III PFDs are recommended for inshore/inland use on calm water (where there is a good chance of fast rescue) coats. Flotation coats are useful in cold weather. Type Ills come in many sizes from small child through large adult. Life jackets come in a variety of colors and patterns - red, blue, green, camouflage, and cartoon characters. From purely a safety standpoint, the best color is bright orange. It is easier to see in the water, especially if the water is rough. Type IV PFDs • See Figures 8 and 9 Type IV ring life buoys, buoyant cushions and horseshoe buoys are Coast Guard approved devices called throwables. They are made to be thrown to people in the water, and should not be worn. Type IV cushions are often used as seat cushions. But, keep in mind that cushions are hard to hold onto in the water, thus, they do not afford as much protection as wearable life jackets. The straps on buoyant cushions are for you to hold onto either in the water or when throwing them, they are NOT for your arms. A cushion should never be worn on your back, as it will turn you face down in the water. Type IV throwables are not designed as personal flotation devices for unconscious people, non-swimmers, or children. Use them only in emergencies. They should not be used for, long periods in rough water. Ring life buoys come in 18, 20, 24, and 30 in. diameter sizes. They usually have grab lines, but you will need to attach about 60 ft. of polypropylene line to the grab rope to aid in retrieving someone in the water. If you throw a ring, be careful not to hit the person. Ring buoys can knock people unconscious Type V PFDs Type V PFDs are of two kinds, special use devices and hybrids. Special use devices include boardsailing vests, deck suits, work vests, and others. They are approved only for the special uses or conditions indicated on their labels. Each is designed and intended for the particular application shown on its label. They do not meet legal requirements for general use aboard recreational boats. Hybrid life jackets are inflatable devices with some built-in buoyancy provided by plastic foam or kapok. They can be inflated orally or by cylinders of compressed gas to give additional buoyancy. In some hybrids the gas is released manually. In others it is released automatically when the life jacket is immersed in water. The inherent buoyancy of a hybrid may be insufficient to float a person unless it is inflated. The only way to find this out is for the user to try it in the water. Because of its limited buoyancy when deflated, a hybrid is recommended for use by a non-swimmer only if it is worn with enough inflation to float the wearer. If they are to count against the legal requirement for the number of life jackets you must carry, hybrids manufactured before February 8,1995 must be worn whenever a boat is underway and the wearer must not go below decks or in an enclosed space. To find out if your Type V hybrid must be worn to satisfy the legal requirement, read its label. If its use is restricted it will say, REQUIRED TO BE WORN in capital letters. Hybrids cost more than other life jackets, but this factor must be weighed against the fact that they are more comfortable than Types I, II or III life jackets. Because of their greater comfort, their owners are more likely to wear them than are the owners of Type I, II or III life jackets. The Coast Guard has determined that improved, less costly hybrids can save lives since they will be bought and used more frequently. For these Fig. 8 Type IV buoyant cushions are thrown to people in the water. If you can squeeze air out of the cushion, it should be replaced Fig. 9 Type IV throwables, such as this ring life buoy, are not designed for unconscious people, non-swimmers, or children
1-8 GENERAL INFORMATION, SAFETY AND TOOLS reasons, a new federal regulation was adopted effective February 8,1 The regulation increases both the deflated and inflated buoyancies of hybrids, makes them available in a greater variety of sizes and types, reduces their costs by reducing production costs. Even though it may not be required, the wearing of a hybrid or a life is encouraged whenever a vessel is underway. Like life jackets, hybrid now available in three types. To meet legal requirements, a Type I hyb be substituted for a Type I life jacket. Similarly Type II and III hybrids c substituted for Type II and Type III life jackets. A Type I hybrid, when in will turn most unconscious people from facedown to vertical or slightly backward positions just like a Type I life jacket. Type II and III hybrids function like Type II and III life jackets. If you purchase a new hybrid, it should have an owner's manual attached that describes its life jacket t and its deflated and inflated buoyancies. It warns you that it may have inflated to float you. The manual also tells you how to don the life jack how to inflate it. It also tells you how to change its inflation mechanism recommended testing exercises, and inspection or maintenance proce The manual also tells you why you need a life jacket and why you sho wear it. A new hybrid must be packaged with at least 3 gas cartridges, of these may already be loaded into the inflation mechanism. Likewise has an automatic inflation mechanism, it must be packaged with at lea three of these water sensitive elements. One of these elements may b installed. Legal Requirements A Coast Guard approved life jacket must show the manufacturer's n and approval number. Most are marked as Type I, II, III, IV or V. All of newer hybrids are marked for type. You are required to carry at least 1 wearable life jacket or hybrid for person on board your recreational vessel. If your vessel is 16 ft. or mo length and is not a canoe or a kayak, you must also have at least 1 Ty on board. These requirements apply to all recreational vessels that are propelled or controlled by machinery, sails, oars, paddles, poles, or an vessel. Sailboards are not required to carry life jackets. You can substitute an older Type V hybrid for any required Type I, I life jacket provided: 1. Its approval label shows it is approved for the activity the vess> engaged in 2. It's approved as a substitute for a life jacket of the type require the vessel 3. It's used as required on the labels and 4. It's used in accordance with any requirements in its owner's mc (if the approval label makes reference to such a manual.) A water skier being towed is considered to be on board the vessel v judging compliance with legal requirements. You are required to keep your Type I, II or III life jackets or equivale hybrids readily accessible, which means you must be able to reach ou get them when needed. All life jackets must be in good, serviceable condition. General Considerations The proper use of a life jacket requires the wearer to know how it w perform. You can gain this knowledge only through experience. Each p on your boat should be assigned a life jacket. Next, it should be fitted person who will wear it. Only then can you be sure that it will be ready use in an emergency. This advice is good even if the water is calm, an intend to boat near shore. Boats can sink fast. There may be no time to look around for a life j Fitting one on you in the water is almost impossible. Most drownings o inland waters within a few feet of safety. Most victims had life jackets, they weren't wearing them. Keeping life jackets in the plastic covers they came wrapped in, and cabin, assure that they will stay clean and unfaded. But this is no way keep them when you are on the water. When you need a life jacket it n be readily accessible and adjusted to fit you. You can't spend time hun for it or learning how to fit it. There is no substitute for the experience of entering the water while wearing a life jacket. Children, especially, need practice. If possible, gi your guests this experience. Tell them they should keep their arms to t sides when jumping in to keep the life jacket from riding up. Let them j and see how the life jacket responds. Is it adjusted so it does not ride it the proper size? Are all straps snug? Are children's life jackets the rig sizes for them? Are they adjusted properly? If a child's life jacket fits d .cket are can be ated, be and res. I ne it me ach in IV ler ual nd son he ket. urin r ,p in f?ls correctly, you can lift the child by the jacket's shoulder straps and the child's chin and ears will not slip through. Non-swimmers, children, handicapped persons, elderly persons and even pets should always wear life jackets when they are aboard. Many states require that everyone aboard wear them in hazardous waters. Inspect your lifesaving equipment from time to time. Leave any questionable or unsatisfactory equipment on shore. An emergency is no time for you to conduct an inspection. Indelibly mark your life jackets with your vessel's name, number, and calling port. This can be important in a search and rescue effort. It could help concentrate effort where it will do the most good. Care of Life Jackets Given reasonable care, life jackets last many years. Thoroughly dry them before putting them away. Stow them in dry, well-ventilated places. Avoid the bottoms of lockers and deck storage boxes where moisture may collect. Air and dry them frequently. Life jackets should not be tossed about or used as fenders or cushions. Many contain kapok or fibrous glass material enclosed in plastic bags. The bags can rupture and are then unserviceable. Squeeze your life jacket gently. Does air leak out? If so, water can leak in and it will no longer be safe to use. Cut it up so no one will use it, and throw it away. The covers of some life jackets are made of nylon or polyester. These materials are plastics. Like many plastics, they break down after extended exposure to the ultraviolet light in sunlight. This process may be more rapid when the materials are dyed with bright dyes such as "neon" shades. Ripped and badly faded fabrics are clues that the covering of your life jacket is deteriorating. A simple test is to pinch the fabric between your thumbs and forefingers. Now try to tear the fabric. If it can be torn, it should definitely be destroyed and discarded. Compare the colors in protected places to those exposed to the sun. If the colors have faded, the materials have been weakened. A life jacket covered in fabric should ordinarily last several boating seasons with normal use. A life jacket used every day in direct sunlight should probably be replaced more often. SOUND PRODUCING DEVICES All boats are required to carry some means of making an efficient sound signal. Devices for making the whistle or horn noises required by the Navigation Rules must be capable of a four-second blast. The blast should be audible for at least one-half mile. Athletic whistles are not acceptable on boats 12 meters or longer. Use caution with athletic whistles. When wet, some of them come apart and loose their "pea." When this happens, they are useless. If your vessel is 12 meters long and less than 20 meters, you must have a power whistle (or power horn) and a bell on board. The bell must be in operating condition and have a minimum diameter of at least 200mm (7.9 in.) at its mouth. VISUAL DISTRESS SIGNALS 4 See Figure 10 Visual Distress Signals (VDS) attract attention to your vessel if you need help. They also help to guide searchers in search and rescue situations. Be sure you have the right types, and learn how to use them properly. It is illegal to fire flares improperly. In addition, they cost the Coast Guard and its Auxiliary many wasted hours in fruitless searches. If you signal a distress with flares and then someone helps you, please let the Coast Guard or the appropriate Search And Rescue (SAR) Agency know so the distress report will be canceled. Recreational boats less than 16 ft. long must carry visual distress signals on coastal waters at night. Coastal waters are: • The ocean (territorial sea) • The Great Lakes • Bays or sounds that empty into oceans • Rivers over two miles across at their mouths upstream to where they narrow to two miles. Recreational boats 16 ft. or longer must carry VDS at all times on coastal waters. The same requirement applies to boats carrying six or fewer passengers for hire. Open sailboats less than 26 ft. long without engines are exempt in the daytime as are manually propelled boats. Also exempt are boats in organized races, regattas, parades, etc. Boats owned in the United States and operating on the high seas must be equipped with VDS.
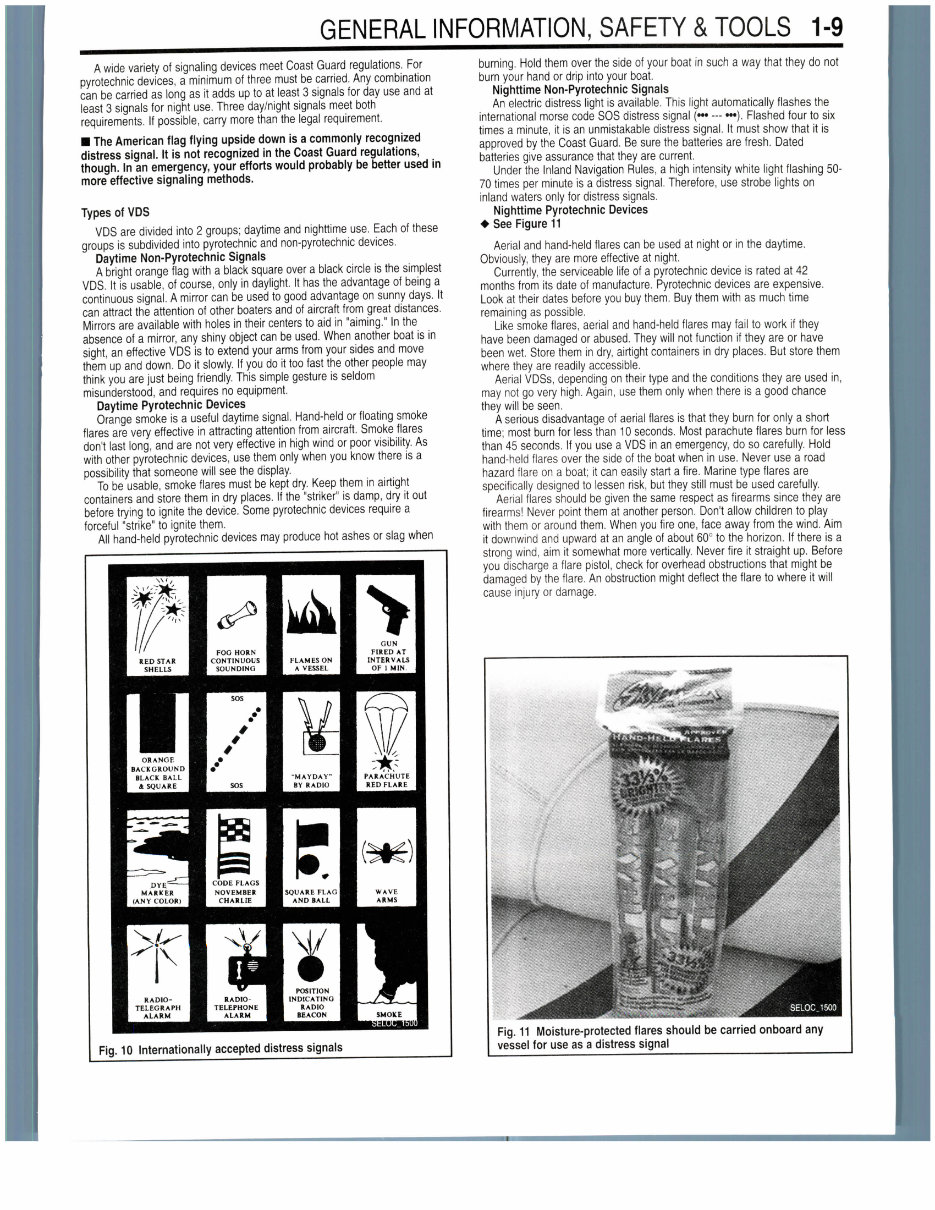
GENERAL INFORMATION, SAFETY & TOOLS 1-9 A wide variety of signaling devices meet Coast Guard regulations. For pyrotechnic devices, a minimum of three must be carried. Any combination can be carried as long as it adds up to at least 3 signals for day use and at least 3 signals for night use. Three day/night signals meet both requirements. If possible, carry more than the legal requirement. • The American flag flying upside down is a commonly recognized distress signal. It is not recognized in the Coast Guard regulations, though. In an emergency, your efforts would probably be better used in more effective signaling methods. Types of VDS VDS are divided into 2 groups; daytime and nighttime use. Each of these groups is subdivided into pyrotechnic and non-pyrotechnic devices. Daytime Non-Pyrotechnic Signals A bright orange flag with a black square over a black circle is the simplest VDS. It is usable, of course, only in daylight. It has the advantage of being a continuous signal. A mirror can be used to good advantage on sunny days. It can attract the attention of other boaters and of aircraft from great distances. Mirrors are available with holes in their centers to aid in "aiming." In the absence of a mirror, any shiny object can be used. When another boat is in sight, an effective VDS is to extend your arms from your sides and move them up and down. Do it slowly. If you do it too fast the other people may think you are just being friendly. This simple gesture is seldom misunderstood, and requires no equipment. Daytime Pyrotechnic Devices Orange smoke is a useful daytime signal. Hand-held or floating smoke flares are very effective in attracting attention from aircraft. Smoke flares don't last long, and are not very effective in high wind or poor visibility. As with other pyrotechnic devices, use them only when you know there is a possibility that someone will see the display. To be usable, smoke flares must be kept dry. Keep them in airtight containers and store them in dry places. If the "striker" is damp, dry it out before trying to ignite the device. Some pyrotechnic devices require a forceful "strike" to ignite them. All hand-held pyrotechnic devices may produce hot ashes or slag when Fig. 10 Internationally accepted distress signals burning. Hold them over the side of your boat in such a way that they do not burn your hand or drip into your boat. Nighttime Non-Pyrotechnic Signals An electric distress light is available. This light automatically flashes the international morse code SOS distress signal (••• — •••). Flashed four to six times a minute, it is an unmistakable distress signal. It must show that it is approved by the Coast Guard. Be sure the batteries are fresh. Dated batteries give assurance that they are current. Under the Inland Navigation Rules, a high intensity white light flashing 50- 70 times per minute is a distress signal. Therefore, use strobe lights on inland waters only for distress signals. Nighttime Pyrotechnic Devices * See Figure11 Aerial and hand-held flares can be used at night or in the daytime. Obviously, they are more effective at night. Currently, the serviceable life of a pyrotechnic device is rated at 42 months from its date of manufacture. Pyrotechnic devices are expensive. Look at their dates before you buy them. Buy them with as much time remaining as possible. Like smoke flares, aerial and hand-held flares may fail to work if they have been damaged or abused. They will not function if they are or have been wet. Store them in dry, airtight containers in dry places. But store them where they are readily accessible. Aerial VDSs, depending on their type and the conditions they are used in, may not go very high. Again, use them only when there is a good chance they will be seen. A serious disadvantage of aerial flares is that they burn for only a short time; most burn for less than 10 seconds. Most parachute flares burn for less than 45 seconds. If you use a VDS in an emergency, do so carefully. Hold hand-held flares over the side of the boat when in use. Never use a road hazard flare on a boat; it can easily start a fire. Marine type flares are specifically designed to lessen risk, but they still must be used carefully. Aerial flares should be given the same respect as firearms since they are firearms! Never point them at another person. Don't allow children to play with them or around them. When you fire one, face away from the wind. Aim it downwind and upward at an angle of about 60° to the horizon. If there is a strong wind, aim it somewhat more vertically. Never fire it straight up. Before you discharge a flare pistol, check for overhead obstructions that might be damaged by the flare. An obstruction might deflect the flare to where it will cause injury or damage. Fig. 11 Moisture-protected flares should be carried onboard any vessel for use as a distress signal
This workshop service manual covers a range of Tohatsu outboard boat engines, including 2-stroke 1, 2, 3, and 4 cylinders. It is compatible with all Windows and Mac versions and requires Adobe Acrobat Reader for viewing due to its format. The file size is 49 MB.
The manual provides detailed information on various engine models, including 2.5, 3.5, 5, 8, 9.8, 9.9, 15, 18, 25, 30, 40, 40D, 40D2, 50D, 50D2, 60B, 60C, 70B, 70C, 80, 90, 115, 120, and 140, along with their respective cylinder(s) and horsepower.
Contents of the manual include general information, tools & techniques, troubleshooting & testing, lubrication system, maintenance & tune-up, synchronization & adjustment, fuel system, electrical system, ignition system, power head, gearcase & midsection, manual rewind starter, power trim & tilt repair, index, and wiring diagram.
This electronic manual features detailed illustrations, step-by-step written instructions, necessary diagrams, and pictures. It is designed for both do-it-yourself enthusiasts and experienced mechanics, serving as a valuable source for repair and service information. By using this manual, individuals can effectively maintain and repair their vehicles at a reasonable cost.