

Sears outboard motor service repair manual 1960 - 1968
What's Included?
Fast Download Speeds
Online & Offline Access
Access PDF Contents & Bookmarks
Full Search Facility
Print one or all pages of your manual

GLENN'S
MARINE
SERIES
FULLY ILLUSTRATED
HAROLD T. GLENN
A COWLES BOOK

Other Books by Harold T. Glenn
Youth at the Wheel
Safe Living
Automechanics
Glenn's Auto Troubleshooting Guide
Glenn's Triumph Repair and Tune-Up Guide
Exploring Power Mechanics
Glenn's Alfa Romeo Repair and Tune-Up Guide
Glenn's Austin, Austin-Healey Repair and Tune-Up Guide
Automobile Engine Rebuilding and Maintenance
Glenn's Sunbeam-Hillman Repair and Tune-Up Guide
Glenn's MG, Morris, and Magnette Repair and Tune-Up Guide
Glenn's Volkswagen Repair and Tune-Up Guide
Glenn's Volkswagen Repair and Tune-Up Guide (Spanish Edition)
Glenn's Mercedes-Benz Repair and Tune-Up Guide
Glenn's Foreign Carburetors and Electrical Systems Guide
Glenn's Renault Repair and Tune-Up Guide
Glenn's Jaguar Repair and Tune-Up Guide
Automobile Power Accessories
Glenn's Volvo Repair and Tune-Up Guide
Glenn's Peugeot Repair and Tune-Up Guide
Glenn's Auto Repair Manual
Glenn's Foreign Car Repair Manual
Glenn's Fiat Repair and Tune-Up Guide
Automotive Smog Control Manual
Honda Repair and Tune-Up Guide
Copyright 0 1968 by HAROLD T. GLENN
All rights reserved.
This volume may not be reproduced in whole or in part
in any Form without written permission from the publisher.
I
Printed in the United States of America 68A
Library of Congress Catalog Number 68-9719
This is a comprehensive repair and tune-up manual for outboard motors. It is designed
to be used' as a classroom text or mechanic's reference book, or it can be used by a boating
enthusiast who is interested in keeping his engine in tip-top shape. A quick-starting and
dependable engine can contribute to an enjoyable vacation; a balky engine can spoil the fun.
This manual is organized about the conventional units of the outboard motor: the engine
and the lower unit. Chapters are devoted to servicing the fuel and electrical systems. A
separate chapter on engine tuning will enable the enthusiast to get all of the power from the
engine that it was designed to deliver. A chapter on maintenance provides vital nontechnical
information for fuel mixing and lubricating the units properly, to keep the engine operating
dependably.
The first chapter deals with troubleshooting. I t enables a mechanic to isolate trouble
before beginning to disassemble the mechanism. It helps to pinpoint the trouble so that a
mechanic will know what to look for as the unit is being disassembled. This feature can save
valuable time when making repairs.
This book contains comprehensive and accurate specification tables, wiring diagrams,
and exploded views of all mechanical and electrical units.
A special feature of this book is the use of many step-by-step illustrated instructions for
representative types of carburetors, engines, and lower units. The illustrations and text are
so closely correlated that no legends are needed. The illustrations have been especially treated
to drop out the backgrounds.
The author wishes to thank Messrs. Will Rush, Jack Carroll, Don Lideen, Bob Allman,
and Paul Taylor for their kind assistance in helping to take the pictures and for furnishing
technical information that has been used in this Guide.
Especial thanks are due my wife, ANNA GLENN, for her devoted assistance in proof-
reading the text.
Harold T. Glenn

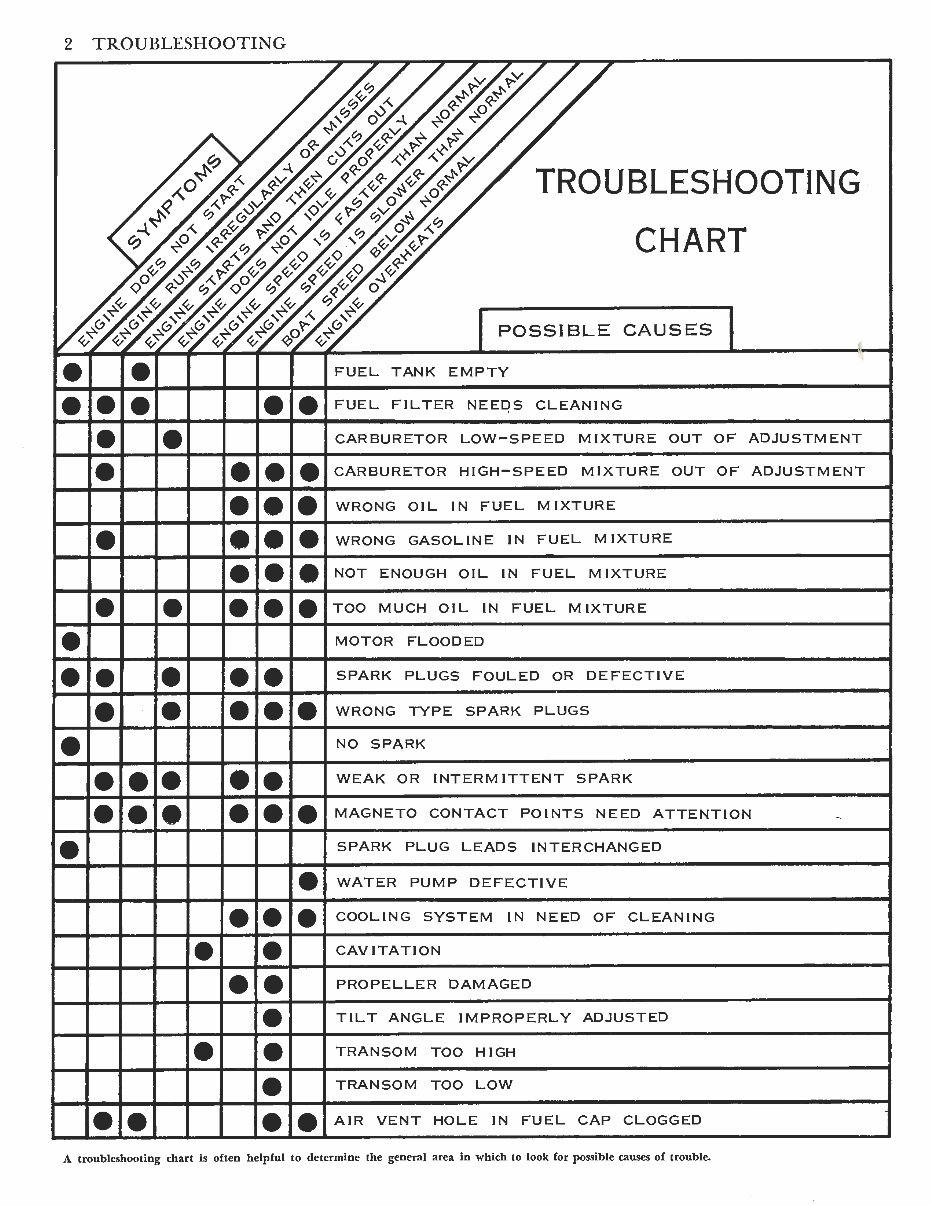
1 TROUBLESHOOTING
Fuel system troubleshooting 1
Troubleshooting chart 2
Fuel system troubleshooting chart 3
Ignition troubleshooting 4
Ignition system troubleshooting chart 4
Compression 5
Compression troubleshooting chart 6
Rough operation 6
Rough operation troubleshooting chart 7
High fuel consumption 8
High fuel consumption troubleshooting chart 8
Noises
Noise troubleshooting chart
Mechanical problems
Mechanical troubleshooting chart
Cooling system troubleshooting chart
Electrical system troubles
Battery troubleshooting chart
Ignition system troubleshooting chart
Starting motor troubleshooting chart
Troubleshooting the cranking motor
Starter-generator troubleshooting chart
Cranking motor troubleshooting chart
2 MAINTENANCE
Boat performance and propeller selection
Boat speed
Center of gravity
Tilt angle
Transom height
Condition of boat bottom
Propeller selection
Fuel consumption
Installing the propeller
Ti1 t pin adjustment
Cavitation
Caution for shallow water operation
Performance factors
Fuel mixing procedure
Fuel mixing chart
Water pump operation
Stopping
Removing the engine from the boat
Maintenance
Lubrication
Fuel filter
Lubrication chart
Operating in salt water or silt
After submersion
Storage
Using a cleaner
Water wisdom
Coast Guard regulations
Rules of the waterways
Signposts
Seamanship for safety
Stepping into the boat
Casting off
Weather signals
8 Rough water
8 Danger zone
9 Overtaking
9 Turns
9 Reverse gear
10 Skiing
10 Stopping
10 Docking
10 3 TUNING FOR PERFORMANCE
11 General ignition service procedures 29
11 Spark plug 29
11 Spark plug troubles 31
Spark plug protectors 33
15 Magneto service procedures 33
15 Removing the flywheel 33
15 Breaker point service 33
15 Breaker point synchronization 34
15 Ignition timing 34
15 Tune-up specifications 35
16 Carburetor throttle pickup adjustment 36
17 One-cylinder tune-up service procedures;
13 3.5 and 4 H P engines 36
17 Breaker point service 36
18 Carburetor adjustments 37
18
Two-cylinder engine tune-up service procedures;
18 7.5, 9, and 12/14 H p engines 37
19 Breaker point service 39
19 Carburetor-timing synchronous adjustment 39
20 Carburetor adjustments 39
20 Two-cyIinder engine tune-up service procedures;
2 1 25/28 Hp engines 40
2 1 Breaker point service 40
2 1 Carburetor-timing synchronous adjustment 41
2 1 Neutral speed limit adjustment 4 1
22 Carburetor adjustments 41
Two-cylinder tune-up service procedures ;
40-45 H p engines 41
Vacuum and throttle switch adjustments 42
Shift-limit switch 43
Ignition service procedures 43
Maximum spark advance adjustment 45
Carburetor-timing synchronous adjustment 46
Vacuum lift-off choke 50
Carburetor adjustmehts 50
High-speed adjustment 50
Altitude trimmer 5 1
Three-cylinder engine tune-up service procedures ;
75 Hp engine
Shift-limit switch
Distributor service
Carburetor-timing synchronous adjustment
Carburetor adjustments
Altitude trimmer
4 FUEL SYSTEM SERVICE
Fuel pump
Fuel pump operation
Fuel pump pressure test
Fuel pump specifications
Fuel pump, R&R
Fuel tank maintenance
Storage
Walbro carburetors
Walbro carburetor with an adjustable
high-speed jkt; 3.5,4, and 14 H p engines
Theory of operation
Overhauling a Walbro carburetor with
an adjustable high-speed jet
Disassembling
Cleaning and inspecting
Assembling
Walbro carburetor with a fixed high-speed jet ;
28, 45 (since l968), and 75 Hp engine
Theory of operation
Idle operation
Mid-range operation
High-speed operation
Overhauling a Walbro carburetor with
a Zxed high-speed jet
Disassembling
Cleaning and inspecting
Assembling
Marvel-Schebler carburetors
Marvel-Schebler, type VHD, carburetor ;
45 H p engine
Idle operation
Intermediate operation
High-speed operation
Economizer system
Accelerating system
Overhauling a Marvel-Schebler,
type VHD, carburetor
Disassembling
Cleaning and inspecting
Assembling
Marvel-Schebler, type SUM;
7.5 and 9 H p engines
Overhauling a Marvel-Schebler,
type SUM, carburetor
Disassembling
-
5 1 Cleaning and inspecting
5 1 Assembling
52 5 ENGINE SERVICE
53 Principles of operation 80
55 Engine details
8 1
55
General instructions 82
Mechanical engine specifications 83
56 Disassembling 83
56 Cleaning and inspecting 88
56 Assembling 9 1
56 Overhauling a two-cylinder, 7.5 and 9 H p engine 100
57 Disassembling 100
57 Cleaning and inspecting 104
57 Assembling 107
57
75, 45, 28, 14, and 3.5 engine service notes 117
75 and 45 H p engine service notes 117
57
28 H p engine service notes 119
57
14 H p engine service notes 121
3.5 Hp engine service notes 123
58
58
6 SERVICING THE LOWER UNIT
59 Description
59 Service procedures
One-cylinder engine
61 Disassembling
61
Cleaning and inspecting
6 1 Assembling
62 Two-cylinder engine
62
Disassembling
Cleaning and inspecting
63 Assembling
63
12 and 14 Hp lower unit
63
25 and 28 Hp lower unit
64
40, 43, 45, 60 and 75 H p lower unit
66 7 ELECTRICAL SYSTEM SERVICE
Cranking motors
66 Overhauling a Delco-Remy cranking motor
66 Disassembling
67 Cleaning and inspecting
67 Assembling
Overhauling a Prestolite cranking motor
Disassembling
Cleaning and inspecting
Assembling
Starter-generator; 7.5 and 9 H p engines ,
Normal starting
Charging
Start button depressed accidentally
Starter-generator troubleshooting
Battery service
Electrical tests
Starter-generator service
Output test
Solenoid output test
Sclenoid energizing test
Diode test
Starter-generator, R&R
Cleaning and inspecting
Brush holders and field windings
Armature
Diodes
Assembling
Alternator
Alternator tests
28 and 45 Hp engine wiring diagram
Selenium rectifier tests
75 H p engine wiring diagram
When the engine won't start, it is very important to Remove a spark plug to check its condition. A wet
be able to run through an organized procedure in order spark plug means that the engine has been overchoked;
to pinpoint the cause of the trouble. Bgsically, starting a dry spark plug means that no fuel is reaching the com-
troubles can be localized to either the fuel system or the bustion chamber. If the carburetor fuel bowl is full, but
ignition system. After isolating the trouble to the defec- the spark plug is dry, the carburetor jets may be plugged.
tive system, go through the following suggested check If the spark plug is wet, go through the procedure
list to determine the exact cause. for starting a flooded engine. Disconnect the fuel line or
shut off the fuel supply completely, and then spin the
flywheel several times to remove the excess fuel from the
combustion chambers. Reconnect the fuel line, replace
the spark plug, and then start the engine in the normal
manner.
FUEL SYSTEM
TROUBLESHOOTING
First make sure that there is gasoline in the tank.
Sometimes the fuel supply burns up faster than you
realize. On engines with a remote fuel tank, make sure
that the air vent screw on the fuel tank cap is open, and
then squeeze the priming bulb in the fuel line. When
the carburetor float bowl is full of gasoline, pressure will
be felt on the priming bulb. However, it is possible to
force fuel past the needle and seat by additional pressure
so that gasoline will flow out of the carburetor throat.
CAUTION: The fuel will leak onto parts of the engine
and could cause a fire. Make sure that all the gasoline
is dried up before attempting to start the engine again.
If the carburetor float bowl is dry, check the line for
an obstruction. Do this by disconnecting the fuel line
from the engine quick-disconnect fitting, and then de-
pressing the check valve in the fuel line connection.
Squeeze the bulb and fuel should come out of the line,
if it is not obstructed.
If the fuel line to the engine is clear, the trouble
could be in the line to the fuel pump or to the carburetor,
usually at the fuel line strainer. To check this out, discon-
nect the fuel line at the carburetor and see if you can
force fuel through it by squeezing the priming bulb.
CAUTION: When disconnecting a fuel line, use the
proper wrenches, never a pair of pliers. CAUTION:
When replacing a fuel line, don't tighten the nuts too
much, especially on aluminum castings where the threads
can be stripped rather easily.
\ dl"
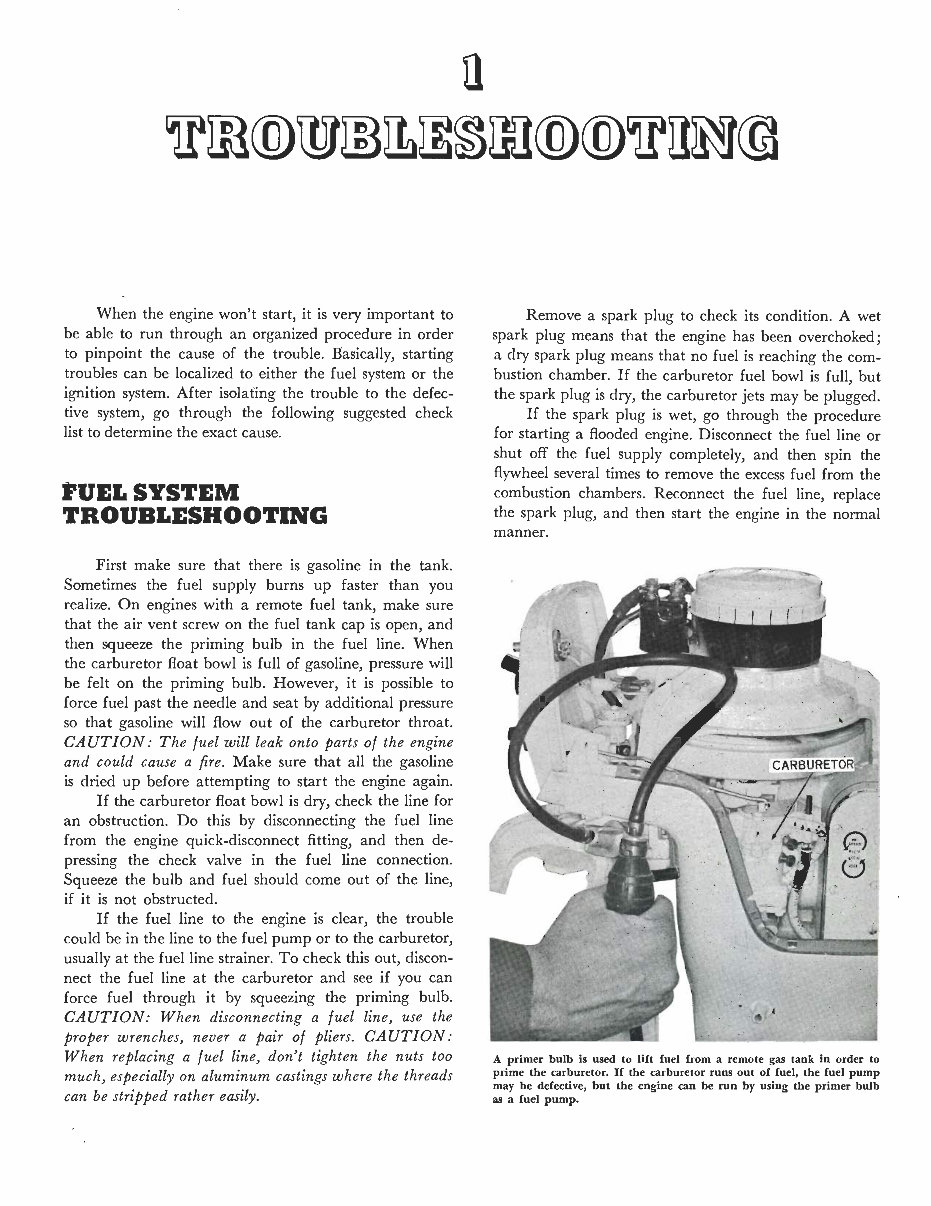
A primer bulb is used to lift fuel from a remote gas tank in order to
prime the carburetor. If the carburetor runs out of fuel, the fuel pump
may be defective, but the engine can be run by using the primer bulb
as a fuel pump.
FUEL SYSTEM 3
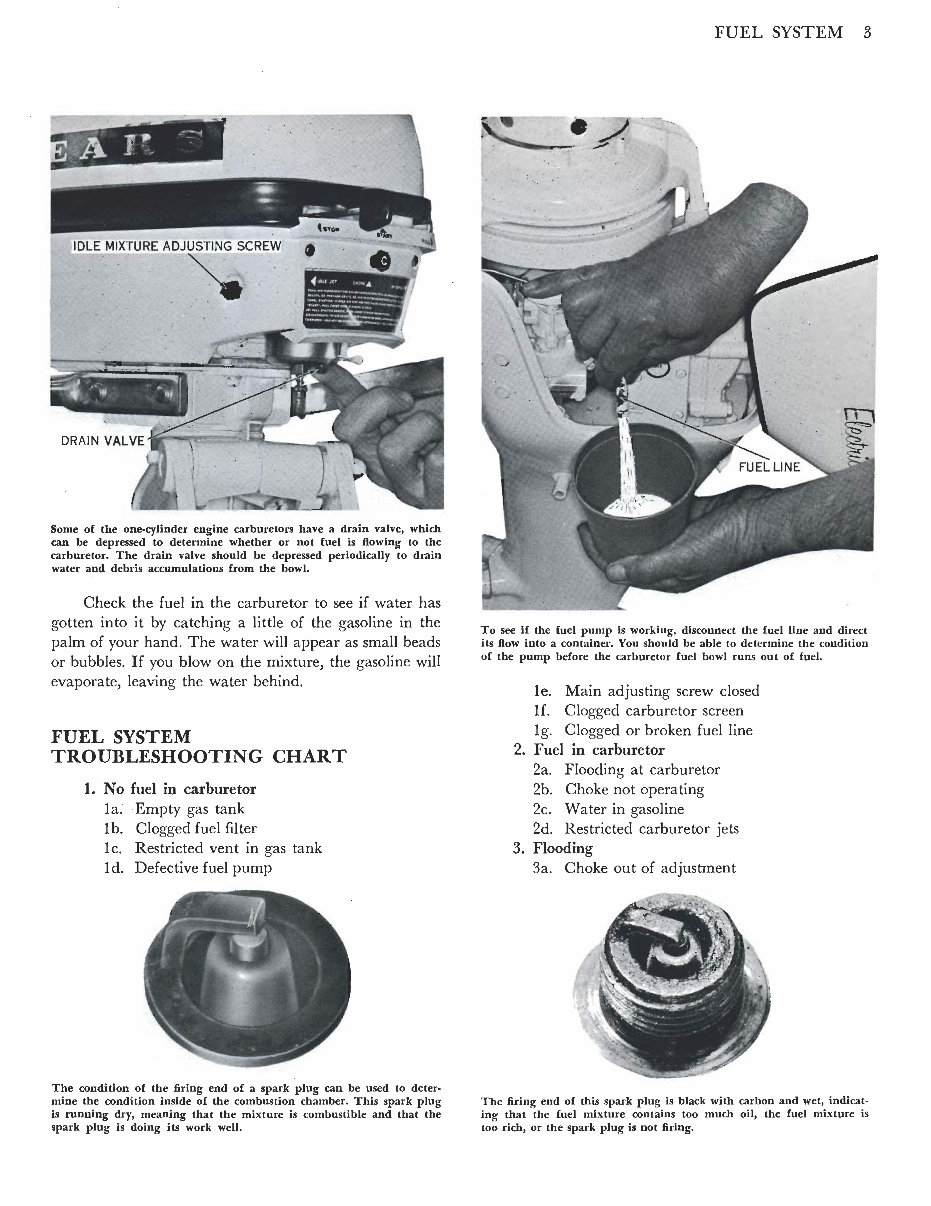
Some of the one-cylinder engine carbureton have a drain valve, which
can be depressed to determine whether or not fuel is flowing to the
carburetor. The drain valve should be depressed periodically to drain
water and debris accumulations from the bowl.
Check the fuel in the carburetor to see if water has
gotten into it by catching a little of the gasoline in the
palm of your hand. The water will appear as small beads
or bubbles. If you blow on the mixture, the gasoline will
evaporate, leaving the water behind.
FUEL SYSTEM
TROUBLESHOOTING CHART
1. No fuel in carburetor
la. Empty gas tank
I b. Clogged fuel filter
Ic. Restricted vent in gas tank
Id. Defective fuel pump
The condition of the firing end of a spark plug can be used to deter-
mine the condition inside of the combustion chamber. This spark plug
is running dry, meaning that the mixture is combustible and that the
spark plug is doing its work well.
To see if the he1 pump is working, disconnect the fuel line and direct
its flow into a container. You should be able to determine the condition
of the pump before the carburetor fuel bowl runs out of fuel.
le. Main adjusting screw closed
If. Clogged carburetor screen
Ig. Clogged or broken fuel line
2. Fuel in carburetor
2a. Flooding at carburetor
2b. Choke not operating
2c. Water in gasoline
2d. Restricted carburetor jets
3. Flooding
3a. Choke out of adjustment
The firing end of this spark plug is black with carbon and wet, indicat-
ing that the fuel mixture contains too much oil, the fuel mixture is
too rich, or the spark plug is not firing.
You're Reading a Preview
What's Included?
Fast Download Speeds
Online & Offline Access
Access PDF Contents & Bookmarks
Full Search Facility
Print one or all pages of your manual
$33.99
Viewed 72 Times Today


Secure transaction
What's Included?
Fast Download Speeds
Online & Offline Access
Access PDF Contents & Bookmarks
Full Search Facility
Print one or all pages of your manual
$33.99
Get your hands on the Sears outboard motor service repair manual covering the years 1960 to 1968. This comprehensive manual is designed for both professional mechanics and DIY enthusiasts, providing detailed information for servicing one, two, and three-cylinder engines.
The manual consists of 160 illustrated pages, offering clear and concise instructions to assist you in maintaining and repairing your outboard motor effectively.


