


i
Dear Correct Craft Owner:
Congratulations on your purchase of a Sport Nautique / Air Nautique / Pro Air
Nautique. You have chosen a boat that is unequaled “on the waters of the
world” for water-skiing and wakeboarding.
Since 1925, we have manufactured some of the finest products boat builders
can produce.
Your boat was manufactured with the latest marine technology and materials.
You have bought into a legacy handed down by W. C. Meloon over 77 years
ago. His dedication to building boats to the glory of God remains true today as
the cornerstone of our commitment in bringing to you the finest in water sports
boats. We continue to lead this industry in technology and design innovation.
Our heritage is a source of pride. Years of experience, including that of four
generations of Meloons have gone into the building of your boat. We hope that
you will enjoy it to the fullest.
Take a moment to review this owners manual for your boat. We have
assembled this manual to inform you about your boat and educate you further
on boating. There are many tips and tricks on care and maintenance sprinkled
throughout the manual, along with some cautions that will apply to your boat.
Boating is very important to us and we would like you to enjoy many years of
boating.
Welcome into the Nautique family.
Sincerely,
Walter N. Meloon
President/Chief Executive Officer
Trust in the Lord with all thine heart;
and lean not unto thine own understanding.
In all thy ways acknowledge him,
and he shall direct thy paths.
Proverbs 3:5-6

ii
T ABLE OF C ONTENTS
Chapter 1. Overview ............................................... Chapter . Page
Dash Pod and Console Layout ...................................1.1
Flight Control Tower Specs........................................1.1
Keyless Ignition and Serial Switching .......................1.2
Multiple Keyless Ignition Codes ................................1.3
Primary User Code................................ .....................1.4
Erasing the User Codes ..............................................1.5
Key Functions .............................................................1.5
Dash Pod Switches .....................................................1.6
Bilge Pump .................................................................1.6
Bilge Pump Only Mode..............................................1.7
Navigation Lights ......................................................1.7
Anchor ........................................................................1.7
Ventilation Blower ......................................................1.7
12 Volt Plug ...............................................................1.8
Engine Warning Light ...............................................1.8
Gauges ........................................................................1.8
Emergency Cut-off Switch ........................................1.8
Throttle .......................................................................1.8
Pylon ...........................................................................1.9
Lifting Rings ..............................................................1.10
Capacity Plate ...........................................................1.10
Hull Identification Number .......................................1.11
Driver’s Seat Adjustment ..........................................1.12
Love Seat ...................................................................1.12
Ski Locker Latch.........................................................1.12
Fueling .......................................................................1.12
Love Seat Extention ...................................................1.12
Walk Through Windshield..........................................1.13
Dash Cooler ...............................................................1.13
Engine Box Latching/Lifting ....................................1.13
Engine Cooling Water Intake Shut-Off Valve ............1.13
Optional Electric Sensor in Drainplug .......................1.13
Stern Seat Bottom Cushion ......................................1.14
Trunk...........................................................................1.14
Manual Latch Release in Trunk .................................1.14
Fuel Tank Location ....................................................1.14
Optional Launch Control System...............................1.14
Winterizing Launch Control System ..........................1.15
Optional Flight Control Tower (folding)...................1.15
Flight Clips .................................................................1.15
Boarding Platform Removal.......................................1.15
Battery Location..........................................................1.16
Correct Craft Cruise ...................................................1.16
Speedometer ................................................................1.16
Tachometer .................................................................1.19

iii
Chapter 2. Engine Overview
Engine Check-List ......................................................2.1
Fuel Injected Engine Does Not Start ..........................2.2
Break In Procedure .....................................................2.4
General Notes..............................................................2.4
Chapter 3. Cautions and Warning Labels.................3.1
Chapter 4. Boat Handling /Safety Regulations........4.1
Chapter 5. Boat Care
Bilge Pump ................................................................5.1
Propeller ....................................................................5.2
Stuffing Box ...............................................................5.4
Quick Drain Oil ..........................................................5.5
Salt Water Boating......................................................5.6
Battery Maintenance ...................................................5.6
Winterizing Your Boat ................................................5.7
Gelcoat Care ...............................................................5.8
Teak Care ....................................................................5.9
Glass Care ...................................................................5.9
Metal Care ..................................................................5.9
Vinyl Care...................................................................5.10
Tunable Rudder ...........................................................5.11
Chapter 6. Trailering
Hitch ...........................................................................6.1
Security .......................................................................6.1
Towing Your Boat.......................................................6.1
Wiring .........................................................................6.1
Long Trips ..................................................................6.2
Chapter 7. Warranty and Owner Responsibility .......7.1
Chapter 8. Engine Maintenance
PCM Delivery Inspection ..........................................8.1
Changing the Engine Oil ..........................................8.3
Engine Crankcase Capacity /Level .............................8.4
Raw Water Strainer ...................................................8.5
Transmission Cooler ..................................................8.5

iv
Chapter 8. Engine Maintenance...
Replacing Fuel Filter ..................................................8.5
Prolonged Storage .....................................................8.6
Exhaust System .........................................................8.6
PCM Transmissions ....................................................8.6
Maintaining Transmission Fluid Level ......................8.7
Adjusting the Water Pump Belt (Ford Only) .............8.7
Alternator Drive Belt Tension ....................................8.8
Fuel Pumps .................................................................8.8
Fuel Control Cell ........................................................8.8
Battery .......................................................................8.9
Fuel ............................................................................8.10
Engine Circuit Breakers on EFI Engines ...................8.11
Cooling System ........................................................8.11
Fresh Water Cooling ..................................................8.12
Checking Coolant Level ............................................8.13
Winterization Instructions ..........................................8.13
Winter Storage of Batteries ........................................8.16
Recommissioning .......................................................8.17
Flushing Instruction ....................................................8.17
Engine Maintenance Schedule ...................................8.19
Engine Troubleshooting..............................................8.21
Engine Specifications .................................................8.23
Chapter 9. Service Records & Order Forms
Change of Ownership .................................................9.1
Problem Notification Form ........................................9.2
Warranty Transfer .......................................................9.3
PCM Warranty ............................................................9.4
Nautique Friend Program ...........................................9.6
Correct Craft Dealer/Nautique Service Center
Locations ....................................................................9.7
NOA Membership Form ............................................9.8
Warranty Transfer Application ...................................9.10
Plaque Order Form .....................................................9.11
Glossary ......................................................................9.12
Chapter 1
O VERVIEW
Specifications Sport Nautique / Air Nautique/
Pro Air Nautique
100 % Fiberglass Construction
Length (without platform) . . . . . . . . . . . 21 2”’ (6.45 m)
Length (with platform) . . . . . . . . . . . . . . . 22’ 7” (6.88 m)
Beam (measured rubrail to rubrail) . . . . . . . 91” (2,31 m)
Draft . . . . . . . . . . . . . . . . . . . . . . . . . . . . . . 24” (0.61 m)
Water line to top of Air Nautique
Flight Control Tower . . . . . . . . . . . . . . . . . . 83” (2,1 m)
Water line to top of Air Nautique
Flight Control Tower (folded forward). . . . . . . 58” (1.47 m)
Water ballast tank Capacity (Approx.. 400 lbs.) 50 Gal (189 ltr)
Approximate Weight. . . . . . . . . . . . . . . . 2890 lbs. (1,315 kg)
Approximate Weight with full LCS . . . . 3,290 lbs. (1,495 kg)
Lifting Rings (Distance between) . . . . . 19’ 9” (6.02 m)
Fuel Capacity . . . . . . . . . . . . . . . . . . 30 Gallons (114 ltr)
Max Capacity. . . . . . . . . . . . . . . 9 people/1325 lbs. (600 kg)
Welcome to the Sport Nautique / Air Nautique / Pro Air Nautique family.
We realize you may be anxious to get your boat in the water. This manual has
been written to familiarize and educate you about your boat so you will be
more comfortable out on the water. Your boat is built to provide you with the
finest watersports boat in the world. Whether you are slalom skiing or ripping
on a wakeboard, we trust you and your family will enjoy this boat for many
years.
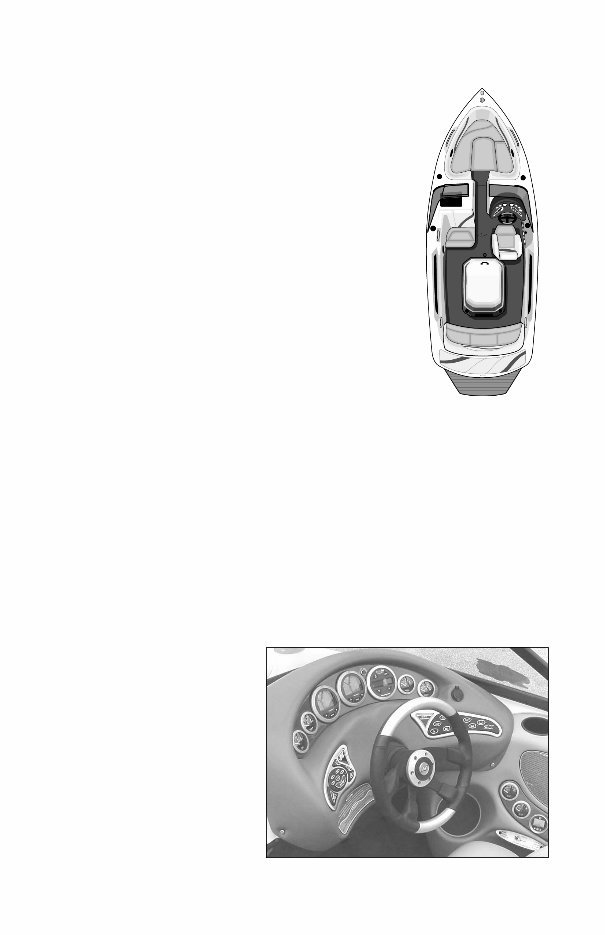
Let’s start by taking a look at the dash pod to familiarize yourself with the
locations of the gauges and switches.
Dash Pod and Console Layout
Standard equipment on your
boat are the following
gauges: oil pressure, engine
coolant temperature,
speedometer, tachometer/
hour meter, fuel level,
voltage. Optional equipment
gauges available include:
air/water temp gauge, clock,
depthfinder, Launch Control
System tank gauges, remote
1.1
Dash Pod
stereo control and Correct Craft Cruise or Perfect Pass Pro speed control.
The optional gauges are positioned on the console located to the right of the
drivers knee or on the two raised surfaces in the center of the dash pod.
CAUTION: The keypad and switch control box will be damaged beyond repair if
the boat battery cables or the main power leads to the keypad and switch control
box are reversed. Be sure to use caution and avoid reversing these connections.
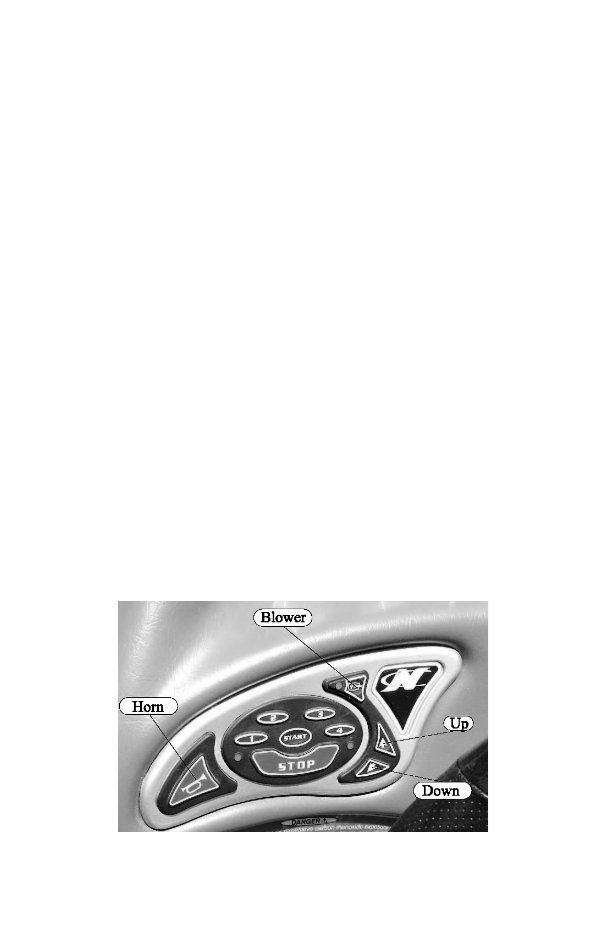
Keyless Ignition and Serial Switching
The ignition switch system is keyless and has three modes of operation.
Locked Mode
When the boat battery is first connected, the unit is in locked mode. In this
mode, the horn, bilge pump, bilge blower, and code buttons are operational.
Unlocked Mode
Unlocked mode is entered after the user successfully enters the user code,
presses, and releases the start button. When the code keys are pressed, the
system indicator light to the right of the start button will turn on while the key
is pressed down. This indicates the button has actually been pushed. When
the system is unlocked, power is supplied to the boat and the system indicator
light will turn on. At this point all keypad buttons are operational and
actuating these buttons will control the corresponding boat functions. To put
the unit back in locked mode, the user must successfully enter the user code
then press the stop button. When the code keys are pressed, the system
indicator light to the right of the start button will turn off while the keys are
pressed down. Power will be cut to all of the accessories with the exception
of the horn, bilge pump, bilge blower and code buttons.
1.2
Keyless Ignition

Run Mode
First enter the unlocked mode.
Pressing and releasing the start button quickly will put the unit in run mode.
When this is done, power is supplied to the engine ignition,but the engine will
not crank and the ignition indicator light just left of the start button is turned
on. If the start button is not pressed again within 15 minutes the unit will exit
run mode by shutting off power to the ignition and re-enter unlocked mode. If
the user presses and holds the start button, power is supplied to the ignition and
starter for as long as the user holds the start button down. All accessory
buttons are operational in this mode as well. Pressing the stop button will shut
off the engine and the unit is then put back in unlocked mode.
After the engine starts, release the start button.
Automatic Reversion to Locked Mode
If no keypad activity takes place for ten hours after unlocking, the system will
automatically revert to the locked mode. This helps to minimize battery drain.
Automatic Back-lighting
Pressing any keypad button will automatically turn the keypad back-lighting
on for ten seconds. This feature is useful for those that use their boat after dark
to find the appropriate keypad buttons.
Multiple Keyless Ignition Codes
The keyless ignition system has provision for three different ignition codes.
Any of the three codes may be used to unlock or lock the system.
The “Master Embedded Code” is programmed into the system at Correct Craft
Inc. and is not changeable, remaining with the boat for it’s life. This code can
be used to unlock the system, to lock the system and to erase the two user
codes.
The “Primary User Code” is programmed into the system by the owner with
the dealers help at the time of boat delivery. This code is used to unlock the
system, to lock the system, and to add or change the “Secondary User Code”
The “Secondary User Code” is programmed into the system by the owner
when necessary. This code is only used to unlock or lock the system. The
“Secondary User Code” is excellent to use for limited access to the boat.
Programming and/or Changing Primary or Secondary User Code
Note: To help prevent battery drain, when you are finished using the boat
make sure you STOP the engine and LOCK the PME ignition system.(two
steps) Note: The “System Indicator Light” is on the ignition keypad below
the number four (4). The “Ignition Indicator Light” is also on the keypad
below the number one (1)
1.3

Programming the Primary User Code
Make sure that the system indicator light is off. Until a primary user code is
set, the keyless ignition will behave as follows. Pressing start once will unlock
the system while pressing it a second time will start the engine. Pressing stop
once will turn off the engine while pressing it a second time will lock the
system.
To program the primary user code, press buttons one and four at the same time,
putting the system in code programming mode. The system indicator light will
be flashing.
Enter a code from two to eight characters long and press start. For verification,
re-enter the code and press start again. The system indicator light should stop
flashing and stay on. If the light does not stop flashing, press stop and begin
again.
To lock the system re-enter either the primary user code or the master
embedded code and press stop.
Changing the Primary User Code
NOTE: The current primary code must be used to change to another primary
code.
Make sure that the system indicator light is off. Enter the primary user code
then press buttons one and four at the same time. This puts the system in code
programming mode. The system indicator light will be flashing.
Enter a code from two to eight characters long and press start. For verification,
re-enter the code and press start again. The system indicator light should stop
flashing and stay on. If the light does not stop flashing, press stop and begin
again.
To lock the system re-enter either the new primary user code or the master
embedded code and press stop. Please note, changing the primary code will
erase the secondary user code. The secondary code will need to be re-entered.
Programming or Changing the Secondary User Code
NOTE: The secondary code will only lock or unlock the system & can not be
used for any reprogramming
Make sure that the system indicator light is off. Enter the primary user code
and press buttons one and three at the same time putting the system in code
programming mode. The system indicator light will be flashing.
Enter a code from two to eight characters long and press start. Re-enter the
code and press start again. The system indicator light should stop flashing and
stay on. If the light does not stop flashing, press stop and begin again.
To lock the system re-enter any of the three codes and press stop.
1.4

Erasing the User Codes
Make sure the system indicator light is off. Enter the master embedded code
and press buttons one and three at the same time. This will erase the system
user codes.
The keyless ignition will now behave as if there are no codes in memory.
Pressing the start button will unlock the system and pressing the stop button
will lock it without entering a code. To program a primary user code, make
sure the system indicator light is off and press buttons one and four at the same
time. This puts the system in code programming mode. The system indicator
light will be flashing. Follow the last two steps above to complete
programming the primary user code.
Key Functions
All keys with the exception of the bilge blower, bilge pump, horn, and the code
keys operate in unlocked or run mode. The horn, up, down, and start buttons,
(when starting the engine), are momentary buttons. All others require a press
to turn on and another press to turn off.
Exceptions
Pressing the heater button will actuate the heater in the following sequence:
Heater off (low(medium(high(back to off)
Pressing the LCS fill or drain will toggle the power to the corresponding
function. Turning either the fill or the drain on will automatically turn the
other off.
The navigation light button always controls the anchor light and if the
navigation lights are on, the anchor light button will have no affect. If the
navigation lights are off, the anchor light button will turn only the anchor light
on and off. One special feature works when the anchor lights are on. If the
user desires to turn the navigation lights on, it is unnecessary to turn the anchor
lights off. Simply pressing the navigation light button will leave the anchor
light on and turn on the bow light.
1.5
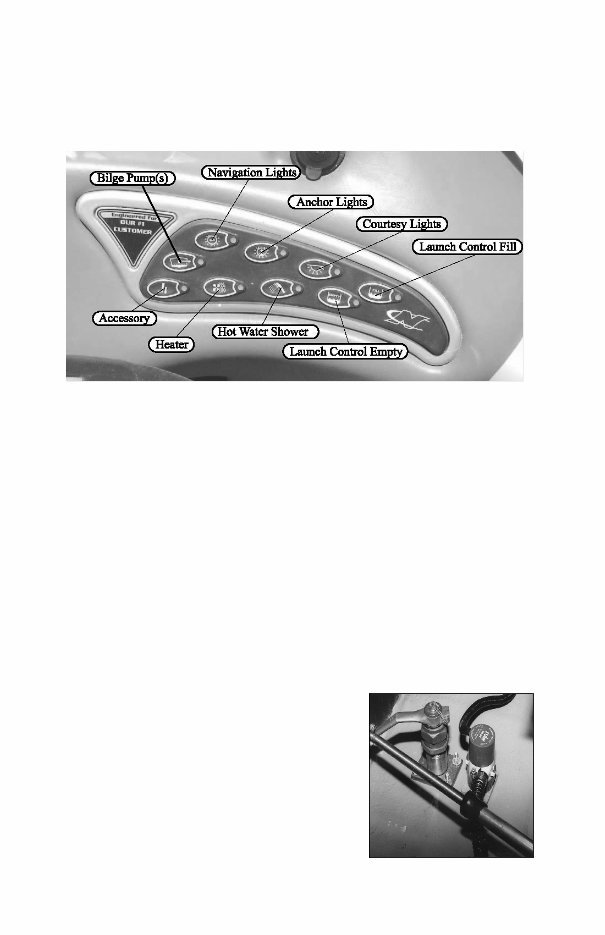
Dash Pod Switches
There are function key switches to the right of the helm and surrounding the
keyless ignition keypad. These are waterproof momentary switches. By
pressing a function key, you activate the function indicated.
All of these switches interface with a sealed circuit breaker box located under
the bow. The circuit breaker box consists of sixteen soft opaque flexible vinyl
tubular shields which cover sixteen circuit switches. When the circuits are
functioning, the tubular shield is somewhat flexible. A tripped circuit breaker
will extend and fill the tubular shield, causing it to be inflexible. To locate a
tripped circuit breaker, run your fingers over the two rows of switches and
locate the switch shield that has become inflexible. To re-set, simply press in
the extended circuit switch shield.
Bilge pumps
The bilge pump switch turns on the bilge pumps. There is a bilge pump down
by the pylon and another bilge pump back by the rudder. When you push the
bilge pump key on the keypad, both pumps will come on and run for several
moments to “sense” of there is water in the bilge. If there is water in the bilge,
they will remain on until the water is pumped out. If there is no water in the
bilge, they will turn off. If you want immediate
pump action, turn the switch off and then back on
again. The pumps will turn on periodically to
determine if there is water in the bilge. If so, they
will remain on until the water is pumped out.
Note: The “Bilge” switch must be turned on
for this feature to operate. This will not drain
significant power from the battery unless the
bilge pumps are required to run frequently
because of a leak or excessive rainwater. This
1.6 1.6
Bilge Pump
Function Keys
You're Reading a Preview
What's Included?
 Lifetime Access
Fast Download Speeds
Online & Offline Access
Access PDF Contents & Bookmarks
Full Search Facility
Print one or all pages of your manual
$26.99
2002 Nautique Sport/Air/Pro Air Nautique Owners Manual
Viewed 67 Times Today

What's Included?
Lifetime Access
Fast Download Speeds
Online & Offline Access
Access PDF Contents & Bookmarks
Full Search Facility
Print one or all pages of your manual
$26.99

Secure transaction
What's Included?
Lifetime Access
Fast Download Speeds
Online & Offline Access
Access PDF Contents & Bookmarks
Full Search Facility
Print one or all pages of your manual
Description
This comprehensive guide is designed for the 2002 Nautique Sport, Air, and Pro Air Nautique models, providing detailed instructions for operation, maintenance, safety, and troubleshooting. It is a valuable resource for both professional mechanics and DIY repair enthusiasts.
The guide covers the following models:
- 2002 Nautique Sport
- 2002 Nautique Air
- 2002 Nautique Pro Air
Its clear and easy-to-understand content explains the functions and features of these models, making it an essential reference for owners and potential buyers alike.


