WASHING MACHINE SERVICE MANUAL CAUTION READ THIS MANUAL CAREFULLY TO DIAGNOSE TROUBLES CORRECTLY BEFORE OFFERING SERVICE. BEFORE SERVICING WASHING MACHINE, UNPLUG THE POWER CORD TO AVOID THE RISK OF ELECTRICAL SHOCK. WHEN SERVICING INTERNAL PARTS, USE ONLY SERVICE PARTS SUPPLIED FROM LG. AFTER SERVICING THE ELECTRICAL WIRE, MAKE SURE THAT APPLY THE INSULATION TAPE TO PREVENT ELECTRICAL SHORT. MODEL : F1443KDS(1~9) / F1243KDS(1~9) website : http://biz.lgservice.com e-mail : http://LGEservice.com/techsup.html
2 CONTENTS 1. SPECIFICATIONS ............................................................................................................................. 3 2. FEATURES & TECHNICAL EXPLANATION ..................................................................................... 4 3. PARTS IDENTIFICATION ................................................................................................................. 6 4. INSTALLATION .................................................................................................................................. 7 5. OPERATION ................................................................................................................................... 12 6. WIRING DIAGRAM / PCB LAYOUT / PROGRAM CHART ............................................................ 14 7. TROUBLESHOOTING ......................................................................................................................19 7-1.BEFORE PERFORMING SERVICE ......................................................................................... 19 7-2.LOAD TEST MODE .................................................................................................................. 19 7-3.HOW TO KNOW THE WATER LEVEL FREQUENCY ............................................................. 20 7-4. HOW TO KNOW THE TEMPERATURE OF EACH THERMISTOR IN OPERATING CONDITION . 20 7-5.HOW TO CHECK THE VIBRATION SENSOR ......................................................................... 21 7-6.ERROR DISPLAY ..................................................................................................................... 22 7-7 TROUBLESHOOTING WITH ERROR ..................................................................................... 24 • IE (Water Inlet Error) .............................................................................................................. 24 • UE (Unbalance Error) ............................................................................................................. 25 • OE (Drain Error) ..................................................................................................................... 26 • FE (Overflow Error) ................................................................................................................ 28 • PE (Pressure Sensor Error) ................................................................................................... 29 • dE (Door open Error) .............................................................................................................. 30 • tE (Thermistor (Heating) Error) ............................................................................................... 31 • LE (Motor Lock Error) ............................................................................................................. 32 8. TROUBLESHOOTING ELSE .......................................................................................................... 34 • PF (Power Failure or no power) ............................................................................................. 34 • Vibation & Noise in spin ......................................................................................................... 35 • Detergent & Softener does not flow in .................................................................................... 36 • Water Leakage ....................................................................................................................... 37 9-1 FILTER ASSEMBLY(LINE FILTER) .............................................................................................. 39 9-2 DOOR LOCK SWITCH ASSEMBLY ............................................................................................. 40 9-3 STATOR ASSEMBLY .................................................................................................................... 42 9-4 PUMP MOTOR ASSEMBLY ......................................................................................................... 45 9-5 INLET VALVE ASSEMBLY ............................................................................................................ 46 10. DISASSEMBLY INSTRUCTIONS ................................................................................................. 47 11. EXPLODED VIEW AND PART LIST ............................................................................................. 61
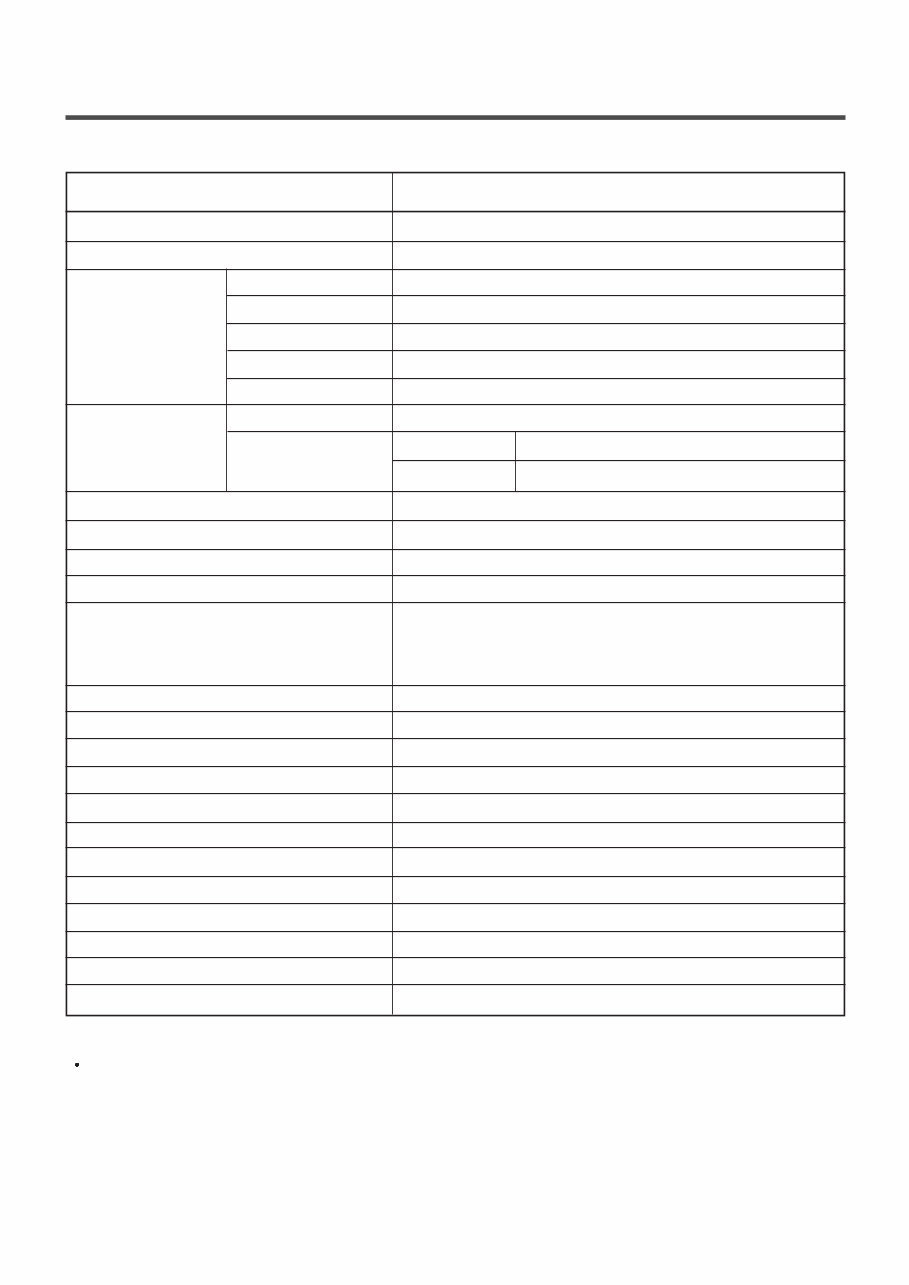
3 1. SPECIFICATION ITEM F1443KDS(1~9) / F1243KDS(1~9) POWER SUPPLY PRODUCT WEIGHT OPERATION WATER PRESSURE CONTROL TYPE WASH CAPACITY DIMENSION WASH PROGRAM RINSE DOOR SWITCH TYPE WATER LEVEL RESERVATION SENSING OF THE LAUNDRY AMOUNT FUZZY LOGIC DISPLAY OF THE REMAINING TIME ERROR DIAGNOSIS POWER AUTO OFF CHILD LOCK AUTO RESTART TIME SAVE ELECTRICITY CONSUMPTION WASHING SPIN DRAIN MOTOR STEAM HEATER WASH HEATER REVOLUTION SPEED WASH SPIN F1443KDS(1~9) F1243KDS(1~9) No Spin/400/600/800/1000/1200/1400 No Spin/400/600/800/1000/1100/1200 50rpm 1.0~10.0kPa(100~1000kgf/cm 2 ) Electronic Refer to the Rating Label 600mm(W)x640mm(D)x850mm(H) Cotton, Cotton Eco, Mix, Easy Care Duvet, Allergy Care, Refresh, Sports Wear, Dark Wash, Delicate, Wool, Intensive 60, Quick 30, Silent Wash Normal, Rinse + , Rinse ++ , Rinse + +Hold, Normal+Hold PTC+Solenoid 10 steps (by sensor) From 3 hours to 19 hours Adapted Adapted Adapted 10 items Adapted Adapted Adapted Adapted 140W 440W 30W 1100W 2000W 220V-240V~, 50Hz 64kg To reduce the risk of personal injury, adhere to all industry recommended safety procedures including the use of long sleeved gloves and safety glasses. Failure to follow all of the safety warnings in this manual could result in property damage, personal injury or death.
4 2.FEATURES & TECHNICAL EXPLANATION 2-1. FEATURES Direct Drive System The advanced Brushless DC motor directly drives the drum without belt and pulley. Water Circulation The detergent water from the drum is sprayed directly over the load ; this enables the clothes to get soaked more quickly during the cycle. The detergent suds can be removed more easily by the water shower during rinse cycle. The water circulation system uses both water and detergent more efficiently. Built-in Heater Internal heater automatically heats the water to the best temperature on selected cycles. Child Lock The Child lock prevents children from pressing any button to change the settings during operation. More economical by Intelligent Wash System Intelligent Wash System detects the amount of load and water temperature, and then determines the optimum water level and washing time to minimize energy and water consumption. Low noise speed control system By sensing the amount of load and balance, it evenly distributes load to minimize the spinning noise level. Safety device (Aqua lock) Aqua lock System is designed for detecting water leak during operation to prevent water from spilling on the floor. Steam Washing and Refresh Steam Washing features upgraded washing performance with low energy consumption. Refresh cycle reduces wrinkles from dry clothes. Automatic Wash Load Detection Automatically detects the load and optimizes the washing time.
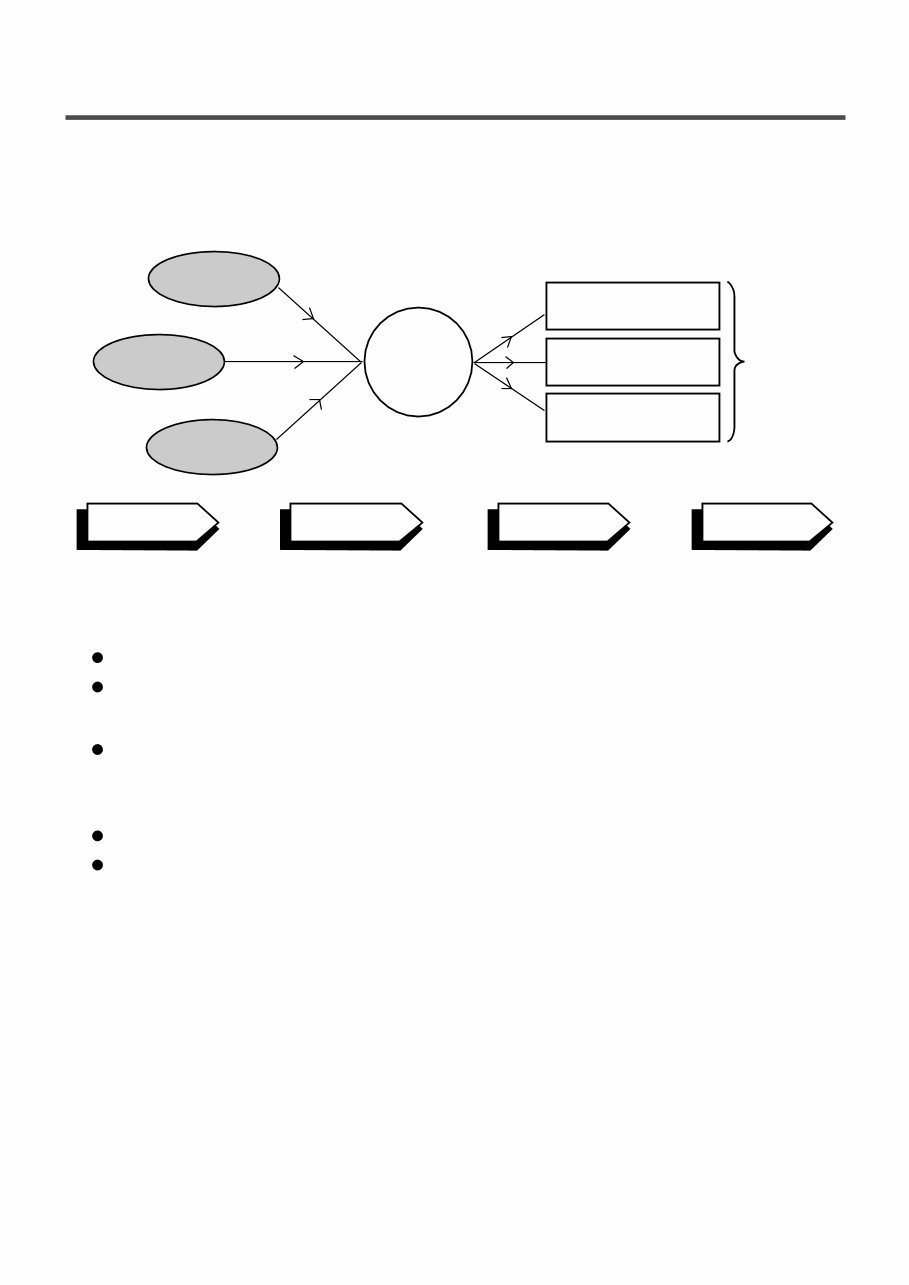
5 2-2. DETERMINE WASHING TIME BY FUZZY LOGIC To get the best washing performance optimal time is determined by sensing of water temperature, selected washing temperature and laundry amount. 2-3. WATER LEVEL CONTROL This model adopts a pressure sensor which can sense the water level in the tub. Water supply is stopped when The water level reaches to the preset level, then washing program proceeds. Spinning does not proceed until the water in the tub reduces to a certain level. water temperature washing time rinse time the best washing performance spin rhythm, time laundry amount FUZZY LOGIC selected washing temperature SENSING EFFECT PROCESSING DETERMINATION 2-4. THE DOOR CAN NOT BE OPENED While program is operating. While Door Lock light turns on.
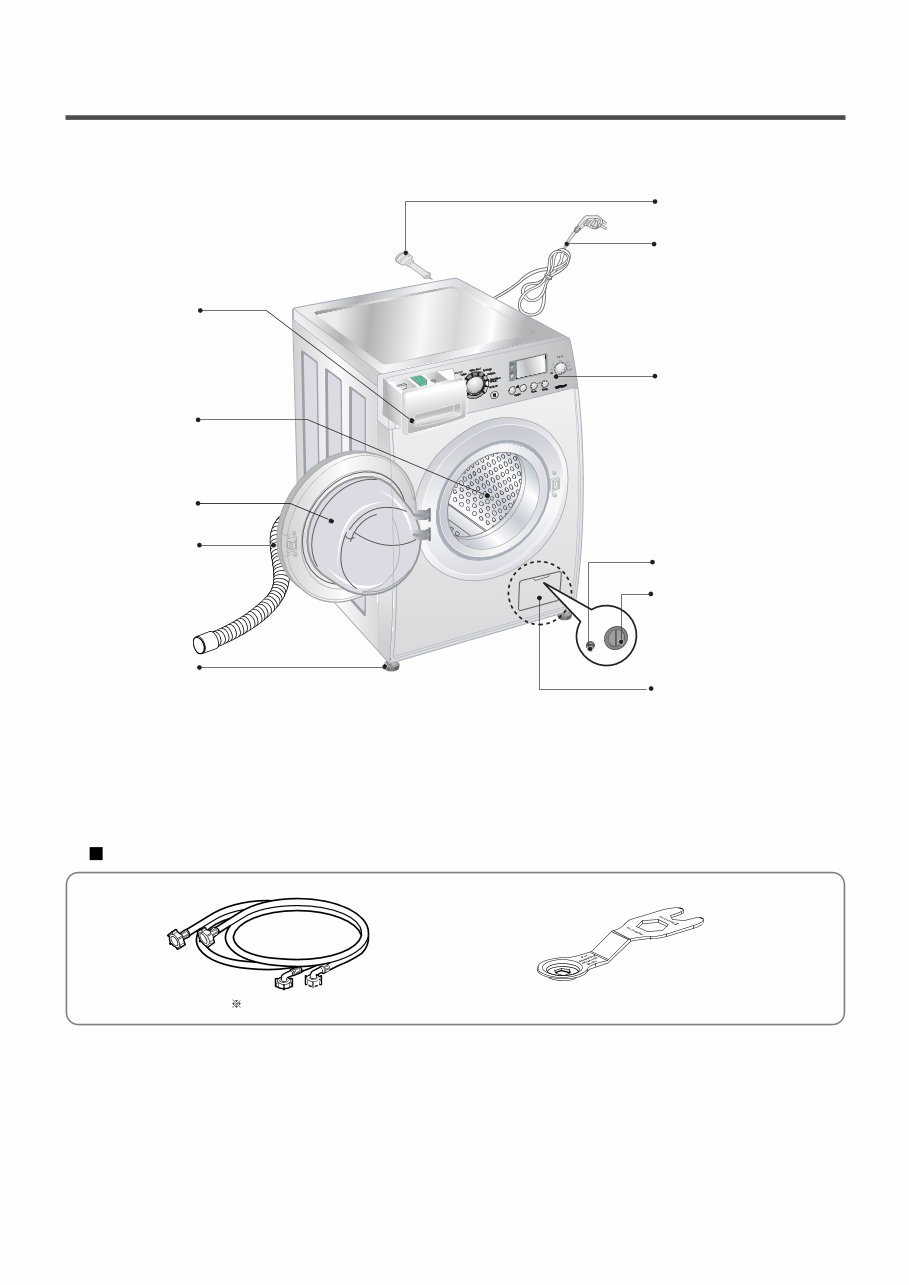
6 3.PARTS IDENTIFICATION Drawer Drum Door Drain Hose Adjustable Feet Shipping Bolts Control Panel Power Pulg Drain Pump Filter Drain Plug Lower Cover Cap If the supply cord is damaged, it must be replaced by the manufacturer or its authorized service technician in order to avoid a hazard. ACCESSORIES Inlet hose(1EA) Option : Hot / Cold(2EA) Spanner
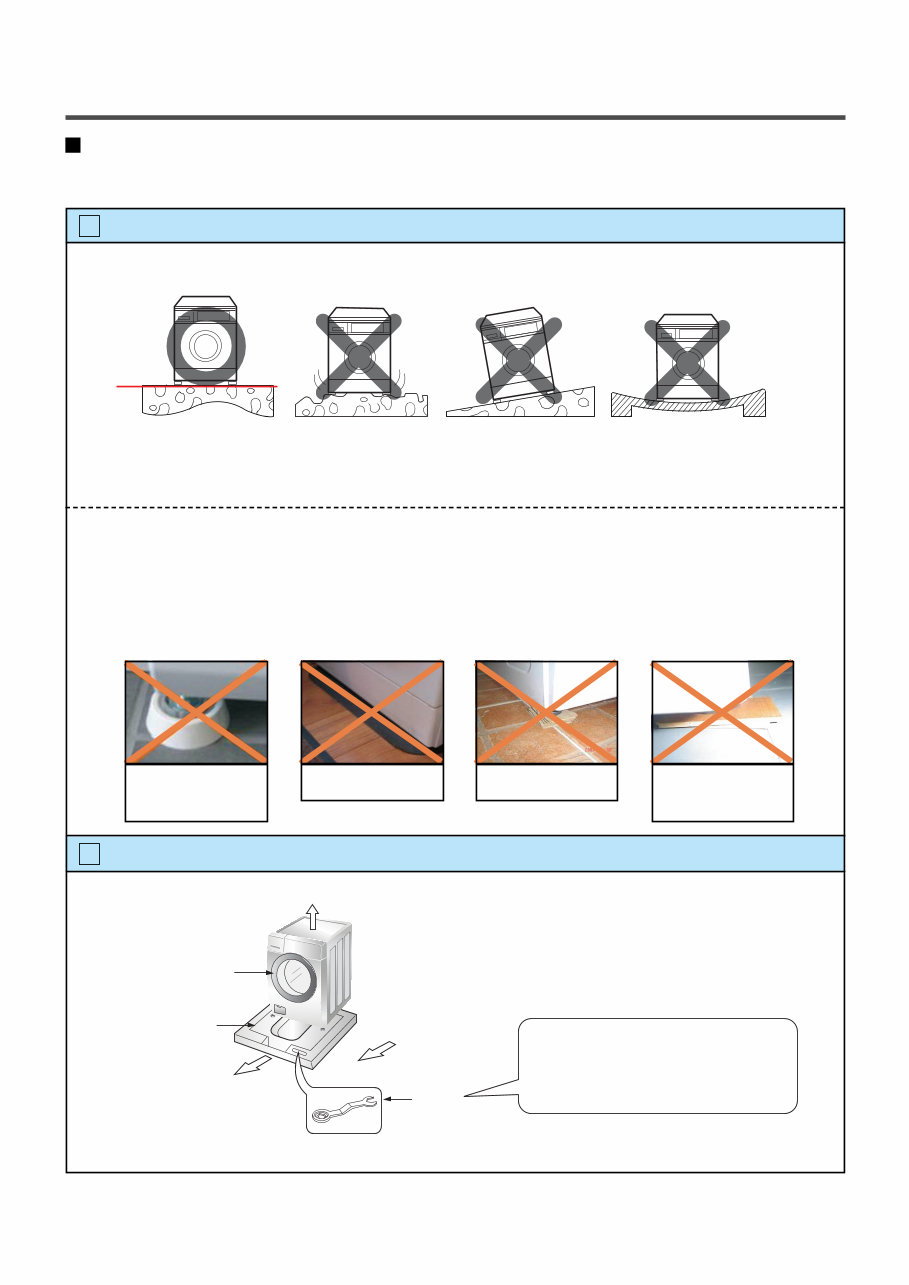
7 4.INSTALLATION INSTALLATION The appliance should be installed as follows. Check the conditions of installation area. 1. Check level ground. On raised foundations or upper level homes, the vibrations can be caused by the type of flooring. It may be necessary to move the machine to a different area in the home or have the floor reinforced to properly support the operation of the unit. 2. Check humidity or any foreign objects under the feet. Clean the floor, and there should not be any foreign objects under the feet. If the unit has foreign objects underneath the feet, this will prevent the unit from being leveled properly and will cause vibrations and slipping. Remove any foreign objects, if any from underneath the machine and level unit properly. See below for examples of foreign objects. 1 Open the box and check appliance condition. 2 horizontal Carpet Paper Laminated paper Washer Wrench This leveling (or spanner) wrench must be used to remove the shipping bolts and level the unit. This should be kept for future use. Packing Support Purchased stopper
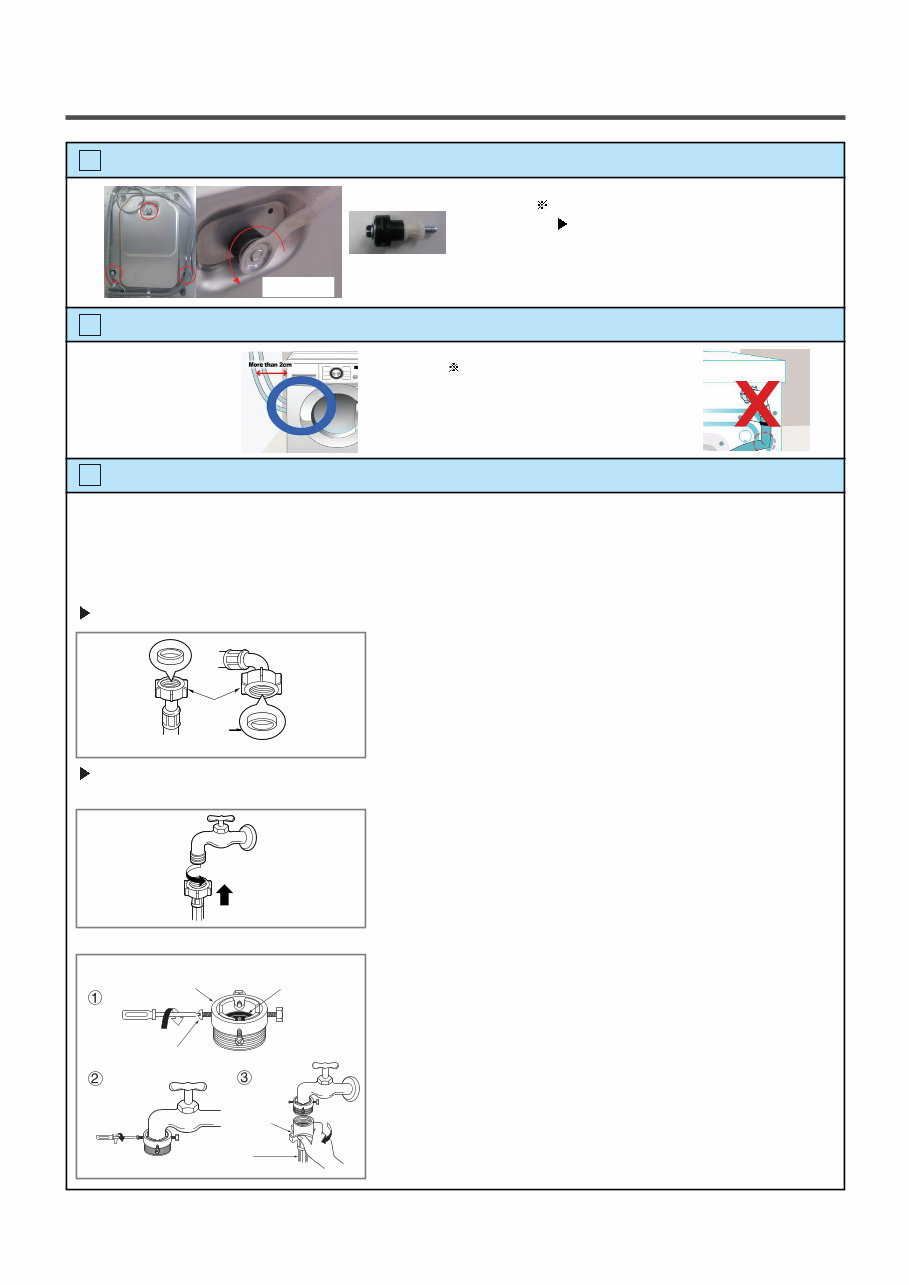
8 Use spanner to remove transit bolts. 3 Confirm the distance between the appliance and the wall. 4 The tap connection and hose connection must be parallel. 5 Without removal of transit bolts Spin noise and shaking. X 3 EA Transit bolts More than 2cm If the distance is less than 2cm, the water supply hose will kink or fold. Unscrew 1. Unscrew the adapter ring plate and the 4 adapter retaining screws. 2. Push the adapter onto the end of the tap so that the rubber seal forms a watertight connection. Tighten the adapter ring plate and the 4 screws. 3. Push the water supply hose vertically upwards so that the rubber packing within in the hose can adhere completely to the tap and then tighten it by screwing it to the right. • Water supply pressure must be between 100 kPa and 1000 kPa (1.0 ~ 10.0 kgf / cm 2 ) • Do not strip or crossthread when connecting Inlet hose to the valve. • If the water supply pressure is more than 1000 kPa, a decompression device should be installed. • Periodically check the condition of the hose and replace the hose if necessary. Type-A : Connecting Screw-type hose to tap with thread • Screw the hose connector onto water supply tap. ■ Connecting water supply hose Step1 : Check rubber seal inlet hose Step2 : Connect hose to water tap • Two rubber seals are supplied with the water inlet hoses. They are used for preventing water leaks. Make sure the connection to taps is sufficiently tight. Upper connector Rubber packing Plate Water supply hose Fixing screw Hose connector Rubber seal Type-B : Connecting Screw-type hose to tap without thread
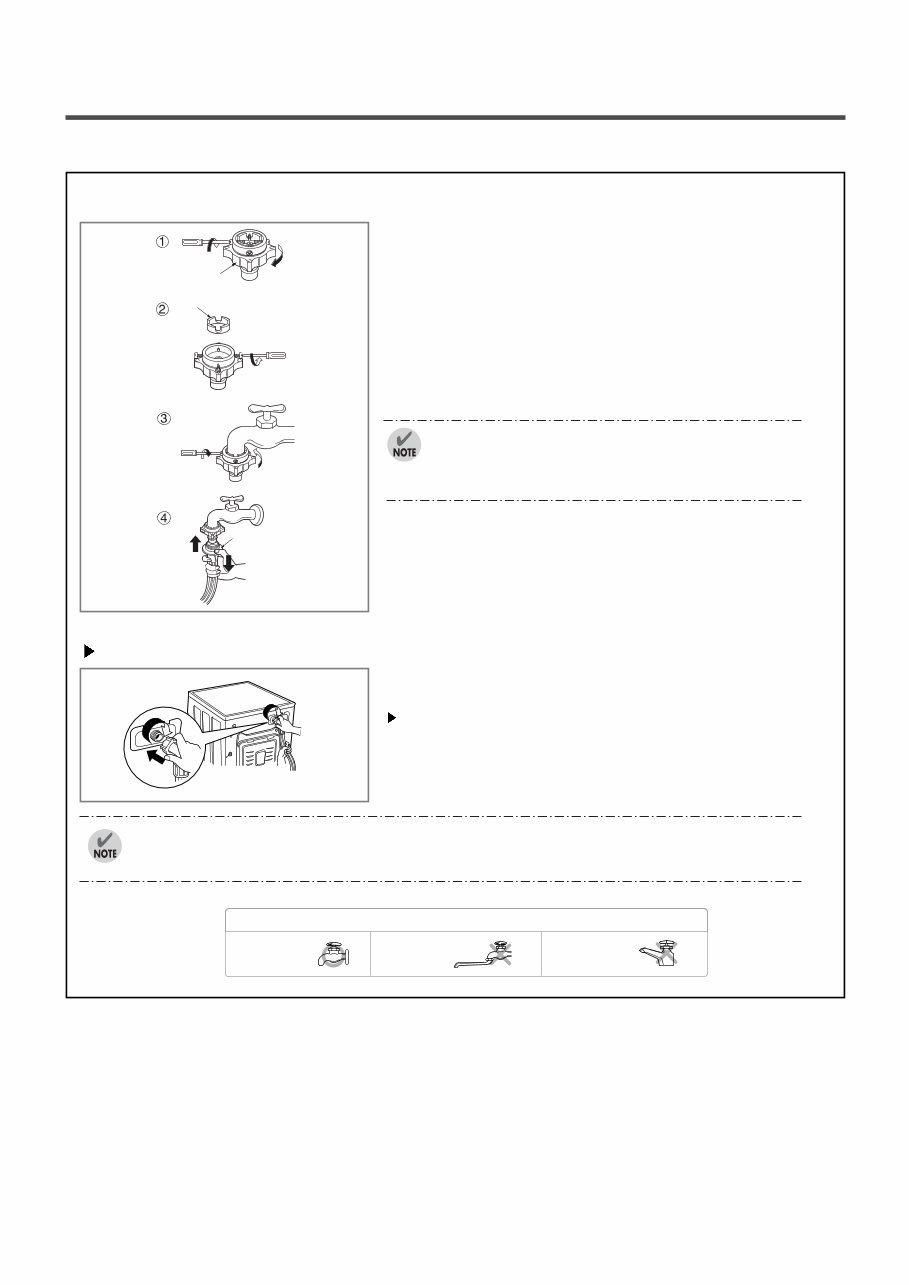
9 Used the horizontal tap Horizontal tap Extension tap Square tap 1. Unscrew the adapter ring plate and the 4 adapter retaining screws. 2. Remove the guide plate if the tap is too large to fit the adapter. 3. Push the adapter onto the end of the tap so that the rubber seal forms a watertight connection. Tighten the adapter ring plate and the 4 screws. 4. Pull the connector latch plate down, push the inlet hose onto the adapter, and release the connector latch plate. Make sure the adapter locks into place. After completing connection, if water leaks from the hose, repeat the same steps. Use the most conventional type of faucet for water supply. In case the faucet is square or too big, remove the spacing ring before inserting the faucet into the adaptor. Ring plate Guide plate Latch plate Type-C : Connecting one touch type hose to tap without thread Step3: Connect hose to washer • Make sure that there are no kinks in the hose and that they are not crushed. When your washer has two valves. • The Inlet hose which has red connector is for the hot water tap. • If the washer has two valves, the energy is saved by using hot valve. After connecting inlet hose to water tap, turn on the water taps to flush out foreign substances (dirt, sand or sawdust) in the water lines. Let water drain into a bucket, and check the water temperature.
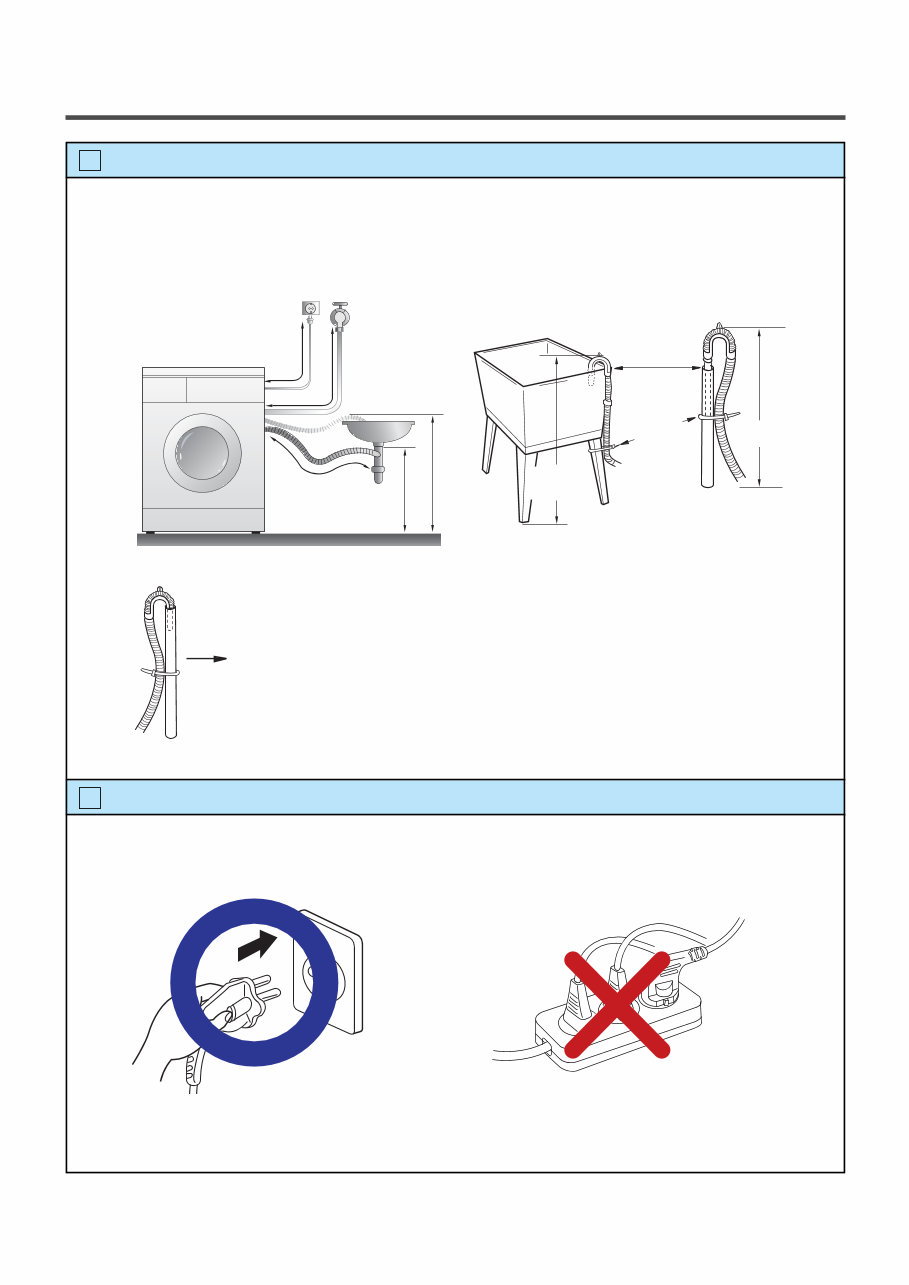
10 Connect Drain Hose. 6 Connect power plug. 7 If the drain hose is not installed properly, the unit will not drain properly. This allows water to back flow into the unit which can cause odors. Refer to Owner Manual for proper drain hose installation. The odor could also be coming from the home’s drain to which the drain hose is attached. In this type of drain hose installation, the odor could be coming from the standpipe. This odor can come up the drain hose and into the unit. Pour a cup or two of bleach or vinegar down the home drain and let it sit for 24 hours before running another cycle. This will help eliminate odor from the home drain. If a cycle is started too soon after doing this, it will not help the issue. Connect the power plug to the wall outlet. Avoid connecting several electric devices, it may be the cause of a fire. about 100 cm about 145 cm about 105 cm Laundry tub Max. 100cm min. 60cm Max. 100cm min. 60cm Retainer Tie strap Hose min. 60 cm max. 100 cm
Why replace while you can upgrade or repair? This service and repair manual is used by the Official Certified LG Technicians. It will help you to troubleshoot and repair your washer!
Contents:
Specification
Features & Technical Explanation
Parts Identification
Installations & Operations
Wiring Diagram
PCB Layout
Trouble Shooting
Error Diagnostics
Disassembly Instructions
Exploded View
Please note this is the official and original service and repair manual in .PDF format, no scanned-in or bootlegged copy. This manual is made in the highest resolution, so when you print the pages you need it is all in great quality!
You can easily print this manual from any printer and any computer!
***INSTANT access*** After your payment, you will have instant access to your manual. No shipping fee, no waiting on postal delivery, you can start doing your repairs right away!
Specifications
Language: English
Format: .PDF
Pages: 64
Platform: Windows and MAC
Looking for a service manual but can't find it anywhere? Please contact us with your request! As you can see we've got the largest & most comprehensive service manual database out there, so a good chance we can help you out!




 Lifetime Access




