



STIH)
STIHL MS 171, 181, 211
2007-05

1 MS 171, MS 181, MS 211
q
© ANDREAS STIHL AG & Co. KG, 2007
RA_533_00_01_01
1. Introduction 3
2. Safety Precautions 4
3. Specifications 5
3.1 Engine 5
3.2 Fuel System 5
3.3 Ignition System 5
3.4 Chain Lubrication 5
3.5 Tightening Torques 6
4. Troubleshooting 8
4.1 Clutch 8
4.2 Chain Drive,
Chain Brake,
Chain Tensioner 9
4.3 Chain Lubrication 10
4.4 Rewind Starter 11
4.5 Ignition System 12
4.6 Carburetor 14
4.7 Engine 17
5. Cutting Attachment 18
5.1 Chain Catcher 18
6. Clutch 19
6.1 Clutch Drum 21
7. Chain Brake 22
7.1 Checking Operation 22
7.2 Removing and
Installing
the Brake Band 22
7.3 Brake Lever 24
7.4 Flat Spring 26
7.5 Pins 26
7.6 Chain Tensioner 27
7.7 Bar Mounting Studs 27
8. Engine 28
8.1 Muffler / Spark
Arresting Screen 28
8.2 Leakage Test 29
8.2.1 Preparations 29
8.2.2 Vacuum Test 30
8.2.3 Pressure Test 30
8.3 Oil Seals 31
8.4 Removing and Installing
the Shroud 32
8.5 Removing and Installing
the Engine 33
8.6 Crankshaft 34
8.7 Ball Bearings/
Crankshaft 36
8.8 Piston 37
8.8.1 Piston Rings 39
9. Ignition System 40
9.1 Ignition Module 40
9.1.1 Removing and
Installing 40
9.2 Ignition Timing 42
9.3 Testing the Ignition
Module 42
9.4 Spark Plug Boot 43
9.5 Flywheel 44
9.6 Short Circuit Wire 45
9.6.1 Testing 45
9.6.2 Removing and
Installing 45
9.6.3 Ground Wire 47
9.6.4 Contact Spring 47
9.7 Ignition System
Troubleshooting 49
10. Rewind Starter 52
10.1 General 52
10.2 Removing and
Installing 52
10.3 Pawl 53
10.4 ErgoStart 53
10.5 Rope Rotor 55
10.6 Starter Rope / Grip 55
10.7 Tensioning
the Rewind Spring 57
10.8 Replacing
the Rewind Spring 58
11. Servicing
the AV System 60
11.1 AV Spring on Oil Tank 60
11.2 AV Spring on
Fuel Tank 60
11.3 AV Spring on
Cylinder 61
11.4 Handle Frame 62
12. Master Control Lever 64
12.1 Switch Shaft 64
12.1.1 Removing and
Installing 64
12.2 Throttle Trigger /
Interlock Lever 66
13. Chain Lubrication 68
13.1 Pickup Body 68
13.2 Oil Suction Hose 68
13.3 Removing and Installing
the Oil Pump 69
13.4 Valve 70
13.5 Oil Tank Cap 71
Contents

2 MS 171, MS 181, MS 211
Contents
14. Fuel System 72
14.1 Air Filter 72
14.2 Baffle / Filter Base 72
14.3 Removing and Installing
the Carburetor 73
14.3.1 Leakage Test 74
14.4 Servicing
the Carburetor 74
14.4.1 Metering Diaphragm 74
14.4.2 Inlet Needle 76
14.4.3 Fixed Jet 76
14.4.4 Valve Jet 77
14.4.5 Pump Diaphragm 77
14.4.6 Air Valve 79
14.4.7 Choke Shaft /
Choke Shutter 80
14.4.8 Throttle Shaft /
Throttle Shutter 82
14.4.9 Adjusting Screws 85
14.5 Adjusting
the Carburetor 86
14.5.1 Basic Setting 86
14.5.2 Standard Setting 87
14.6 Choke and
Throttle Rods 87
14.7 Removing and Installing
the Intake Manifold 89
14.7.1 Removing and Installing
the Carburetor Carrier 90
14.8 Tank Vent 92
14.8.1 Testing 92
14.8.2 Removing and
Installing 93
14.8.3 Manual Fuel Pump 93
14.9 Fuel Intake 94
14.9.1 Pickup Body 94
14.9.2 Fuel Intake Hoses 95
14.9.3 Fuel Hoses, Tank Vent /
Manual Fuel Pump 96
14.9.4 Fuel Tank Cap 97
15. Special Servicing
Tools 98
16. Servicing Aids 100
3 MS 171, MS 181, MS 211
1. Introduction
This service manual contains
detailed descriptions of all the
typical repair and servicing
procedures for this power tool.
You should make use of the
illustrated parts lists while carrying
out repair work. They show the
installed positions of the individual
components and assemblies.
Refer to the latest edition of the
relevant parts list to check the part
numbers of any replacement parts.
A fault on the machine may have
several causes. To help locate the
fault, consult the chapter on
"Troubleshooting" and the "STIHL
Service Training System" for all
assemblies.
Refer to the “Technical Information”
bulletins for engineering changes
which have been introduced since
publication of this service manual.
Technical information bulletins also
supplement the parts list until an
updated edition is issued.
The special tools mentioned in the
descriptions are listed in chapter
"Special Servicing Tools" of this
manual. Use the part numbers to
identify the tools in the "STIHL
Special Tools" manual which lists all
the special servicing tools currently
available from STIHL.
Symbols are included in the text and
pictures for greater clarity.
The meanings are as follows:
In the descriptions:
: = Action to be taken as
shown in the illustration
(above the text)
– = Action to be taken that is
not shown in the illustration
(above the text)
IIn the illustrations:
A Pointer
aDirection of movement
b 4.2 = Reference to another
chapter, i.e. chapter 4.2
in this example
Service manuals and technical
information bulletins are intended
exclusively for the use of properly
equipped repair shops. They must
not be passed to third parties.
Servicing and repairs are made
considerably easier if the machine
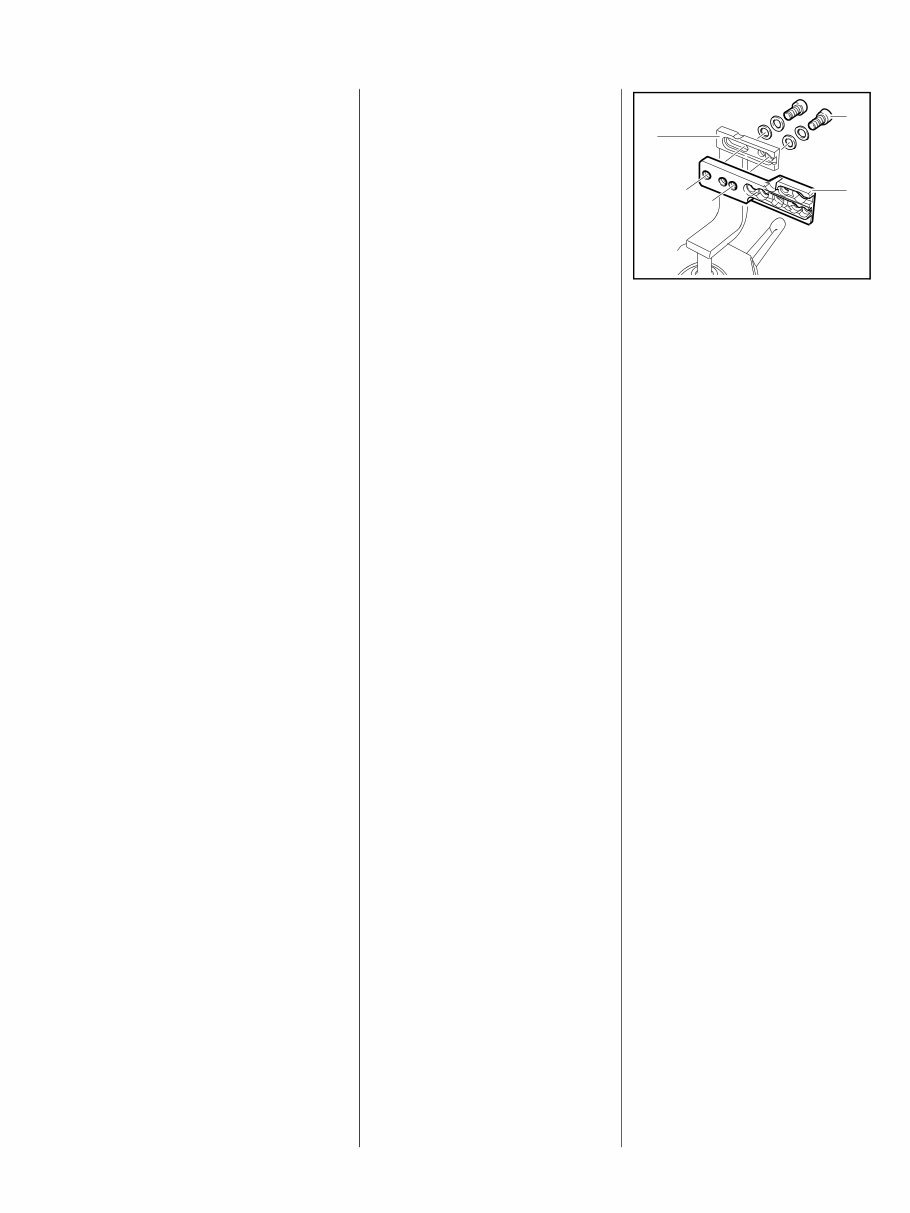
is mounted to assembly stand (3)
5910 890 3100. To do this, secure
the mounting plate (2) 5910 850
1650 to the assembly stand with two
screws (1) and washers.
The screws must not project since
they, depending on the machine,
may damage housings when the
machine is clamped in position.
The above operation is not
necessary with the new assembly
stand 5910 890 3101 since the
mounting plate is already fitted.
1
2
3
219RA000 TG

4 MS 171, MS 181, MS 211
After disengaging the chain brake
and removing the chain sprocket
cover, bar and chain, the
powerhead’s bar stud is pushed
through the outer hole in the
mounting plate and secured with the
nut (arrow).
The machine is held in position on
the mounting plate by the two screw
heads on the engine housing.
Always use original STIHL
replacement parts.
They can be identified by the
STIHL part number,
the STIH) logo and the
STIHL parts symbol (
This symbol may appear alone on
small parts.
Storing and disposing of oils and
fuels
Collect fuel or lubricating oil in a
clean container and dispose of it
properly in accordance with local
environmental regulations.
533RA000 TG
2. Safety Precautions
If the engine is started up in the
course of repairs or maintenance
work, observe all local and country-
specific safety regulations as well
as the safety precautions and
warnings in the instruction manual.
Gasoline is an extremely flammable
fuel and can be explosive in certain
conditions.
Always wear suitable protective
gloves for operations in which
components are heated for
assembly or disassembly.
Improper handling may result in
burns or other serious injuries.
Do not bring any fire, flame, spark or
other source of heat near the fuel.
All work with fuel must be performed
outdoors only. Spilled fuel must be
wiped away immediately.
Always perform leakage test after
working on the fuel system and the
engine.

5 MS 171, MS 181, MS 211
3. Specifications
3.1 Engine
MS 171 MS 181, MS 181 C MS 211, MS 211 C
Displacement: 30.1 cm
3
31.8 cm
3
35.2 cm
3
Bore: 37 mm 38 mm 40 mm
Stroke: 28 mm 28 mm 28 mm
Engine power to ISO 7293: 1.3 kW (1.8 PS)
at 9,500 rpm
1.5 kW (2.0 PS)
at 9,500 rpm
1.7 kW (2.3 PS)
at 9,500 rpm
Max. permissible engine speed
with bar and chain: 13,500 rpm 13,500 rpm 13,500 rpm
Idle speed: 2,800 rpm 2,800 rpm 2,800 rpm
Clutch: Centrifugal clutch without linings
Clutch engages at: 5,100 rpm 5,100 rpm 5,100 rpm
Crankcase leakage test
at gauge pressure: 0.5 bar
under vacuum: 0.5 bar
3.2 Fuel System Carburetor leakage test
at gauge pressure:
0.8 bar
Operation of tank vent at gauge pressure: 0.5 bar
Fuel: as specified in instruction manual
3.3 Ignition System Air gap between ignition module and
fanwheel:
0.15...0.35 mm
Spark plug (suppressed): NGK CMR 6H
Electrode gap: 0.5 mm
3.4 Chain Lubrication Fully automatic, speed-controlled oil pump with reciprocating
piston
Oil delivery rate: 7.0 cm³/min at
10,000 rpm

6 MS 171, MS 181, MS 211
3.5 Tightening Torques
DG and P (Plastoform) screws are used in polymer and light metal components. These screws form a
permanent thread when they are installed for the first time. They can be removed and installed as often as
necessary without impairing the strength of the screwed assembly, providing the specified tightening torque is
observed.
For this reason it is essential to use a torque wrench.
Fastener Thread size For component Torque Remarks
Nm
Screw P 4x12 Cover plate, chain sprocket cover 2.5
Screw B 3.9x13 Cover plate (special accessory) 1.0
Screw D 4x15 Chain tensioner cover/engine housing 2.5
Collar screw D 8x18 Collar screw, engine housing/guide bar,
rear
16.0 1)
Collar screw D 8x18 Collar screw engine housing/guide bar,
front
16.0 1)
Screw P 4x16 Cover, chain brake/engine housing
(repair solution)
2.0
Screw D 5x16 Cover, chain brake/engine housing
(repair solution)
2.0
Countersunk screw M 6x14 Replacement chain catcher (repair
solution)
4.0
Screw P 5x20 Filter base/engine housing 4.0
Screw P 5x20 Filter base/engine housing/carburetor
carrier
4.0
Screw D 5x16 Spiked bumper/engine housing 3.5
Screw D 4x12 Manifold/cylinder 4.0
Screw P 5x20 AV bearing plug, front bottom/engine
housing
4.0
Screw P 5x20 AV bearing plug, rear bottom/handle
frame
4.0
Screw P 5x20 AV bearing plug, rear bottom/engine
housing
4.0
Screw D 5x18 AV bearing plug/cylinder 8.0
Screw P 5x25 Fan housing/hand guard/engine
housing
4.0
Screw P 5x20 Fan housing/engine housing 4.0
M 12x1 L Clutch/crankshaft 50.0
Screw D 5.3x41 Crankcase/engine pan/cylinder 11.0
Collar nut M 5 Baffle/filter base/collar screw,
carburetor
3.5
Screw D 5x18 Muffler/cylinder 8.0
Nut M 8x1 Flywheel/crankshaft 28.0 2)
M 10x1 Spark plug 12.0
Screw D 4x18 Ignition module/cylinder 4.0

7 MS 171, MS 181, MS 211
Remarks:
1) Loctite 243 medium strength
2) Degrease crankshaft/flywheel faces and mount oil-free
Use the following procedure when refitting a DG or P screw in an existing thread:
Place the screw in the hole and rotate it counterclockwise until it drops down slightly.
Tighten the screw clockwise to the specified torque.
This procedure ensures that the screw engages properly in the existing thread and does not form a new thread
and weaken the assembly.
Power screwdriver setting for polymer: DG and P screws max. 500 rpm
Do not use a impact wrench for releasing or tightening screws.
Do not mix up screws with and without binding head

8 MS 171, MS 181, MS 211
4. Troubleshooting
4.1 Clutch
Condition Cause Remedy
Saw chain stops under load at full
throttle
Clutch shoes badly worn Install new clutch
Clutch drum badly worn Install new clutch drum
Saw chain rotates at idle speed Engine idle speed too high Readjust with idle speed screw
(LA) (counterclockwise)
Clutch springs stretched or fatigued Replace the clutch springs or install
new clutch
Clutch spring hooks broken Replace the clutch springs
Clutch shoe bores worn Replace clutch shoes or install new
clutch
Loud noises Clutch springs stretched or fatigued Replace all clutch springs
Needle cage damaged Fit new needle cage
Clutch shoe retainer broken Fit new retainer
Clutch shoes and carrier worn Install new clutch

9 MS 171, MS 181, MS 211
4.2 Chain Drive, Chain Brake, Chain Tensioner
Condition Cause Remedy
Chain sprocket wears rapidly Chain not properly tensioned Tension chain as specified
Wrong chain pitch Fit chain of correct pitch
Insufficient chain lubrication Check chain lubrication
Chain sprocket worn Fit new chain sprocket
Saw chain stops under load at full
throttle
Clutch shoes badly worn Install new clutch
Clutch drum badly worn Install new clutch drum
Brake band blocked Check freedom of movement and
operation of brake band
Saw chain does not stop
immediately when brake is
activated
Brake spring stretched or broken Fit new brake spring
Brake band stretched or worn Fit new brake band
Clutch drum worn Fit new clutch drum
You're Reading a Preview
What's Included?
 Lifetime Access
Fast Download Speeds
Online & Offline Access
Access PDF Contents & Bookmarks
Full Search Facility
Print one or all pages of your manual
$39.99
Stihl MS171, MS181, MS211 Chainsaw Full Service & Repair Manual
Viewed 83 Times Today

What's Included?
Lifetime Access
Fast Download Speeds
Online & Offline Access
Access PDF Contents & Bookmarks
Full Search Facility
Print one or all pages of your manual
$39.99

Secure transaction
What's Included?
Lifetime Access
Fast Download Speeds
Online & Offline Access
Access PDF Contents & Bookmarks
Full Search Facility
Print one or all pages of your manual
Description
The Stihl MS171, MS181, MS211 Chainsaw Full Service & Repair Manual is a comprehensive factory service repair workshop manual. It is instantly accessible on your computer, tablet, or smartphone without any additional fees or expiration dates.
This professional manual is designed to cover all repair, servicing, and troubleshooting procedures with detailed photos, diagrams, step-by-step instructions, and highly detailed exploded diagrams and pictures. It is an invaluable resource for both professional mechanics and DIY enthusiasts.
- Printing: You have the option to print out a single page or the entire manual as per your requirement.
- Multi-Device Usage: The manual can be used on multiple computers without any limitations.
- Full Version: This is the full manual without any trial periods or limitations, and it can be used for life.
- Compatibility: The manual is fully compatible with Windows and MAC computers.
For a reliable and detailed resource for servicing and repairing Stihl MS171, MS181, MS211 chainsaws, click on the button to access the manual.


