

Panasonic EP30007 Service Manual & Repair Guide
What's Included?
Fast Download Speeds
Online & Offline Access
Access PDF Contents & Bookmarks
Full Search Facility
Print one or all pages of your manual
EP30007
ORDER NO. HPD1002U25C1
- 1 -
MASSAGE LOUNGER
EP30007
USA
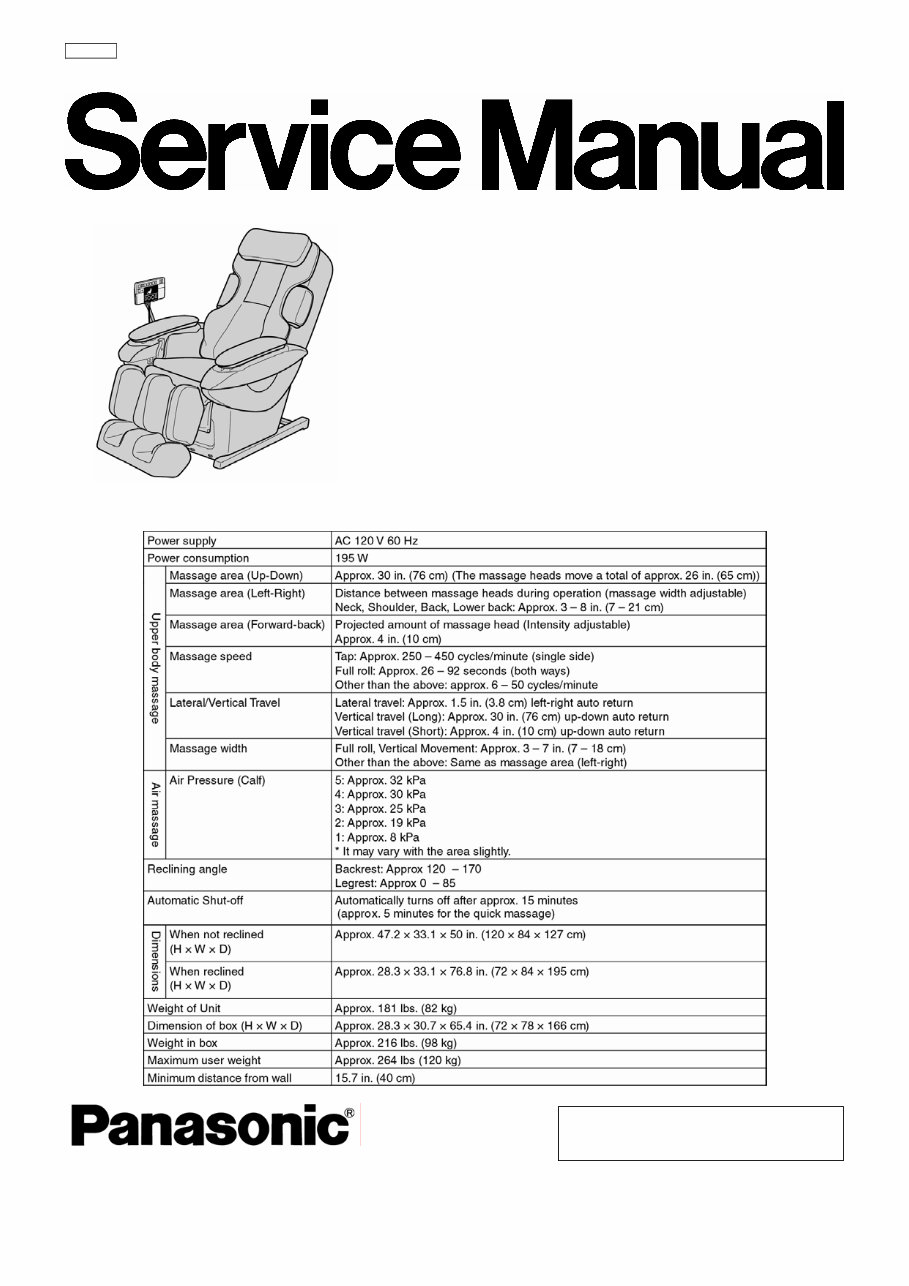
SPECIFICATIONS
©2007 Matsushita Electric Works, Ltd.
All rights reserved. Unauthorized copying
and distribution is a violation of law.

EP30007
ORDER NO. HPD1002U25C1
- 2 -
CONTENTS
Page
1 COMPONENTS IDENTIFICATION…………………………………………………………………………………………………………………………3
2 TURNING ON THE POWER………………………………………………………………………………………………………………………………7
3 REQUIRED TOOLS…………………………………………………………………………………………………………………………………………8
4 ADJUSTMENT OF PRESSURE SENSOR…………………………………………………………………………………………………………………9
5 OPERATIONS OF ELECTROMAGNETIC VALVES AND AIR BAGS………………………………………………………………………………10
6 DISPLAY METHOD OF MASSAGE BLOCK TOTAL USE TIME………………………………………………………………………………………11
7 DISPLAY METHOD OF EACH OPERATION USE TIME………………………………………………………………………………………………12
8 METHOD OF PACKAGING POSITION SET-UP…………………………………………………………………………………………………………12
9 METHOD OF MASSAGE MECHANISM BLOCK INSTALLATION MODE SET-UP (MANUAL SET-UP)…………………………………………13
10 DISASSEMBLY……………………………………………………………………………………………………………………………………………14
11 ACTUAL WIRING DIAGRAM……………………………………………………………………………………………………………………………44
12 PHENOMENA CAUSED BY THE SENSOR MALFUNCTION OR LOCK PROTECTION OPERATION…………………………………………47
13 CHECKING…………………………………………………………………………………………………………………………………………………49
14 GREASE……………………………………………………………………………………………………………………………………………………57
15 EXPLODED VIEW…………………………………………………………………………………………………………………………………………60
16 REPLACEMENT PARTS LIST……………………………………………………………………………………………………………………………66
EP30007
ORDER NO. HPD1002U25C1
- 3 -
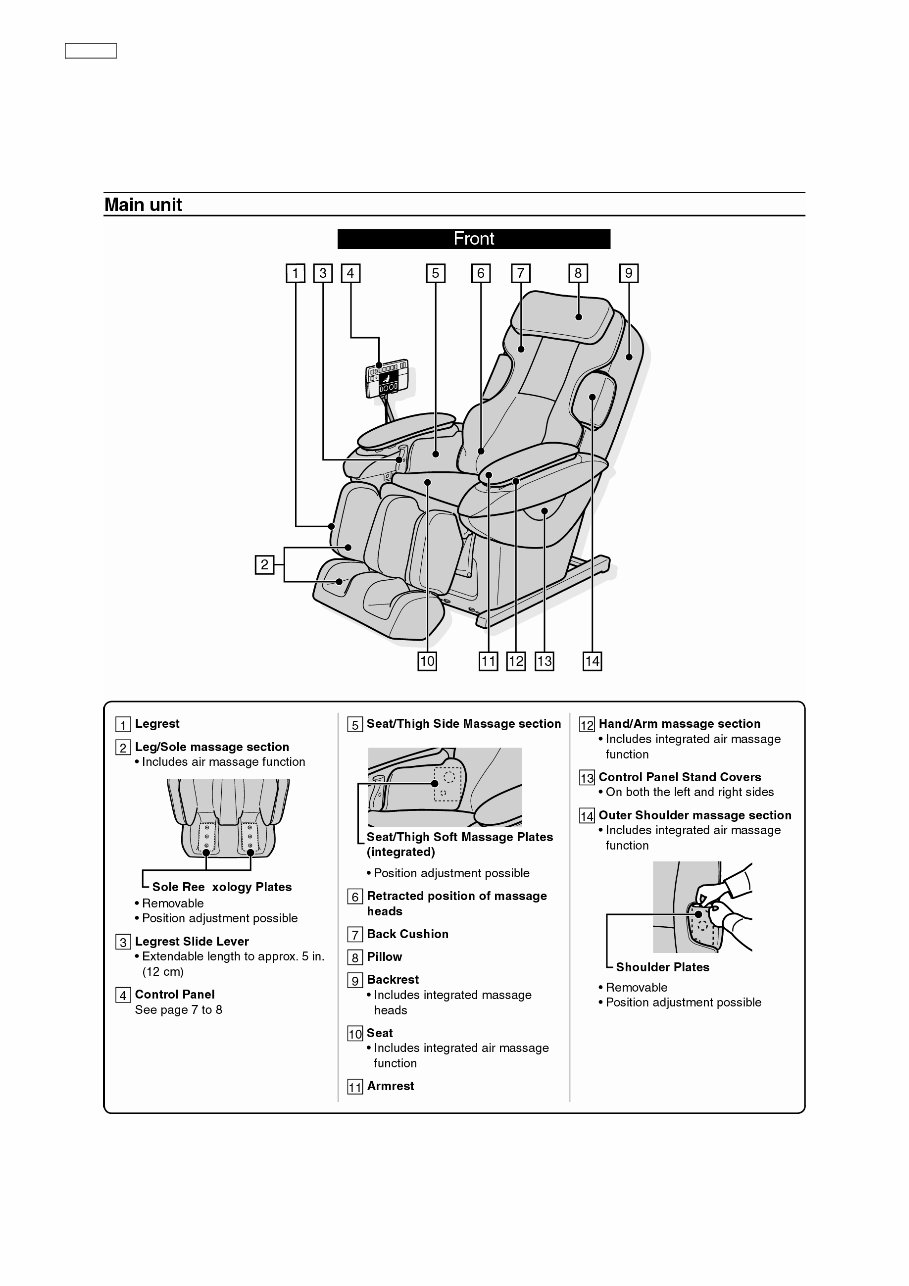
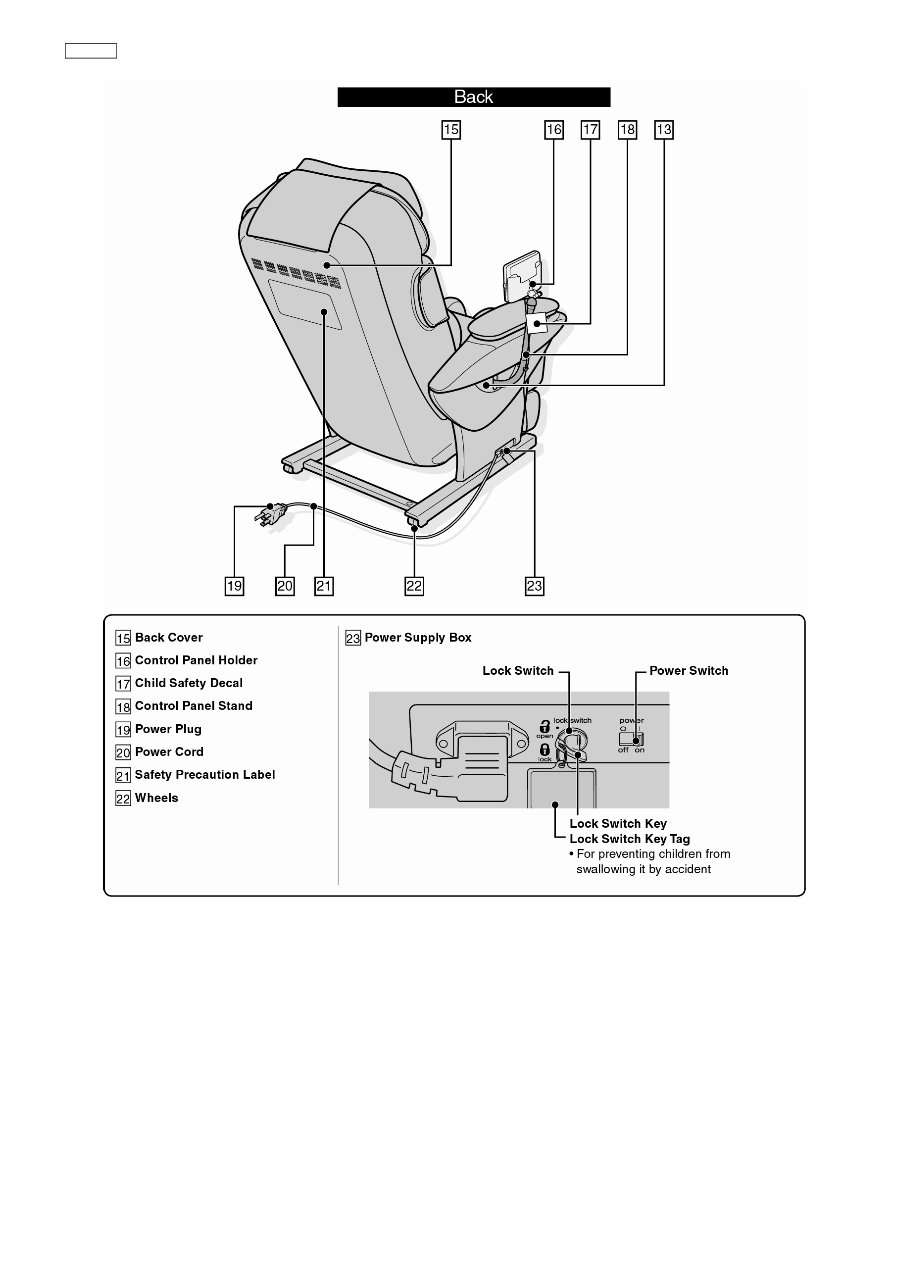
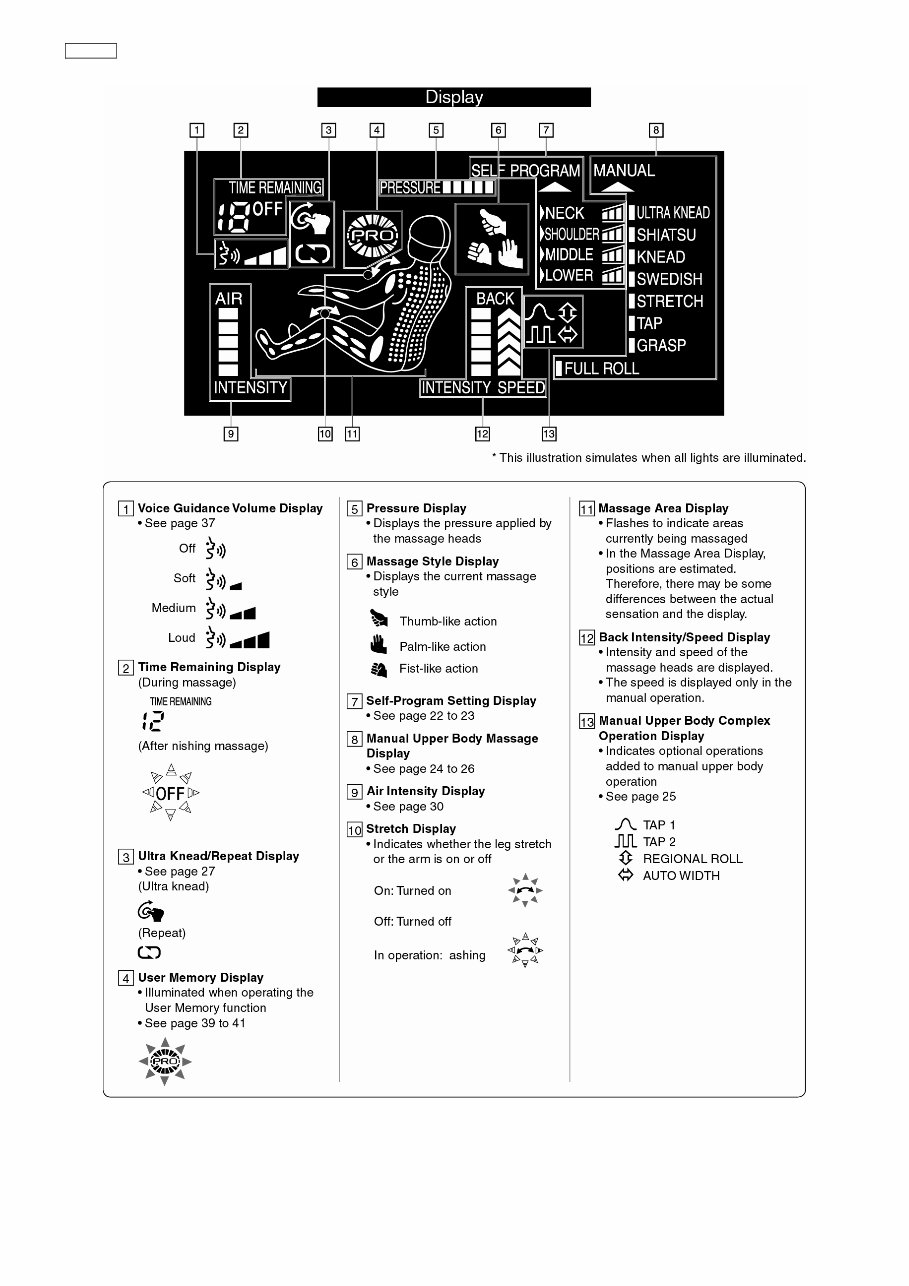
1. COMPONENTS IDENTIFICATION
1.1 MASSAGE LOUNGER
EP30007
ORDER NO. HPD1002U25C1
- 4 -
EP30007
ORDER NO. HPD1002U25C1
- 5 -
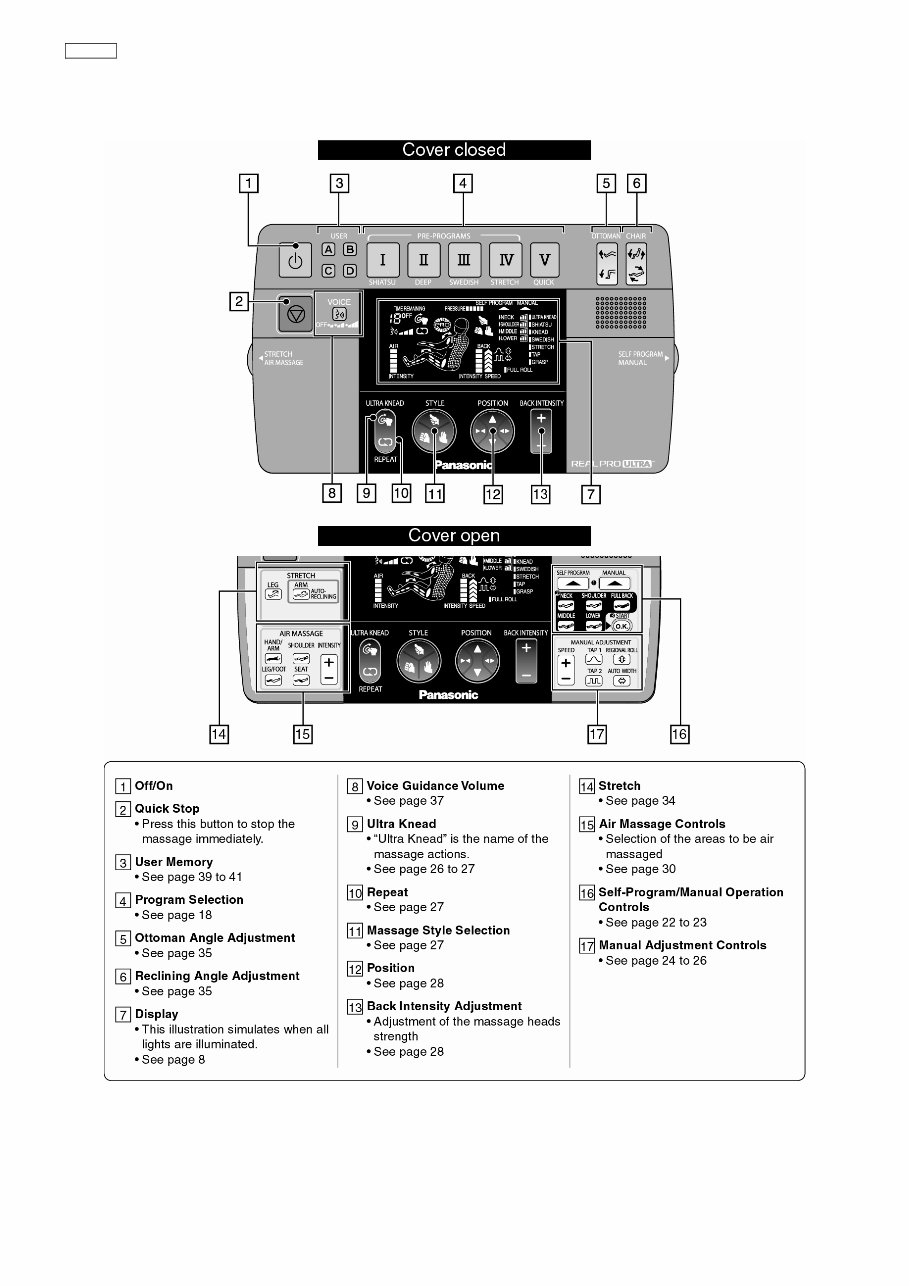
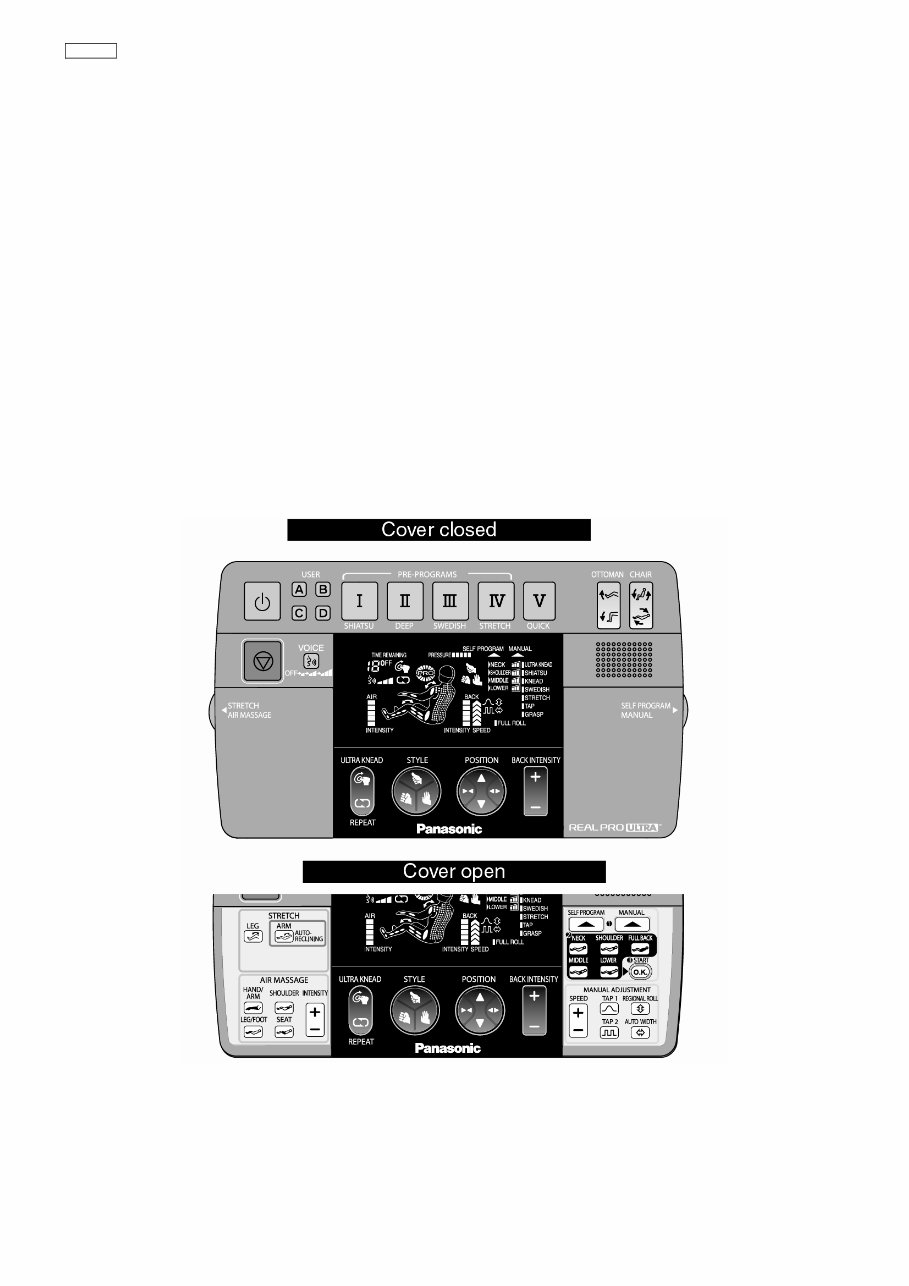
1.2 CONTROLLER
EP30007
ORDER NO. HPD1002U25C1
- 6 -
EP30007
ORDER NO. HPD1002U25C1
- 7 -
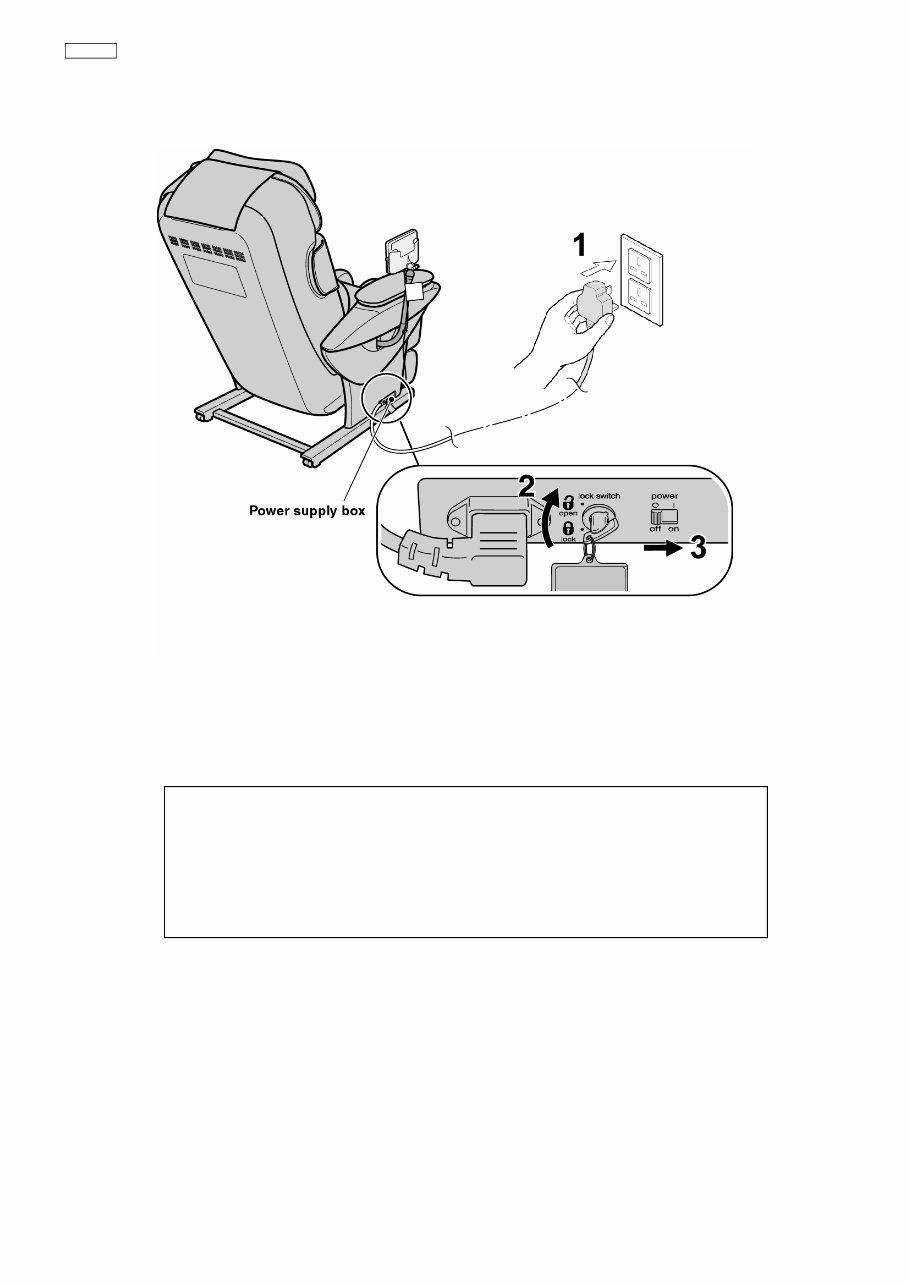
2. TURNING ON THE POWER
1. Plug the power plug into the power socket.
2. Turn the lock switch to the open position.
3. Turn on the power switch on the back of the unit.
・ When the operating lock switch is pointing toward ‘lock’, the power switch cannot be moved to the ‘on’ position.
Timer
When the on/off button is pushed, a timer begins to prevent overuse. After approximately 15 minutes, time expires and the
massage wheel goes into storage position.
After each use.
・ Be sure to turn the power switch to ‘off’.
・ To prevent children from using this unit, lock the power switch by moving the operating lock
switch to the ‘lock’ position.
・ As a further caution, unplug the power cord from the power socket after each use.
EP30007
ORDER NO. HPD1002U25C1
- 8 -
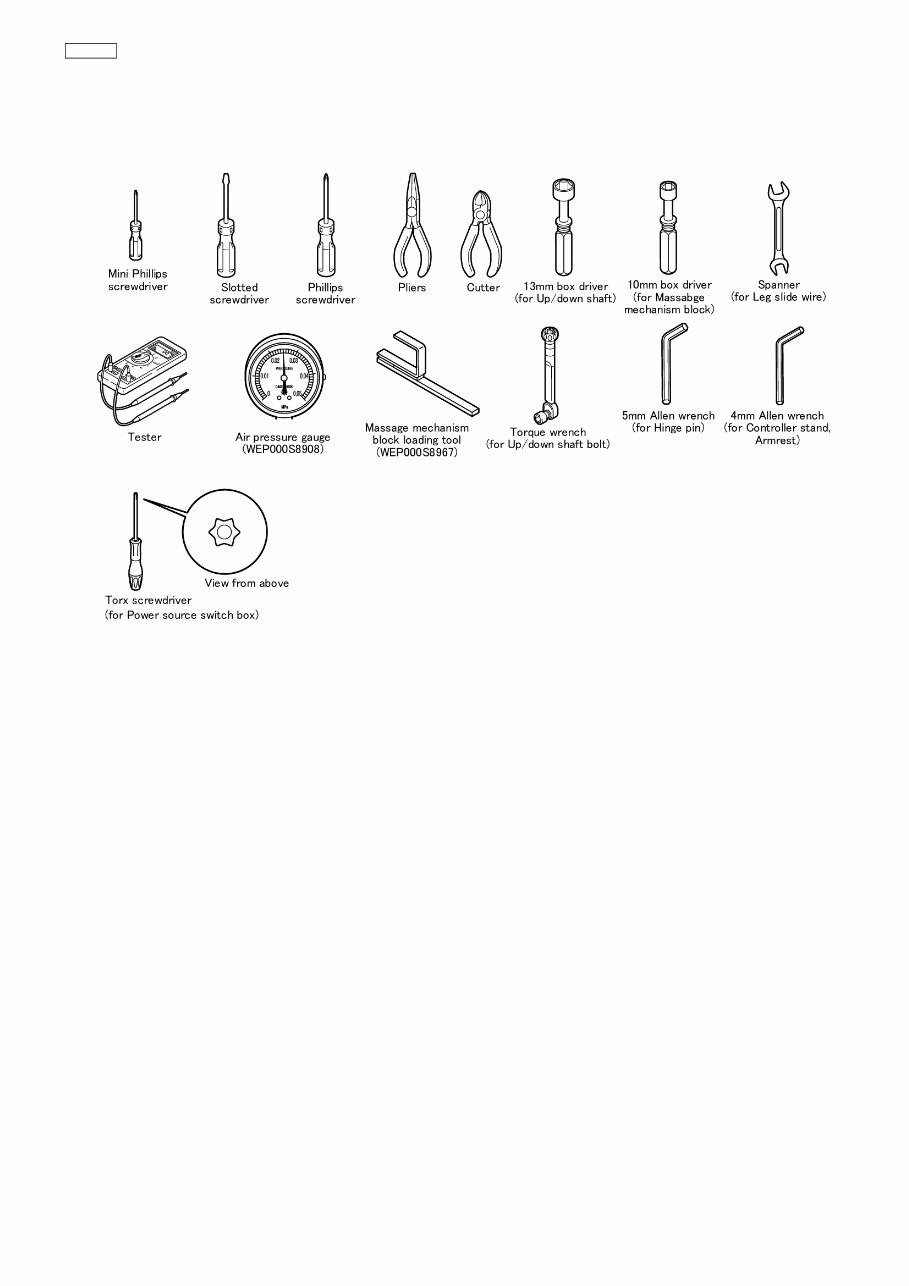
3. REQUIRED TOOLS
EP30007
ORDER NO. HPD1002U25C1
- 9 -
4. ADJUSTMENT OF PRESSURE SENSOR
The adjustment of the Pressure sensor is necessary every time after the Main PCB or Massage mechanism block are
replaced or repaired disassembled & reassembled.
First, keep the Massage mechanism block unloaded without pressure and move it upward halfway.
- If the Massage mechanism block is at the highest or lowest position, you cannot arrange the pressure sensor correctly
because the fabric becomes tense with pressure.
1. Insert the Power plug into the power source and turn on the switch of the Power source switch block.
2. While pushing the buttons of Ⅰ and Ⅲ, continue to push the On/off button for more than approximately three seconds.
Then, the buttons of Ⅰ, Ⅲ, and USER A light.
3. In ten seconds after the buttons of Ⅰ, Ⅲ, and USER A light, push the buttons as follows: ①SELF PROGRAM⇒②
LEG/FOOT⇒③AUTO WIDTH⇒④START
4. Push the button of START again, then the adjustment of Pressure sensor finishes.
5. Push the button of Stop.
EP30007
ORDER NO. HPD1002U25C1
- 10 -
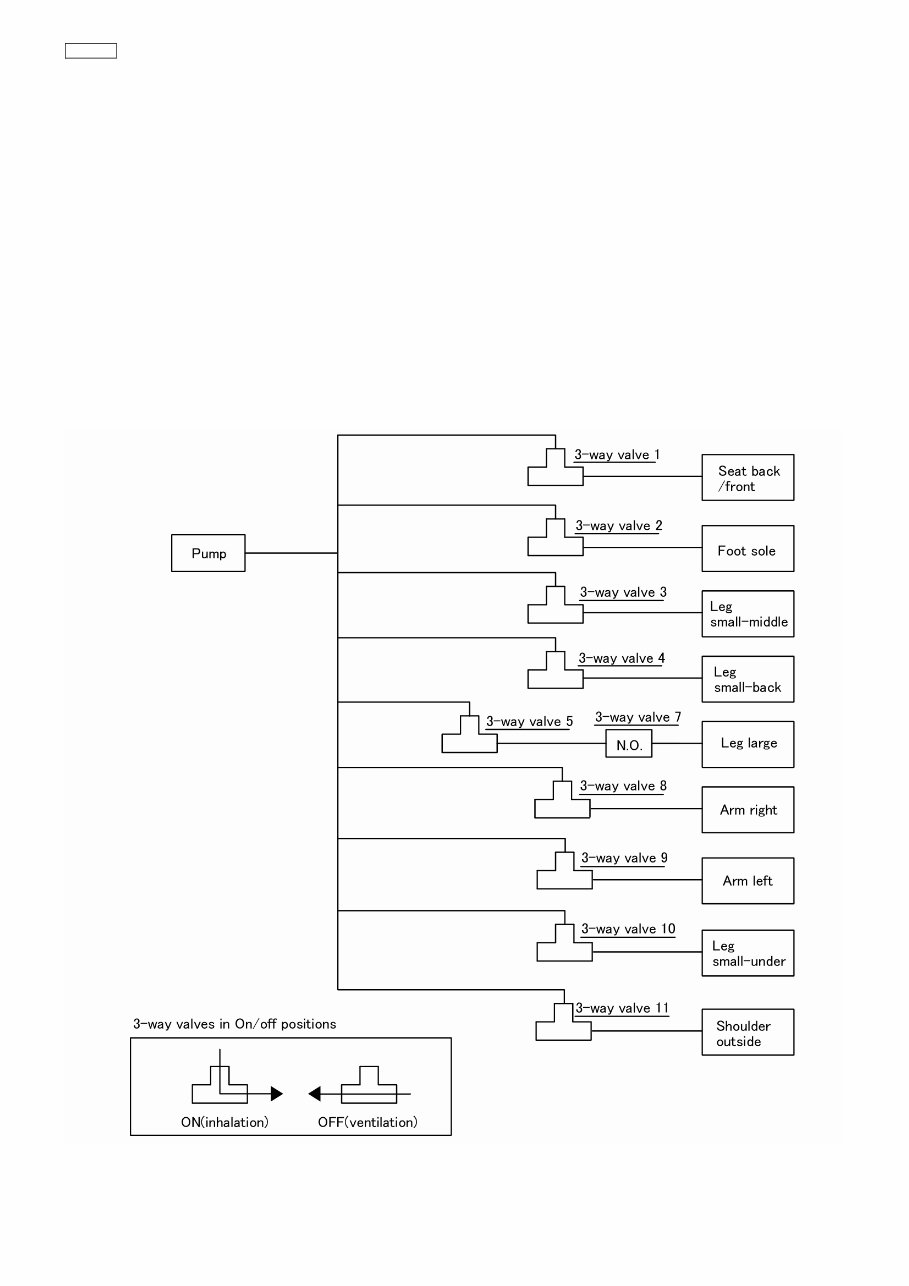
5. OPERATIONS OF ELECTROMAGNETIC VALVES AND AIR BAGS
Air massage operates with one Pump unit, nine 3-way electromagnetic valves, an Switch electromagnetic valve.
1. Air massage operates with the Pump and the Electromagnetic valve.
2. The Pump and all the Electromagnetic valves are OFF when the operation stops.
3. Air control stops when the Reclining lift motor and the Ottoman lift motor operate.(Electromagnetic valves are OFF in
ventilation.)
4. The Pump stops when in the On/off operation, or Electric reclining lift unit or Electric Ottoman lift unit operate in the standby
mode.(Pressure level is maintained.)
Electricity is OFF in five seconds after the Packaging mode, or the operation stop after the stop mode (Packaging mode), or
Electric reclining lift or Electric Ottoman lift are OFF in the standby mode.
*However, the Lift motors operate controlling the air when in stretching of legs and ankles.
You're Reading a Preview
What's Included?
Fast Download Speeds
Online & Offline Access
Access PDF Contents & Bookmarks
Full Search Facility
Print one or all pages of your manual
$35.99
Viewed 98 Times Today


Secure transaction
What's Included?
Fast Download Speeds
Online & Offline Access
Access PDF Contents & Bookmarks
Full Search Facility
Print one or all pages of your manual
$35.99
This service and repair manual for the Panasonic EP30007 Massage Chair is an essential resource for both professional technicians and DIY enthusiasts. It provides detailed instructions and illustrations for troubleshooting and repairing the massage lounger.
- Components Identification
- Turning On the Power
- Required Tools
- Adjustment of Pressure Sensor
- Operations of Electromagnetic Valves And Air B
- Display Method of Massage Block Total Use Time
- Display Method of Each Operation Use Time
- Method of Packaging Position Set-Up
- Method of Massage Mechanism Block Installation
- Disassembly
- Actual Wiring Diagram
- Phenomena Caused by the Sensor Malfunction Or
- Checking the Electromagnetic Valves
- Grease
- Exploded View
- Replacement Parts List
This manual is designed to be easily printable from any computer and printer. It is the official service and repair manual, ensuring the highest resolution and quality for all printed pages.
With instant access after payment, there are no shipping fees or waiting for postal delivery, allowing you to begin repairs within minutes. The manual is available in English and is provided in format, comprising 71 pages.


