LG LRG3081ST LRG3081SB LRG3081SW Service Manual & Repair Guide
What's Included?
Lifetime Access
Fast Download Speeds
Online & Offline Access
Access PDF Contents & Bookmarks
Full Search Facility
Print one or all pages of your manual
30” Freestanding Gas Range SERVICE MANUAL MODEL: LRG3081ST LRG3081SB LRG3081SW CAUTION BEFORE SERVICING THE UNIT, READ THE SAFETY PRECAUTIONS IN THIS MANUAL. Website http://biz.lgservice.com P/NO : MFL63290118 May, 2014 Printed in Korea 삼 흥 정 판 Internal Use Only
This LG Service Manual, “ 30” Freestanding Self-Cleaning Gas Range,” provides the technician with information on the operation and service of the Freestanding Self-Cleaning Gas Range. It is to be used as a training Service Manual. For specific information on the model being serviced, refer to the “Owner’s Manual” or “Tech Sheet” provided with the gas range. SAFETY PRECAUTIONS • Repairs of the appliance should be carried out by a licensed technician only. Incorrect repairs may result in dangerous situations. If you need repairs, contact an LG Service Center or your dealer. • If the power cord is defective, it must be replaced by a qualified service agent with a UL listed range cord. • Electrical leads and cables should not be allowed to touch the oven. • Rating plate is located on the left side of warming drawer. • The power supply of the appliance should be turned off when it is being repaired. FORWARD LG Electronics assumes no responsibility for any repairs made on our products by anyone other than Authorized Service Technicians. WARNING • DISCONNECT power supply cord from the outlet before servicing. • Replace all panels and parts before operating. • RECONNECT all grounding devices. - Failure to do so can result in severe personal injury, death or electrical shock. • DO NOT Touch when the oven operates. - The interior parts will be very hot. WARNING If the information in this manual is not followed exactly, a fire or explosion may result causing property damage, personal injury or death. If you smell gas: • Do not try to light any appliance. • Do not touch any electrical switch; do not use any phone in your building. • Immediately call your gas supplier from a neighbor’s phone. Follow the gas supplier’s instructions. • If you cannot reach your gas supplier, call the fire department.
(PAGE) GENERAL-------------------------------------------------------------------------------------------- 1-1 ~ 1-5 • Important safety instructions -------------------------------------------------------------------------------------- 1-1 ~ 1-3 • Model & Serial number label and tech sheet locations ----------------------------------------------------------- 1-4 • Specifications ------------------------------------------------------------------------------------------------------------------ 1-5 USING YOUR RANGE ------------------------------------------------------------------------- 2-1 ~ 2-4 • General information --------------------------------------------------------------------------------------------------------- 2-1 • Control panel features ---------------------------------------------------------------------------------------------- 2-2 ~ 2-4 - To turn on on the surface burners - Setting the Clock - Start, Clear/Off - To turn On/Off the oven light - Timer On/Off - Oven Temperature Adjustment - Preheating Alarm Light ON/Off - Beeper Volume - Temperature Unit(°F or °C) - Bake, Timed Bake - Broil - Time cook with warm - Oven lockout - Changing hour mode on clock (12HR, 24HR) - Self-Clean - Auto Conversion COMPONENT ACCESS --------------------------------------------------------------------- 3-1 ~ 3-21 • Component Locations ------------------------------------------------------------------------------------------------------ 3-1 • Removing the Back, Control cover and Key pad assembly ----------------------------------------------------- 3-2 • Removiing Power Control Board (PCB) -------------------------------------------------------------------------------- 3-3 • Removiing the Cooktop Plate and the Spark Module ------------------------------------------------------------- 3-4 • Removing the Case assembly(Cooktop Burner assembly) ----------------------------------------------------- 3-5 • Removing the Cooktop Parts -------------------------------------------------------------------------------------- 3-6~3-7 • Removing the Door Latch and the Door Switch --------------------------------------------------------------------- 3-8 • Removing the BROIL Burner assembly ------------------------------------------------------------------------------- 3-9 • Oven Bottom, the Frame guide and the Burner assembly ----------------------------------------------------- 3-10 • Removing the convection an blade and fan motor --------------------------------------------------------------- 3-11 • Removing the Oven light & Socket assembly ---------------------------------------------------------------------- 3-12 • Removing the latch drive assembly ----------------------------------------------------------------------------------- 3-13 - Door locking mechanism ---------------------------------------------------------------------------------------------- 3-13 • Removing the Oven temperature Sensor --------------------------------------------------------------------------- 3-14 • Removing & Replacing the drawer ------------------------------------------------------------------------------------ 3-15 • Removing & Replacing the Lift-off Oven Door --------------------------------------------------------------------- 3-16 • Removing the Oven Door Handle & Glass ----------------------------------------------------------------- 3-17~3-18 • Removing the Oven Door Gasket ------------------------------------------------------------------------------------- 3-19 • Removing a Side Panel --------------------------------------------------------------------------------------------------- 3-20 • Removing the Oven Valve (Safety Valve) & Gas Regulator --------------------------------------------------- 3-21 TABLE OF CONTENTS
(Page) COMPONENT TEST ----------------------------------------------------------------------------- 4-1 ~ 4-4 • Convection Motor ----------------------------------------------------------------------------------------------------------- 4-1 • Door locking Motor --------------------------------------------------------------------------------------------------------- 4-2 • Micro Switch (normally open type) ----------------------------------------------------------------------------------- 4-2 • Oven Sensor ----------------------------------------------------------------------------------------------------------------- 4-2 • Door switch ------------------------------------------------------------------------------------------------------------------- 4-3 • Oven lamp -------------------------------------------------------------------------------------------------------------------- 4-3 • Broil or bake igniter -------------------------------------------------------------------------------------------------------- 4-3 • Oven (safety) valve -------------------------------------------------------------------------------------------------------- 4-4 • Ignition switch ---------------------------------------------------------------------------------------------------------------- 4-4 CONVERSION TO LP GAS ------------------------------------------------------------------ 5-1 ~ 5-5 COMPOSITION OF CONTROL ------------------------------------------------------------- 6-1 ~ 6-2 • Main PCB ----------------------------------------------------------------------------------------------------------------------- 6-2 • Power PCB---------------------------------------------------------------------------------------------------------------------- 6-2 DIAGNOSIS THROUGH SCHEMATIC ------------------------------------------------------------ 7-1 CHECK THE FAILURE CODE (F-code) --------------------------------------------------------- 8-1 FAILURE CODE SUMMARY -------------------------------------------------------------------------- 9-1 CHECKING FLOW CHART BY FAILURE ---------------------------------------- 10-1 ~ 10-22 • No display (No power) ------------------------------------------------------------------------------------------- 10-1 ~ 10-4 • No heating (including F9 error) ------------------------------------------------------------------------------- 10-5 ~ 10-8 • Door lock system failure (including F10 error) ---------------------------------------------------------- 10-9 ~ 10-12 • Sensing fail (including F1, F2 error) --------------------------------------------------------------------- 10-13 ~ 10-16 • Oven hot (including F6 error) ------------------------------------------------------------------------------ 10-17 ~ 10-19 • No Key input ---------------------------------------------------------------------------------------------------------------- 10-20 • Oven lamp does not operate -------------------------------------------------------------------------------- 10-21~10-22 TROUBLE SHOOTING --------------------------------------------------------------------- 11-1 ~ 11-4 EXPLODED VIEW ---------------------------------------------------------------------------- 12-1 ~ 12-6
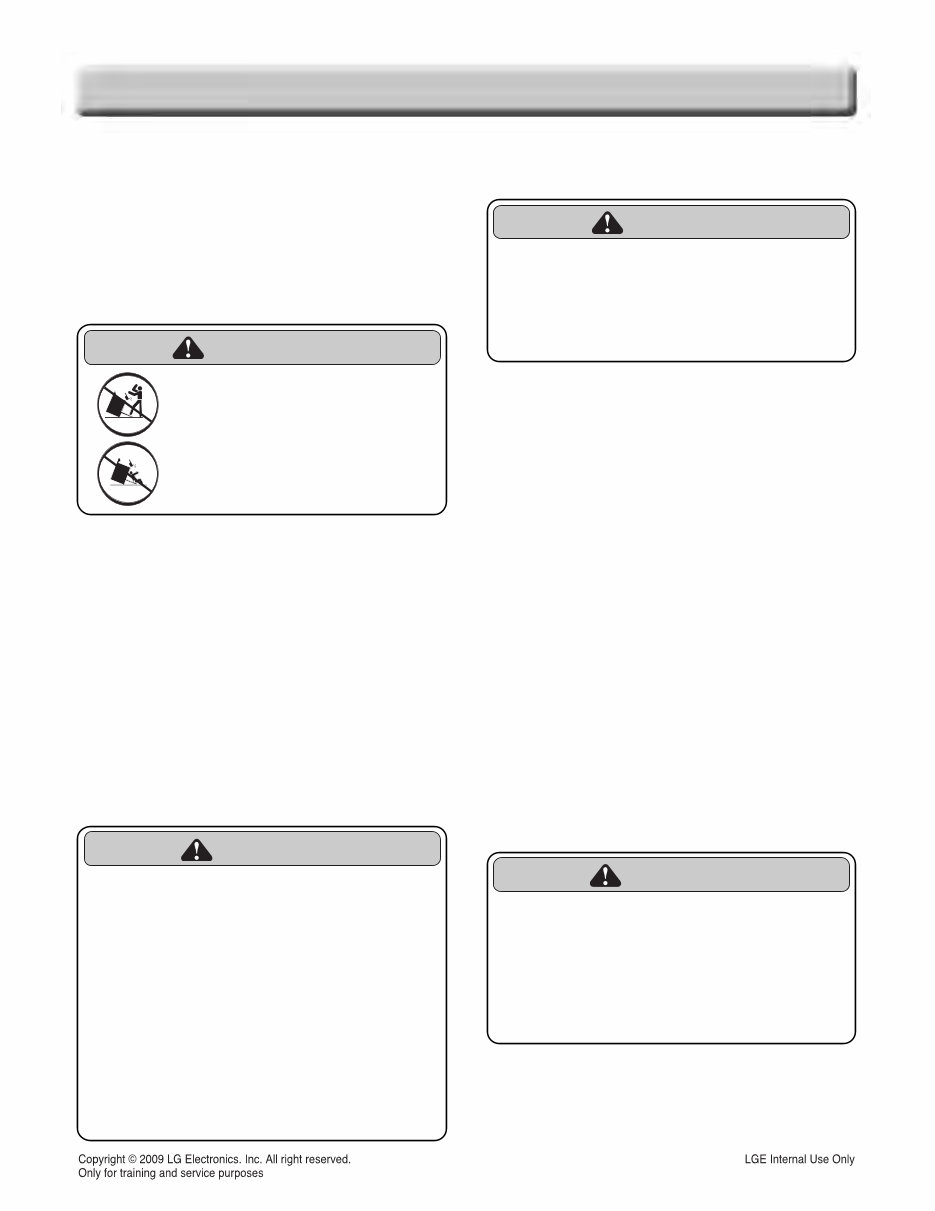
1-1 GENERAL IMPOR IMPORTANT SAFETY INSTRUCTIONS ANT SAFETY INSTRUCTIONS Read and follow all instructions before using your oven to prevent the risk of fire, electric shock, injury to person, or damage when using the range. This guide don’t cover all possible conditions that may occur. For further assistance contact your service agent or manufacturer. This is the safety alert symbol. This symbol alerts you to potential hazards that can kill or hunt you and others. All safety messages will follow the safety alert symbol and either the word “WARNING” or “CAUTION”. These word means : This symbol will alert you to hazards or unsafe practices which could cause serious bodily harm or death. WARNING This symbol will alert you to hazards or unsafe practices which could cause bodily injury or property damage. CAUTION WARNING • DO NOT step or sit on the door and install the Anti-Tip Bracket packed with range. - The range could be tipped and injury might result from spilled hot liquid, food, or the range itself. - If the range is pulled away from the wall for cleaning, service, or any other reason, ensure that the Anti-Tip Device is properly reengaged when the range is pushed back against the wall. • DISCONNECT power supply cord from the outlet before servicing. • Replace all panels and parts before operating. • RECONNECT all grounding devices. - Failure to do so can result in severe personal injury, death or electrical shock. • DO NOT touch burners, grates or interior surfaces of oven. - Heating element may be hot even though they are off. - Interior surfaces of an oven become hot enough to cause burns. • During and after use, do not touch, or let clothing or other flammable materials contact burners, grates or interior surfaces of oven until they have had sufficient time to cool. - Other surfaces of the appliance may become hot enough to cause burns among these surfaces are oven vent openings and surfaces near these openings, oven doors, and windows of oven doors. • DO NOT store items of interest to children in cabinets above a range or on the back guard of a range. - Children climbing on the range to reach items could be seriously injured. CAUTION • Always use Pot Holders or oven mitts when removing food from the Warming Drawer. - You can be burned as cookware and plates will be hot. • Be careful when you work on the gas range handling the sheet metal part. - Sharp edge may be present and you can cut yourself. • Be careful not to bend the fan blade - Failure to do so can result in vibration, noise, and poor performance of convection when operating. • Be careful not to scratch or chip the oven liner paint when you remove the oven light socket in the next step. • Turn power OFF before removing the Warming Drawer. • Be careful when removing and lifting the door. • DO NOT lift the door by the handle. - Failure to do so can result in personal injury as the door is very heavy.
1-2 GENERAL IMPOR IMPORTANT SAFETY INSTRUCTIONS ANT SAFETY INSTRUCTIONS WARNING • DISCONNECT power supply cord from the outlet before servicing. • Replace all panels and parts before operating. • RECONNECT all grounding devices. - Failure to do so can result in severe personal injury, death or electrical shock. • Be sure your appliance is properly installed and grounded by a qualified technician. • Do not repair or replace any part of the appliance unless specifically recommended in the manual. All other servicing should be referred to a qualified technician. • Always disconnect power to appliance before servicing by removing the fuse or switching off the circuit breaker • DO NOT step or sit on the door and install the Anti-Tip Bracket packed with range. - The range could be tipped and injury might result from spilled hot liquid, food, or the range itself. - If the range is pulled away from the wall for cleaning, service, or any other reason, ensure that the Anti-Tip Device is properly reengaged when the range is pushed back against the wall. To reduce the risk of tipping of the range, the range must be secured by properly installed anti-tip devices. To check if the bracket is installed properly. - Warming drawer : grasp the top rear edge of the Range and carefully attempt to tilt it forward. Verify that the anti-tip devices are engaged. - Storage drawer : Remove drawer and verify leveling leg is inserted into and fully secured by the anti-tip devices. Refer to the installation manual for proper anti-tip bracket installation. WARNING • DO NOT touch burners, grates or interior surfaces of oven. - Burners, grates may be hot even though they are off. - Interior surfaces of an oven become hot enough to cause burns. • During and after use, do not touch, or let clothing or other flammable materials contact burners, grates or interior surfaces of oven until they have had sufficient time to cool. - Other surfaces of the appliance may become hot enough to cause burns among these surfaces are oven vent openings and surfaces near these openings, oven doors, and windows of oven doors. WARNING • DO NOT store items of interest to children in cabinets above a range or on the back guard of a range. - Children climbing on the range to reach items could be seriously injured. WARNING • ALL RANGES CAN TIP • INJURY TO PERSONS COULD RESULT • INSTALL ANTI-TIP DEVICES PACKED WITH RANGE • SEE INSTALLATION • Do Not Leave Children Alone - Children should not be left alone or unattended in area where appliance is in use. They should never be allowed to sit or stand on any part of the appliance. • Never Use Your Appliance for Warming or Heating the Room. • Storage in or on Appliance – Flammable materials should not be stored in an oven or near surface units. Be sure all packing materials are removed from the appliance before operating it. Keep plastics, clothes and paper away from parts of the appliance that may become hot • Wear Proper Apparel – Loose-fitting or hanging garments should never be worn while using the appliance. • Do Not Use Water on Grease Fires – Turn off oven to avoid spreading the flame. Smother the fire or flame by closing the door or use dry chemical, baking soda or foam- type extinguisher. • Make sure your range is properly adjusted by a qualified service technician or installer for the type of gas (natural or LP) that is to be used. Your range can be converted for use with either type of gas. • NEVER block the vents (air holes)of the range. They provide the air inlet and outlet that are necessary for the range to operate properly with correct combustion. Air openings are located at the rear of the cooktop, at the top and bottom of the oven door, and at the bottom of the range under the warming drawer.
1-3 GENERAL SURFACE COOKING UNITS • If the top burner flame goes out,gas is still flowing to the burner until the knob is turned to the “OFF” position.Do not leave the burners “ON” unattended. • Use Proper Pan Size – This appliance is equipped with one or more surface units of different sizes. Select utensils having flat bottoms large enough to cover the surface unit heating element. The use of undersized utensils will expose a portion of the heating element to direct contact and may result in ignition of clothing. Proper relationship of utensil to burner will also improve efficiency. • Never Leave Surface Units Unattended at High Heat Settings – Boil overs may cause smoking and greasy spillovers may ignite. • Make Sure Reflector Pans or Drip Bowls Are in Place – Absence of these pans or bowls during cooking may subject wiring or components underneath to damage. • Protective Liners – Do not use aluminum foil to line surface unit drip bowls or oven bottoms, except as suggested in the manual. Improper installation of these liners may result in a risk of electric shock, or fire. • Glazed Cooking Utensils – Only certain types of glass, glass/ceramic, ceramic, earthenware, or other glazed utensils are suitable for range-top service without breaking due to the sudden change in temperature. • Utensil Handles Should Be Turned Inward and Not Extend Over Adjacent Surface Units – To reduce the risk of burns, ignition of flammable materials, and spillage due to unintentional contact with the utensil, the handle of a utensil should be positioned so that it is turned inward, and does not extend over adjacent surface units. • Be sure you know which knobs operate each burner. Make sure you turned on the correct burner. • To prevent burns, always be sure that the controls for all burners are at the “OFF” position and all grates are cool before attempting to remove them. IMPOR IMPORTANT SAFETY INSTRUCTIONS ANT SAFETY INSTRUCTIONS SELF-CLEAN OVENS • Do Not Clean Door Gasket – The door gasket is essential for a good seal. Care should be taken not to rub, damage, or move the gasket. • Do Not Use Oven Cleaners – No commercial oven cleaner or oven liner protective coating of any kind should be used in or around any part of the oven. • Clean in the self-clean cycle only parts listed in this manual. Before self-cleaning the oven, remove the broiler pan and any utensils from the oven. • Never keep pet birds in the kitchen – the health of birds is extremely sensitive to the fumes released during an oven self- clean cycle. Fumes may be harmful or fatal to birds. Move birds to well-ventilated room. • Important Instruction – In the event the self-clean mode “F” code goes on, or three long beeps sound, oven is malfunctioning in the self-clean mode. Turn off or disconnect appliance from power supply and have serviced by a qualified technician. VENTILATING HOODS: • Clean Ventilating Hoods Frequently – Grease should not be allowed to accumulate on hood or filter. • When flaming foods under the hood, turn the fan on. OVEN • Use Care When Opening Door – Let hot air or steam escape before you remove or replace food in the oven • Do Not Heat Unopened Food Containers – Build-up of pressure may cause container to burst and result in injury. • Keep Oven Vent Ducts Unobstructed – the oven vent is located above the center burner. This area could become hot during oven use. Never block this vent and never place plastic or heat-sensitive items on vent. • Placement of Oven Racks – Always place oven racks in desired location while oven is cool. If rack must be moved while oven is hot, do not let potholder contact hot heating element in oven. • Do Not allow aluminum foil or meat probe to contact heating elements. DEEP FAT FRYERS: • Use extreme caution when moving the grease kettle or disposing of hot grease.
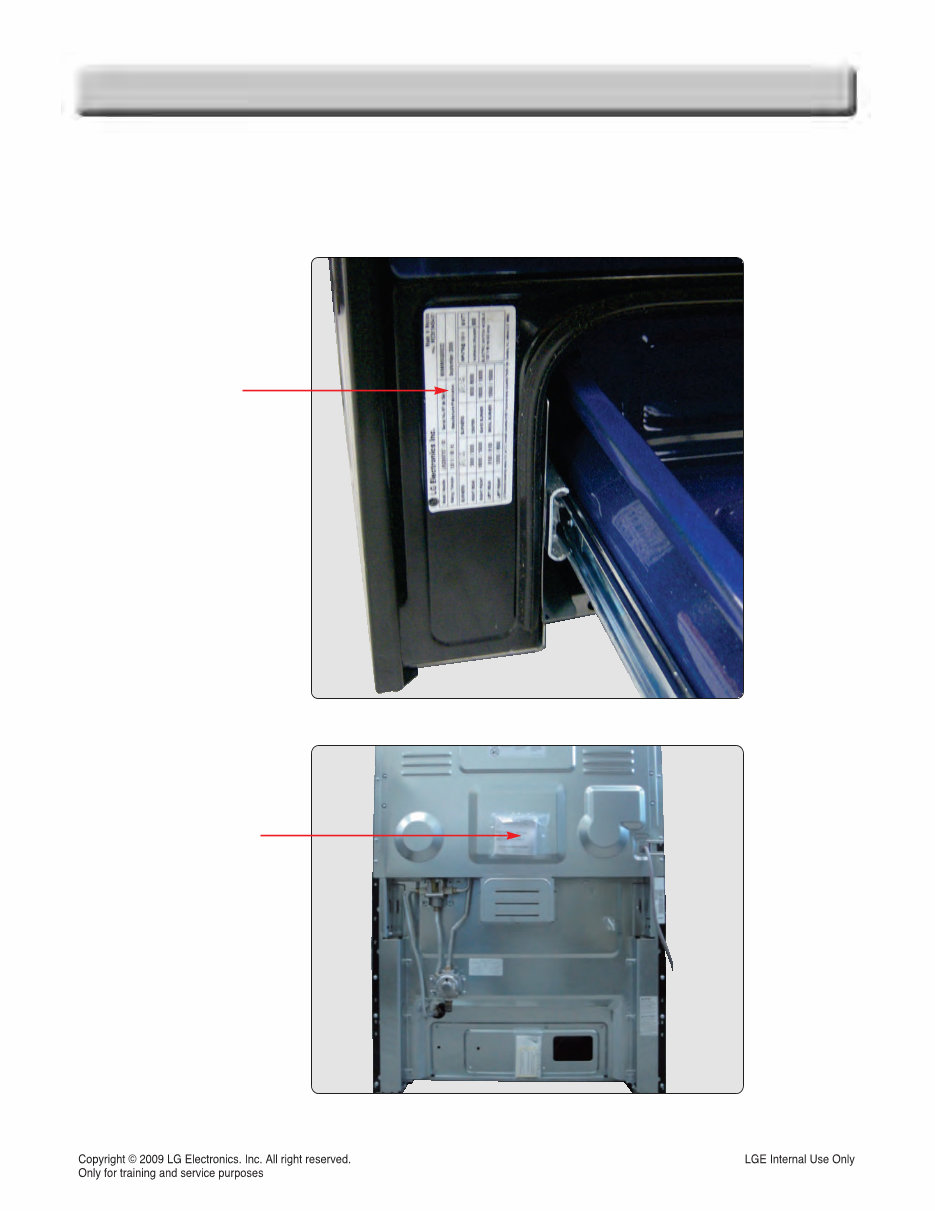
1-4 GENERAL The Model/Serial Number label and Tech Sheet locations are shown below. Model & Serial Number Location MODEL & SERIAL NUMBER LABEL MODEL & SERIAL NUMBER LABEL AND TECH SHEET LOCA AND TECH SHEET LOCATIONS TIONS Tech Sheet Location (On Low Rear Cover)
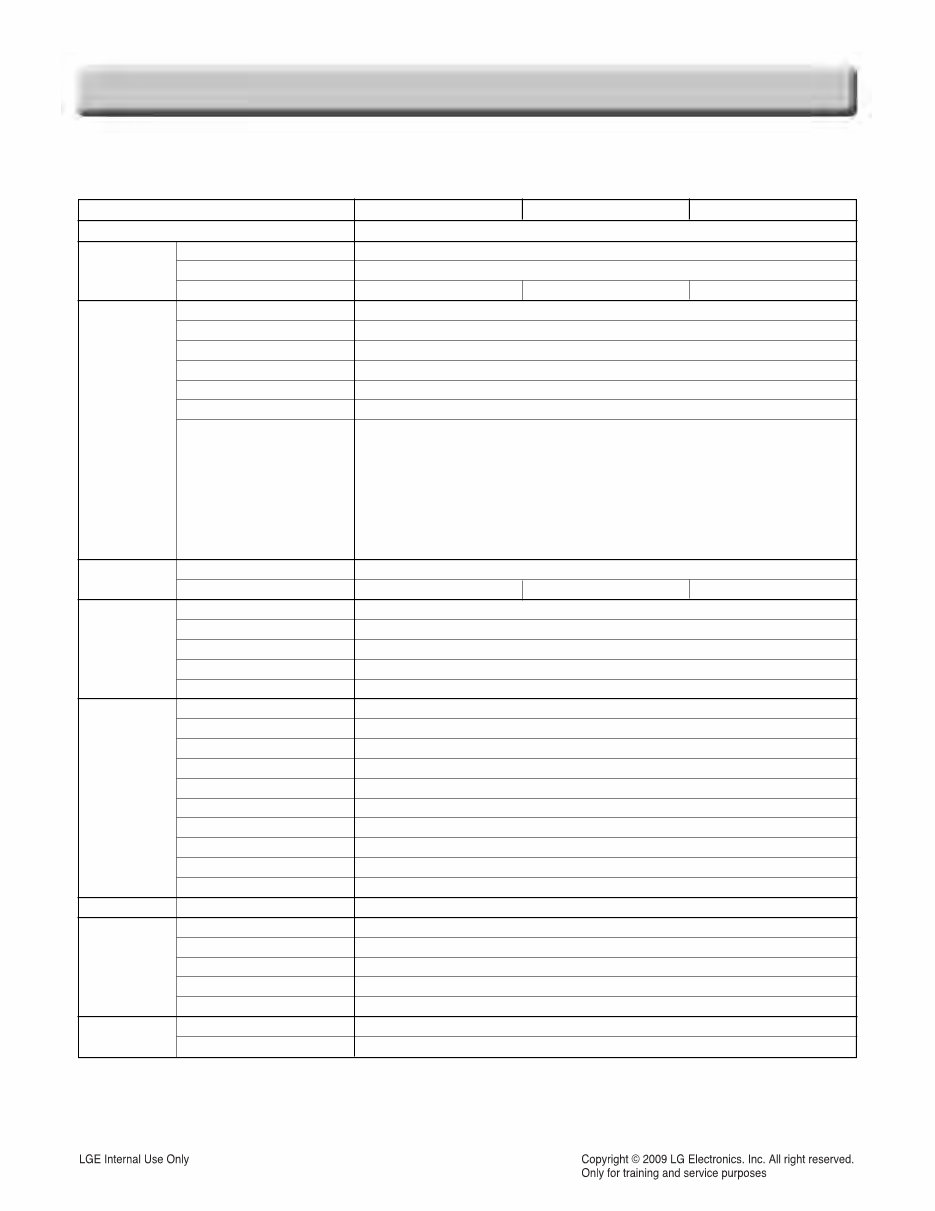
1-5 GENERAL SPECIFICA SPECIFICATIONS TIONS Model Number LRG3081ST LRG3081SB LRG3081SW Category Non Convection Overall Control Cooktop Input Rate NAT / LP [BTU/hr] Oven Drawer Dimensions Power Width Installation type Color availability Oven Cooktop Display Electronic clock & timer Control lock capability Audible preheat signal Special function Material # of element LR RR CR LF RF Capacity(cu.fe) Broil (NAT/ LP)[BTU/hr] Bake (BTU/hr) Convection system # of Racks Interior oven light Proof Cook & warm Favorites Door lock out Broiler pan Type Oven Interior(W x H x D) Exterior - Width Exterior - Height Exterior - Depth Net weight: lbs (kg) Rating 30" Freestanding STS Black White Tact Switch Knob LED Green Yes Yes Yes Setting (6 categories) 1. Convection auto conversion On/Off 2. Thermostat Adjustment 3. Preheating alarm Light On/Off 4. Beeper volume (Hi, Lo, Off) 5. Temperature unit (°F / °C) Enamel 5 5 5 9.1k / 9.1k 5k / 5k 9.1k / 9.1k 12k / 9.5k 17k / 10k 5.4 14.5k / 13.5k 19k / 18k Yes 2 (standard) auto / manual No No No Yes No Storage 24 1 /2 x 19 1 /2 x 19 3 /8 30 36 (cooktop), 47 7 /16 (backguard top) 26 1 /2 (Door), 28 3 /4 (with handle) 269 lbs (122kg) 120V 4.5A
2-1 USING YOUR RANGE GENERAL INFORMA GENERAL INFORMATION TION Rating Label Model numbers are recorded on the rating label. Rating label is located on the lower front left corner of the oven frame. It can be seen by opening the storage drawer or warming drawer. Before ordering parts, write down the correct model and serial number from rating label. This avoids incorrect shipments and delays. Please refer to parts reference material when ordering replacement parts. Functional Operation Bake Mode Bake burner operates during bake mode. Bake can be used to cook foods which are normally baked. Oven must be preheated. Broil Mode Broil burner operates during broil mode. Broil can be used to cook foods which are normally broiled. Preheating is not required when using broil. All foods should be turned at least once except fish, which does not need to be turned. Convection Bake / Roast Mode During a convection bake the fan and the burner run opposite of each other, however on a convection roast the fan and burner operate at the same time after preheat has been completed. Convection bake should be used for cooking casseroles and roasting meats. Oven should be preheated for best results when using convection bake. Pans do not need to be staggered. Cooking Guide Refer to the owners manual for recommendations of times and temperatures. Times, rack position, and temperatures may vary depending on conditions and food type. For best results, always check food at minimum time. When roasting, choose rack position based on size of food item. Bake burner Convection element Bake burner Broil burner
This service and repair manual is an essential resource for anyone looking to maintain or repair their LG LRG3081ST, LRG3081SB, or LRG3081SW freestanding gas range. Whether you are a professional mechanic or a DIY enthusiast, this guide provides comprehensive information to assist you in troubleshooting and servicing your range.
Product Specifications
Parts Identification
Disassembly Instructions
Troubleshooting
Component Testing
Schematic Diagrams
Error Codes
Exploded Views
Parts List Catalog
This detailed manual is illustrated with pictures and step-by-step instructions, ensuring that you can effectively repair and service your device. It is the official service and repair manual, provided in a high-resolution format, guaranteeing excellent print quality for the pages you need.
Upon payment, you will have instant access to the manual, eliminating the need for shipping and allowing you to commence repairs within minutes. The manual is available in English and consists of 91 pages.
Recently Viewed
5,521,897Happy Clients
2,594,462eManuals
1,120,453Trusted Sellers
15Years in Business
Price:
Actual Price:
LG LRG3081ST LRG3081SB LRG3081SW Service Manual & Repair Guide