

New Dometic Refrigerator Manual
What's Included?
Fast Download Speeds
Online & Offline Access
Access PDF Contents & Bookmarks
Full Search Facility
Print one or all pages of your manual
OPERATING
INSTRUCTIONS
RM3762 RM3962
FOR YOUR SAFETY
If you smell gas:
1. Open windows.
2. Don’t touch electrical switches.
3. Extinguish any open flame.
4. Immediately call your gas supplier.
FOR YOUR SAFETY
Do not store or use gasoline or other flam-
mable vapors and liquids in the vicinity of
this or any other appliance.
REVISION B
Form No. 3313513.016 09/16
(French 3313514.014_B)
©2016 Dometic Corporation
LaGrange, IN 46761
CANADA
Dometic Corporation
46 Zatonski, Unit 3
Brantford, ON N3T 5L8
CANADA
USA
Dometic Corporation
Service Office
1120 North Main Street
Elkhart, IN 46514
For Service Center &
Dealer Locations
Please Visit:
www.eDometic.com
Improper installation, adjustment,
alteration, service or maintenance can cause
injury or property damage. Refer to this man-
ual. For assistance or additional information
consult a qualified installer, service agency
or the gas supplier.
If the refrigerator stops cooling - or - if
it emits an ammonia smell, immediately
turn the refrigerator off and contact a
Service Center.
2
NOTES
3
INTRODUCTION
REFRIGERATOR OVERVIEW 4
INSTRUCTIONS FOR USE 6
STORAGE COMPARTMENTS 9
PRODUCT CARE 10
MAINTENANCE & SERVICE 12
TROUBLESHOOTING 14
APPENDIX A - SPARE PARTS 16
APPENDIX B - REARVIEW EQUIPMENT 17
APPENDIX C - WIRING DIAGRAM 18
APPENDIX D - CONSUMER SUPPORT 19
APPENDIX E - DOMETIC WARRANTY 20
APPENDIX F - MAINTENANCE SCHEDULE 21
REGISTRATION CARD 23
CONTENTS
Thank you for purchasing a new Dometic refrigerator. This product is a recreational vehicle refrigerator intended for the stor-
age of fresh and frozen foods, as well as making ice.
Appearance of your product may vary from illustrations shown in this document.
Please read and be aware of possible safety hazards identified in this manual, and become familiar with the alert symbols
on the refrigerator. Read this manual carefully so that you know how to operate the refrigerator safely and correctly. Keep
this manual with the refrigerator for future reference.
SYMBOLS
The following symbols are used throughout this manual:
This is the safety alert symbol. It is used to alert you to personal injury hazards. Obey all safety
messages that follow this symbol to avoid possible injury or death.
WARNING indicates a hazardous situation which, if not avoided, could result in death or serious injury.
CAUTION, used with the safety alert symbol, indicates a hazardous situation which, if not avoided,
could result in minor or moderate injury.
NOTICE is used to address practices not related to personal injury.
Information
Step-by-step instructions
4
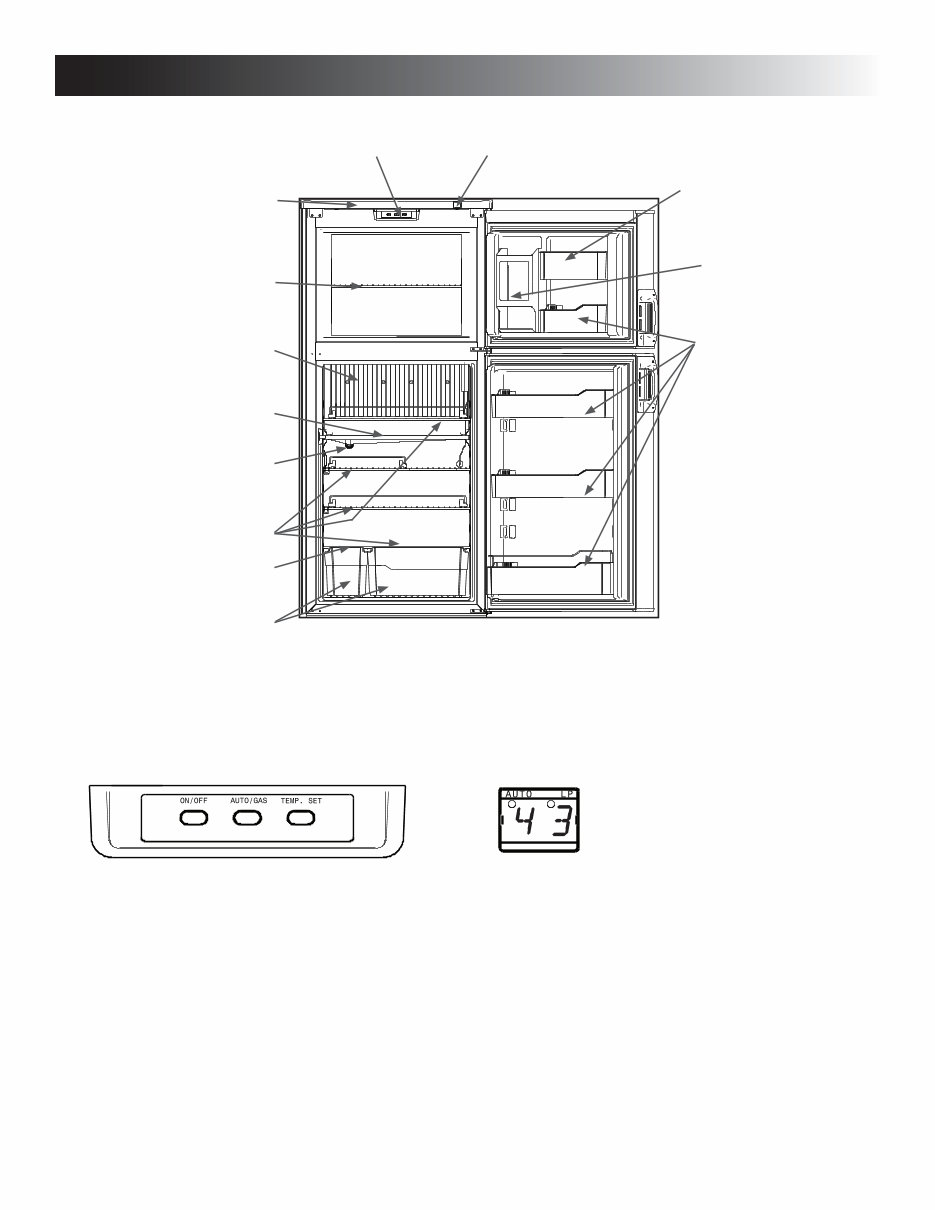
Appearance and features may vary depending on model. Quantity and
position of items may also vary.
Wire shelves
Finned plate
Draining pipe
Control panel LED display panel
Top decor
Drip protection
Wire shelf
Crispers
Retainer
Door compartments
Plastic shelf
1. ON/OFF button (main power)
Press this button to turn the refrigerator ON or OFF.
Button In = Unit Is ON Button Out = Unit Is OFF
2. AUTO/GAS mode selector button
Press this button to turn the AUTO mode ON or OFF.
Button In = Auto Mode (Attempts Electric Mode First)
Button Out = Auto OFF (Attempts LP Gas Mode Only)
3. TEMP. SET button
The thermostat has 5 settings where “1” indicates the
warmest and “5” the coldest temperature setting. Press
this button once to display the current setting. Continue
to press repeatedly until the desired setting, e.g. “3”,
is shown in the LED display. This value is shown for
about 5 seconds and then the fresh food compartment
temperature is displayed once again.
CONTROL PANEL
1 3 2
The LED display panel provides a quick visual indicator of
the temperature in the fresh food storage compartment,
modes of operation, status messages, and alarm condi-
tions. See LED PANEL INDICATIONS table on the following
page.
LED DISPLAY PANEL
Ice box
REFRIGERATOR OVERVIEW
5
REFRIGERATOR OVERVIEW
ABSORPTION COOLING SYSTEM
When turning on the refrigerator, you should adjust
the thermostat to the coldest temperature setting.
The cooling cycle may require an extended running
time before cooling effect is observed.
LEVELING THE REFRIGERATOR
Leveling is one of the requirements for proper operation
with absorption refrigerators. To ensure proper leveling the
vehicle needs to be leveled so it is comfortable to live in
(no noticeable sloping of floor or walls).
Any time the vehicle is parked for several hours with the
refrigerator operating, the vehicle should be leveled to al-
low proper cooling.
When the vehicle is moving, the leveling is not critical, as
the rolling and pitching movement of the vehicle will pass
to either side of level, keeping the liquid ammonia from
accumulating in the evaporator tubing.
OPERATING REFRIGERATOR AT HIGH
ALTITUDE
All gas appliances experience lowered efficiency (or
rating) at high altitude This is a direct result of lower
atmospheric pressure and oxygen levels, and is not a
defect of the refrigerator.
Reduced cooling performance and burner outage may
occur at altitudes higher than 5500 feet above sea level
(while operating on LP gas). Always operate refrigerator
on electric power at altitudes higher than 5500 feet.
AUTOMATIC ENERGY SELECTOR
CONTROL SYSTEM
The refrigerator is equipped with an automatic energy
selector control system. The user turns the refrigerator on,
selects the desired temperature, and then the refrigerator
automatically selects the most suitable energy source avail-
able (either 120 VAC or LP gas operation). The system can
be set by the user to be fully automatic (AUTO mode is
selected) or to operate on LP gas only (AUTO mode is off).
The refrigerator controls will work down to 9.6 volt DC.
PURGING AIR FROM THE LINES
If the refrigerator has not been used for a long time - or -
the LP tanks have just been refilled, air may be trapped in
the supply lines. To purge the air from the lines, turn the
refrigerator off and on by pressing the ON/OFF button. If
the flame is not lit within 45 seconds, turn the refrigerator
off and back on again. This procedure can be repeated 3 to
4 times. If repeated attempts fail to start the LP gas opera-
tion, check to make sure that the LP gas supply tanks are
not empty and that all manual shutoff valves in the lines
are open. If the problem persists, turn the refrigerator off
and take it to a Service Center.
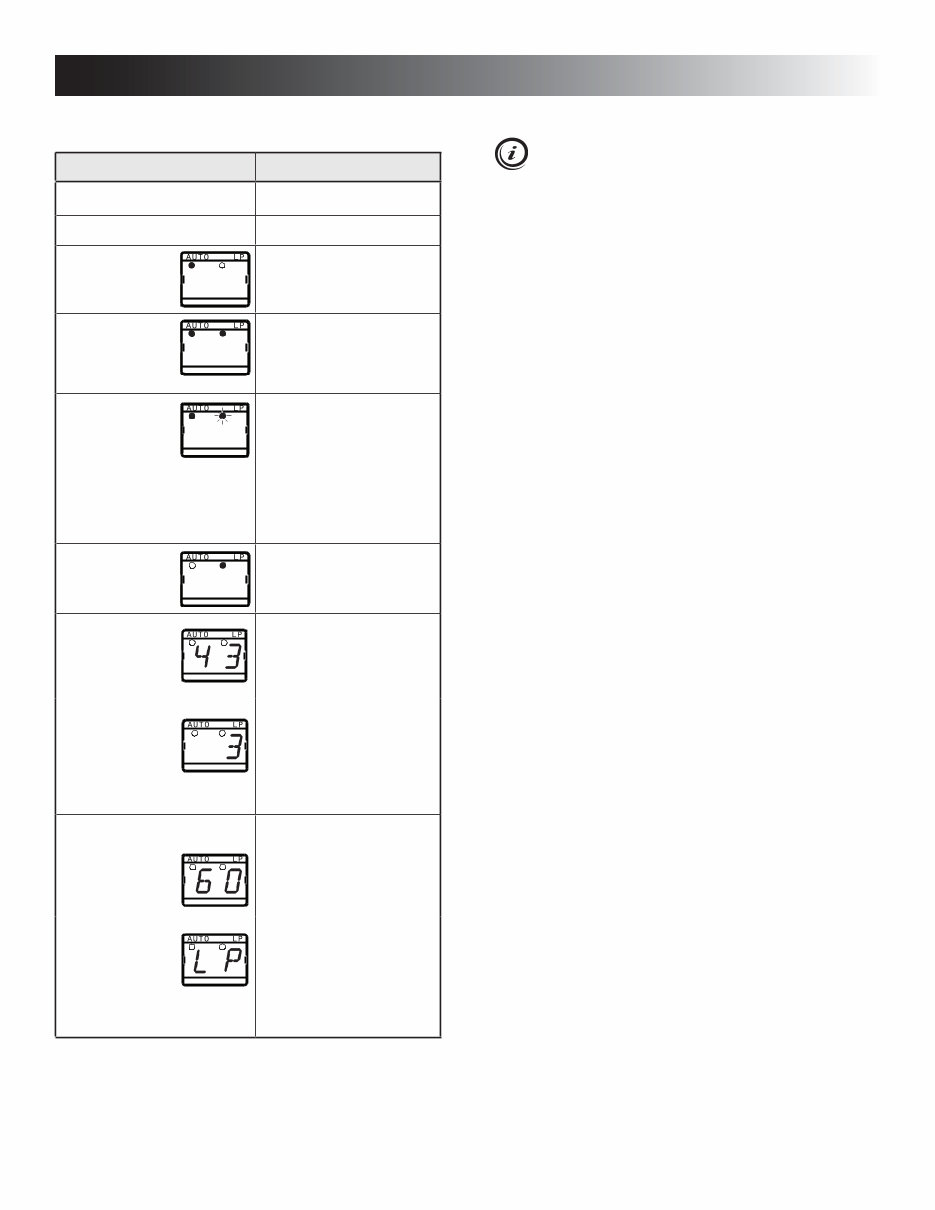
LED PANEL INDICATIONS STATUS INFORMATION
Display is on Refrigerator on
Display is off Refrigerator off
The AUTO
indication
dot is lit.
AUTO mode and AC op-
eration
The AUTO
and LP
indication
dots are lit.
AUTO mode and LP gas
operation
The AUTO
indication
dot is lit.
LP indication
dot flashes slowly.
Temporary gas lockout
function. Only in AUTO
mode. It delays LP gas
operation by 15 minutes
when ignition switch is
turned OFF. This is for
stopping at a refueling
station.
The LP
indication
dot is lit.
Manual LP gas operation
mode.
Digital display:
Fresh food storage com-
partment temperature.
Thermostat range setting
indication (1 - 5).
Temporary during setting.
The thermostat settings
are stored automatically
after 5 sec. of inactivity.
Message indications:
“60” is
displayed.
Fresh food compartment
temperature is above
measurement range.
“LP” is flashing
(The message
alternates
between “LP”
and the fresh food com-
partment temperature.)
LP gas operation lock out.
(Check LP gas.)
LED PANEL INDICATIONS
6
4. Select operation mode:
- AUTO mode (AC and LP gas)
Press the AUTO/GAS mode
selector button
(if not already on).
- GAS mode (LP gas operation only)
Press the AUTO/GAS mode
selector button to turn off the AUTO
mode (if not already off).
ADJUSTING THE THERMOSTAT
The adjustable thermostat ranges from 1 - 5 (5 = coldest
temperature setting).
After the initial start-up, adjust the thermostat by
pressing the TEMP. SET button repeatedly until the
desired setting is displayed.
The thermostat controls both the gas and electric opera-
tion. Thus, it is not necessary to reset each time a different
energy source is employed.
OPERATING THE ICE MAKER
(ICE MAKER MODELS ONLY)
Before the ice maker can operate, make sure that:
• The refrigerator is connected to 120 VAC.
• The water valve supplying the refrigerator is turned on.
• The ice level bail arm is in its fully down position.
Keep bail arm in the up (OFF) position until water
is present at the ice maker.
REFRIGERATOR OVERVIEW
STARTING THE REFRIGERATOR
INSTRUCTIONS FOR USE
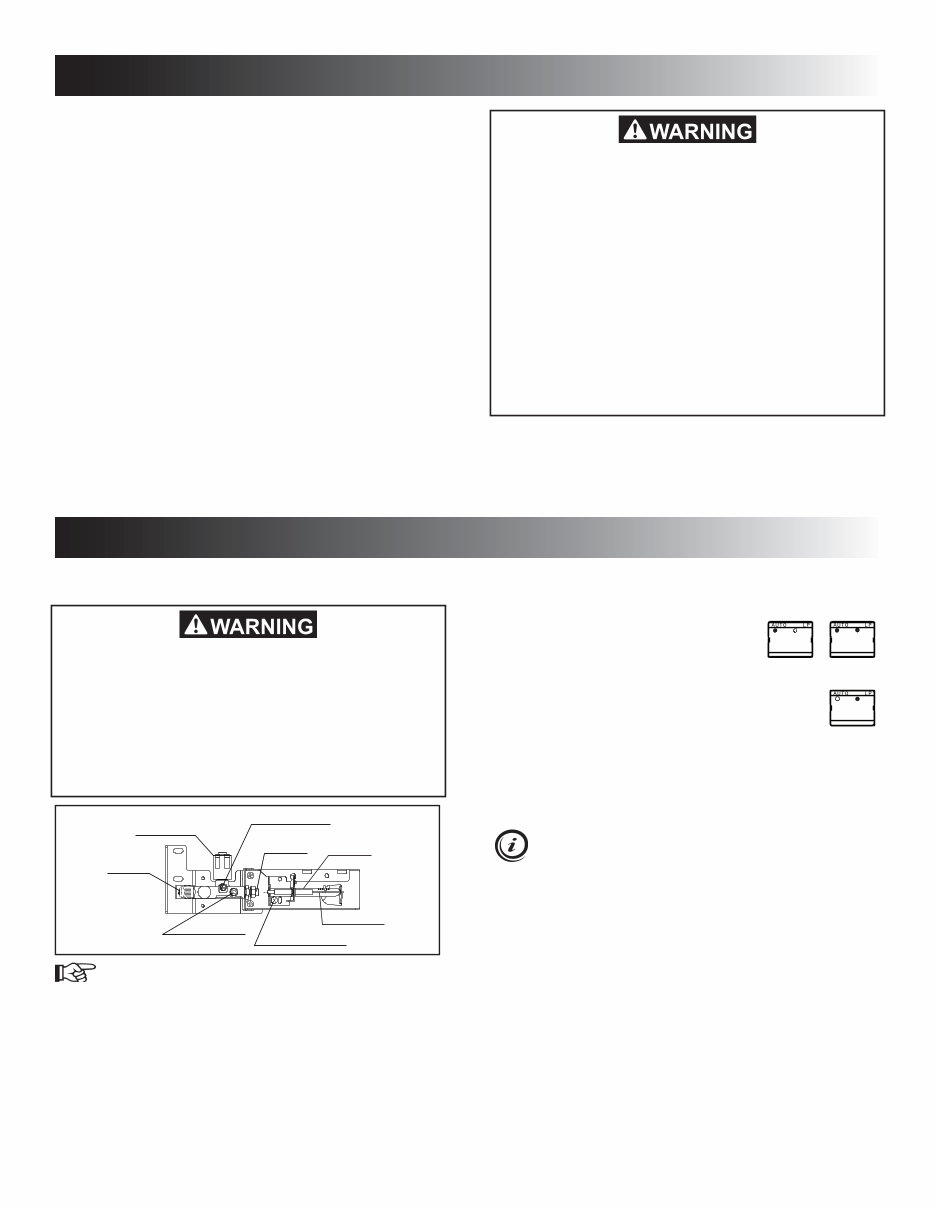
INLET FITTING
MANUAL SHUTOFF VALVE
(shown in open position)
PRESSURE TEST PORT
BURNER JET
BURNER MOUNTING SCREW
BURNER TUBE
SPARK ELECTRODE
APPROVED
SOLENOID VALVE
MODES OF OPERATION
The refrigerator is equipped with a control system where
the user can choose to turn the AUTO mode on or off.
AUTO MODE IS TURNED ON
The system is fully automatic which means that it selects
the most suitable energy source available, either 120 VAC
or LP gas operation.
TEMPORARY GAS LOCKOUT
When the refrigerator’s temporary gas lockout is energized,
the LP gas operation will automatically lock out for 15
minutes when the engine is switched off. This will prevent
LP gas operation e.g. when stopping at a refueling station.
See Installation Instructions ALTERNATOR (D+) CONNEC-
TION to install this feature.
AUTO MODE IS TURNED OFF (GAS MODE)
The system operates on LP gas only. The control system
activates the ignition system and makes one attempt to
light the burner.
1. Check that all the manual gas valves are in the
ON position.
2. Make sure that a continuous 12 VDC supply is
available for the electronic control to function.
3. Press the ON/OFF button.
AUTO + AC AUTO + GAS
GAS ONLY
FIRE OR EXPLOSION HAZARD. The tempo-
rary gas lockout feature will not work when
AUTO mode is turned OFF. Consequently,
while refueling or parking near a gasoline
pump, make sure that AUTO mode is ON and
all LP gas appliances vented to the outside of
the vehicle are shut OFF. Otherwise, gasoline
fumes from gasoline pumps could come into
contact with an LP gas appliance burner flame
and ignite. Failure to obey this warning could
cause a fire or explosion resulting in death or
serious injury.
FIRE HAZARD. When the RV has not been
used for some time, make sure that the path
between the burner jet and the burner tube
has not been obstructed before lighting the
LP gas burner. Failure to obey this warning
could cause a fire resulting in death or seri-
ous injury.
7
INSTRUCTIONS FOR USE
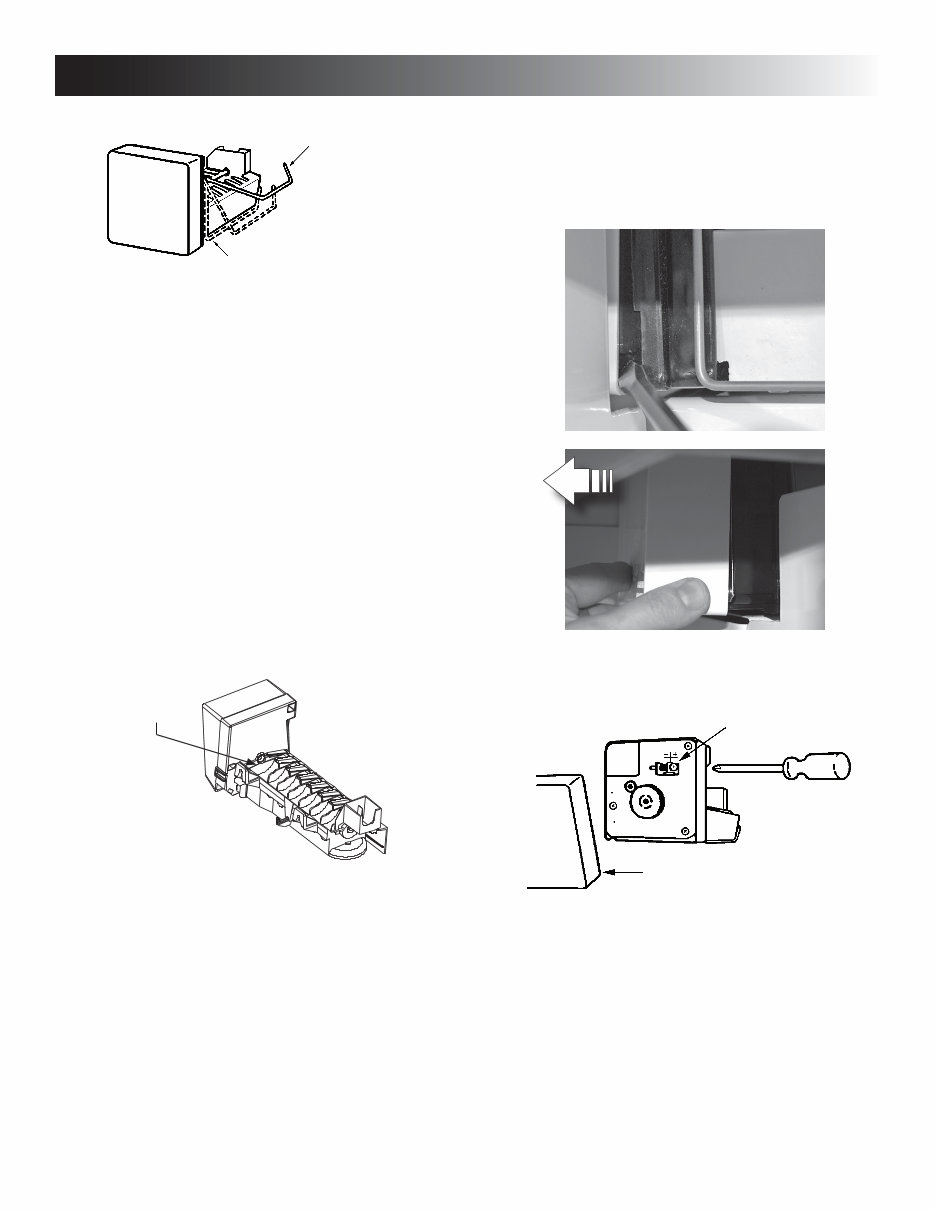
Ice level
bail arm
Down
position
When the ice maker thermostat senses the preset tempera-
ture for the ejection of the ice cubes, the fingers will start
to rotate, dumping any ice cubes and filling the mold with
water. When the storage container is full, the bail arm will
come in contact with the ice cubes. The bail arm cannot
return to the full down position and the ice production is
stopped until the bin is emptied, or ice cubes are removed.
To prevent water from splashing out of the mold assembly
while travelling in your recreational vehicle, raise the bail
arm to the full UP/OFF position about 1-1/2 hours before
departing. This will allow the water in the mold to freeze.
WATER SUPPLY
The water supply system must have a minimum pressure
of 15 pounds per square inch gauge (psig). A 1/4" diameter
water line to the water valve should be used at the rear of
the refrigerator. The water line must have a manual shutoff
valve placed where it is easily accessible.
The maximum water level is represented by a thin line. It
is essential that the water level does not exceed this line!
Maximum
water level
If necessary, change the water flow by adjusting the water
supply. For instructions, see ADJUSTING THE SIZE OF
CUBES.
ADJUSTING THE SIZE OF CUBES
If the ice maker was cleaned and drained, no ice
cubes will be dumped into the bin during the first
cycle.
The first few cycles may have small cubes due to air
trapped in the water lines. The first container of ice cubes
should be dumped if the water system has been winterized
or not used for several weeks. Once the ice maker has
run through several cycles and if cubes are too small or
sticking together, adjustment is necessary on the amount
of water entering the mold.
Cover
Adjusting screw
TO ADJUST THE SIZE OF CUBES, FOLLOW THESE
STEPS:
1. Remove the protective cover from the ice maker
mechanism. Using a flat-head screwdriver, place
the tip of the screwdriver in the slot. Twist the
screwdriver blade gently to loosen the cover.
2. Locate the adjusting screw under the protec-
tive cover. Turn the screw counterclockwise to
increase the size of cubes.
3. Turn the screw clockwise to decrease the cube
size or if the mold is overfilling, and the cubes
are stuck together.
To prevent overfilling, do not turn the adjustment
screw more than one revolution at a time. Allow
the ice maker to cycle several times before another
adjustment is made. Be sure to replace the protec-
tive cover on the cycle after the adjustments are
complete.
8
INSTRUCTIONS FOR USE
This refrigerator is intended for continuous
use. Do not allow it to run unattended when
there is a risk for loss of electricity or fuel.
Food spoilage could occur.
COLD WEATHER LOW AMBIENT
CONTROL
The refrigerator is equipped with an automatic Low Ambi-
ent Control (LAC) function which allows for trouble-free
operation in low ambient temperature (below 50°F) for
extended periods of time.
EXTREME COLD WEATHER OPERA-
TION
Refrigerator performance may be reduced in extremely
cold (subzero) temperatures. This temporary condition is
normal for absorption refrigerators and does not indicate
product failure. In the event that performance is reduced
in such conditions, turn the refrigerator off. As ambient
temperatures rise, please restart your refrigerator accord-
ing to instructions before requesting service.
TURNING OFF THE REFRIGERATOR,
AND WHEN IT IS NOT IN USE
You can turn off your refrigerator by pressing the main
power ON/OFF button found on the control panel to the
off position. This will shut off all power to the refrigerator,
including DC power.
If the refrigerator will not be in operation for an extended
period of time or put into winter storage, it should be emp-
tied, defrosted, cleaned, and the doors placed in the airing
position. If ice cube trays are in use, they should also be
dried and kept outside the cabinet.
The refrigerator’s control system still consumes a
few milliamps even if it is turned off. If your RV is
being put into winter storage, it is recommended to
either put your RV batteries on a battery charger or
turn off the vehicle’s main 12 VDC switch. This will
prevent the RV battery from discharging.
9
STORAGE COMPARTMENTS
FOOD STORAGE COMPARTMENT
• Cool the refrigerator before placing any food inside.
Never put hot food or drinks into the refrigerator - cool
them first.
• The food storage compartment is completely closed and
unventilated, which is necessary to maintain the required
low temperature for food storage. Consequently, foods
having a strong odor or those that absorb odors easily
should be covered.
• Vegetables, salads, etc. should be covered to retain
their crispness.
• The coldest positions in the refrigerator are under the
cooling fins and at the bottom of the refrigerator. The
warmer areas are on the upper door shelves. This should
be considered when placing different types of food in
the refrigerator.
• Arrange all food in the unit to allow for free air circulation.
Do not overpack because a stuffed refrigerator must
work harder and will have higher cabinet temperatures.
• Do not leave the unit’s door open any longer than neces-
sary. This will reduce frost formation and increase the
efficiency of the refrigerator.
FROZEN FOOD STORAGE
COMPARTMENT
This compartment is not designed for deep or quick freez-
ing of food.
• To prevent food from drying out, keep it in covered dish-
es, containers, plastic bags or wrapped in aluminum foil.
• Meat or fish, whether raw or prepared, can be stored
in the frozen food storage compartment provided they
are precooled first in the refrigerator. They can be stored
about three times longer in the frozen food compartment
as compared to the fresh food compartment.
• Quick frozen soft fruits and ice cream should be placed
in the coldest part of the compartment, which is at the
bottom of the aluminum liner.
• Frozen vegetables, may be stored in any part of the
compartment.
• To prevent frost buildup, which can reduce efficiency,
wipe excess moisture off items being placed in the
compartment.
ICE CUBES
Ice cubes can be made in the freezer compartment. For
faster freezing, place trays in direct contact with the bottom
of the freezer compartment. Ice will be made more rapidly
if the thermostat is set at its highest position, but be sure to
move the thermostat back to normal setting when the ice is
formed; the refrigerator might otherwise become too cold.
REFRIGERATOR VOLUME
REFRIGERATOR
MODEL
TOTAL REFRIGERATED
VOLUME (CU. FT.)
RM3762 7
RM3962 9
FIRE OR EXPLOSION HAZARD. Do not store
or use gasoline, oil or gasoline soaked rags,
or other flammable vapors and liquids in the
service area behind the refrigerator or in the
vicinity of this or any other gas appliance.
Failure to obey this warning could cause a
fire or an explosion resulting in death or seri-
ous injury.
10
STORAGE COMPARTMENTS
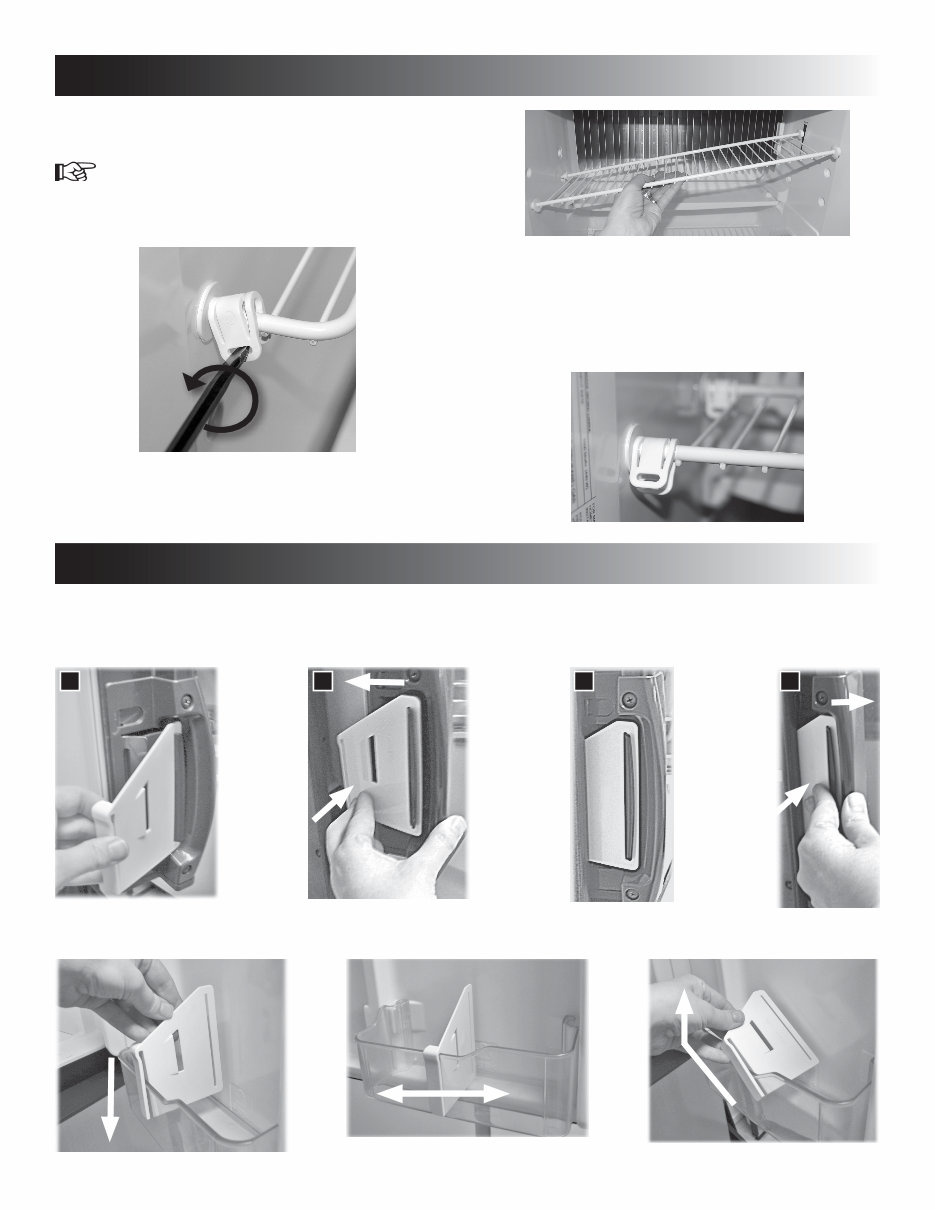
The card may be used as an adjustable partition in the door bin compartments. Press firmly until it snaps into place. To
remove, tilt the card and detach.
AIRING POSITION CARD
Use the airing position card to keep the doors ajar if the refrigerator is put into storage or will not be used for an extended
period of time.
REMOVING AND REPLACING THE
SHELVES
1. Remove the shelf locks by inserting the tip of a
flat bladed screwdriver into the slot of the locks.
Turn the screwdriver counterclockwise and then
remove the shelf locks from the wire shelf.
3. Reposition the shelf in the desired location. Insert
the ends of the wire shelf on the left-hand side
and slide the shelf into the holes on the right-
hand side.
4. Slide the plastic plugs into the holes of the wall.
5. Snap the shelf locks onto the wire shelf.
PRODUCT CARE
1
2 2 1 3 4
1
2
2. Slide the shelf to the left until bushings disen-
gage, then tilt the shelf to one side at an angle
while pulling forward.
You're Reading a Preview
What's Included?
Fast Download Speeds
Online & Offline Access
Access PDF Contents & Bookmarks
Full Search Facility
Print one or all pages of your manual
$30.99
$40.99
Viewed 19 Times Today


Secure transaction
What's Included?
Fast Download Speeds
Online & Offline Access
Access PDF Contents & Bookmarks
Full Search Facility
Print one or all pages of your manual
$30.99
$40.99
Get your hands on the comprehensive Dometic Refrigerator Manual, a valuable resource for anyone involved in car repair. Whether you're a professional mechanic or a DIY enthusiast, this manual provides detailed insights into the inner workings of Dometic refrigerators. With clear instructions and diagrams, it covers troubleshooting, maintenance, and repair procedures, making it an indispensable tool for anyone dealing with Dometic refrigeration systems.
Available in .PDF format, this manual is easily accessible and can be used on various devices, ensuring convenience and flexibility. Dive into the world of Dometic refrigeration with this essential manual at your fingertips.


