Table of Contents | Next Page Sewing Machine No. 15 OSCILLATING SHUTTLE, FOR FAMILY USE No. 15 Instruction Manual (WITH ATTACHMENTS 120603)
Previous Page | Next Page Sewing Machine No. 15 Instructions for Operating the Machine Main Parts To Take out the Bobbin To Wind the Bobbin To thread the Bobbin Case To Replace the Bobbin Case To Set the Needle To Thread the Needle To Prepare for Sewing To Commence Sewing To Remove the Work Tensions To Regulate the Tensions To Regulate the Length of Stitch To Turn a Corner To Regulate the Pressure on the Material HINTS The Belt Machine Working Heavily To Avoid Breaking Needles Breaking of Needle Thread Breaking of Bobbin Thread Skipping of Stitches To Oil the Machine Instructions for Using the Attachments Foot Hemmer -- Hemming Foot Hemmer -- Hemming and Sewing on Lace Foot Hemmer -- Felling Adjustable Hemmer -- Hemming Adjustable Hemmer -- Wide Hemming Beinder -- Binding Tucker Ruffler To Attach the Ruffler to the Machine To Adjust the Ruffler for Gathering To Make a Ruffle and Sew it to a Garment in One Operation To Ruffle and Sew on a Facing in One Operation Piping a Ruffle To Adjust the Ruffler for Plaiting To Adjust the Ruffler for Group Plaiting and Gathering To Oil the Ruffler Table of Contents
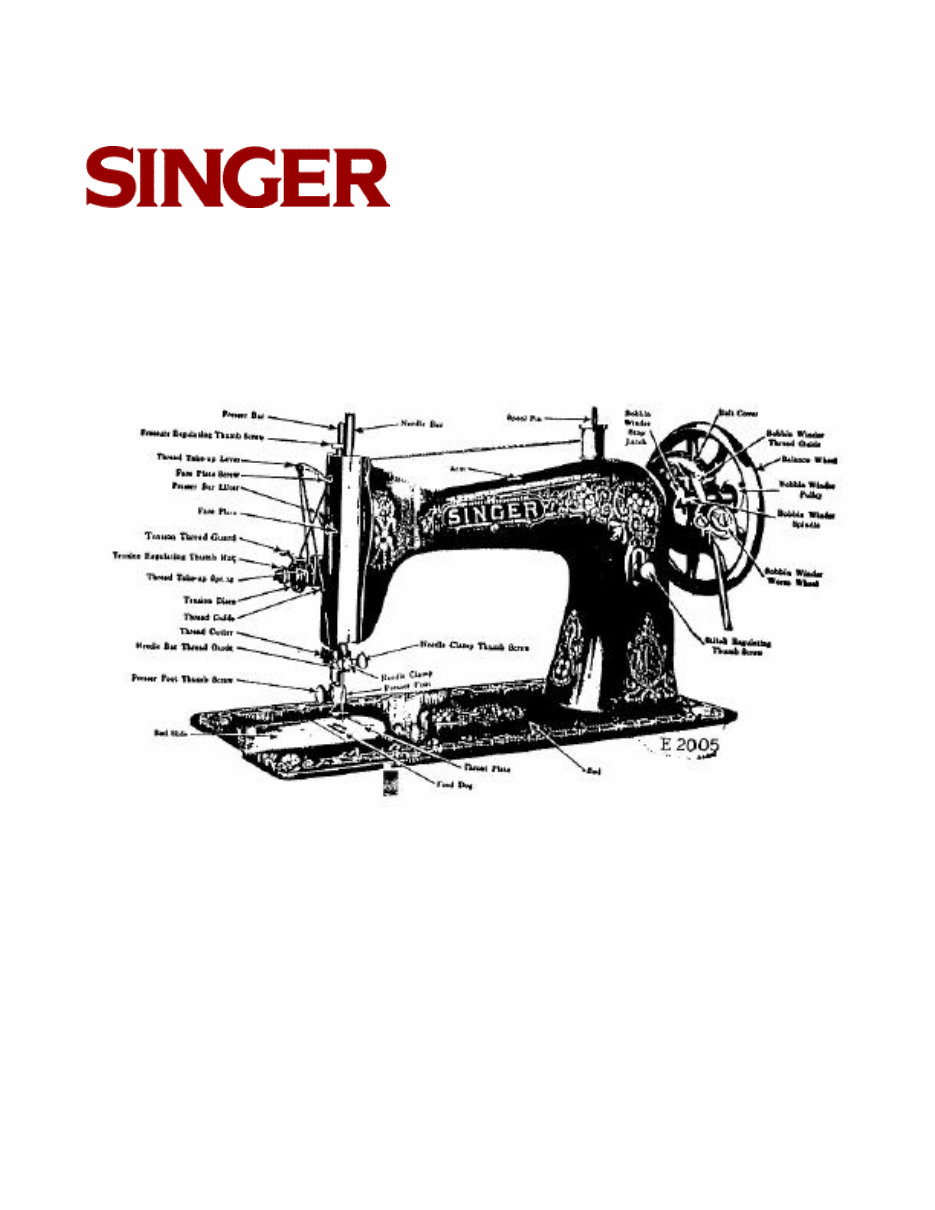
Table of Contents Previous Page | Next Page Sewing Machine No. 15 3 Main Parts
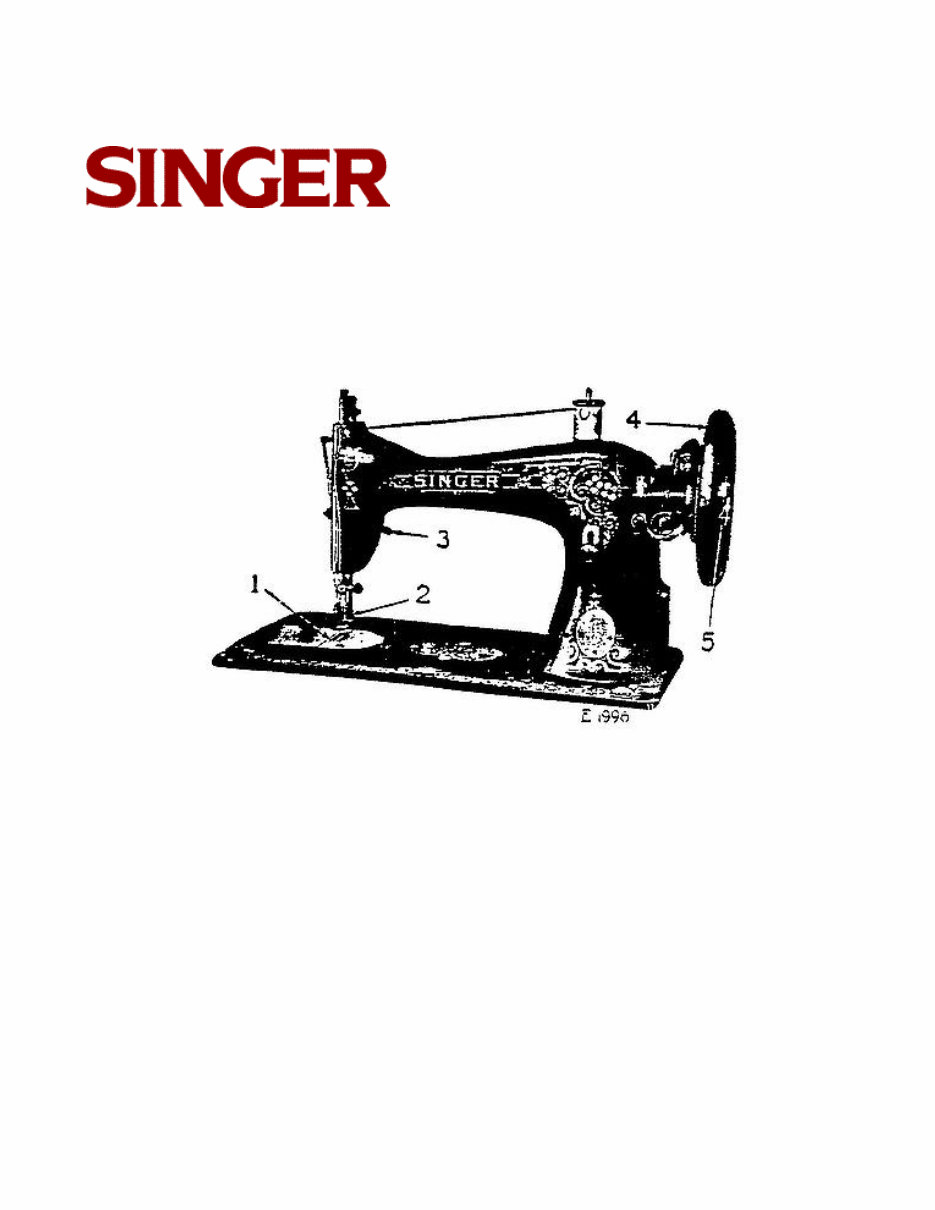
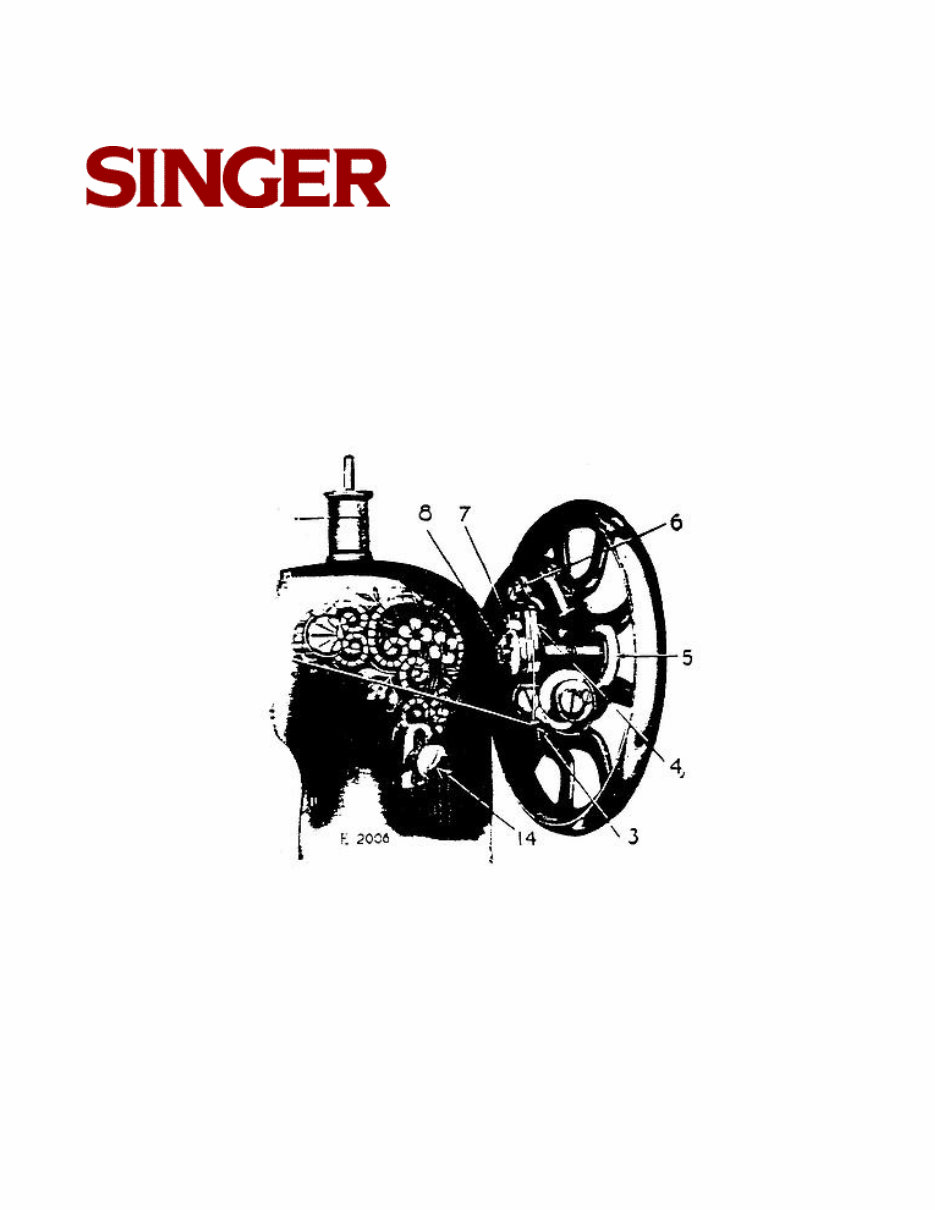
Previous Page | Next Page Sewing Machine No. 15 4 INSTRUCTIONS FOR OPERATING THE MACHINE Raise the presser foot (2, Fig 3) by means of the presser bar lifter (3, Fig. 3) to prevent injury to the foot (2, Fig. 3) and feed (1, Fig. 3). FIG. 3. FRONT VIEW OF THE MACHINE It is necessary to understand the stop motion (5, Fig, 3) by which the balance wheel (4, Fig. 3) can be released when required, thus enabling the operator to become proficient in the use of the treadle, and permitting the winding of bobbins without running the stitching mechanism. It also allows the operator to wind bobbins without removing partially sewn work and without unthreading the machine.
Table of Contents Previous Page | Next Page Sewing Machine No. 15 5 To release the balance wheel (4, Fig. 3, page 3) turn the stop motion screw (5, Fig. 3, page 3) over toward you. It will be necessary to hold the balance wheel while loosening the stop motion screw. After releasing the balance wheel, place your feet upon the treadle and with the right hand turn the balance wheel over toward you. This will start the band wheel, treadle and pitman, the sewing mechanism having been disconnected. Continue the motion thus begun by an alternate pressure of heel and toe, until a regular and easy movement is acquired, and the balance wheel kept continuous rotation by use of the feet alone. When you are thoroughly familiar with the treadle movement, and can restart the machine without turning the balance wheel in the wrong direction tighten the stop motion screw to connect the balance wheel with the stitching: mechanism. Place a piece of cloth under the presser foot, let the foot down upon it, and operate the machine in this way without being threaded, until you have become accustomed to guiding the material. To Ensure Perfect Action of the Machine The balance wheel must always turn over toward the operator. Do not run the machine with the presser foot resting on the feed without cloth under the presser foot. Do not run the machine when both bobbin case and needle are threaded unless there is material under the presser foot. Do not try to help the machine by pulling the fabric lest you bend the needle. The machine feeds the work without assistance. The slide over the bobbin case should be kept closed when the machine is in operation.
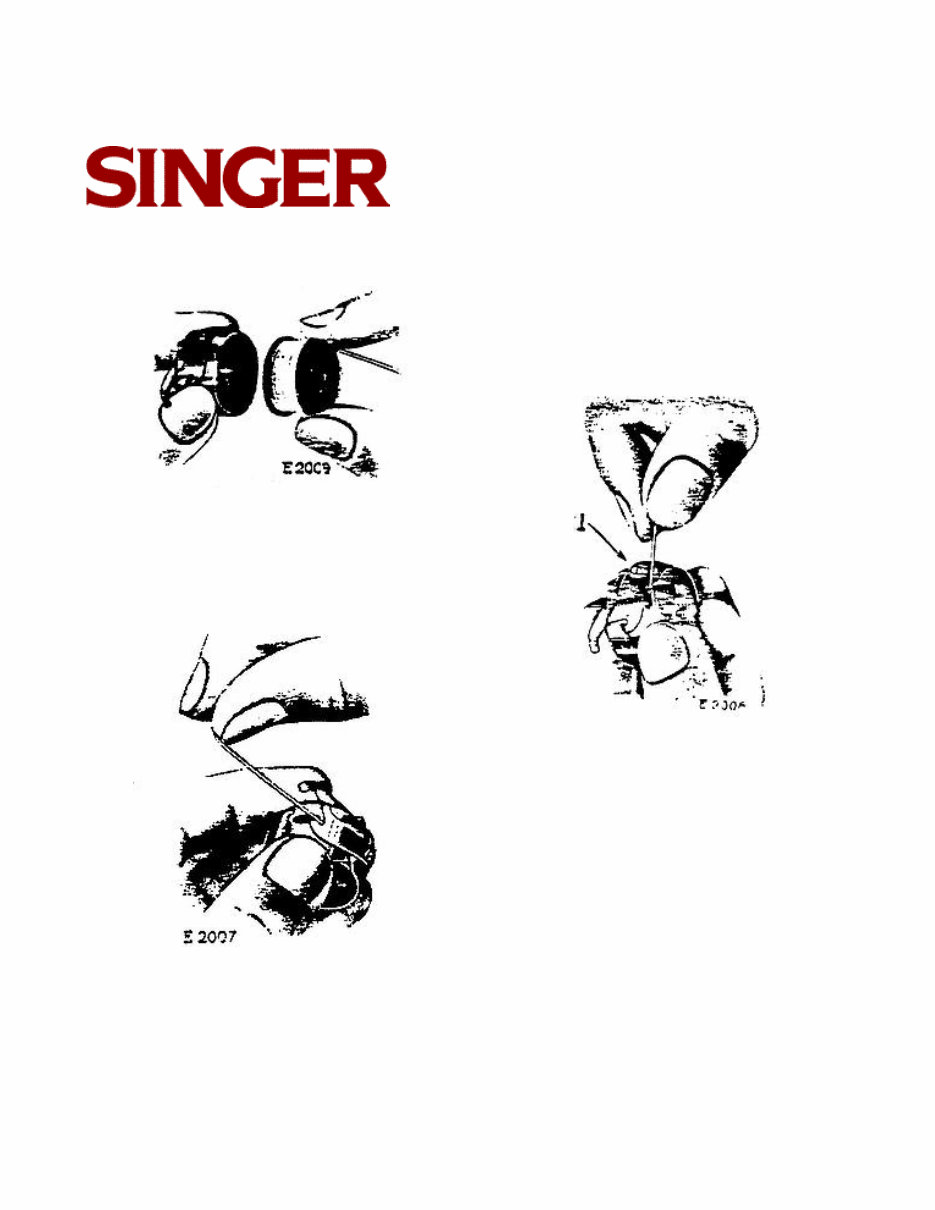
Table of Contents Previous Page | Next Page Sewing Machine No. 15 6 To Take Out the Bobbin Draw to the left the slide in the bed of the machine Reach down with the thumb and forefinger of the left hand, open the bobbin case latch (2, Fig. 4) and lift out the bobbin case. While the latch remains open, the bobbin is retained in the bobbin case. Release the latch, turn the open end of the bobbin case downward and the bobbin will drop out. FIG. 4. TAKING OUT THE BOBBIN CASE
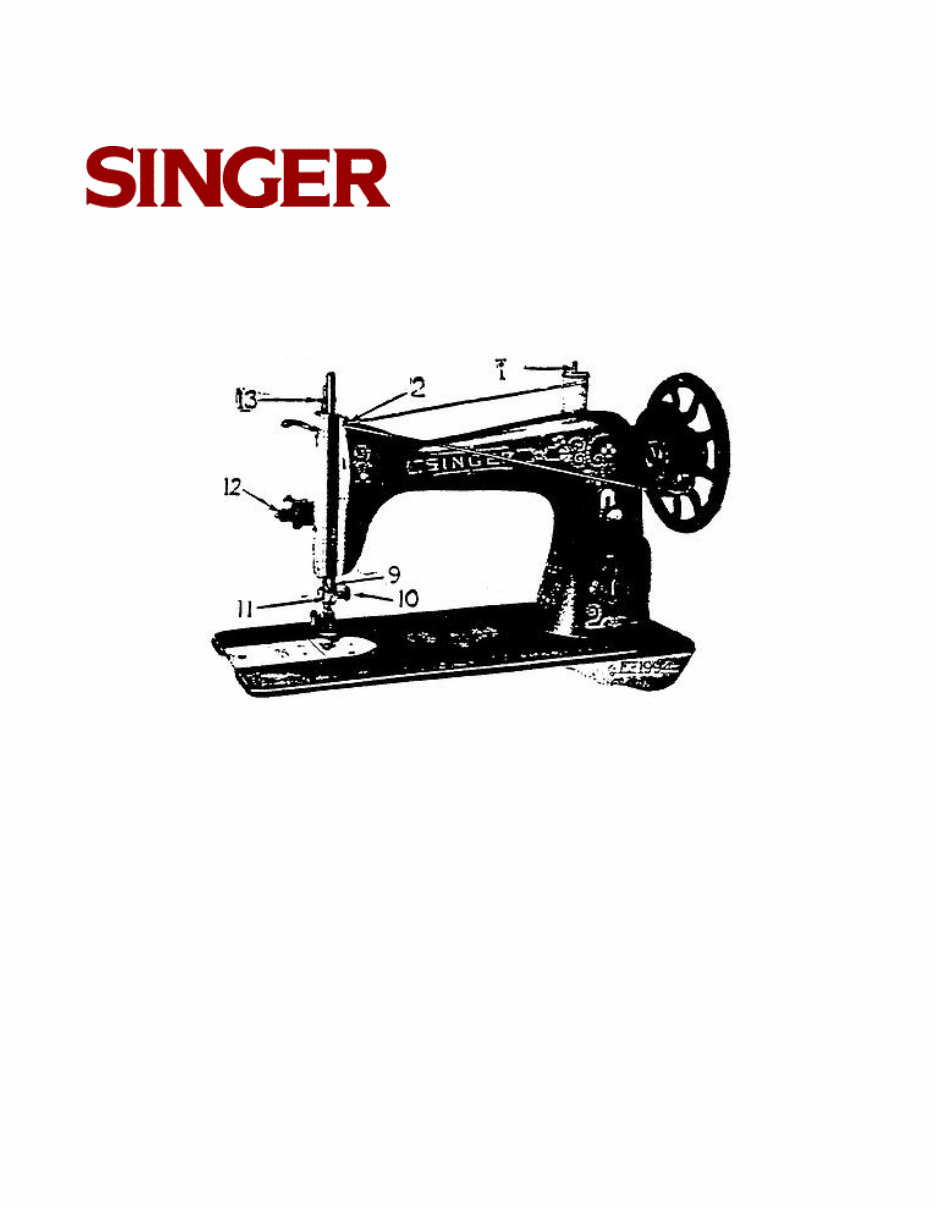
Table of Contents Previous Page | Next Page Sewing Machine No. 15 7 To Wind the Bobbin Release the balance wheel (4, Fig. 3) by turning the stop motion screw (5, Fig. 3) over toward you. FIG. 5. MACHINE THREADED FOR WINDING THE BOBBIN Place the bobbin on the bobbin winder spindle (8, Fig. 6) and push it up closely against the shoulder, having the small pin in the spindle enter the slot in the side of the bobbin. Put the spool of thread on the spool pin (1, Fig. 5). Pass the end of the thread into the thread guide (2, Fig. 5) at the left and near the top of the arm, then up into the lower eyelet (3, Fig. 6) of the bobbin winder thread guide, into the notch (4, Fig. 6) and pass the thread through the slot in the left side of the bobbin from the inside. Press the bobbin winder pulley (5, Fig. 6) down on the balance wheel hub, and the latch (7, Fig. 6) will drop down and hold it. Then operate the treadle the same as for sewing.
Table of Contents Previous Page | Next Page Sewing Machine No. 15 8 FIG. 6. WINDING THE BOBBIN The end of the thread must be held by the hand until a few coils are wound and should then be broken off. When sufficient thread has been wound upon the bobbin, the bobbin winder is automatically released from the balance wheel. If the pressure of the rubber ring (5, Fig. 6) against the hub of the balance wheel is insufficient for winding the bobbin, loosen the adjusting screw (6, Fig. 6) and press the bobbin winder lightly until the rubber ring is in contact with the hub of the balance wheel; then tighten the screw.
Table of Contents Previous Page | Next Page Sewing Machine No. 15 9 To Thread the Bobbin Case Hold the bobbin between the thumb and forefinger of the right hand, the thread leading on top from the left toward the right (see Fig. 7). With the left hand hold the bobbin case as shown in Fig. 7, the slot in the edge being at the top, and place the bobbin into it. Then pull the thread into the slot in the edge of the bobbin case (see Fig. 8), draw the thread down under the tension spring and into the delivery at the end of the tension spring (see Fig. 9). FIG. 7 FIG. 9 FIG. 8
Table of Contents Previous Page | Next Page Sewing Machine No. 15 10 To Replace the Bobbin Case After threading, take the bobbin case by the latch, holding it between the thumb and forefinger of the left hand. Place the bobbin case on the centre stud (1, Fig. 4) of the shuttle body with the position finger (1, Fig. 10) opposite the notch at the top of the shuttle race, release the latch and press the bobbin case back until the latch catches the groove near the end of the stud. Allow the thread to hang free and close the slide in the bed of the machine. FIG. 10. BOBBIN CASE THREADED AND REPLACED
Includes easy-to-read exploded views to ensure quick identification of parts, careful disassembly procedures, accurate adjustments, and proper repairs. This manual provides clear, step-by-step instructions to guide you through maintenance and troubleshooting.
All sections are neatly organized in Adobe Acrobat with high-resolution, scalable images. You’ll find tons of crystal clear illustrations, detailed specifications, and numerous pictures to assist you throughout the service process. Special tool information is also provided for precise and efficient repairs.
This digital format mirrors the quality of the original paper manual, allowing you to zoom, print, and save pages as needed without the burden of a bulky binder.