2011 Toyota CAMRY Submodel: LE | Engine Type: L4 | Liters: Fuel Delivery: FI | Fuel: GAS Last Modified: 2010-12-8 00:00:00 A From:201001 Model Year: 2011 Model: Camry Doc ID: RM000000TXU03QX Engine Family: 2AR-FE Body Type: VDS: BF3EK Title: 2AR-FE ENGINE MECHANICAL: DRIVE BELT: INSTALLATION (2011 Camry) INSTALLATION HINT: The high strength drive belt is used for the generator side drive belt. When replacing the drive belt, use Toyota genuine drive belt or equivalent high strength drive belt. If the high strength drive belt is not used, durability of the belt may become less than expected. The high strength drive belt is a belt with Aramid core which has higher strength compared to usually available belts with PET or PEN core. 1. INSTALL V-RIBBED BELT (for Compressor and Generator) (a) Set the V-ribbed belt onto each part as shown in the illustration except the water pump pulley. (b) Loosen the V-ribbed belt by turning the belt tensioner clockwise. (c) Set the V-ribbed belt onto the water pump pulley. NOTICE: Make sure that the belt is attached to each pulley. In particular, make sure that the belt is securely fitted into the grooves of the crankshaft pulley. 2. INSTALL V-RIBBED BELT (for Vane Pump) (a) Set the V-ribbed belt onto each part as shown in the illustration except the tensioner pulley. (b) Loosen the V-ribbed belt by turning the belt tensioner clockwise. (c) Set the V-ribbed belt onto the tensioner pulley. NOTICE: Make sure that the belt is attached to each pulley. In particular, make sure that the belt is securely fitted into the grooves of the crankshaft pulley. 3. INSTALL FRONT FENDER APRON SEAL RH 4. INSTALL ENGINE UNDER COVER RH 5. INSTALL FRONT WHEEL OPENING EXTENSION PAD RH 6. INSTALL FRONT WHEEL RH Torque: 103 N·m (1050 kgf·cm, 76 ft·lb)
2011 Toyota CAMRY Submodel: LE | Engine Type: L4 | Liters: Fuel Delivery: FI | Fuel: GAS Last Modified: 2010-12-8 00:00:00 G From:201001 Model Year: 2011 Model: Camry Doc ID: RM000003PK0009X Engine Family: 2AR-FE Body Type: VDS: BF3EK Title: 2AR-FE ENGINE MECHANICAL: DRIVE BELT: ON-VEHICLE INSPECTION (2011 Camry) ON-VEHICLE INSPECTION 1. INSPECT V-RIBBED BELT (a) Check the belt for wear, cracks or other signs of damage. If any of the following defects is found, replace the V-ribbed belt. The belt is cracked. The belt is worn out to the extent that the cords are exposed. The belt has chunks missing from the ribs. (b) Check that the belt fits properly in the ribbed grooves. HINT: Check with your hand to confirm that the belt has not slipped out of the groove on the bottom of the pulley. If it has slipped out, replace the V-ribbed belt. Install a new V-ribbed belt correctly. 2. INSPECT V-RIBBED BELT TENSIONER ASSEMBLY (a) Check that nothing gets caught in the tensioner by turning it clockwise and counterclockwise. If a malfunction exists, replace the V-ribbed belt tensioner.
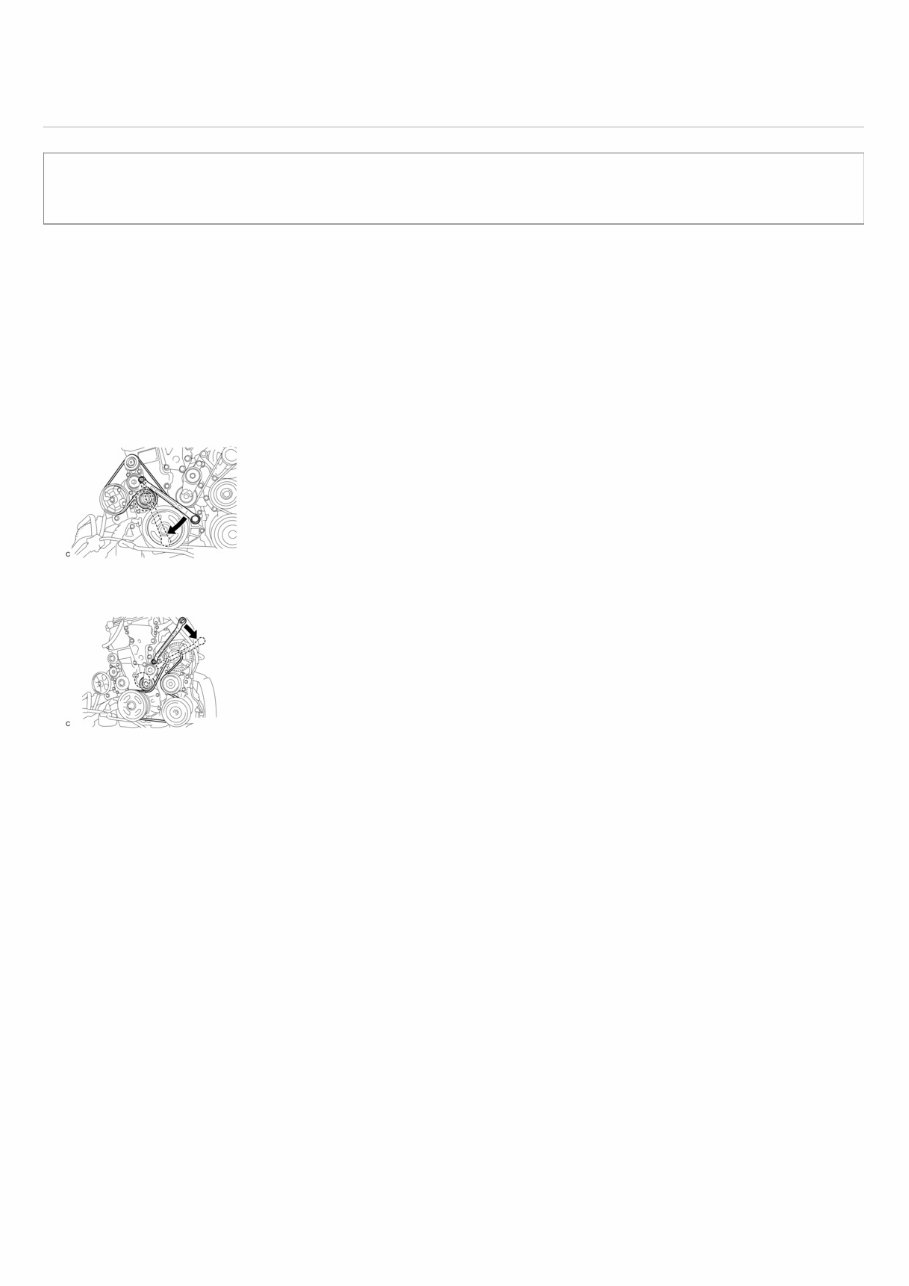
2011 Toyota CAMRY Submodel: LE | Engine Type: L4 | Liters: Fuel Delivery: FI | Fuel: GAS Last Modified: 2010-12-8 00:00:00 A From:201001 Model Year: 2011 Model: Camry Doc ID: RM000000TXV03SX Engine Family: 2AR-FE Body Type: VDS: BF3EK Title: 2AR-FE ENGINE MECHANICAL: DRIVE BELT: REMOVAL (2011 Camry) REMOVAL HINT: The high strength drive belt is used for the generator side drive belt. When replacing the drive belt, use Toyota genuine drive belt or equivalent high strength drive belt. If the high strength drive belt is not used, durability of the belt may become less than expected. The high strength drive belt is a belt with Aramid core which has higher strength compared to usually available belts with PET or PEN core. 1. REMOVE FRONT WHEEL RH 2. REMOVE FRONT WHEEL OPENING EXTENSION PAD RH 3. REMOVE ENGINE UNDER COVER RH 4. REMOVE FRONT FENDER APRON SEAL RH 5. REMOVE V-RIBBED BELT (for Vane Pump) (a) Attach a wrench to the hexagonal portion of the belt tensioner as shown in the illustration, rotate the belt tensioner clockwise, and remove the V-ribbed belt. 6. REMOVE V-RIBBED BELT (for Compressor and Generator) (a) Attach a wrench to the hexagonal portion of the belt tensioner as shown in the illustration, rotate the belt tensioner clockwise, and remove the V-ribbed belt.
2011 Toyota CAMRY Submodel: LE | Engine Type: L4 | Liters: Fuel Delivery: FI | Fuel: GAS Last Modified: 2010-12-8 00:00:00 A From:201001 Model Year: 2011 Model: Camry Doc ID: RM000000MNN017X Engine Family: 2AR-FE 2GR-FE Body Type: VDS: BF3EK BK3EK Title: EXTERIOR: FRONT DOOR BELT MOULDING: INSTALLATION (2011 Camry) INSTALLATION 1. INSTALL FRONT DOOR BELT MOULDING ASSEMBLY (a) Engage the 2 clips and 5 claws, and install the front door belt moulding assembly. 2. INSTALL OUTER REAR VIEW MIRROR ASSEMBLYClick here for more information. 3. INSTALL FRONT DOOR INNER GLASS WEATHERSTRIPClick here for more information. 4. INSTALL FRONT DOOR TRIM BOARD SUB-ASSEMBLYClick here for more information. 5. INSTALL COURTESY LIGHT ASSEMBLYClick here for more information. 6. INSTALL ASSIST GRIP COVERClick here for more information. 7. INSTALL FRONT DOOR INSIDE HANDLE BEZEL PLUGClick here for more information. 8. INSTALL FRONT DOOR LOWER FRAME BRACKET GARNISHClick here for more information.
2011 Toyota CAMRY Submodel: LE | Engine Type: L4 | Liters: Fuel Delivery: FI | Fuel: GAS Last Modified: 2010-12-8 00:00:00 A From:201001 Model Year: 2011 Model: Camry Doc ID: RM000000MNO017X Engine Family: 2AR-FE 2GR-FE Body Type: VDS: BF3EK BK3EK Title: EXTERIOR: FRONT DOOR BELT MOULDING: REMOVAL (2011 Camry) REMOVAL 1. REMOVE FRONT DOOR LOWER FRAME BRACKET GARNISHClick here for more information. 2. REMOVE FRONT DOOR INSIDE HANDLE BEZEL PLUGClick here for more information. 3. REMOVE ASSIST GRIP COVERClick here for more information. 4. REMOVE COURTESY LIGHT ASSEMBLYClick here for more information. 5. REMOVE FRONT DOOR TRIM BOARD SUB-ASSEMBLYClick here for more information. 6. REMOVE FRONT DOOR INNER GLASS WEATHERSTRIPClick here for more information. 7. REMOVE OUTER REAR VIEW MIRROR ASSEMBLYClick here for more information. 8. REMOVE FRONT DOOR BELT MOULDING ASSEMBLY (a) Fully open the front door glass. (b) Put protective tape around the front door belt moulding assembly. (c) Using a moulding remover, disengage the 2 clips and 5 claws, and remove the front door belt moulding assembly. HINT: Tape the remover tip before use. NOTICE: Be careful when removing the moulding as there are claws attached to the front and rear ends of the moulding.
You're Reading a Preview
What's Included?
Lifetime Access
Fast Download Speeds
Offline Viewing
Access Contents & Bookmarks
Full Search Facility
Print one or all pages of your manual
$39.99
Toyota 2.5L (2AR-FE) & 2.4L (2AZ-FXE) Engine Service & Repair Manual
Discover the 2.5L 2AR-FE & 2.4L 2AZ-FXE Engine Workshop Service Repair Manual, tailored for the 2.5L 4-cylinder 2AR-FE DOHC VVT engine and the 2.4L 2AZ-FXE hybrid engine. This manual is a valuable resource for both professional mechanics and DIY enthusiasts.
Contained within are detailed assembly instructions, guidance on engine belts, hoses, and pulleys, comprehensive engine control system details, cooling system insights, emission control information, exhaust system guidance, fuel and SFI system instructions, intake air system insights, lubrication system details, ignition system instructions, starting system guidance, and charging system insights.
Featuring detailed exploded views, step-by-step written procedures accompanied by pictures and diagrams, this manual is a trusted resource for engine repair. Whether you need repairs, maintenance, or servicing, this fully printable manual has you covered. You can select specific pages or print the entire manual as needed, providing comprehensive information and guidance.
For a reliable resource to assist in maintaining and repairing your 2.5L 2AR-FE & 2.4L 2AZ-FXE engines, this exceptional manual is the perfect choice to ensure your engines are in top-notch condition.
Reviews
Q&A
Recently Viewed
5,521,897Happy Clients
2,594,462eManuals
1,120,453Trusted Sellers
15Years in Business
Price:
Actual Price:
Toyota 2.5L (2AR-FE) & 2.4L (2AZ-FXE) Engine Service & Repair Manual