

1972-1990 Chevrolet Small-Block Engine Overhaul Manual
What's Included?
Fast Download Speeds
Offline Viewing
Access Contents & Bookmarks
Full Search Facility
Print one or all pages of your manual

Contents
Chapter 1 Introduction
How to use this repair manual 1-1
What is an overhaul? 1-1
Engine identification 1-2
Parts interchangeability 1-6
Buying parts 1-11
Chapter 2 Tools and equipment
A place to work 2-1
Tools and equipment 2-3
Fasteners 2-37
Component disassembly 2-41
Gasket sealing surfaces 2-41
Hose removal tips 2-42
Automotive chemicals and lubricants 2-42
Safety first! 2-43
Chapter 3 Diagnosing engine problems
General information 3-1
Reading symptoms 3-1
Measuring oil consumption 3-2
Diagnostic checks 3-2
Is the engine worth rebuilding? 3-11
Chapter 4 Preparing for an overhaul
Preparing to remove the engine 4-1
Removing the engine 4-2
Removing the external engine components 4-11
Chapter 5 Overhauling the cylinder heads
Removing the cylinder heads 5-1
Rebuilding the cylinder heads 5-3
Inspecting the valve springs 5-11
Assembling the heads 5-13
Installing the heads 5-14
Installing the valve train 5-16
Chapter 6 Overhauling the engine block
Disassembly 6-1
Cleaning and inspection 6-5
Machine shop procedures 6-17
Choosing piston rings and honing the cylinders 6-19
Reassembly 6-21
Chapter 7 Reassembling and installing the engine
Introduction 7-1
Replacing the front transmission seal 7-1
Assembling the engine 7-3
\r\staU\ngthe engine 7-14
Starting the engine 7-15
Breaking in the engine 7-16
Chapter 8 Related repairs
Carburetor overhaul 8-1
Distributor overhaul 8-3
Fuel pump overhaul 8-5
Starter overhaul 8-5
Generator overhaul 8-10
Alternator overhaul 8-10
Chapter 9 Improving performance and economy
Introduction 9-1
Camshaft selection 9-3
Exhaust modifications 9-8
Ignition systems 9-11
Intake manifolds 9-12
Carburetors 9-14
Making it all work together 9-18
Engine swaps 9-18
Glossary GL-1
Appendix
A Booster battery (jump) starting AP-1
B Conversion factors AP-2
C Electrical glossary AP-3
D Understanding wiring diagrams AP-12
Index iND-1
Introduction
How to use
this repair manual
The manual is divided into Chapters. Each Chapter is
sub-divided into Sections, some of which consist of con-
secutively numbered Paragraphs (usually referred to as
"Steps", since they're normally part of a procedure). If the
material is basically informative in nature, rather than a
step-by-step procedure, the Paragraphs aren't numbered.
The first three Chapters contain material on preparing
for an overhaul. The remaining Chapters cover the specifics
of the overhaul procedure.
Comprehensive Chapters covering tool selection and
usage, safety and general shop practices have been
included.
The term "see illustration" (in parentheses), is used in
the text to indicate that a photo or drawing has been
included to make the information easier to understand (the
old cliche "a picture is worth a thousand words" is espe-
cially true when it comes to how-to procedures). Also, every
attempt is made to position illustrations directly opposite
the corresponding text to minimize confusion. The two
types of illustrations used (photographs and line drawings)
are referenced by a number preceding the caption. Illustra-
tion numbers denote Chapter and numerical sequence
within the Chapter (i.e., 3.4 means Chapter 3, illustration
number four in order).
The terms "Note", "Caution", and "Warning" are used
throughout the text with a specific purpose in mind - to
attract the reader's attention. A "Note" simply provides
information required to properly complete a procedure or
information which will make the procedure easier to under-
stand. A "Caution" outlines a special procedure or special
steps which must be taken when completing the procedure
where the Caution is found. Failure to pay attention to a
Caution can result in damage to the component being
repaired or the tools being used. A "Warning" is included
where personal injury can result if the instructions aren't fol-
lowed exactly as described.
Even though extreme care has been taken during the
preparation of this manual, neither the publisher nor the
author can accept responsibility for any errors in, or omis-
sions from, the information given.
What is an overhaul?
An engine overhaul involves restoring the internal parts
to the specifications of a new engine. During an overhaul,
the piston rings are replaced and the cylinder walls are
reconditioned (rebored and/or honed). If a rebore is done,
new pistons are required. The main bearings, connecting
rod bearings and camshaft bearings are generally replaced
with new ones and, if necessary, the crankshaft may be
reground to restore the journals.
Generally, the valves are serviced as well, since they're
usually in less-than-perfect condition at this point. While the
engine is being overhauled, other components, such as the
distributor, starter and alternator, can be rebuilt as well. The
end result should be like a new engine that will give many
thousands of trouble-free miles. Note: Critical cooling sys-
tem components such as the hoses, drivebelts, thermostat
1-1
Haynes Chevrolet engine overhaul manual
1.1 Typical Chevrolet code number locations
and water pump MUST be replaced with new parts when an
engine is overhauled. The radiator should be checked care-
fully to ensure that it isn't clogged or leaking; if in doubt,
replace it with a new one. Also, always install a new oil
pump when overhauling the engine - we recommend
against rebuilt pumps.
It's not always easy to determine when, or if, an engine
should be completely overhauled, as a number of factors
must be considered.
High mileage is not necessarily an indication that an
overhaul is needed, while low mileage doesn't preclude the
need for an overhaul. Frequency of servicing is probably the
most important consideration. An engine that's had regular
and frequent oil and filter changes, as well as other required
maintenance, will most likely give many thousands of miles
of reliable service. Conversely, a neglected engine may
require an overhaul very early in its life.
Excessive oil consumption is an indication that piston
rings, valve seals and/or valve guides are in need of atten-
tion. Make sure that oil leaks aren't responsible before
deciding that the rings and/or guides are bad. Perform a
compression check (see Chapter 3) and have a leak-down
test performed by an experienced tune-up mechanic to
determine the extent of the work required.
If the engine is making obvious knocking or rumbling
noises, the connecting rod and/or main bearings may be at
fault. Check the oil pressure with a gauge installed in place
of the oil pressure sending unit or switch (see Chapter 3)
and compare it to the specifications for the particular
engine (see the Haynes Automotive Repair Manual for your
vehicle). If it's extremely low (generally, less than 10 psi at
idle), the bearings and/or oil pump are probably worn out.
Loss of power, rough running, excessive valvu train
noise and high fuel consumption rates may also point to the
need for an overhaul, especially if they're all present at the
same time. If a complete tune-up doesn't remedy the situa-
tion, major mechanical work is the only solution.
Before beginning the engine overhaul, read through
this entire manual to familiarize yourself with the scope and
requirements of the job. Overhauling an engine isn't partic-
1.2 Check for a casting number at the rear of the
block (arrow)
ularly difficult if you have the correct equipment; however, it
is time consuming. Plan on the vehicle being tied up for a
minimum of two weeks, especially if parts must be taken to
an automotive machine shop for repair or reconditioning.
Check on availability of parts and make sure that any nec-
essary special tools and equipment are obtained in
advance. Most work can be done with typical hand tools,
although a number of precision measuring tools are
required for inspecting parts to determine if they must be
replaced. Often an automotive machine shop will handle
the inspection of parts and offer advice concerning recon-
ditioning and replacement.
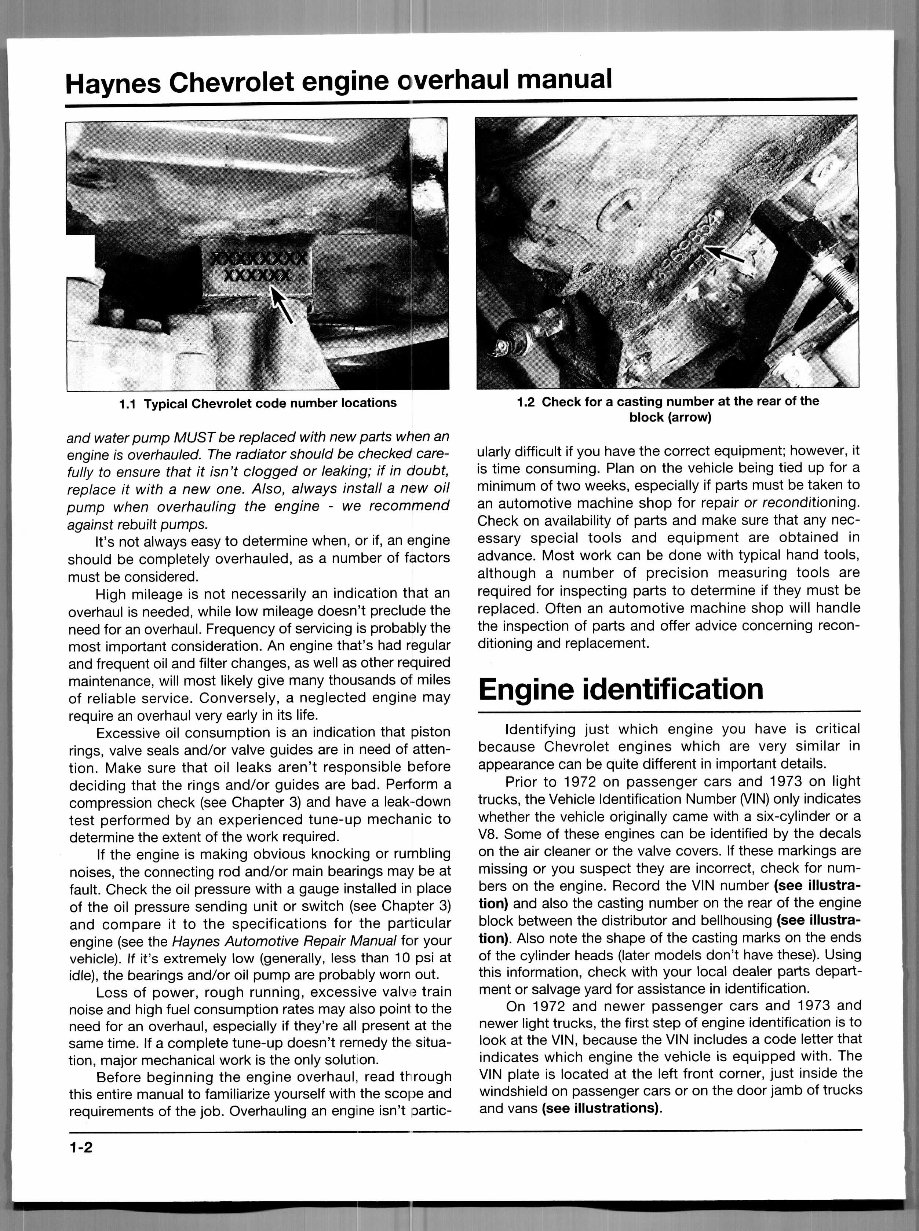
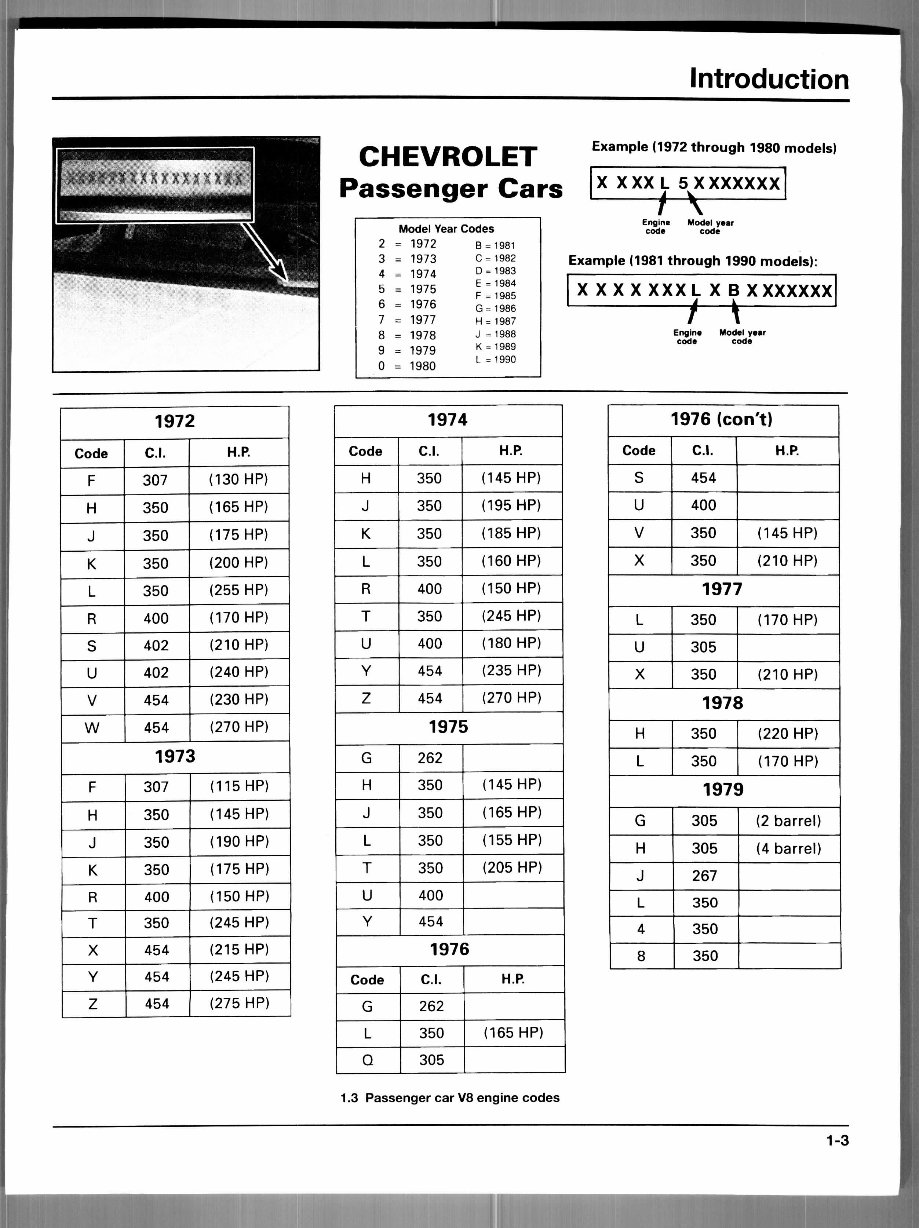
Engine identification
Identifying just which engine you have is critical
because Chevrolet engines which are very similar in
appearance can be quite different in important details.
Prior to 1972 on passenger cars and 1973 on light
trucks, the Vehicle Identification Number (VIM) only indicates
whether the vehicle originally came with a six-cylinder or a
V8. Some of these engines can be identified by the decals
on the air cleaner or the valve covers. If these markings are
missing or you suspect they are incorrect, check for num-
bers on the engine. Record the VIN number (see illustra-
tion) and also the casting number on the rear of the engine
block between the distributor and bellhousing (see illustra-
tion). Also note the shape of the casting marks on the ends
of the cylinder heads (later models don't have these). Using
this information, check with your local dealer parts depart-
ment or salvage yard for assistance in identification.
On 1972 and newer passenger cars and 1973 and
newer light trucks, the first step of engine identification is to
look at the VIN, because the VIN includes a code letter that
indicates which engine the vehicle is equipped with. The
VIN plate is located at the left front corner, just inside the
windshield on passenger cars or on the door jamb of trucks
and vans (see illustrations).
1-2
Introduction
CHEVROLET
Passenger Cars
Example (1972 through 1980 models)
Model Year Codes
2 = 1972
3 = 1973
4 = 1974
5 = 1975
6 = 1976
7 = 1977
8 = 1978
9 = 1979
0 = 1980
B =1981
C = 1982
D = 1983
E = 1984
F =1985
G = 1986
H = 1987
J =1988
K = 1989
L =1990
X X XX L S^X XXXXXX
Engine Model year
code code
Example (1981 through 1990 models):
X XXX XXX L X BX XXXXXX
Engine Model year
code code
1972
Code
F
H
J
K
L
R
S
U
V
\N
C.I.
307
350
350
350
350
400
402
402
454
454
H.P.
(130 HP)
(165 HP)
(175 HP)
(200 HP)
(255 HP)
(170 HP)
(210 HP)
(240 HP)
(230 HP)
(270 HP)
1973
F
H
J
K
R
T
X
Y
Z
307
350
350
350
400
350
454
454
454
(115HP)
(145 HP)
(190 HP)
(175 HP)
(150 HP)
(245 HP)
(215 HP)
(245 HP)
(275 HP)
1974
Code
H
J
K
L
R
T
U
Y
Z
C.I.
350
350
350
350
400
350
400
454
454
H.P.
(145 HP)
(195 HP)
(185 HP)
(160 HP)
(150 HP)
(245 HP)
(180 HP)
(235 HP)
(270 HP)
1975
G
H
J
L
T
U
Y
262
350
350
350
350
400
454
(145 HP)
(165 HP)
(155 HP)
(205 HP)
1976
Code
G
L
Q
C.I.
262
350
305
H.P.
(165 HP)
1976 (con't)
Code
S
U
V
X
C.I.
454
400
350
350
H.P.
(145 HP)
(210 HP)
1977
L
U
X
350
305
350
(170 HP)
(210 HP)
1978
H
L
350
350
(220 HP)
(170 HP)
1979
G
H
J
L
4
8
305
305
267
350
350
350
(2 barrel)
(4 barrel)
1.3 Passenger car V8 engine codes
1-3
Haynes Chevrolet engine overhaul manual
1980
Code
H
J
L
6
8
C.I.
305
267
350
350
350
H.P.
1981
H
J
L
6
305
267
350
350
1982
H
J
7
8
305
267
305
350
(fuel
injection)
(fuel
injection)
Code
H
S
6
7
8
G
H
6
8
F
G
H
6
8
198:
C.I.
305
305
350
305
350
198'
305
305
350 _
350**
1985 - '
305
305
305
350
350
}
H.P.
(police)
1
[
(fuel
injection)
1986
(fuel
injection)
(police)
(fuel
injection)
1987 - 1988
Code
E
F
G
H
Y
8
C.I.
305
305
305
305
305
350
H.P.
(fuel
injection)
(TPI)
(4 barrel)
(4 barrel)
(4 barrel)
(TPI)
1989 - 1990
E
F8
Y
8
305
305
305
350
(fuel
injection)
(fuel
injection)
(fuel
injection)
1.3 Passenger car V8 engine codes (continued)
CHEVROLET & CMC Light trucks
Model Year Codes
4 = 1974
5 = 1975
6 = 1976
7 = 1977
8=1978
9=1979
0=1980
B = 1981
C = 1982
D = 1983
E = 1984
F = 1985
G = 1986
H = 1987
J =1988
K = 1989
L = 1990
Example (1974 through 1980models):
XX VXX5XXXXXXX
1—t-
Engine Model year
code cod*
Example (1981 through 1990 models):
X X X X XXX L X F XXXXXXX
Engln* Model year
code code
1-4
1.4 Light truck V8 engine codes
Introduction
1973
Code
X
Y
Z
C.I.
307
350
454
H.P.
(130 HP)
(155 HP)
(240 HP)
1974
L
U
V
W
Y
Z
454
350
350
350
350
454
(245 HP)
(export)
(2 barrel)
(LPgas)
(160 HP)
(230 HP)
1975
L
M
U
V
Y
Z
454
400
350
350
350
454
(245 HP)
(export)
(2 barrel)
(4 barrel)
(230 HP)
1976
L
S
U
V
Y
350
454
400
350
454
1977
L
R
S
U
Y
350
400
454
305
454
1978
Code
L
R
S
U
Y
C.I.
350
400
454
305
454
H.P.
1979
L
M
R
S
U
350
350
400
454
305
1980
G
L
M
P
R
S
W
X
305
350
350
350
400
454
454
400
1981
F
G
H
J
L
M
P
W
305
305
305
267
350
350
350
454
1982-1984
Code
F
H
L
M
P
W
C.I.
305
305
350
350
350
454
H.P.
1985-1986
F
H
K
L
M
N
W
305
305
350
350
350
262
454
1987
H
K
M
N
W
305
350
350
454
454
(TBI)
(TBI)
(4 barrel)
(TBI)
(4 barrel)
1988
H
K
N
305
350
454
(fuel
injection)
(fuel
injection)
(fuel
injection)
1989- 1990
H
K
M
N
W
305
350
350
454
454
(fuel
injection)
(fuel
injection)
(fuel
injection)
1.4 Light truck V8 engine codes (continued)
1-5
Haynes Chevrolet engine overhaul manual
Parts interchangeability
A lot of time and money can be saved if you know
which parts are interchangeable between your engine and
those available on the used market and in wrecking yards.
There is considerable interchangeability within the
Chevrolet small block and big block families. However, few
parts from one family are usable in the other; about the only
notable exception is the distributor.
Due to the vast number of Chevrolet V8 engines pro-
duced since 1955 in many versions, a complete and com-
prehensive guide would require several volumes the size of
this book. Most wrecking yards have interchange manuals
that provide a wealth of information for parts swapping. The
following information provides a basic overview, and does
not cover every possible combination of parts.
We will treat the small block and big block engines sep-
arately; refer to the appropriate Sections based on the
engine family you are working on.
Small block V8s
Small block Chevrolet engines were produced in the
largest numbers of any automotive powerplant in history.
Beginning with 1955 models through the present, they have
been built in 262, 265, 267, 283, 302, 305, 307, 327, 350
and 400 cubic inch versions.
The different displacements are obtained by combining
several bores and strokes in various combinations:
Bore (inches)
3.671
3.750
3.500
3.875
4.001
3.736
3.876
4.001
4.001
4.126
Stroke (inches)
3.10
3.00
3.48
3.00
3.00
3.48
3.25
3.25
3.48
3.75
Displacement
(cubic inches)
262
265
267
283
302
305
307
327
350
400
Displacement table
Camshafts
Camshaft specifications vary considerably among dif-
ferent model years and horsepower versions. The camshaft
specifications should closely match the rest of the engine
to assure the best performance, driveability, economy and
lowest emissions.
Except for 1987 and newer models with roller lifters,
camshafts are interchangeable from one year or model to
the other, since the journals have the same diameter and
spacing. Note: On 7955 and some 1956 265 engines, the
rear journal of the camshaft must be notched to assure an
oil supply to the valve gear.
Chevrolet factory camshafts are available: for hydraulic,
solid and even roller lifters (on 1987 and later models) Fac-
tory roller cams and lifters can only be installed in 1987 and
newer blocks that were designed for them. Camshafts and
non-roller lifters should always be replaced togethe1 as a
set.
It is often difficult to determine which camshaft is
installed in a particular used engine before it is taken apart.
Even after the camshaft is removed, casting numbers are
unreliable for identifying specific grinds. Although used
camshafts can be installed in another engine if the lifters are
reinstalled on the same lobes, we recommend new
camshafts and lifters when replacement is necessary.
Cylinder heads
Except for a few aluminum heads found on racing
Corvettes around 1961, virtually all factory made small
block heads are made from cast iron.
Cylinder heads are available in a wide variety of valve
sizes, combustion chamber volume, spark plug type and
port size.
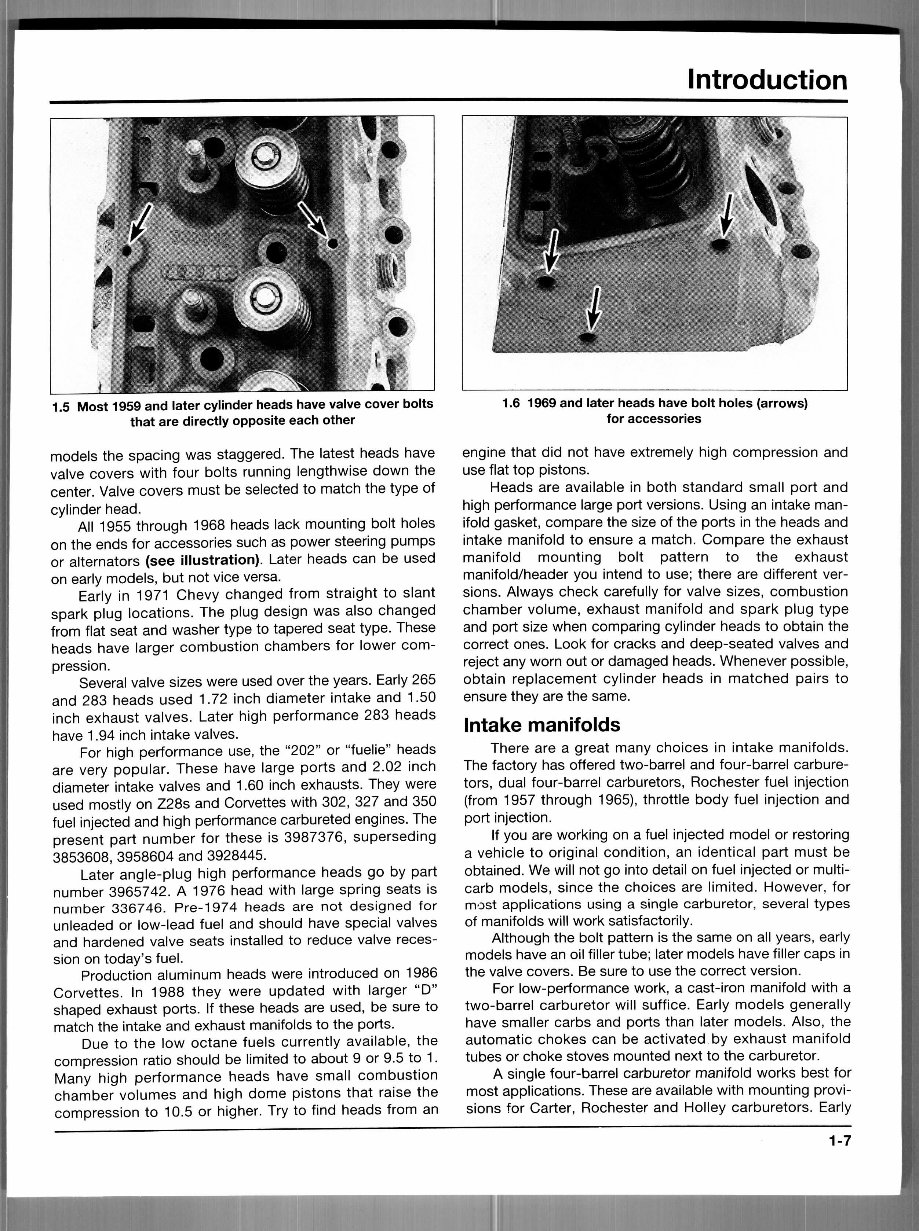
Pre-1959 heads can be identified by the spacing of the
valve cover bolts. On 1959 and later heads, the bolt holes
are directly opposite each other (see illustration); on early
1-6
Introduction
1.5 Most 1959 and later cylinder heads have valve cover bolts
that are directly opposite each other
models the spacing was staggered. The latest heads have
valve covers with four bolts running lengthwise down the
center. Valve covers must be selected to match the type of
cylinder head.
All 1955 through 1968 heads lack mounting bolt holes
on the ends for accessories such as power steering pumps
or alternators (see illustration). Later heads can be used
on early models, but not vice versa.
Early in 1971 Chevy changed from straight to slant
spark plug locations. The plug design was also changed
from flat seat and washer type to tapered seat type. These
heads have larger combustion chambers for lower com-
pression.
Several valve sizes were used over the years. Early 265
and 283 heads used 1.72 inch diameter intake and 1.50
inch exhaust valves. Later high performance 283 heads
have 1.94 inch intake valves.
For high performance use, the "202" or "fuelie" heads
are very popular. These have large ports and 2.02 inch
diameter intake valves and 1.60 inch exhausts. They were
used mostly on Z28s and Corvettes with 302, 327 and 350
fuel injected and high performance carbureted engines. The
present part number for these is 3987376, superseding
3853608, 3958604 and 3928445.
Later angle-plug high performance heads go by part
number 3965742. A 1976 head with large spring seats is
number 336746. Pre-1974 heads are not designed for
unleaded or low-lead fuel and should have special valves
and hardened valve seats installed to reduce valve reces-
sion on today's fuel.
Production aluminum heads were introduced on 1986
Corvettes. In 1988 they were updated with larger "D"
shaped exhaust ports. If these heads are used, be sure to
match the intake and exhaust manifolds to the ports.
Due to the low octane fuels currently available, the
compression ratio should be limited to about 9 or 9.5 to 1.
Many high performance heads have small combustion
chamber volumes and high dome pistons that raise the
compression to 10.5 or higher. Try to find heads from an
1.6 1969 and later heads have bolt holes (arrows)
for accessories
engine that did not have extremely high compression and
use flat top pistons.
Heads are available in both standard small port and
high performance large port versions. Using an intake man-
ifold gasket, compare the size of the ports in the heads and
intake manifold to ensure a match. Compare the exhaust
manifold mounting bolt pattern to the exhaust
manifold/header you intend to use; there are different ver-
sions. Always check carefully for valve sizes, combustion
chamber volume, exhaust manifold and spark plug type
and port size when comparing cylinder heads to obtain the
correct ones. Look for cracks and deep-seated valves and
reject any worn out or damaged heads. Whenever possible,
obtain replacement cylinder heads in matched pairs to
ensure they are the same.
Intake manifolds
There are a great many choices in intake manifolds.
The factory has offered two-barrel and four-barrel carbure-
tors, dual four-barrel carburetors, Rochester fuel injection
(from 1957 through 1965), throttle body fuel injection and
port injection.
If you are working on a fuel injected model or restoring
a vehicle to original condition, an identical part must be
obtained. We will not go into detail on fuel injected or multi-
carb models, since the choices are limited. However, for
most applications using a single carburetor, several types
of manifolds will work satisfactorily.
Although the bolt pattern is the same on all years, early
models have an oil filler tube; later models have filler caps in
the valve covers. Be sure to use the correct version.
For low-performance work, a cast-iron manifold with a
two-barrel carburetor will suffice. Early models generally
have smaller carbs and ports than later models. Also, the
automatic chokes can be activated by exhaust manifold
tubes or choke stoves mounted next to the carburetor.
A single four-barrel carburetor manifold works best for
most applications. These are available with mounting provi-
sions for Carter, Rochester and Holley carburetors. Early
1-7
Haynes Chevrolet engine overhaul manual
1.7 If you're swapping manifolds, make sure there are
provisions for all your vacuum fittings (arrow)
models and/or lower horsepower engines can use manifold
part number 3888886 with a small Carter or Holley four-bar-
rel. From 1966 on, most four-barrel models used Rochester
Quadrajets on a manifold with part number 3987361.
Relatively few aluminum four-barrel manifolds were
installed at the factory. Exchanging a cast-iron manifold for
an aluminum one is an easy way to shave weight off the
front end of a vehicle.
For high-performance street use, the factory aluminum
high-rise is hard to beat. It mounts a square-flange Holley
four-barrel or Carter AFB and goes under part number
3958627 superseded to 3972114.
Always compare the port sizes of the heads and mani-
folds by holding a gasket up to both openings. For optimum
performance, the sizes must match. Larger ports favor high
rpm and larger displacements. Small ports tend to improve
low rpm torque and driveability.
On 1973 and later models, look for Exhaust Gas Recir-
culation (EGR) valve provisions. Always compare the old
and new manifolds to determine if sufficient vacuum fittings
are present (see illustration).
Exhaust manifolds
The choice of exhaust manifolds is limited to a few
basic designs; none of these are exceptional from a perfor-
mance standpoint. Many enthusiasts convert to tubular
headers if they are looking for more performance.
Generally, the "ram's horn" shape manifolds used on
early Corvettes and high-performance passenger cars pro-
duce more power than the log shape designs. However,
clearance between body and frame determines which
exhaust manifolds can be used in a given situation.
There are several types of exhaust outlet flanges from 2
to 2 1/2 inches in diameter, using both two and three studs.
Heat risers or EFE valves, if used, must fit the manifold cor-
rectly. Also, accessory mounts and the length and angle of
exhaust outlet must match the engine and vehicle. Be sure
to check the number of cylinder head-to-manifold mounting
bolt holes; these vary on different models.
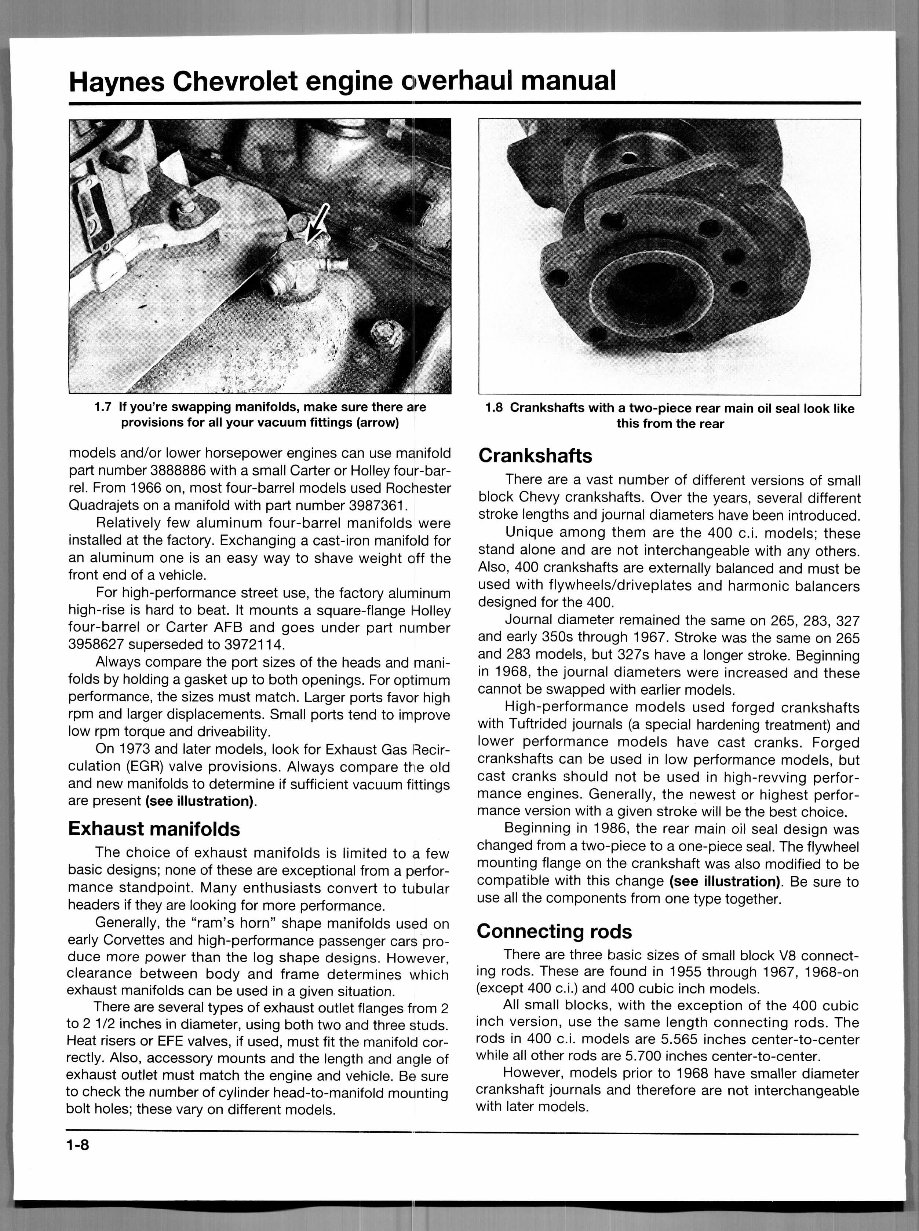
1.8 Crankshafts with a two-piece rear main oil seal look like
this from the rear
Crankshafts
There are a vast number of different versions of small
block Chevy crankshafts. Over the years, several different
stroke lengths and journal diameters have been introduced.
Unique among them are the 400 c.i. models; these
stand alone and are not interchangeable with any others.
Also, 400 crankshafts are externally balanced and must be
used with flywheels/driveplates and harmonic balancers
designed for the 400.
Journal diameter remained the same on 265, 283, 327
and early 350s through 1967. Stroke was the same on 265
and 283 models, but 327s have a longer stroke. Beginning
in 1968, the journal diameters were increased and these
cannot be swapped with earlier models.
High-performance models used forged crankshafts
with Tuftrided journals (a special hardening treatment) and
lower performance models have cast cranks. Forged
crankshafts can be used in low performance models, but
cast cranks should not be used in high-revving perfor-
mance engines. Generally, the newest or highest perfor-
mance version with a given stroke will be the best choice.
Beginning in 1986, the rear main oil seal design was
changed from a two-piece to a one-piece seal. The flywheel
mounting flange on the crankshaft was also modified to be
compatible with this change (see illustration). Be sure to
use all the components from one type together.
Connecting rods
There are three basic sizes of small block V8 connect-
ing rods. These are found in 1955 through 1967, 1968-on
(except 400 c.i.) and 400 cubic inch models.
All small blocks, with the exception of the 400 cubic
inch version, use the same length connecting rods. The
rods in 400 c.i. models are 5.565 inches center-to-center
while all other rods are 5.700 inches center-to-center.
However, models prior to 1968 have smaller diameter
crankshaft journals and therefore are not interchangeable
with later models.
1-8
You're Reading a Preview
What's Included?
Fast Download Speeds
Offline Viewing
Access Contents & Bookmarks
Full Search Facility
Print one or all pages of your manual
$33.99
Viewed 27 Times Today


Secure transaction
What's Included?
Fast Download Speeds
Offline Viewing
Access Contents & Bookmarks
Full Search Facility
Print one or all pages of your manual
$33.99
Get your hands on the 1972-1990 Chevrolet V8 Engine Overhaul Manual. This manual covers a range of engines including the 262, 267, 305, 307, 350, 400, 402, and 454. Whether you're a professional mechanic or a DIY enthusiast, this manual is an invaluable resource for all your repair needs.


