Caterpillar (CAT) 3406E/3456 Engines OEM Service & Repair Manual
What's Included?
Lifetime Access
Fast Download Speeds
Offline Viewing
Access Contents & Bookmarks
Full Search Facility
Print one or all pages of your manual
RENR1364-06 May 2008 Disassembly and Assembly 3406E and 3456 Engines for Caterpillar Built Machines 7RC1-Up (Engine) BLC1-Up (Engine) BKN1-Up (Engine) 9AP1-Up (Engine) BET1-Up (Engine) BNT1-Up (Engine) SAFETY.CAT.COM
i01658146 Important Safety Information Most accidents that involve product operation, maintenance and repair are caused by failure to observe basic safety rules or precautions. An accident can often be avoided by recognizing potentially hazardous situations before an accident occurs. A person must be alert to potential hazards. This person should also have the necessary training, skills and tools to perform these functions properly. Improper operation, lubrication, maintenance or repair of this product can be dangerous and could result in injury or death. Do not operate or perform any lubrication, maintenance or repair on this product, until you have read and understood the operation, lubrication, maintenance and repair information. Safety precautions and warnings are provided in this manual and on the product. If these hazard warnings are not heeded, bodily injury or death could occur to you or to other persons. The hazards are identified by the “Safety Alert Symbol” and followed by a “Signal Word” such as “DANGER”, “WARNING” or “CAUTION”. The Safety Alert “WARNING” label is shown below. The meaning of this safety alert symbol is as follows: Attention! Become Alert! Your Safety is Involved. The message that appears under the warning explains the hazard and can be either written or pictorially presented. Operations that may cause product damage are identified by “NOTICE” labels on the product and in this publication. Caterpillar cannot anticipate every possible circumstance that might involve a potential hazard. The warnings in this publication and on the product are, therefore, not all inclusive. If a tool, procedure, work method or operating technique that is not specifically recommended by Caterpillar is used, you must satisfy yourself that it is safe for you and for others. You should also ensure that the product will not be damaged or be made unsafe by the operation, lubrication, maintenance or repair procedures that you choose. The information, specifications, and illustrations in this publication are on the basis of information that was available at the time that the publication was written. The specifications, torques, pressures, measurements, adjustments, illustrations, and other items can change at any time. These changes can affect the service that is given to the product. Obtain the complete and most current information before you start any job. Caterpillar dealers have the most current information available. When replacement parts are required for this product Caterpillar recommends using Caterpil- lar replacement parts or parts with equivalent specifications including, but not limited to, phys- ical dimensions, type, strength and material. Failure to heed this warning can lead to prema- ture failures, product damage, personal injury or death.
RENR1364-06 3 Table of Contents Table of Contents Disassembly and Assembly Section Fuel Priming Pump - Remove and Install .............. 4 Fuel Filter Base - Remove and Install .................... 4 Fuel Transfer Pump - Remove ................................ 5 Fuel Transfer Pump - Install .................................... 6 Electronic Unit Injector - Remove ........................... 6 Electronic Unit Injector - Install ............................... 8 Electronic Unit Injector Sleeve - Remove ............. 10 Electronic Unit Injector Sleeve - Install ................. 10 Turbocharger - Remove ......................................... 11 Turbocharger - Disassemble ................................ 12 Turbocharger - Assemble .................................... 13 Turbocharger - Install ............................................ 13 Exhaust Manifold - Remove and Install ............... 14 Inlet and Exhaust Valve Springs - Remove and Install ................................................................... 16 Inlet and Exhaust Valves - Remove and Install .... 18 Inlet and Exhaust Valve Guides - Remove and Install ................................................................... 19 Inlet and Exhaust Valve Seat Inserts - Remove and Install ................................................................... 20 Engine Oil Filter Base - Remove .......................... 21 Engine Oil Filter Base - Disassemble ................... 22 Engine Oil Filter Base - Assemble ........................ 24 Engine Oil Filter Base - Install .............................. 24 Engine Oil Cooler - Remove ................................. 25 Engine Oil Cooler - Disassemble ......................... 26 Engine Oil Cooler - Assemble .............................. 27 Engine Oil Cooler - Install ..................................... 27 Engine Oil Pump - Remove .................................. 28 Engine Oil Pump - Disassemble ........................... 29 Engine Oil Pump - Assemble ................................ 30 Engine Oil Pump - Install ...................................... 31 Water Pump - Remove ......................................... 31 Water Pump - Disassemble ................................. 33 Water Pump - Disassemble ................................. 34 Water Pump - Assemble ...................................... 35 Water Pump - Assemble ...................................... 36 Water Pump - Install ............................................. 38 Water Temperature Regulator - Remove and Install ............................................................................. 40 Flywheel - Remove ............................................... 45 Flywheel - Install ................................................... 45 Crankshaft Rear Seal - Remove ........................... 46 Crankshaft Rear Seal - Install ............................... 47 Flywheel Housing - Remove and Install .............. 48 Vibration Damper and Pulley - Remove and Install ............................................................................. 49 Crankshaft Front Seal - Remove .......................... 50 Crankshaft Front Seal - Install .............................. 51 Front Cover - Remove .......................................... 52 Front Cover - Install .............................................. 52 Gear Group (Front) - Remove .............................. 53 Gear Group (Front) - Install .................................. 56 Housing (Front) - Remove .................................... 58 Housing (Front) - Install ........................................ 60 Valve Mechanism Cover - Remove and Install ..... 62 Valve Mechanism Cover Base - Remove and Install ................................................................... 62 Compression Brake - Remove (If Equipped) ........ 64 Compression Brake - Disassemble (If Equipped) .. 64 Compression Brake - Assemble (If Equipped) ...... 67 Compression Brake - Install (If Equipped) ............ 68 Rocker Arm and Shaft - Remove .......................... 69 Rocker Arm - Disassemble ................................... 70 Rocker Arm - Assemble ........................................ 71 Rocker Arm and Shaft - Install .............................. 71 Cylinder Head - Remove ...................................... 72 Cylinder Head - Install .......................................... 75 Camshaft - Remove .............................................. 78 Camshaft - Install .................................................. 82 Camshaft Gear - Remove and Install .................. 86 Camshaft Bearings - Remove ............................... 88 Camshaft Bearings - Install ................................... 89 Engine Oil Pan - Remove and Install ................... 91 Cylinder Liner - Remove ....................................... 92 Cylinder Liner - Install ........................................... 93 Piston Cooling Jets - Remove and Install ............. 93 Pistons and Connecting Rods - Remove .............. 94 Pistons and Connecting Rods - Disassemble ....... 95 Pistons and Connecting Rods - Assemble ........... 97 Pistons and Connecting Rods - Install .................. 99 Connecting Rod Bearings - Remove .................. 100 Connecting Rod Bearings - Install ...................... 101 Crankshaft Main Bearings - Remove .................. 102 Crankshaft Main Bearings - Install ...................... 103 Crankshaft - Remove .......................................... 104 Crankshaft - Install .............................................. 105 Bearing Clearance - Check ................................. 106 Coolant Temperature Sensor - Remove and Install ................................................................. 107 Engine Oil Pressure Sensor - Remove and Install ........................................................................... 108 Speed/Timing Sensor - Remove and Install ...... 109 Fan Drive - Remove ............................................ 110 Fan Drive - Disassemble .................................... 110 Fan Drive - Assemble ......................................... 111 Fan Drive - Install ................................................ 111 Electronic Control Module - Remove and Install .. 112 Electric Starting Motor - Remove and Install ...... 113 Index Section Index .................................................................... 114
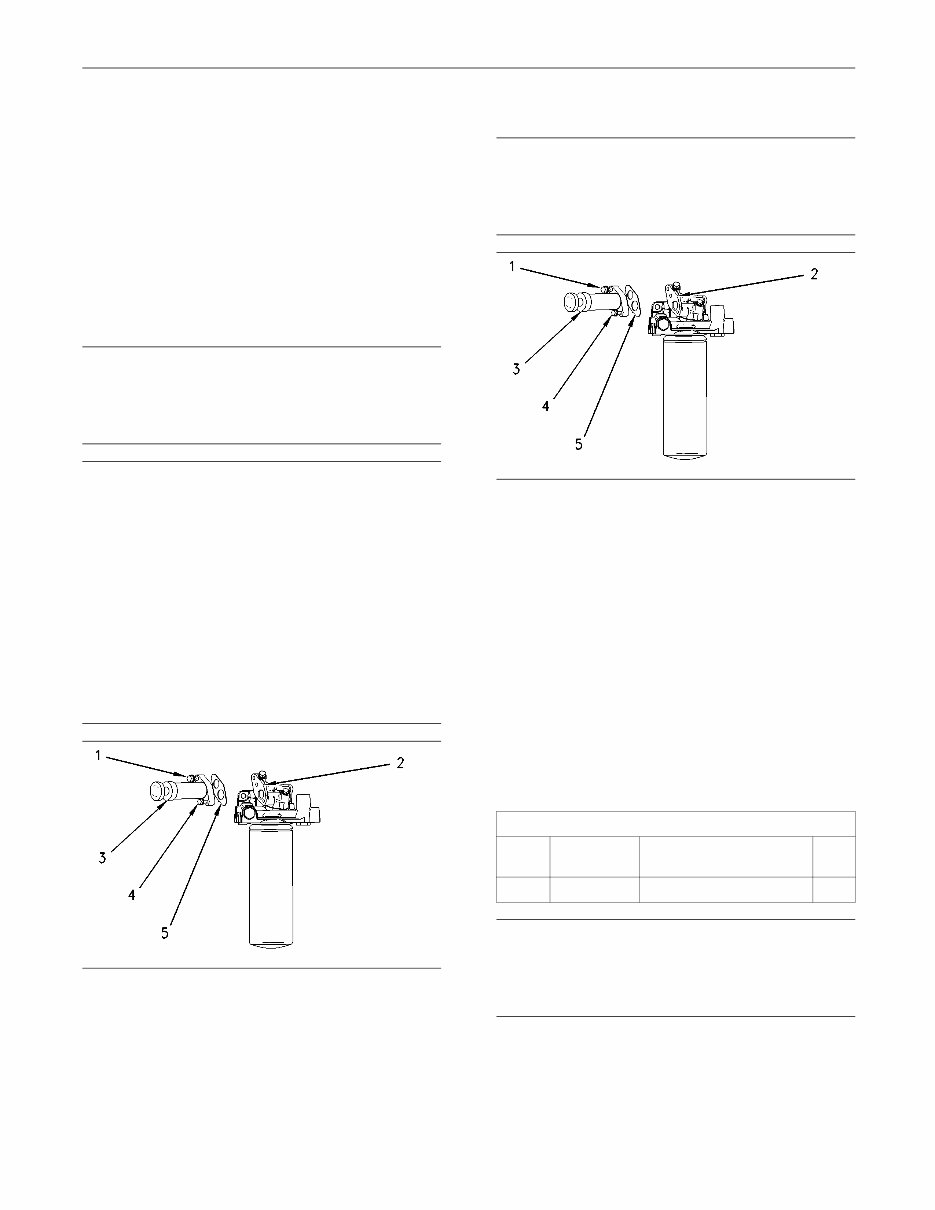
4 RENR1364-06 Disassembly and Assembly Section Disassembly and Assembly Section i02022754 Fuel Priming Pump - Remove and Install SMCS Code: 1258-010 Removal Procedure NOTICE Keep all parts clean from contaminants. Contaminants may cause rapid wear and shortened component life. NOTICE Care must be taken to ensure that fluids are contained during performance of inspection, maintenance, test- ing, adjusting and repair of the product. Be prepared to collect the fluid with suitable containers before open- ing any compartment or disassembling any compo- nent containing fluids. Refer to Special Publication, NENG2500, “Caterpillar Tools and Shop Products Guide” for tools and supplies suitable to collect and contain fluids on Caterpillar products. Dispose of all fluids according to local regulations and mandates. g01002542 Illustration 1 1. Remove bolt (1) and bolt (4). Remove fuel priming pump (3) from fuel filter base (2). 2. Remove gasket (5) for the fuel priming pump and the fuel filter base. Installation Procedure NOTICE Keep all parts clean from contaminants. Contaminants may cause rapid wear and shortened component life. g01002542 Illustration 2 1. Ensure that gasket (5) is in position for the fuel priming pump. 2. Put fuel priming pump (3) in position on fuel filter base (2). Install bolt (1) and bolt (4). i02110352 Fuel Filter Base - Remove and Install SMCS Code: 1262-010 Removal Procedure Table 1 Required Tools Tool Part Number Part Description Qty A 2P-8250 Strap Wrench 1 NOTICE Keep all parts clean from contaminants. Contaminants may cause rapid wear and shortened component life.
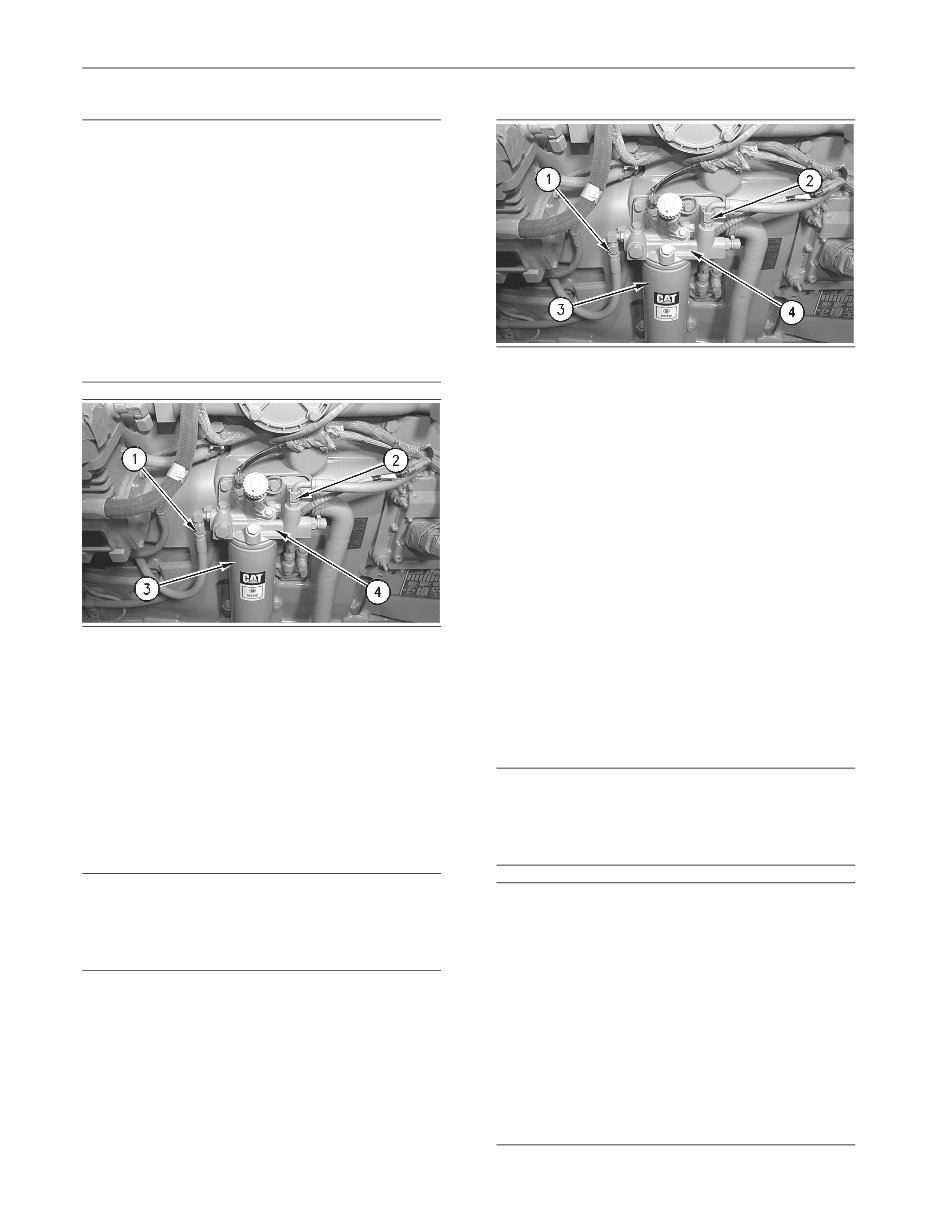
RENR1364-06 5 Disassembly and Assembly Section NOTICE Care must be taken to ensure that fluids are contained during performance of inspection, maintenance, test- ing, adjusting and repair of the product. Be prepared to collect the fluid with suitable containers before open- ing any compartment or disassembling any compo- nent containing fluids. Refer to Special Publication, NENG2500, “Caterpillar Tools and Shop Products Guide” for tools and supplies suitable to collect and contain fluids on Caterpillar products. Dispose of all fluids according to local regulations and mandates. g00516824 Illustration 3 1. Turn the fuel supply to the “OFF” position. 2. Disconnect hose assemblies (1) and (2). 3. Use Tooling (A) to remove fuel filter (3) from the fuel filter base. 4. Remove the bolts that fasten the fuel filter base to the engine. Remove fuel filter base (4). Installation Procedure NOTICE Keep all parts clean from contaminants. Contaminants may cause rapid wear and shortened component life. g00516824 Illustration 4 1. Install fuel filter base (4) on the engine. 2. Install fuel filter (3) on the fuel filter base. Follow the directions on the fuel filter for the correct installation procedure. 3. Connect hose assemblies (1) and (2) to the fuel filter base. 4. Turn the fuel supply to the “ON” position. 5. Remove the air from the system. Refer to Testing and Adjusting, “Fuel System - Prime”. i02110363 Fuel Transfer Pump - Remove SMCS Code: 1256-011 Removal Procedure NOTICE Keep all parts clean from contaminants. Contaminants may cause rapid wear and shortened component life. NOTICE Care must be taken to ensure that fluids are contained during performance of inspection, maintenance, test- ing, adjusting and repair of the product. Be prepared to collect the fluid with suitable containers before open- ing any compartment or disassembling any compo- nent containing fluids. Refer to Special Publication, NENG2500, “Caterpillar Tools and Shop Products Guide” for tools and supplies suitable to collect and contain fluids on Caterpillar products. Dispose of all fluids according to local regulations and mandates.
Thank you for considering this comprehensive Service Repair Workshop Manual for the Caterpillar (CAT) 3406E/3456 Engines OEM Service & Repair Manual. This manual is an invaluable resource covering every service and repair procedure necessary, designed to help you save money by facilitating DIY repairs. It provides easy-to-follow, step-by-step instructions and detailed images for all servicing and repairs.
Upon acquisition, this manual becomes your permanent asset, allowing you to print individual pages, chapters, or the entire document. Additionally, it can be conveniently accessed on your tablet or smartphone.
Models Covered:
All Models/Engines/Trim/Transmissions Types Are Covered
Contents:
This high-quality manual encompasses all repair procedures from A to Z, ensuring comprehensive coverage of every repair and service procedure for both 3406E and 3456 engines.
Technical Features:
OEM level detailed service and repair instructions
Step-by-step guidance with detailed images and diagrams
Comprehensive coverage of troubleshooting, maintenance, and repair procedures specific to CAT 3406E/3456 engines
Computer Requirements:
This manual is compatible with all PC & MAC Computers, tablets, and mobile phones. The only software required is Adobe Reader, which is typically pre-installed on most computers. If not, it can be downloaded for free.
Delivery:
Upon payment confirmation via Visa, MasterCard, or PayPal, the manual will be instantly emailed to the address provided during checkout.
Customer satisfaction is guaranteed with this comprehensive Service Repair Workshop Manual for your Caterpillar (CAT) 3406E/3456 Engines.
Recently Viewed
5,521,897Happy Clients
2,594,462eManuals
1,120,453Trusted Sellers
15Years in Business
Price:
Actual Price:
Caterpillar (CAT) 3406E/3456 Engines OEM Service & Repair Manual