

Yamaha SLG110S Silent Guitar Service Manual
What's Included?
Fast Download Speeds
Online & Offline Access
Access PDF Contents & Bookmarks
Full Search Facility
Print one or all pages of your manual
SERVICE MANUAL
Silent Violins™
SLG110S
HAMAMATSU, JAPAN
Copyright (c) Yamaha Corporation. All rights reserved. YMW ´10.07
EG
011990
SLG110S
TBS
Tobacco Brown Sunburst
(タバコブラウンサンバースト)
SLG110S
BM
Black Metallic
(ブラックメタリック)
SLG110S
NT
Natural
(ナチュラル)
SPECIFICATIONS (総合仕様)............................................................ 3
PANEL LAYOUT (パネルレイアウト)................................................. 4
CIRCUIT BOARD LAYOUT (ユニットレイアウト)............................. 6
DISASSEMBLY PROCEDURES (分解手順) ....................................... 7
CIRCUIT BOARDS (シート基板図)................................................... 11
INSPECTION (検査)........................................................................ 12
TUNING (調弦) ................................................................................ 14
PARTS LIST
BLOCK DIAGRAM (ブロック図)
OVERALL CIRCUIT DIAGRAM (総回路図)
■ CONTENTS (目次)
WARNING: This product contains chemicals known to the State of California to cause cancer, or birth defects or other reproductive harm.
DO NOT PLACE SOLDER, ELECTRICAL/ELECTRONIC OR PLASTIC COMPONENTS IN YOUR MOUTH FOR ANY REASON WHAT SO
EVER!
Avoid prolonged, unprotected contact between solder and your skin! When soldering, do not inhale solder fumes or expose eyes to solder/flux
vapor!
If you come in contact with solder or components located inside the enclosure of this product, wash your hands before handling food.
IMPORTANT NOTICE
This manual has been provided for the use of authorized Yamaha Retailers and their service personnel. It has been assumed that basic service
procedures inherent to the industry, and more specifically Yamaha Products, are already known and understood by the users, and have there-
fore not been restated.
WARNING: Failure to follow appropriate service and safety procedures when servicing this product may result in personal injury, destruc-
tion of expensive components and failure of the product to perform as specified. For these reasons, we advise all Yamaha prod-
uct owners that all service required should be performed by an authorized Yamaha Retailer or the appointed service represen-
tative.
IMPORTANT: This presentation or sale of this manual to any individual or firm does not constitute authorization, certification, recognition of
any applicable technical capabilities, or establish a principal-agent relationship of any form.
The data provided is believed to be accurate and applicable to the unit(s) indicated on the cover. The research engineering, and service depart-
ments of Yamaha are continually striving to improve Yamaha products. Modifications are, therefore, inevitable and changes in specification are
subject to change without notice or obligation to retrofit. Should any discrepancy appear to exist, please contact the distributor’s Service Divi-
sion.
WARNING: Static discharges can destroy expensive components. Discharge any static electricity your body may have accumulated by
grounding yourself to the ground bus in the unit (heavy gauge black wires connect to this bus).
IMPORTANT: Turn the unit OFF during disassembly and parts replacement. Recheck all work before you apply power to the unit.
■ WARNING (注意)
Components having special characteristics are marked and must be replaced with parts having specification equal to those originally
installed.
印の商品は、安全を維持するために重要な部品です。交換する場合は、安全のために必ず指定の部品をご使用ください。
SLG110S
2

■ SPECIFICATIONS (総合仕様)
棹 マホガニー
胴 メイプル
指板 ローズウッド
下駒 ローズウッド
フレーム メイプル
弦 フォークギター用スチール弦
センサー LR-Baggs
電気 ・ AUX IN 端子
・ AUX IN レベルコントロール
・ LINE OUT 端子(モノラル)
・ ヘッドフォン出力端子(ステレオ)
・ ボリューム
・ ベースコントロール
・ トレブルコントロール
・ エフェクトスイッチ
(OFF/REV1/REV2/CHORUS/ECHO)
・ ヘッドフォンスイッチ(ON/OFF)
・ LINE OUT 端子兼 POWER スイッチ
(ジャック差込時 ON)
電源 電源アダプター、乾電池(6LR61 × 1 本)兼用
※ 指定電源アダプター:
PA-1E、PA-3C、PA-D09、PA-D012(A)、
PA-130(A)
電池寿命 通常連続使用時
・ アルカリ乾電池:20 時間
・ マンガン乾電池:9 時間
エフェクト使用時
・ アルカリ乾電池:13 時間
・ マンガン乾電池:5 時間
弦長 634 mm
寸法 (左フレーム取付、ボディエンド部調整ネジ最短
状態)
985(L)× 355(W)× 80(H)mm
重量 1.9 kg
Neck Mahogany
Body Maple
Fingerboard Rosewood
Bridge Rosewood
Frame Unit Maple
Strings Steel Strings for Acoustic Guitar
Sensors LR-Baggs
Connectors/Controls • AUX IN
• AUX IN Level Control
• LINE OUT jack (monaural)
• PHONES jack (stereo)
• Volume
• BASS control
• TREBLE control
• EFFECT switch
(OFF/REV1/REV2/CHORUS/ECHO)
• PHONES switch (ON/OFF)
• LINE OUT Jack with POWER Switch
(Inserting a plug into the jack
switches the power on)
Power Supply AC Adaptor/battery (6LR61) x 1 dual
power source
* Recommended AC Adaptors:
PA-1E, PA-3C, PA-D09, PA-D012(A),
PA-130(A)
Battery Life Continuous Use
• Using Alkaline battery:
approximately 20 hours
• Using Manganese battery:
approximately 9 hours
With the effect activated
• Using Alkaline battery:
approximately 13 hours
• Using Manganese battery:
approximately 5 hours
String Length 634 mm (24-15/16")
Dimensions (with the left frame attached and to the end of
the strap pin)
985 (L) x 355 (W) x 80 (H) mm
38-3/4" (L) x 14" (W) x 3-1/8" (H)
Weight approximately 1.9 kg (4 lbs. 3 oz.)
SLG110S
3
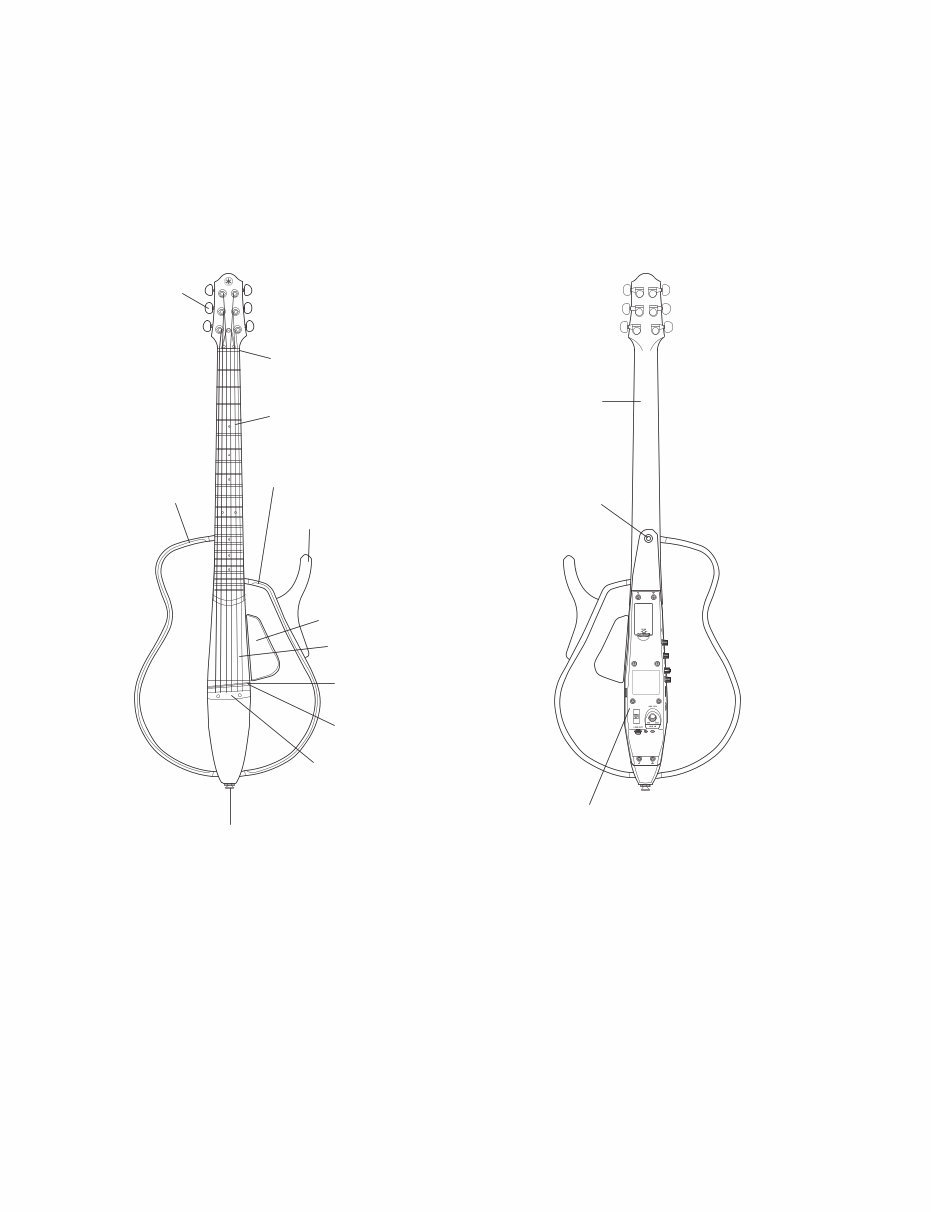
• Front (フロント部) • Rear (リア部)
Controls (See page 5.)
(コントロール部(5ページ参照))
Neck
(棹(ネック))
Frame attachment screw 1
(Doubles as the strap pin)
(フレーム調整ネジ 1
(ストラップピン兼用))
Fingerboard
(指板(フィンガーボード))
Saddle
(サドル)
Tuning peg
(糸巻(ペグ))
Nut
(上駒(ナット))
Finger rest
(フィンガーレスト)
Left frame (Removable)
(左フレーム(脱着可))
Bridge
(下駒(ブリッジ))
Right frame (Fixed)
(右フレーム(固定式))
Horn (Leg support)
(ホーン(膝当て))
Pickup (underneath the saddle)
(ピックアップ(サドルの下部))
Body
(胴(ボディ))
Frame attachment screw 2 (Doubles as the strap pin)
(フレーム調整ネジ2(ストラップピン兼用))
SLG110S
4
■ PANEL LAYOUT (パネルレイアウト)
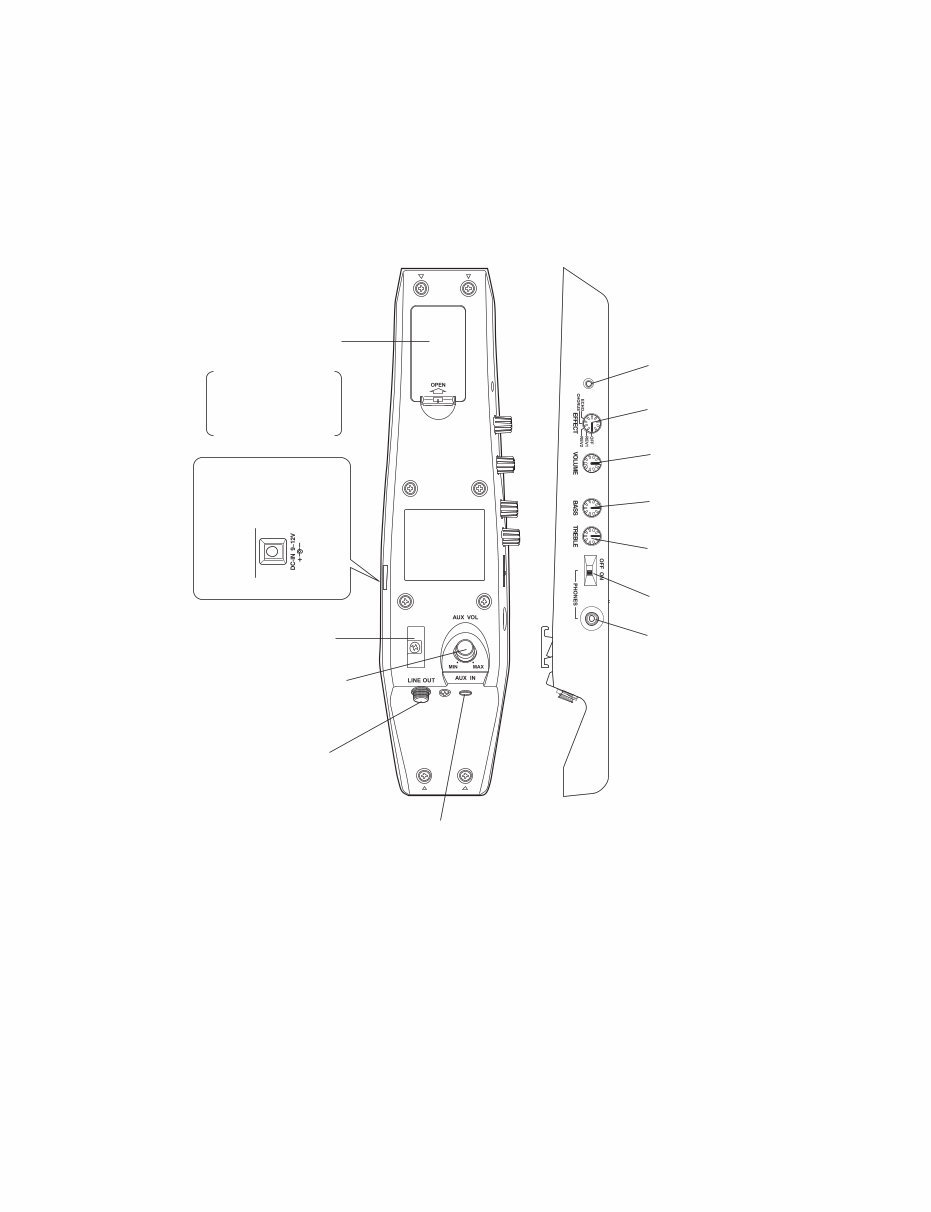
• Controls (コントロール部)
VOLUME control
(ボリュームコントロール)
Battery compartment
(電池ケース)
EFFECT switch
(エフェクトスイッチ)
POWER lamp
(パワーランプ)
AUX IN jack
(AUX IN(外部入力)端子)
AUX IN level control
(AUX IN(外部入力)レベルコントロール)
LINE OUT jack
(LINE OUT(外部出力)端子)
DC-IN jack
(Power adaptor connector)
(電源アダプター接続端子)
BASS control
(ベースコントロール)
TREBLE control
(トレブルコントロール)
PHONES ON/OFF switch
(ヘッドフォン ON/OFF スイッチ)
PHONES jack
(ヘッドフォン端子)
use 6LR61 9V
alkaline battery
(6LR61 9V
アルカリ乾電池使用)
Cord hook
(コードフック)
SLG110S
5
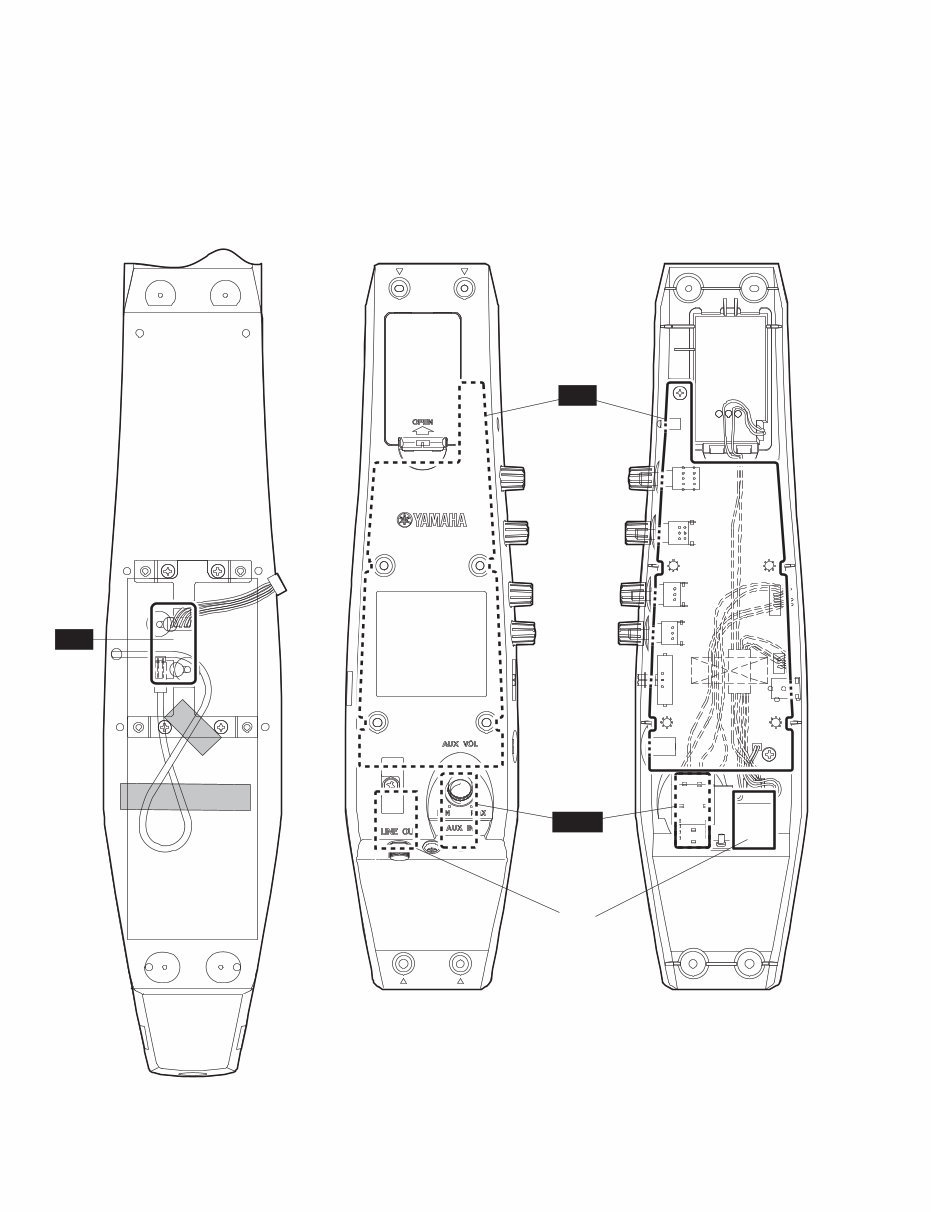
Jack
(ジャック)
AUX
MA
PU
■ CIRCUIT BOARD LAYOUT (ユニットレイアウト)
• Body (rear view)
(underneath the panel assembly)
(ボディの裏側(パネル Ass'y の下部) )
• Panel Assembly
(パネル Ass'y)
SLG110S
6
Bracket assembly
(ブラケット Ass'y)
Bracket assembly
(ブラケット Ass'y)
Right bracket
(ブラケット(R))
Right frame
(フレーム(R))
Horn
(ホーン)
Right bracket
(ブラケット(R))
Sleeve
(スリーブ)
Sleeve
(スリーブ)
Left frame
(フレーム(L))
[E28]
[D17]
[E25]
[D17]
[D14]
[D13]
[D13]
[D14]
[E24]
Bracket
(フレーム受けプレート)
Bracket
(フレーム受けプレート)
[E28]
[D11]
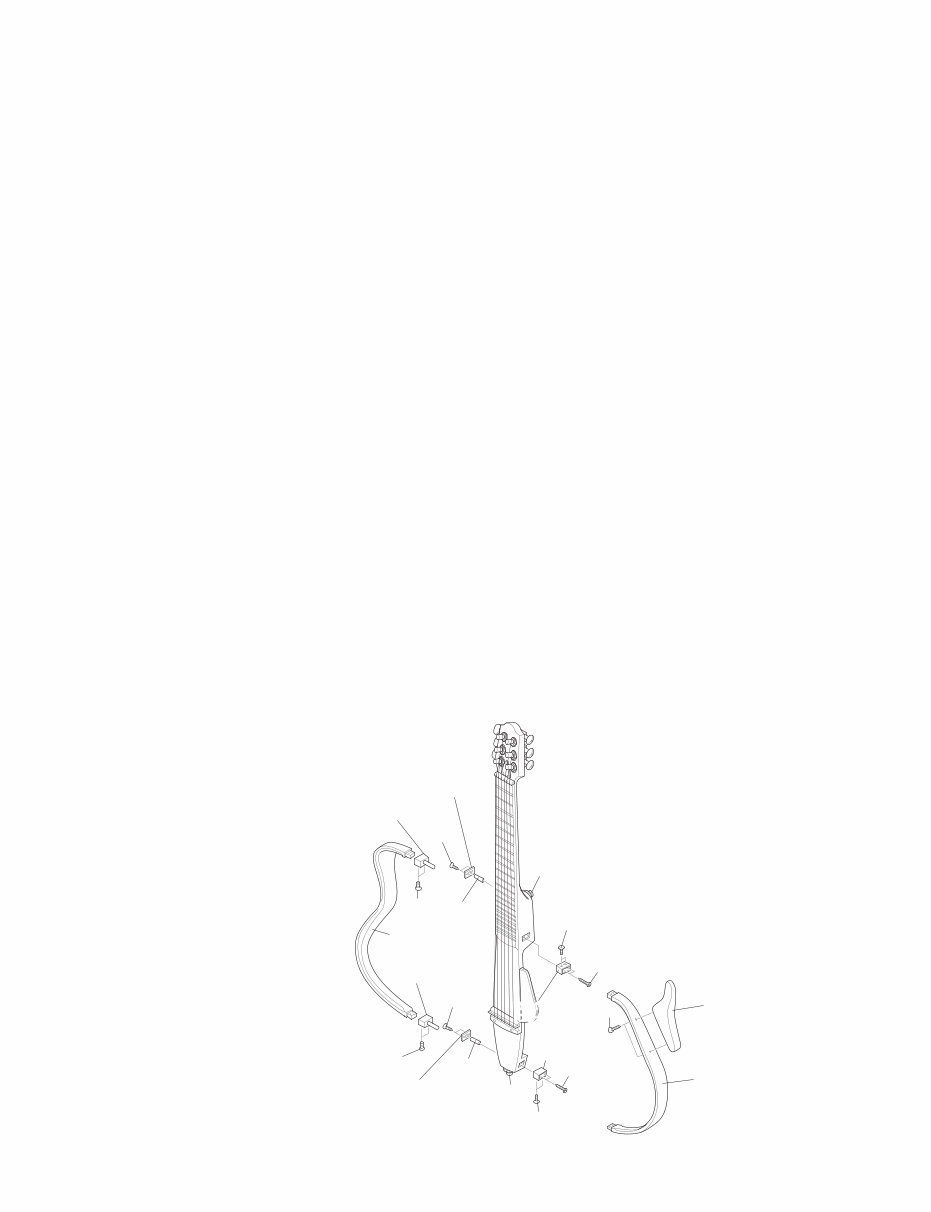
■ DISASSEMBLY PROCEDURES (分解手順)
Preparations
Make the following preparations;
●
Turn off the [PHONES] switch.
●
Remove the battery cover and battery.
1. Left Frame (Time required: About 1 minute)
1-1 Loosen the adjusting bolt (front) marked [E24] and the
adjusting bolt (rear) marked [E25]. The left frame can then be
removed. (Fig. 1)
2. Bracket Assembly, Bracket, and Sleeve
(Time required: About 2 minutes each)
2-1 Remove the left frame. (See procedure 1.)
2-2 Bracket Assembly:
Remove the two (2) screws marked [D17]. The upper bracket
assembly can then be removed from the left frame. (Fig. 1)
The lower bracket assembly can be removed in the same
manner.
2-3 Bracket, Sleeve:
Remove the two (2) screws marked [E28]. The upper bracket
and the upper sleeve can then be removed. (Fig. 1)
The lower bracket and the lower sleeve can be removed in the
same manner.
3. Right Frame (Time required: About 1 minute)
3-1 Remove the four (4) screws marked [D14]. The right frame
can then be removed together with the horn. (Fig. 1)
4. Horn, Right Bracket
(Time required: About 2 minutes each)
4-1 Remove the right frame. (See procedure 3.)
4-2 Horn:
Remove the two (2) screws marked [D11]. The horn can then
be removed. (Fig. 1)
4-3 Right Bracket:
Remove the two (2) screws marked [D13]. The upper right
bracket can then be removed. (Fig. 1)
The lower right bracket can be removed in the same manner.
準備
作業を行う前に下記のことを行ってください。
●
[PHONES]スイッチを OFF にします。
●
バッテリーカバーを外し、中のバッテリー(乾電池)を
取り外します。
1. フレーム(L)(所要時間:約1分)
1-1 [E24]の調整ボルト(F)1 本と[E25]の調整ボルト(R)
1本を緩めて、フレーム(L)を外します。(図 1)
2. ブラケット Ass'y、フレーム受けプレート、スリーブ
(所要時間:各約 2 分)
2-1 フレーム(L)を外します。(1 項参照)
2-2 ブラケット Ass'y:
[D17]のネジ 2 本を外して、フレーム(L)から上側の
ブラケットAss'yを外します。(図 1)
下側のブラケット Ass'y も、同様にして外すことができ
ます。
2-3 フレーム受けプレート、スリーブ:
[E28]のネジ 2 本を外して、上側のフレーム受けプレー
トとスリーブを外します。(図 1)
下側のフレーム受けプレートとスリーブも、同様にして
外すことができます。
3. フレーム(R)(所要時間:約1分)
3-1 [D14]のネジ 4 本を外して、ホーンと共にフレーム(R)
を外します。(図 1)
4. ホーン、ブラケット(R)
(所要時間:各約 2 分)
4-1 フレーム(R)を外します。(3項参照)
4-2 ホーン:
[D11]のネジ2本を外して、ホーンを外します。(図 1)
4-3 ブラケット(R):
[D13]のネジ 2 本を外して、上側のブラケット(R)を
外します。(図 1)
下側のブラケット(R)も、同様にして外すことができ
ます。
Fig. 1 (図 1)
SLG110S
7
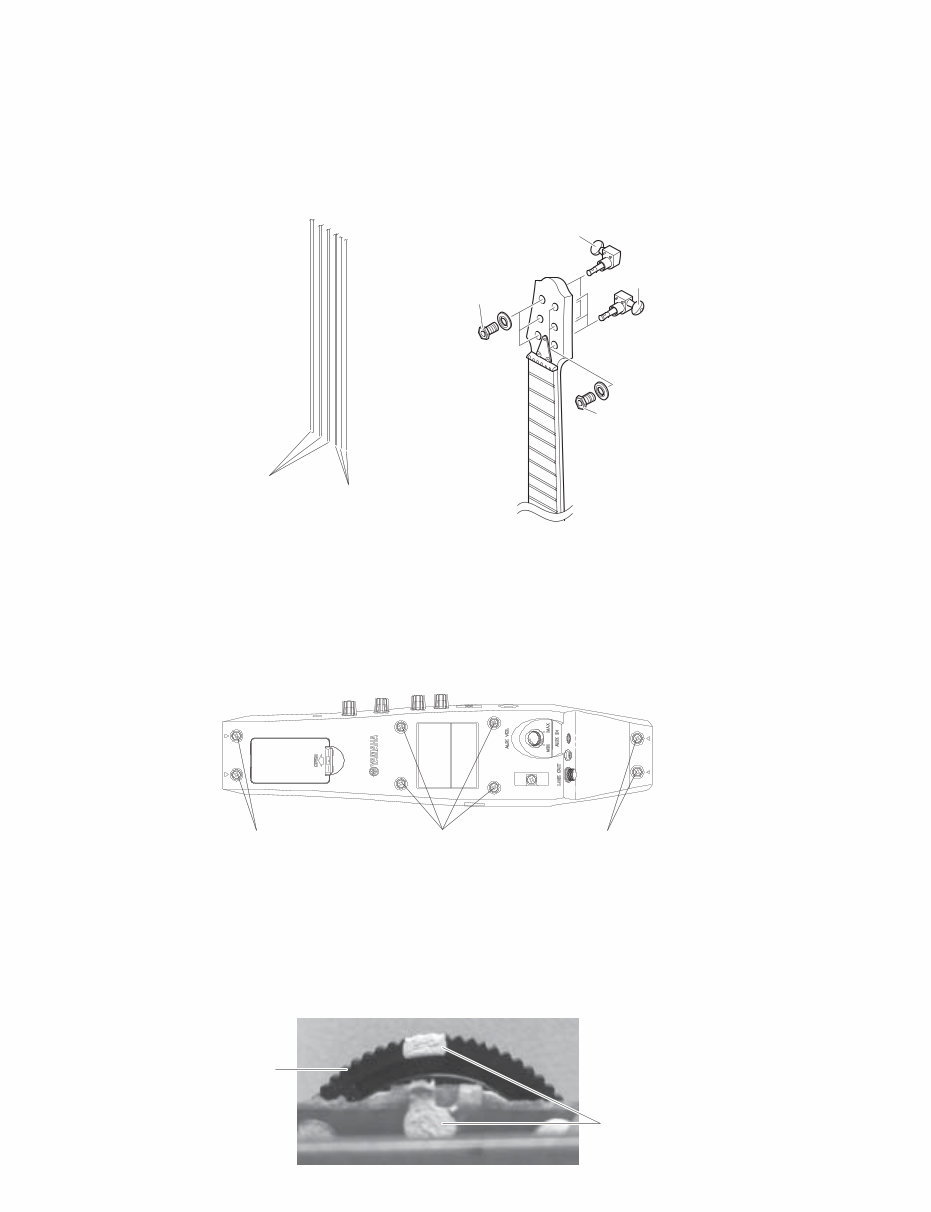
Gain adjusting variable resistor VR201
(ゲイン調整ボリューム)
Mark
(マーク)
[A]
[A]
Tuning peg
(糸巻き)
Left side Strings (4th–6th)
(左側の弦(4弦~6弦)) Right side Strings (1st–3rd)
(右側の弦(1 弦~3弦))
Tuning peg
(糸巻き)
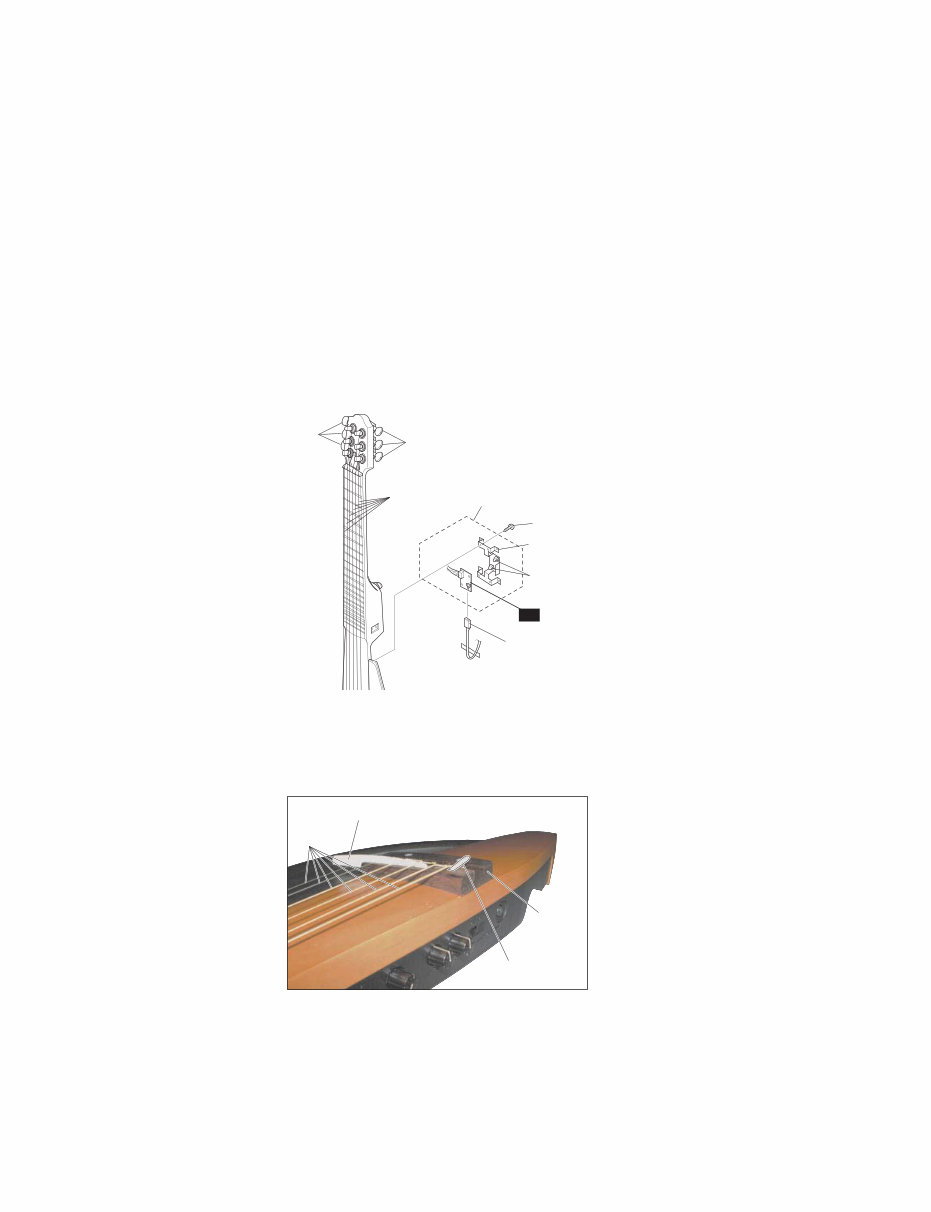
5. Tuning Peg (Time required: About 2 minutes)
5-1 Remove the string attached to the tuning peg you want to
replace. (Fig. 2)
5-2 Remove the screw marked [A].
The tuning peg can then be removed. (Fig. 2)
6. Panel Assembly
(Time required: About 1 minute)
6-1 Remove the four (4) screws marked [F39] and the four
(4) screws marked [F40]. The panel assembly can then be
removed. (Fig. 3)
Notes: When removing the panel assembly, mark the gain
adjusting variable resistor VR201 on the PU circuit
board with white ink or the like as shown in the
photo.1 below before proceeding to next work. If
the variable resistor is turned unintentionally when
working, return its mark to original position before
installing the panel assembly.
5. 糸巻き(所要時間:約 2 分)
5-1 交換する糸巻きに取り付けられている弦を外します。
(図 2)
5-2 [A]のネジを外して、糸巻きを外します。(図 2)
6. パネル Ass'y
(所要時間:約 1 分)
6-1 [F39]のネジ 4 本と[F40]のネジ 4 本を外して、パネ
ル Ass'y を外します。(図 3)
注: パネル Ass'y を外した場合は次の作業に進む前に、
写真 1 のように PU シートのゲイン調整ボリュー
ム VR201 に白色のインクなどでマークしてくだ
さい。もし、作業中に意図せずにこのボリューム
の位置が動いた場合、マーカーを元の位置に戻し
てから組立ててください。(写真1)
Fig. 2 (図 2)
Fig. 3 (図 3)
Photo. 1 (写真 1)
[F40] [F39] [F39]
SLG110S
8
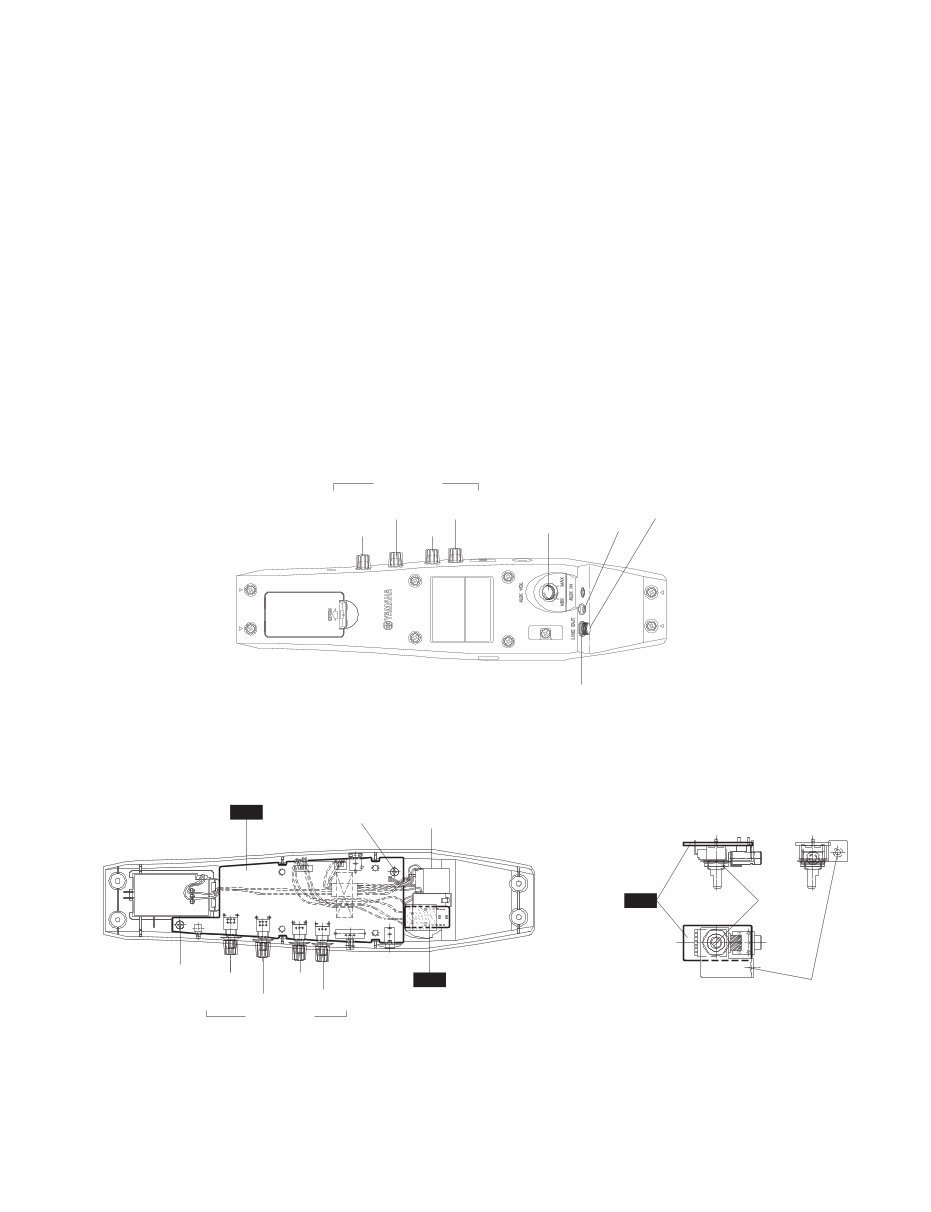
[F19A]
[F19A]
[TREBLE] [VOLUME]
[BASS] [EFFECT] AUX
MA
Jack (LINE connector assembly)
(ジャック(LINE束線))
Rotary knob
(ロータリーツマミ)
7. MA Circuit Board, AUX Circuit Board and Jack
(LINE Connector Assembly)
(Time required: About 3 minutes each)
7-1 Remove the panel assembly. (See procedure 6.)
7-2 MA Circuit Board:
Pull out the four (4) rotary knobs for [EFFECT], [VOLUME],
[BASS] and [TREBLE]. (Fig. 4, 5)
Remove the two (2) screws marked [F19A]. The MA circuit
board can then be removed. (Fig. 5)
7-3 AUX Circuit Board:
Pull out the AUX knob and remove the screw marked [F19B].
The AUX circuit board can then be removed together with the
jack holder. (Fig. 4, 5, 6)
Remove the hexagonal nut marked [A]. The jack holder can
then be removed from the AUX circuit board. (Fig. 6)
7-4 Jack (LINE Connector Assembly):
Remove the hexagonal nut marked [F32]. The jack (LINE
connector assembly) can then be removed. (Fig. 4, 5)
7. MA シート、AUX シート、ジャック
(LINE 束線)
(所要時間:各約 3 分)
7-1 パネルAss'yを外します。(6 項参照)
7-2 MA シート:
[EFFECT]、[VOLUME]、[BASS]、[TREBLE]用のロー
タリーツマミ4個を引き抜きます。(図 4、5)
[F19A]のネジ 2 本を外して、MA シートを外します。
(図 5)
7-3 AUX シート:
AUX ツマミ 1 個を引き抜き、[F19B]のネジ 1 本を外し
て、ジャックホルダーと共に AUX シートを外します。
(図 4、5、6)
[A]の六角ナット 1 個を外して、AUX シートからジャッ
クホルダーを外します。(図6)
7-4 ジャック(LINE束線):
[F32]の六角ナット1個を外して、ジャック(LINE 束線)
を外します。(図 4、5)
Fig. 4 (図 4)
Fig. 5 (図 5) Fig. 6 (図 6)
[VOLUME]
[BASS] [EFFECT]
[TREBLE]
[F19B]
[F32]
Rotary knob
(ロータリーツマミ)
Jack (LINE connector assembly)
(ジャック(LINE束線)) AUX knob
(AUX ツマミ)
[A] AUX
Jack holder
(ジャックホルダー)
SLG110S
9
[F10] x 4
PU
Pickup assembly
(ピックアップ Ass'y)
Panel holder assembly
(パネルホルダー Ass'y)
Panel holder
(パネルホルダー)
Spacer
(基板スペーサー)
Tuning peg
(糸巻)
Tuning peg
(糸巻)
String
(弦)
8. PU Circuit Board
(Time required: About 3 minutes)
8-1 Remove the panel assembly. (See procedure 6.)
8-2 Remove the four (4) screws marked [F10]. The panel holder
assembly can then be removed. (Fig. 7)
8-3 Remove the PU circuit board from the two (2) spacers. (Fig. 7)
9. Pickup (Time required: About 3 minutes)
9-1 Remove the panel assembly. (See procedure 6.)
9-2 Turn each tuning peg and loosen the strings. (Fig. 7, Photo. 2)
9-3 Remove the bridge saddle. (Photo. 2)
9-4 Remove the pickup from the slot on the bridge. (Photo. 2)
9-5 Disconnect the connector from the PU circuit board. (Fig. 7)
8. PU シート(所要時間:約 3 分)
8-1 パネル Ass'y を外します。(6 項参照)
8-2 [F10]のネジ 4 本を外して、パネルホルダー Ass'y を外
します。(図7)
8-3 基板スペーサー 2 個から PU シートを外します。(図 7)
9. ピックアップ(所要時間:約 3 分)
9-1 パネル Ass'y を外します。(6 項参照)
9-2 糸巻きを回して、弦を緩めます。(図7、写真2)
9-3 下駒枕を横へすべらせる様にして外します。(写真2)
9-4 下駒の溝からピックアップを外します。(写真2)
9-5 PUシートからコネクターを抜きます。(図7)
Photo. 2 (写真 2)
Fig. 7 (図 7)
Bridge saddle (下駒枕)
String (弦)
Pickup assembly
(ピックアップ Ass'y)
Bridge
(下駒)
SLG110S
10
You're Reading a Preview
What's Included?
Fast Download Speeds
Online & Offline Access
Access PDF Contents & Bookmarks
Full Search Facility
Print one or all pages of your manual
$33.99
Viewed 39 Times Today


Secure transaction
What's Included?
Fast Download Speeds
Online & Offline Access
Access PDF Contents & Bookmarks
Full Search Facility
Print one or all pages of your manual
$33.99
The Yamaha SLG110S Silent Guitar Service Manual provides essential technical information for professional mechanics and DIY enthusiasts. It covers a wide range of topics including specifications, panel layout, circuit board layout, disassembly procedures, inspection tuning, parts list, block diagram, and overall circuit diagram.
This manual is available in English and can be accessed on both Windows and Mac platforms. It is a valuable resource for anyone looking to understand and maintain the Yamaha SLG110S Silent Guitar.


