


PIXMA PRO9000
SERVICE
MANUAL
Canon
Copyright 2006, Canon U.S.A. This technical publication is the proprietary and confidential information of Canon U.S.A. which
shall be retained for reference purposes by Authorized Service Facilities of Canon U.S.A. Its unauthorized use is prohibited.

I. MANUAL OUTLINE
This manual consists of the following three parts to provide information necessary to service the PIXMA Pro9000:
Part 1: Maintenance
Information on maintenance and troubleshooting of the PIXMA Pro9000
Part 2: Technical Reference
New technology and technical information such as FAQ's (Frequently Asked Questions) of the PIXMA Pro9000
Part 3: Appendix
Block diagrams and pin layouts of the PIXMA Pro9000
PIXMA Pro9000
Reference
This manual does not provide sufficient information for disassembly and reassembly procedures.
Refer to the graphics in the separate Parts Catalog.
<I. MANUAL OUTLINE>

II. TABLE OF CONTENTS
Part 1: MAINTENANCE
1. MAINTENANCE
1-1 Adjustment, Periodic Maintenance, Periodic Replacement Parts, and Replacement Consumables by Service Engineer
1-2 Customer Maintenance
1-3 Product Life
1-4 Special Tools
1-5 Serial Number Location
2. LIST OF ERROR DISPLAY / INDICATION
2-1 Operator Call Error
2-2 Service Call Error
2-3 Warnings
2-4 Troubleshooting by Symptom
3. REPAIR
3-1 Notes on Service Part Replacement (and Disassembling / Reassembling)
3-2 Special Notes on Repair Servicing
3-3 Adjustment / Settings
(1) Paper feed motor adjustment
(2) Carriage unit position adjustment
(3) Grease application
(4) Ink absorber counter / wetting liquid counter setting
(5) User mode
(6) Service mode
Service test print, EEPROM initialization, Ink absorber counter reset,
Destination settings
3-4 Verification Items
(1) Service test print
(2) EEPROM information print
4. PRINTER TRANSPORTATION
Part 2: TECHNICAL REFERENCE
1. NEW TECHNOLOGIES
2. CLEANING MODE AND AMOUNT OF INK PURGED
3. PRINT MODE
4. FAQ (Problems Specific to the Pro9000 and Corrective Actions)
Part 3: APPENDIX
1. BLOCK DIAGRAM
2. CONNECTOR LOCATION AND PIN LAYOUT
2-1 Logic Board Ass'y
2-2 Carriage Board (Print Head Connector)
PIXMA Pro9000 Specifications
PIXMA Pro9000
To the top
<II. TABLE OF CONTENTS>

Part 1
MAINTENANCE
PIXMA Pro9000 TABLE OF CONTENTS
1. MAINTENANCE
1-1. Adjustment, Periodic Maintenance, Periodic Replacement Parts, and Replacement Consumables by
Service Engineer
(1) Adjustment
Note: The red screws on the right side of the chassis, which secure the carriage shaft position, may be loosened only when necessary.
The red screws securing the paper feed motor may be loosened only at replacement of the paper feed motor.
(2) Periodic maintenance
No periodic maintenance is necessary.
(3) Periodic replacement parts
There are no parts in this printer that require periodic replacement by a service engineer.
(4) Replacement consumables
There are no consumables that require replacement by a service engineer.
Part 1: MAINTENANCE TABLE OF CONTENTS
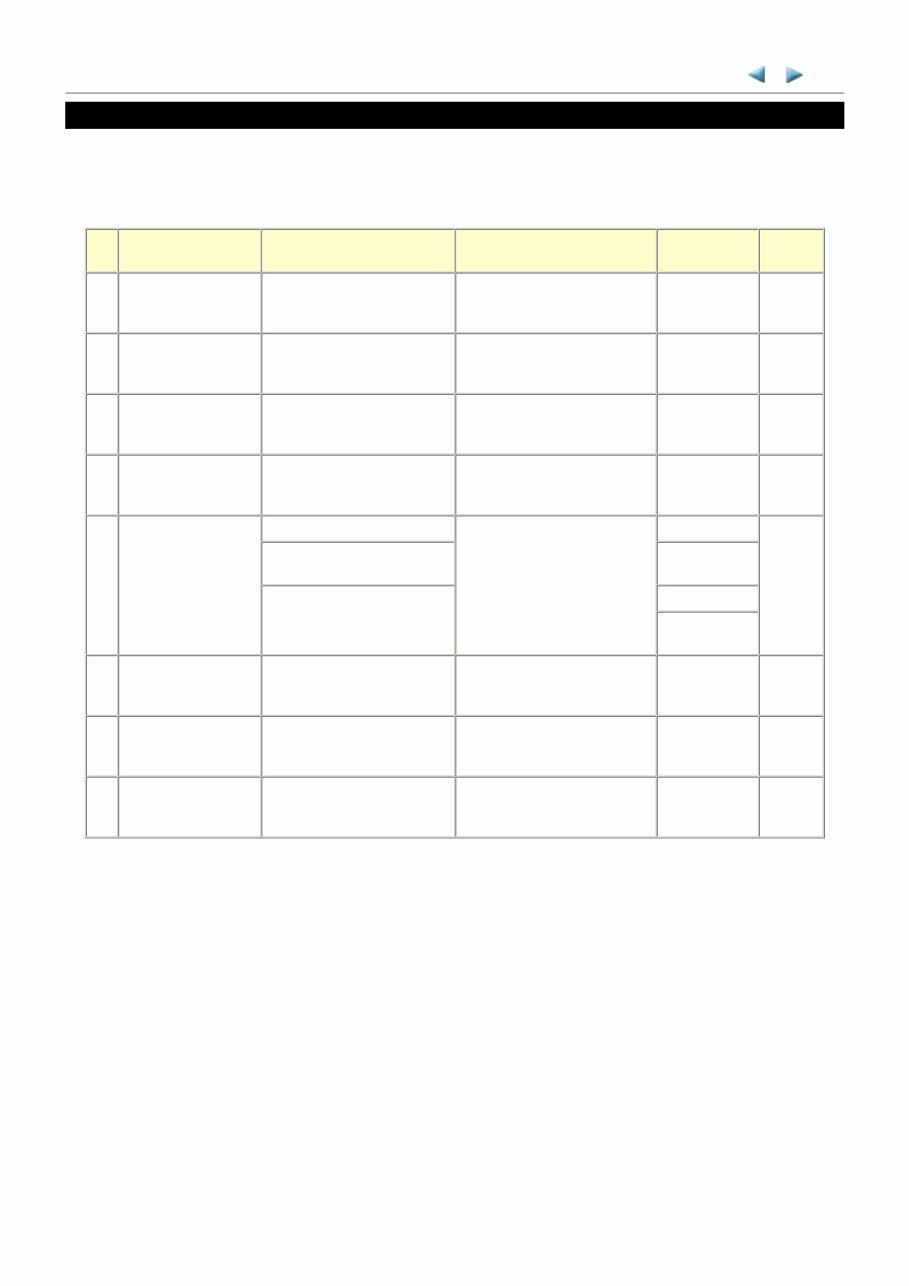
Adjustment Timing Purpose Tool
Approx.
time
Destination settings
(EEPROM settings)
- At logic board replacement To set the destination. None.
Perform in the
service mode.
1 min.
Ink absorber counter
resetting(EEPROM
settings)
- At logic board replacement- At ink
absorber replacement
To reset the ink absorber counter. None.
Perform in the
service mode.
1 min.
Paper feed motor position
adjustment
- At paper feed motor replacement To adjust the belt tension. (Position the
paper feed motor so that the belt is
stretched tight.)
None. 2 min.
None. 2 min.
Grease application - At carriage unit replacement - To maintain sliding properties of the
carriage shaft.
- To protect the printer's sliding
portions and gears.
EU-1 1 min.
- At parts replacement MOLYKOTE PG-
641
FLOIL KG-107A
MOLYKOTE HP-
300
Ink system function check - At logic board replacement- At
platen unit replacement- At
carriage unit replacement
To maintain detection functionality for
presence of the ink tanks and each ink
tank position.
None.
Perform in the
service mode.
1 min.
New Carriage position
adjustment
- At carriage unit installation (at
carriage unit or platen unit
replacement)
To adjust the carriage position(Mark
the position of the red screws before
loosening them.)
None. 1 min.
Line feed correction - At logic board replacement- At LF
roller replacement
To correct the line feed tolerant
accuracy.
None.
Perform in the
service mode.
1 min.
1-1

1-2. Customer Maintenance
Adjustment Timing Purpose Tool
Approx.
time
Print head alignment At print head replacement. To ensure accurate dot
placement.
- Printer buttons
- Computer (automatic settings
via the printer driver)
6 min.
Print head cleaning When print quality is not satisfying. To improve nozzle
conditions.
- Printer buttons
- Computer (settings via the
printer driver)
2 min.
Print head deep cleaning When print quality is not satisfying, and not
improved by print head cleaning.
To improve nozzle
conditions.
Computer (settings via the printer
driver)
3 min.
Ink tank replacement When an ink tank becomes empty.
("No ink error" via the computer, or ink tank
LED flashing fast in red)
----- ----- 2 min.
Paper feed roller cleaning When necessary To clean the paper feed
rollers.
Printer buttons 2 min.
Bottom plate cleaning When the back side of the paper is smeared. To clean the platen ribs. - Plain paper
- Computer (settings via the
printer driver)
1 min.
1-2
1-3. Product Life
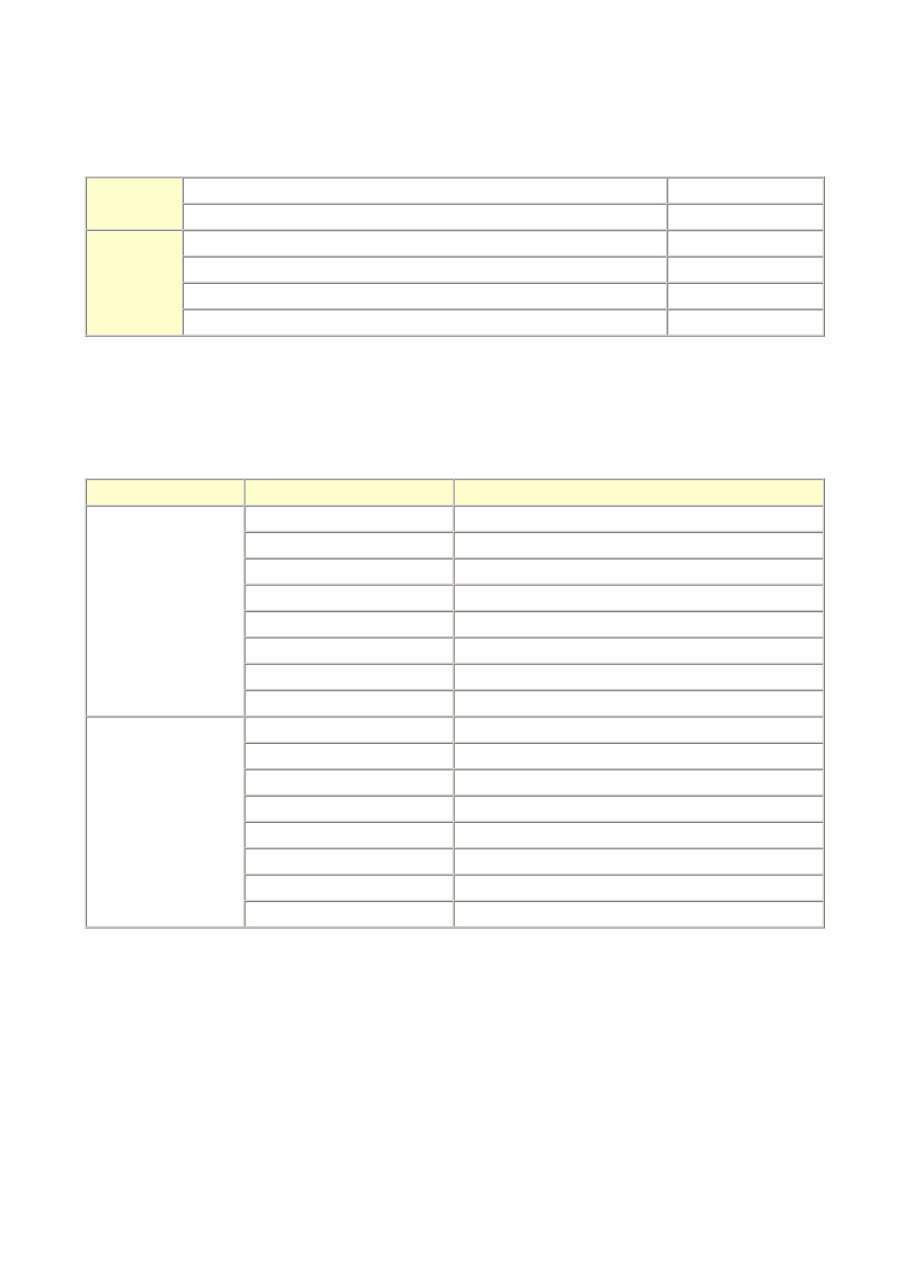
(1) Printer
Specified print volume (I) or the years of use (II), whichever comes first.
(I) Print volume: 21,000 pages
(II) Years of use: 5 years of use
(2) Print head
Print volume: 21,000 pages
(The breakdown is the same as the above.)
(3) Ink tank (target value)
*1 Color document: Declared yield value in accordance with ISO/IEC FCD24711. Values obtained by continuous printing.
*2 Photo (4" x 6"): When printing Canon standard patterns on 4" x 6" <Photo Paper Pro> continuously with the default settings of
<Photo Paper Pro> using Windows XP printer driver in borderless printing mode and Windows XP Photo Printing Wizard.
Declared yield value determined based on Canon standard method referring to ISO/IEC FCD24712.
* Ink yield may vary depending on texts/photos printed, applications software used, print mode and type of paper used.
Black
1,500 character pattern (B5 to A3) 6,300 pages
Postcard 2,700 pages
Color 7.5% duty per color pattern (B5 to A3) 3,450 pages
Photo, borderless printing (5 x 7 to A3+) 3,250 pages
4 x 6, photo, borderless printing 2,100 pages
Postcard, photo, borderless printing 3,200 pages
Pattern Ink tank used Print yield
Color document *1 CLI-8BK Approx. 1,550 pages
CLI-8C Approx. 580 pages
CLI-8M Approx. 410 pages
CLI-8Y Approx. 380 pages
CLI-8PC Approx. 3,600 pages
CLI-8PM Approx. 4,050 pages
CLI-8R Approx. 4,000 pages
CLI-8G Approx. 4,150 pages
Photo (4" x 6") *2 CLI-8BK Approx. 1,290 pages
CLI-8C Approx. 900 pages
CLI-8M Approx. 585 pages
CLI-8Y Approx. 272 pages
CLI-8PC Approx. 195 pages
CLI-8PM Approx. 142 pages
CLI-8R Approx. 2,705 pages
CLI-8G Approx. 2,770 pages
1-3
1-4. Special Tools
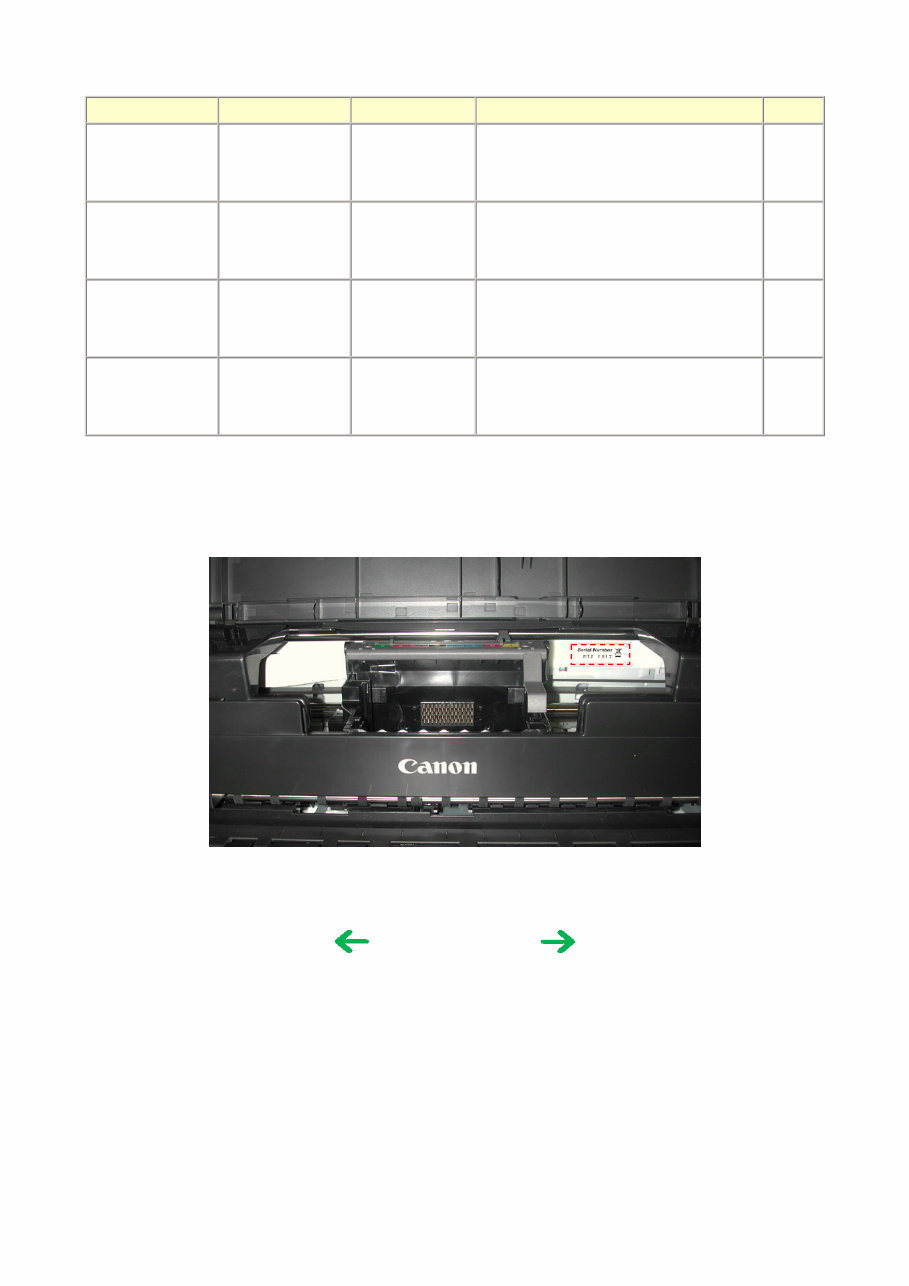
1-5. Serial Number Location
On the carriage flexible cable holder (visible on the right of the carriage after the printer is turned on, the access cover is opened, and the carriage moves
to the center).
Name Tool No. Price (JPY) Application Remarks
FLOIL KG-107A QY9-0057-000 210 To protect the printer's sliding portions. In
common
with the
S520.
EU-1 QY9-0037-000 3,080 To maintain sliding properties of the carriage shaft. In
common
with the
i990.
MOLYKOTE PG641 CK-0562-000 820 To protect the printer's sliding portions In
common
with the
S520.
MOLYKOTE HP300 QY9-0035-000 4,200 To protect the printer's sliding portions In
common
with the
iP4100.
To the table of contents To the top
<Part 1: 1. MAINTENANCE>
1-4
2. LIST OF ERROR DISPLAY / INDICATION
Errors are indicated by the LED, and warnings are displayed on the monitor of the computer connected to the printer.
2-1. Operator Call Errors (by Alarm LED Blinking in Orange)
Part 1: MAINTENANCE TABLE OF CONTENTS
Alarm
LED
blinking
in
orange
Error [Error code] Solution Remarks
Lit Printing from the front tray is
incomplete. [1320]
Set the paper in the front tray properly, and
press the Resume/Cancel button.
Power LED lights in green (differentiating from RAM
Service Call Error.)
2 times No paper (ASF) [1000] Set the paper in the ASF, and press the
Resume/Cancel button.
3 times Paper jam (ASF) [1300]
Paper jam (front tray) [1305]
Remove the jammed paper, and press the
Resume/Cancel button.
Front tray closed [1250] Open the front tray. The error is indicated when the front tray is not opened
at start of printing, or when the front tray is closed
during printing.
Rear
support
closed
[1260]
Open the rear support, and
press the Resume/Cancel
button.
The error is indicated when the rear support is
not opened at start of paper feeding from the
front tray.
4 times No ink [1600] Replace the empty ink tank(s), or press the
Resume/Cancel button.
Pressing the Resume/Cancel button will exit the error
without ink tank replacement, however, ink may run out
during printing.
Ink tank not installed [1660] Install the applicable ink tank(s) properly, and
confirm that the LED's of all the ink tanks
light red.
5 times The print head is not installed
[1401], or it is not properly
installed (Print head
temperature sensor error
[1403] / Faulty EEPROM
data of the print head
[1405]).
Install the print head properly.
6 times Inner cover open [1841] Close the inner cover, and press the
Resume/Cancel button.
Inner cover open during
printing on paper [1846]
Close the inner cover, and press the
Resume/Cancel button.
Inner cover open during
printing on paper (print
continuable) [1851]
Close the inner cover, and press the
Resume/Cancel button.
Inner cover open during
printing on paper (print NOT
continuable) [1856]
Close the inner cover, and press the
Resume/Cancel button to clear the error. The
paper being printed at error occurrence will be
ejected without printing the remaining data
for the ejected paper, then printing will
resume from the next page.
1-5

7 times Multiple ink tanks of the
same color installed [1681]
Replace the wrong ink tank(s) with the correct
one(s).
Ink tank in a wrong position
[1680]
Install the ink tank(s) in the correct position.
8 times Warning: The ink absorber
becomes almost full. [1700]
Pressing the Resume/Cancel button will exit
the error, and enable printing.
The service call error indicating the ink absorber is full
is likely to occur soon.
9 times The connected digital camera
or digital video camera does
not support Camera Direct
Printing. [2001]
Remove the cable between the camera and the
printer.
10 times Front tray in the raised
position [1281]
Lower the front tray, and press the
Resume/Cancel button.
The error is indicated when the front tray is in the raised
position at the start of printing from the ASF.
Front tray in the raised
position [1283]
Lower the front tray, and press the
Resume/Cancel button. (The paper being
printed at error occurrence will be ejected,
and the print job will be cancelled
automatically.)
The error is indicated when the front tray is raised
during printing from the ASF.
Front tray in the lowered
position [1284]
Raise the front tray, and press the
Resume/Cancel button. (The paper being
printed at error occurrence will be ejected,
and the print job will be cancelled
automatically.)
The error is indicated when the front tray is lowered
during printing from the front tray.
11 times Failed in automatic print
head alignment [2500]
Press the Resume/Cancel button.
- If paper is being fed at error occurrence, the
error is indicated after the paper is ejected.
- If the error occurs, the print head alignment
values are not changed.
-After exit from the error by the
Resume/Cancel button, the automatic print
head alignment will not be re-done.
The error is indicated when the pattern is not printed due
to no ink or non-ejection of ink, or when the sensor's AD
value is incorrect.
Paper size smaller than
specified [1062]
Press the Resume/Cancel button. (The paper
will be ejected, and the print job will be
cancelled automatically.)
The error is indicated when the size of paper actually set
is smaller than the one selected in the printer driver.
Printing on the platen can occur.
(e.g. When A4 paper is set though A3 is selected in the
printer driver, the error occurs.
v.v. If A3 paper is set and A4 is selected in the printer
driver, then the error is not indicated and printing
is performed.)
12 times Paper not set properly in the
front tray / Non-supported
size of paper set in the front
tray [1321]
Press the Resume/Cancel button to clear the
error, then set a supported size of paper
properly in the front tray.
13 times Remaining ink amount
unknown [1683]
An ink tank which has once been empty is
installed. Replace the applicable ink tank with
a new one.
If an ink tank has once been removed, this error can
occur.If printing is continued without replacing the
applicable ink tank, the print head can be damaged.To
continue printing with a refilled ink tank, press the
Resume/Cancel button for 5 sec. or longer to record the
use of the refilled ink tank.
1-6
You're Reading a Preview
What's Included?
 Lifetime Access
Fast Download Speeds
Online & Offline Access
Access PDF Contents & Bookmarks
Full Search Facility
Print one or all pages of your manual
$36.99
Canon Pixma Pro 9000 printer service repair workshop manual
Viewed 17 Times Today

What's Included?
Lifetime Access
Fast Download Speeds
Online & Offline Access
Access PDF Contents & Bookmarks
Full Search Facility
Print one or all pages of your manual
$36.99

Secure transaction
What's Included?
Lifetime Access
Fast Download Speeds
Online & Offline Access
Access PDF Contents & Bookmarks
Full Search Facility
Print one or all pages of your manual
Description
Get the service manual for the Canon Pixma Pro 9000 printer, designed for quick and precise repair procedures.
- Bookmarked chapters for easy navigation
- Notes, cautions, and warnings throughout each chapter
- Numbered instructions for step-by-step guidance
- Bold figured numbers for quick illustration matching
- Detailed illustrations, diagrams, drawings, and photos
- Numbered table of contents for fast information retrieval
Language: English
File Format: PDF
File Delivery: Instant
Pages: 38
Whether you're a professional mechanic or a DIY enthusiast, this manual is a valuable resource for maintaining and repairing your Canon Pixma Pro 9000 printer.
Simply click the green instant button to purchase and download the manual for easy access anytime.


