Canon Pixma IP100 Service Manual & Repair Guide + Parts Catalog
What's Included?
Lifetime Access
Fast Download Speeds
Offline Viewing
Access Contents & Bookmarks
Full Search Facility
Print one or all pages of your manual
PIXMA iP100 SERVICE MANUAL Canon Copyright 2008, Canon U.S.A. This technical publication is the proprietary and confidential information of Canon U.S.A. which shall be retained for reference purposes by Authorized Service Facilities of Canon U.S.A. Its unauthorized use is prohibited.
TABLE OF CONTENTS 1. MAINTENANCE 1-1. Adjustment, Periodic Maintenance, Periodic Replacement Parts, and Replacement Consumables by Service Engineer 1-2. Customer Maintenance 1-3. Special Tools 1-4. Serial Number Location 2. LIST OF ERROR DISPLAY / INDICATION 2-1. Operator Call Errors 2-2. Service Call Errors 2-3. Warnings 2-4. Troubleshooting by Symptom 3. REPAIR 3-1. Notes on Service Part Replacement 3-2. Special Notes on Repair Servicing (1) Setting of the absolute time at removal of the coin cell unit or coin battery (2) Notes on attachment of the main case unit (3) Notes on attachment of the sheet feed unit (4) Notes on attachment of the purge unit (5) Notes on attachment of the print unit (6) Wiring of the flexible cable and harnesses and Connection of the connecter 3-3. Adjustment / Settings (1) Paper feed motor adjustment (2) Grease application (3) Ink absorber counter setting (4) User mode (5) Service mode A: Service mode operation procedures B: Destination settings C: Ink absorber resetting D: Ink absorber setting E: LF / Eject correction F: How to determine the selection 3-4. Verification Items (1) Service test print (2) Ink absorber counter value print 4. MACHINE TRANSPORTATION iP100 <TABLE OF CONTENTS>
1. MAINTENANCE 1-1. Adjustment, Periodic Maintenance, Periodic Replacement Parts, and Replacement Consumables by Service Engineer (1) Adjustment (2) Periodic maintenance No periodic maintenance is necessary. (3) Periodic replacement parts There are no parts in this machine that require periodic replacement by a service engineer. (4) Replacement consumables There are no consumables that require replacement by a service engineer. iP100 TABLE OF CONTENTS Adjustment Timing Purpose Tool Approx. time EEPROM initialization - At logic board replacement To initialize settings None. Perform in the service mode. 1 min. Destination settings (EEPROM settings) - At logic board replacement To set destination. None. Perform in the service mode. 1 min. Ink absorber replacement - When the ink absorber becomes full To replace the ink absorber with a new one. None. 13 min. Ink absorber counter resetting (EEPROM settings) - At logic board replacement - At ink absorber replacement To reset the ink absorber counter. None. Perform in the service mode. 1 min. Print head alignment - At logic board replacement - At carriage unit replacement - At print unit replacement - At print head replacement - When print quality is not satisfying To secure the dot placement accuracy. Auto.: MP101 (A4, 1 sheet) Manual: Plain paper (A4, 3 sheets) 4 min. LF / Eject correction - At logic board replacement - At print unit replacement - At print head replacement To correct line feeding / paper feeding. None. Perform in the service mode. 3 min. Grease application - At carriage unit replacement - To the carriage shaft sliding portion - To the carriage oil pad - To the carriage slider sliding portion - EU-1 - FLOIL KG- 107A 1 min. Ink system function check - At logic board replacement - At print unit replacement - At carriage unit replacement To maintain detection functionality for presence of the ink tanks and each ink tank position. None. Perform in the service mode. 2 min. - DO NOT loosen the red screws at both ends of the carriage shaft, securing the print head position, as they are not re-adjustable. - The red screws securing the paper feed motor may be loosened only at replacement of the paper feed motor unit. 1 / 26
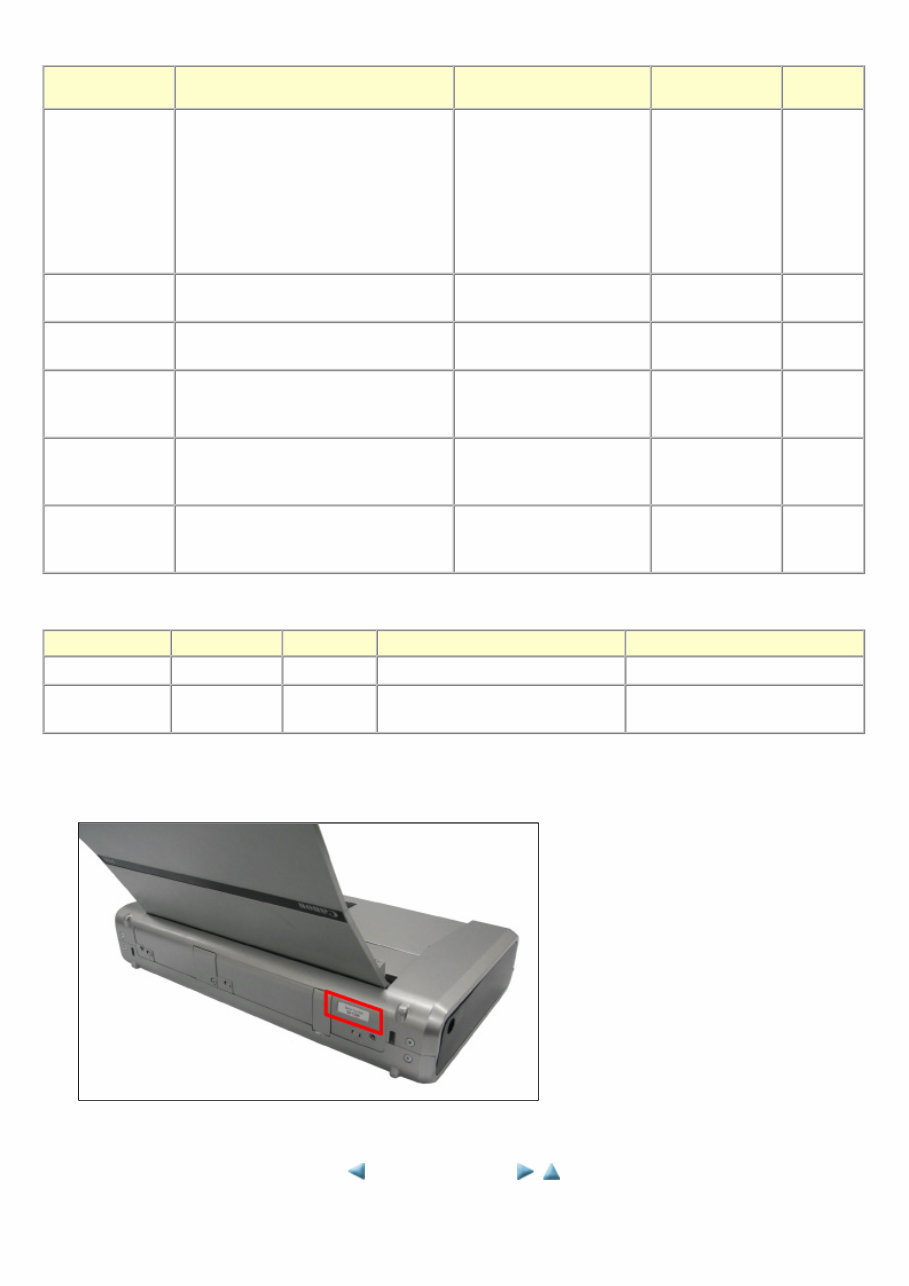
1-2. Customer Maintenance 1-3. Special Tools 1-4. Serial Number Location On the back side of the printer Adjustment Timing Purpose Tool Approx. time Automatic print head alignment - At print head replacement - When print quality is not satisfying (uneven printing, etc.) To ensure accurate dot placement. Auto.: MP101 (A4, 1 sheet) Manual: Plain paper (A4, 3 sheets) - Computer (MP driver) 4 min. Print head cleaning When print quality is not satisfying. To improve nozzle conditions. - Computer (MP driver) 2 min. Print head deep cleaning When print quality is not satisfying, and not improved by print head cleaning. To improve nozzle conditions. - Computer (MP driver) 2 min. Ink tank replacement When an ink tank becomes empty. ("No ink error" displayed on the PC, or short flashing of the ink tank LED) --- --- 2 min. Paper feed roller cleaning - When paper does not feed properly. - When the front side of the paper is smeared. To clean the paper feed rollers. - Computer (MP driver) 1min. Bottom plate cleaning When the back side of the paper is smeared. To clean the platen ribs. - Plain paper - Computer (MP driver) 1 min. Name Tool No. Application Remarks FLOIL KG-107A QY9-0057-000 To the carriage shaft sliding portion In common with the other models. Oil EU-1 QY9-0037-000 To the carriage shaft sliding portion To the carriage oil pad In common with the other models. <1. MAINTENANCE> 2 / 26
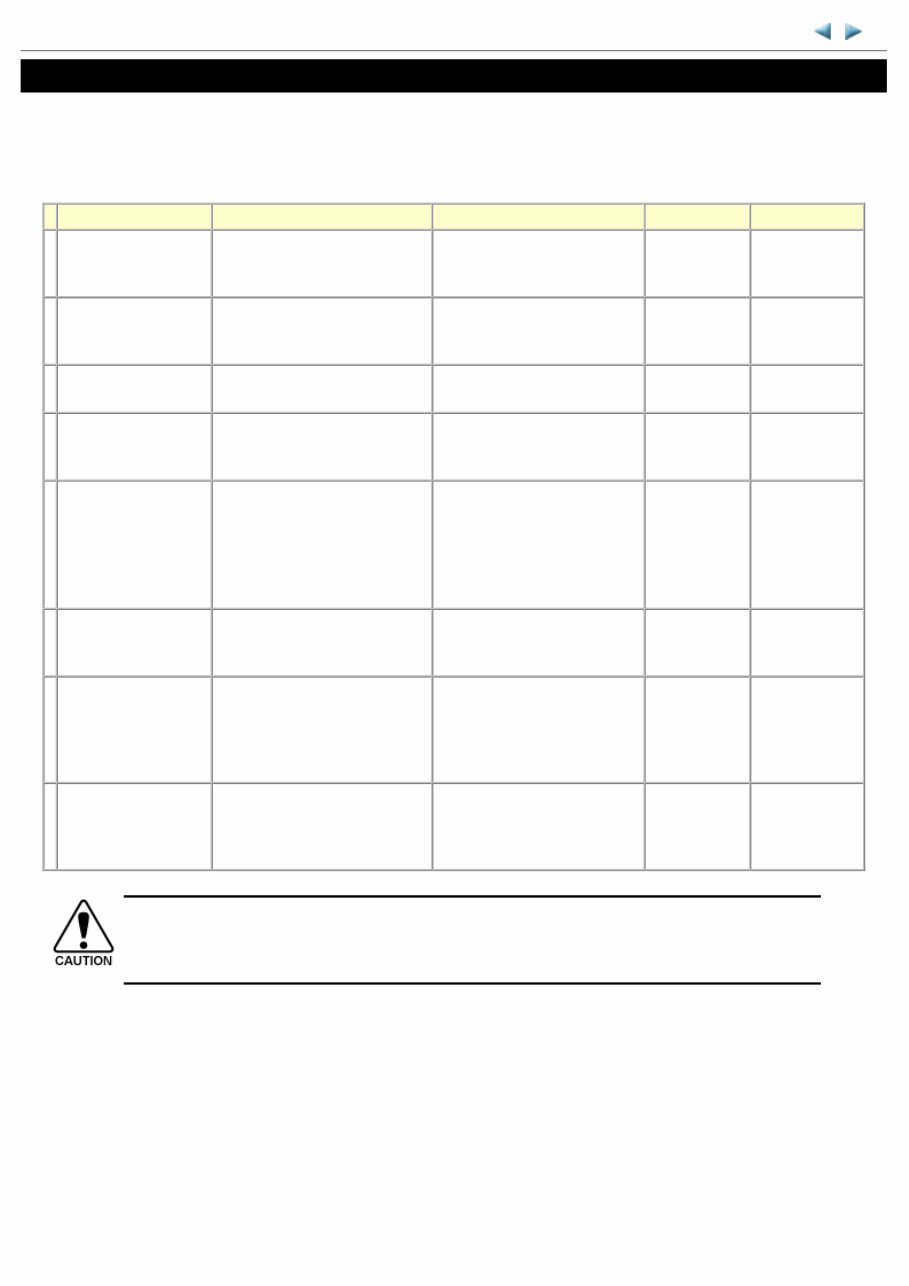
2. LIST OF ERROR DISPLAY / INDICATION Errors and warnings are displayed by the following ways: 1. Operator call errors are indicated by the Alarm LED blinks in orange, and messages are displayed on the MP driver Status Monitor. 2. Error codes are printed in the "operator call/service call error record" area in EEPROM information print Buttons valid when an operator call error occurs: 1. Power button: To turn the machine off and on again. 2. Resume/Cancel button: To cancel the job at error occurrence, and to clear the error. 2-1. Operator Call Errors (by Alarm LED blinks in Orange) iP100 TABLE OF CONTENTS Blinking of Alarm LED Error Solution Reference 2 times No paper in the rear tray. [1000] Set the paper in the rear tray, and press the Resume/Cancel button. 3 times Paper jam. [1300] Remove the jammed paper, and press the Resume/Cancel button. 4 times Ink may have run out. [1600] Replace the applicable ink tank and close the print head cover, or press the Resume/Cancel button to clear the error without ink tank replacement. When the error is cleared by pressing the Resume/Cancel button, ink may run out during printing. Ink tank not installed. [1660] Install the applicable ink tank(s) properly, and confirm that the LED's of all the ink tanks light in red. 5 times Print head not installed, or not properly installed./Print head ID error. [1401] Print head temperature sensor error. [1403] Install the print head properly. 8 times Warning: The ink absorber becomes almost full. [1700/1701] Press the Resume/Cancel button. The error showing that the ink absorber becomes full (service call error) may occurs soon. 9 times The connected digital camera or digital video camera does not support Camera Direct Printing. [2001] Remove the cable between the camera and the printer. 11 times Failed in automatic print head alignment. [2500] Press the Resume/Cancel button to clear the error. - The Alarm LED starts blinking after the paper is ejected. - Once the error occurs, the print head alignment values are not written. - To perform automatic print head alignment, start from the first step. The error occurs when: - The automatic print head alignment is not correctly performed due to ink out or non- ejection of ink. - The AD value of the sensor is not correct. - The size of the paper used for alignment is not proper. 12 times Low battery. [1810] Connect the universal AC adapter to the printer to charge 3 / 26
Is your Canon Pixma IP100 Printer letting you down?
Why replace when you can upgrade or repair? This service and repair manual is used by the Official Certified Canon Technicians. It will help you to troubleshoot and repair your Printer!
You will learn about:
Product Specifications
Troubleshooting
Maintenance
Repair
Adjustments
Exploded Views (can be used for disassembly)
Parts List/ Parts Catalog
This service manual is very detailed and illustrated with pictures and step-by-step instructions on how to repair/service this printer the best way there is!
Please note this is the OFFICIAL service and repair manual in .PDF format, no scanned-in or bootlegged copy. This manual is made in the highest resolution, so when you print the pages you need it is all in great quality!
INSTANT access! After your payment, you will have instant access to your manual. No shipping fee, no waiting on postal delivery, you can start doing your repairs right away!
Specifications
Language: English
Platform: Windows and MAC
Looking for a service manual but can't find it anywhere? Please contact us with your request! As you can see we've got the largest & most comprehensive service manual database out there, so a good chance we can help you out!
Recently Viewed
5,521,897Happy Clients
2,594,462eManuals
1,120,453Trusted Sellers
15Years in Business
Price:
Actual Price:
Canon Pixma IP100 Service Manual & Repair Guide + Parts Catalog