TABLE OF CONTENTS 1. MAINTENANCE 1-1. Adjustment, Periodic Maintenance, Periodic Replacement Parts, and Replacement Consumables by Service Engineer 1-2. Customer Maintenance 1-3. Special Tools 1-4. Serial Number Location 2. LIST OF ERROR DISPLAY / INDICATION 2-1. Operator Call Errors 2-2. Service Call Errors 2-3. Other Error Messages 2-4. Warnings 2-5. Troubleshooting by Symptom 3. REPAIR 3-1. Notes on Service Part Replacement 3-2. Special Notes on Repair Servicing (1) External housing, scanner unit, and document cover removal (2) Operation panel removal (3) Cable wiring and connection (4) Emblem removal (5) Printer unit separation from the bottom case (how to remove the screw under the purge unit) 3-3. Adjustment / Settings (1) Paper feed motor adjustment (2) Document pressure plate sheet (sponge sheet) replacement (3) Grease application (4) Ink absorber counter setting (5) User mode (6) Service mode A: Service mode operation B: Destination settings C: Ink absorber counter resetting D: Ink absorber counter setting E: LF / Eject correction F: Left margin correction G: Button and LCD test 3-4. Verification Items (1) Service test print (2) Ink absorber counter value print 4. MACHINE TRANSPORTATION MP970 <TABLE OF CONTENTS>
1. MAINTENANCE 1-1. Adjustment, Periodic Maintenance, Periodic Replacement Parts, and Replacement Consumables by Service Engineer (1) Adjustment MP970 TABLE OF CONTENTS Adjustment Timing Purpose Tool Approx. time EEPROM initialization - At logic board replacement To initialize settings None. Perform in the service mode. 1 min. Destination settings (EEPROM settings) - At logic board replacement To set destination. None. Perform in the service mode. 1 min. Ink absorber counter resetting (EEPROM settings) - At logic board replacement - At ink absorber replacement To reset the ink absorber counter. None. Perform in the service mode. 1 min. Ink absorber counter value setting (EEPROM settings) - At logic board replacement To set the ink amount data in the ink absorber to the ink absorber counter. None. Perform in the service mode. 1 min. Ink absorber replacement - When the ink absorber becomes full To replace the ink absorber with a new one. Screwdriver, a pair of tweezers, etc. 15 min. Paper feed motor position adjustment - At paper feed motor replacement To adjust the belt tension. (Position the paper feed motor so that the belt is stretched tight.) None. 5 min. CD / DVD detection sensor light volume correction *1 - At carriage unit replacement - At logic board replacement To correct the light volume for the CD / DVD detection sensor. None. Perform in the service mode. 5 min. Automatic print head alignment - At print head replacement - At logic board replacement - When print quality is not satisfying To secure the dot placement accuracy. None. Perform in the user mode. 4 min. Manual print head alignment - At print head replacement - At logic board replacement - When print quality is not satisfying To secure the dot placement accuracy. None. Perform in the user mode. 5 min. Grease application - At carriage unit replacement - At lift cam replacement - To gears - At Easy-Scroll Wheel replacement To maintain sliding properties of the following items: - Carriage shaft - Lift cam bushing - Machine sliding portions (gears) - Wheel base FLOIL KG-107A 1 min. Ink system function check - At logic board replacement - At spur base replacement - At carriage unit replacement To maintain detection functionality for presence of the ink tanks and each ink tank position. None. Perform in the service mode. 1 min. LCD language settings - At logic board replacement To set the language to be displayed on the LCD. None. Perform in the user mode. 1 min. 1 / 45
*1: Only for CD / DVD printing supported regions. (2) Periodic maintenance No periodic maintenance is necessary. (3) Periodic replacement parts There are no parts in this machine that require periodic replacement by a service engineer. (4) Replacement consumables There are no consumables that require replacement by a service engineer. Platen glass protection sheet (document pressure plate sheet) position adjustment - At protection sheet replacement - At protection sheet frame replacement - At scanner unit replacement To maintain scanning accuracy, hold the sheet with the long side down, then fit its lower right corner to the platen glass reference mark (back left). None. 1 min. LF / Eject correction - At logic board replacement - At feed roller ass'y replacement To correct line feeding (LF roller diameter). None. Perform in the service mode. 5 min. (LF correction and Eject correction is performed at the same time.) - At logic board replacement - At platen unit replacement To correct line feeding (eject roller diameter). None. Perform in the service mode. LAN resetting - At logic board replacement To initialize the network setting None. Perform in the user mode. - Machine buttons - Host computer (IJ Network tool) - WEB UI (DTV) (Japan only) 1 min. LAN setting information display - At confirmation of the network setting (as needed) To confirm the network setting None. Perform in the user mode. - Machine buttons - Host computer (IJ Network tool) - WEB UI (DTV) (Japan only) 1 min. - DO NOT loosen the red screws at both ends of the carriage shaft, securing the print head position, as they are not re-adjustable. - The red screws securing the paper feed motor may be loosened only at replacement of the paper feed motor unit. 2 / 45
1-2. Customer Maintenance Adjustment Timing Purpose Tool Approx. time Automatic print head alignment - At print head replacement - When print quality is not satisfying (uneven printing, etc.) To ensure accurate dot placement. - Machine buttons - Computer (MP driver) 4 min. Manual print head alignment - At print head replacement - When print quality is not satisfying (uneven printing, etc.) To ensure accurate dot placement. - Machine buttons - Computer (MP driver) 5 min. Print head cleaning When print quality is not satisfying. To improve nozzle conditions. - Machine buttons - Computer (MP driver) 1 min. Print head deep cleaning When print quality is not satisfying, and not improved by print head cleaning. To improve nozzle conditions. - Machine buttons - Computer (MP driver) 2 min. Ink tank replacement When an ink tank becomes empty. ("No ink error" displayed on the monitor or on the machine LCD, or short flashing of an ink tank LED) To replace the empty ink tank. --- 1 min. Paper feed roller cleaning - When paper does not feed properly. - When the front side of the paper is smeared. To clean the paper feed rollers of the rear tray. - Machine buttons - Computer (MP driver) 2 min. Rear tray sub- roller cleaning When the paper fed from the rear tray is smeared due to ink mist attached to the rear tray sub-rollers. To clean the rear tray sub-rollers. - Machine buttons 1 min. Bottom plate cleaning When the back side of the paper is smeared. To clean the platen ribs. - Machine buttons - Computer (MP driver) 1 min. Scanning area cleaning When the platen glass or document pressure plate sheet is dirty. To clean the platen glass and plate sheet. Soft, dry, and clean lint-free cloth. 1 min. Exterior cleaning When necessary To clean the machine exterior Soft, dry, and clean lint-free cloth. 1 min. LAN resetting When changing the network setting, etc. To return the LAN setting to its original state. None. Perform in the user mode. - Machine buttons - Host computer (IJ Network tool) - WEB UI (DTV) (Japan only) 1 min. LAN setting information display When changing the network setting, etc. To confirm the LAN setting information. None. Perform in the user mode. - Machine buttons - Host computer (IJ Network tool) - WEB UI (DTV) (Japan only) 1 min. 3 / 45
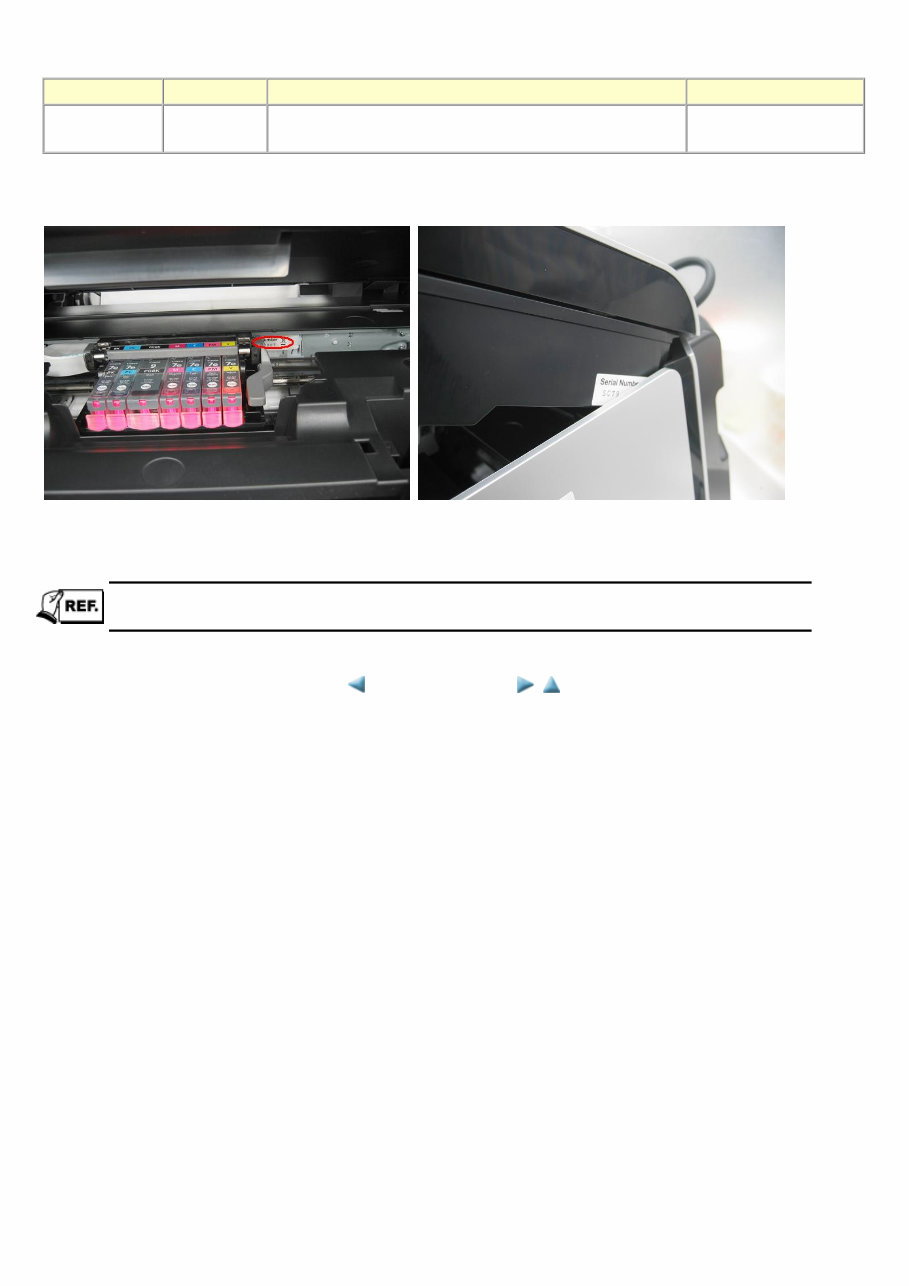
1-3. Special Tools 1-4. Serial Number Location On the carriage flexible cable holder (visible on the right of the carriage after the machine is turned on, the scanning unit is opened, and the carriage stops at the ink tank replacement position) Name Tool No. Application Remarks FLOIL KG-107A QY9-0057-000 To the carriage shaft sliding portions, lift cam bushing, and Easy- Scroll Wheel base. In common with the MP600, etc. The serial number for the scanning unit: On the right side of the unit (visible on the right side when the scanning unit is opened) <1. MAINTENANCE> 4 / 45
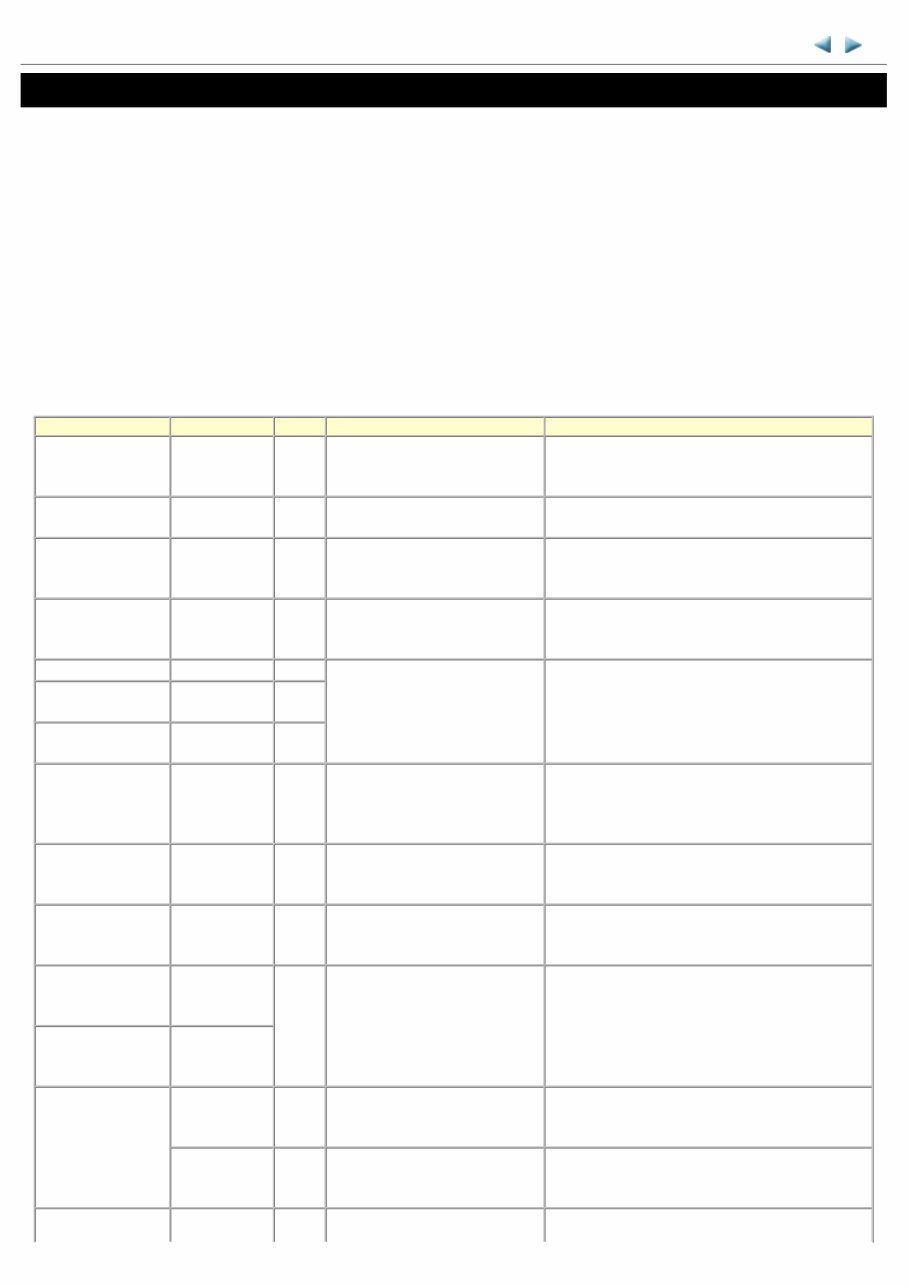
2. LIST OF ERROR DISPLAY / INDICATION Errors and warnings are displayed by the following ways: 1. Operator call errors are indicated by the Alarm LED lit in orange, and the error and its solution are displayed on the LCD in text and by icon. 2. Messages during printing from a computer are displayed on the MP driver Status Monitor. 3. Error codes are printed in the "operator call/service call error record" area in EEPROM information print Buttons valid when an operator call error occurs: 1. ON/OFF button: To turn the machine off and on again. 2. OK button: To clear and recover from an error. In some operator call errors, the error will automatically be cleared when the cause of the error is eliminated, and pressing the OK button may not be necessary. 3. Stop/Reset button: To cancel the job at error occurrence, and to clear the error. 2-1. Operator Call Errors (by Alarm LED Lit in Orange) MP970 TABLE OF CONTENTS Error Error code U No. Message on the LCD Solution No paper in the rear tray. [1000] --- Rear tray. There is no paper. Load paper and press [OK]. Confirm that the rear tray is selected as the paper source. Set the paper in the rear tray, and press the OK button. No CD / DVD tray *1 . [1001] --- There is no CD-R tray. Attach the tray and press [OK]. Set the CD / DVD tray, and press the OK button. No CD or DVD *1 . [1002] --- Printable disc is not set. Correctly place a disc in the CD-R tray and press [OK]. Set a CD or DVD in the CD / DVD tray, and inset the CD / DVD tray in the proper position. Then, press the OK button. No paper in the cassette. [1003] --- Cassette. There is no paper. Load paper and press [OK]. Confirm that the cassette is selected as the paper source. Set the paper in the cassette, and press the OK button. Paper jam. [1300] --- The paper is jammed. Clear the paper and press [OK]. Remove the jammed paper, and press the OK button. Paper jam in the rear guide. [1303] --- Paper jam in the under guide. [1304] --- Ink may have run out. [1600] U041 The following ink may have run out. Replacing the ink tank is recommended. Replace the applicable ink tank, or press the OK button to clear the error without ink tank replacement. When the error is cleared by pressing the OK button, ink may run out during printing. Ink tank not installed. [1660] U043 The following ink tank cannot be recognized. (Applicable ink tank icon) Install the applicable ink tank(s) properly, and confirm that the LED's of all the ink tanks light red. Print head not installed, or not properly installed. [1401] U051 Print head is not installed. Install the print head. Install the print head properly. Print head temperature sensor error. [1403] U052 The type of print head is incorrect. Install the correct print head. Re-set the print head. If the error is not cleared, the print head may be defective. Replace the print head. Faulty EEPROM data of the print head. [1405] Inner cover error. [1841 *2 , 1846 *2 , 1851 *1 , 1856 *1 ] --- Inner cover is open. Close the inner cover and press [OK]. Close the inner cover, and press the OK button. [1850 *1 , 1855 *1 ] --- Open the inner cover, place the CD-R tray and press [OK]. Open the inner cover which functions as the CD / DVD tray feeder, set the CD / DVD tray in the feeder, and press the OK button. Multiple ink tanks of [1681] U071 More than one ink tank of the Replace the wrong ink tank(s) with the correct one 5 / 45
*1: Only for models supporting CD / DVD printing *2: Only for models not supporting CD / DVD printing the same color installed. following color is installed. (s). Ink tank in a wrong position. [1680] U072 Some ink tanks are not installed in place. Install the ink tank(s) in the correct position. Warning: The ink absorber becomes almost full. [1700, 1701] --- Contact the support center or service center for ink absorber replacement. Press [OK] to continue printing. Replace the ink absorber, and reset its counter. [See 3-3. Adjustment / Settings, (6) Service mode.] Pressing the OK button will exit the error, and enable printing without replacing the ink absorber. However, when the ink absorber becomes full, no further printing can be performed unless the applicable ink absorber is replaced. The connected digital camera or digital video camera does not support Camera Direct Printing. [2001] --- The device may be incompatible. Remove the device and check the manual supplied with the connected device. Remove the cable between the camera and the machine. Automatic duplex printing cannot be performed. [1310] --- This paper is not compatible with duplex printing. Remove the paper and press [OK]. The paper length is not supported for duplex printing. Press the OK button to eject the paper being used at error occurrence. Data which was to be printed on the back side of paper at error occurrence is skipped (not printed). Failed in automatic print head alignment. [2500] --- Auto head align has failed. Press [OK] and repeat operation. <See manual> Press the OK button to clear the error, then perform the automatic print head again. (In the MP610, use Matte Photo Paper MP-101.) The remaining ink amount unknown. [1683] U130 (Applicable ink tank icon) The remaining level of the following ink cannot be correctly detected. Replace the ink tank. An ink tank which has once been empty is installed. Replace the applicable ink tank with a new one. Printing with a once-empty ink tank can damage the machine. To continue printing without replacing the ink tank (s), press the Stop/Reset button for 5 sec. or longer to disable the function to detect the remaining ink amount. After the operation, it is recorded in the machine EEPROM that the function to detect the remaining ink amount was disabled. Ink tank not recognized. [1684] U140 The following ink tank cannot be recognized. (Applicable ink tank icon) A non-supported ink tank is installed (the ink tank LED is turned off). Install the supported ink tanks. Ink tank not recognized. [1410 to 1419] U150 The following ink tank cannot be recognized. (Applicable ink tank icon) A hardware error occurred in an ink tank (the ink tank LED is turned off). Replace the ink tank(s). No ink (no raw ink). [1688] U163 The following ink has run out. Replace the ink tank. (Applicable ink tank icon) Replace the empty ink tank(s), and close the scanning unit (printer cover). Printing with an empty ink tank can damage the machine. To continue printing without replacing the ink tank (s), press the Stop/Reset button for 5 sec. or longer to disable the function to detect the remaining ink amount. After the operation, it is recorded in the machine that the function to detect the remaining ink amount was disabled. Non-supported hub [2002] --- An unsupported USB hub is connected. Remove the hub. Remove the applicable USB hub from the PictBridge (USB) connector. Unable to release Scanner lock switch. [5020] --- Release the scanner lock switch and turn the power off and back on. Unlock the scanner lock switch, turn the machine off, then turn the machine on again. 6 / 45
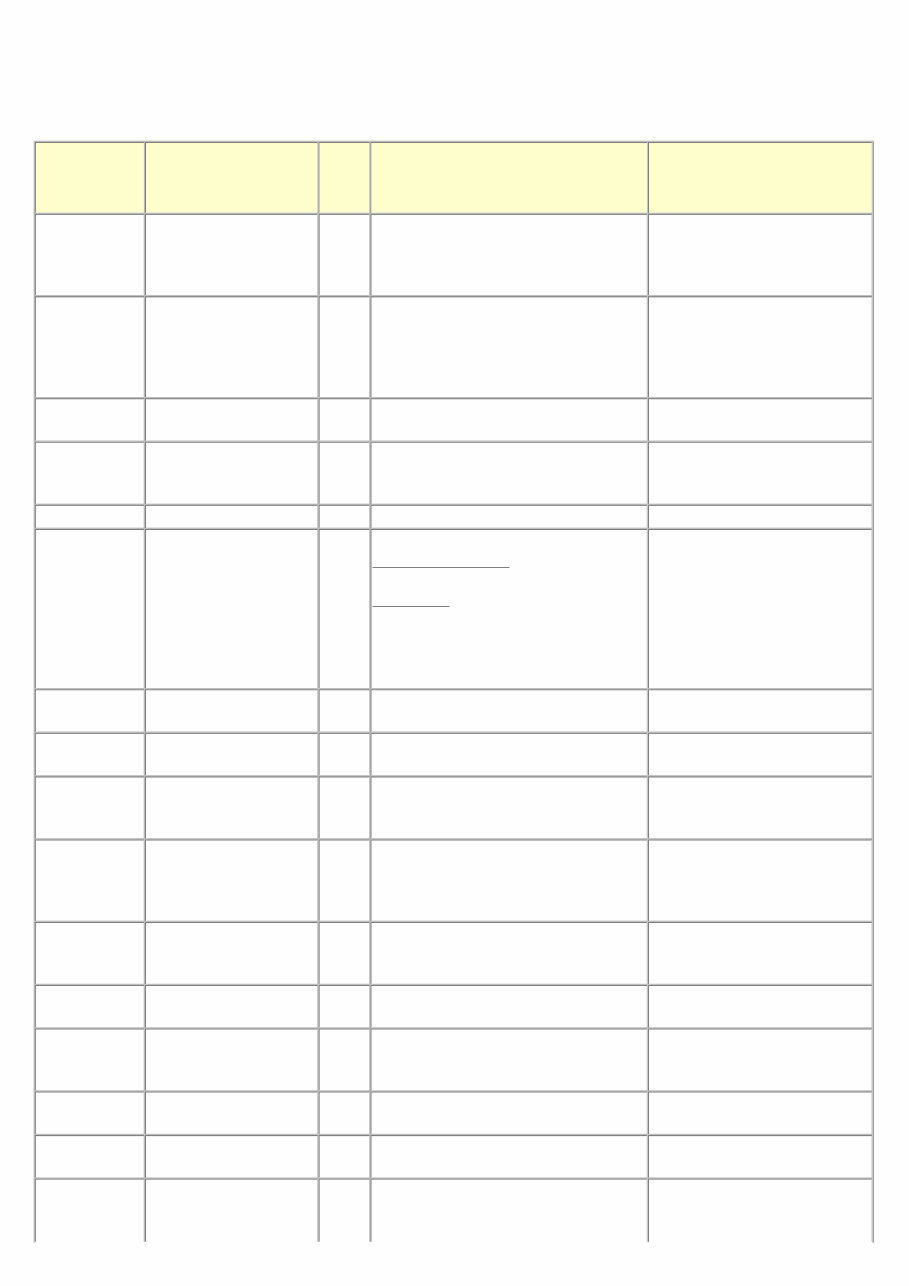
2-2. Service Call Errors (by Cyclic Blinking of Alarm and Power LEDs) Service call errors are indicated by the number of cycles the Alarm and Power LEDs blink, and the corresponding error code with the message, "Printer error has occurred. Turn off power then back on again. If problem persists, see the manual." is displayed on the LCD. Cycles of blinking of Alarm and Power LEDs Error Error code Conditions Solution (Replacement of listed parts, which are likely to be faulty) 2 times Carriage error [5100] An error occurred in the carriage encoder signal. - Carriage unit - Timing slit film - Logic board - Carriage motor 3 times Line feed error [6000] An error occurred in the LF encoder signal. - Timing sensor unit - Timing slit disk film - Feed roller - Logic board - Paper feed motor 4 times Purge cam sensor error [5C00] An error occurred in the purge unit. - Purge unit - Logic board 5 times ASF (cam) sensor error [5700] This error takes place when feeding paper from the rear tray after an error occurred in the ASF cam sensor. - Sheet feed unit - ASF_PE sensor board - Logic board 6 times Internal temperature error [5400] The internal temperature is not normal. - Logic board 7 times Ink absorber full [5B00, 5B01] The ink absorber is supposed to be full. Message on the LCD: Ink absorber full. Service required. Error codes: 5B00: Main ink absorber is full (overseas). 5B01: Main ink absorber is full (Japan). - Ink absorber kit 8 times Print head temperature rise error [5200] The print head temperature exceeded the specified value. - Print head - Logic board 9 times EEPROM error [6800] A problem occurred in writing to the EEPROM. - Logic board 10 times VH monitor error [B200] The internal temperature exceeded the specified value. - Print head - Carriage unit - Logic board 11 times Carriage lift mechanism error [5110] The carriage did not move up or down properly. - Sheet feed unit - PR lift shaft ass'y - Carriage lift sensor unit - Logic board 12 times AP position error [6A00] An error occurred in the AP motor during purging operation. - Sheet feed unit - Purge unit - Logic board 13 times Paper feed position error [6B00] An error occurred in the paper feed motor during line feeding. - Sheet feed unit - Logic board 14 times Paper feed cam sensor error [6B10] An error occurred in the paper feed cam sensor during paper feeding from the cassette. - Sheet feed unit - Logic board 15 times USB Host VBUS overcurrent [9000] The USB Host VBUS is overloaded. - Logic board 16 times Pump roller sensor error [5C20] The pump roller position cannot be detected. - Purge unit - Logic board 17 times Paper eject encoder error [6010] An error occurred in the paper eject encoder signal. - Platen unit - Timing sensor unit - Timing slit disk eject film 7 / 45
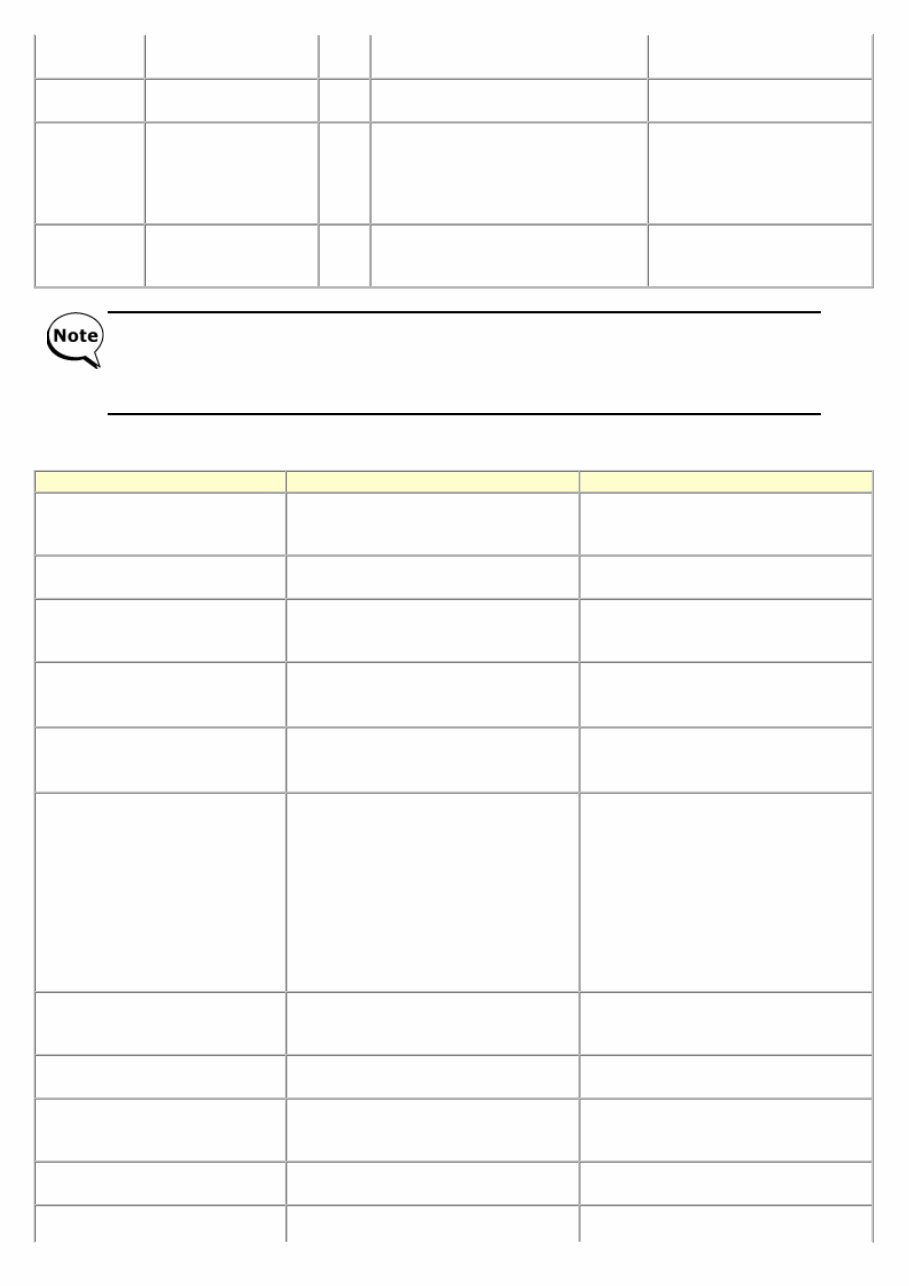
2-3. Other Error Messages - Paper feed motor - Logic board 19 times Ink tank position sensor error [6502] None of the ink tank position is detected. - Platen unit - Logic board 22 times Scanner home position error [5010] The scanner unit cannot detect the home position, or the scanner unit warming-up is not performed properly at power-on. On the LCD, "Scanner is not operating correctly." is displayed. - Scanner unit Power LED turned off, and Alarm LED lit ROM / RAM error --- The check sum value is incorrect in the ROM check or RAM check at hard-power- on. - Logic board Before replacement of the logic board ass'y, check the ink absorber counter value (by service test print or EEPROM information print). If the counter value is 7% or more, also replace the ink absorber kit when replacing the logic board ass'y. If the counter value is less than 7%, register the current ink absorber counter value to the replaced new logic board instead. [See 3-3. Adjustment / Settings, (6) Service mode, for details.] Message on the LCD Cause Solution The selected paper cannot be fed from cassette. Change the paper source and press [OK]. The paper type being used (business card, Credit Card size paper, or stickers, etc.) is not supported for paper feeding from the cassette. Change the paper source to the rear tray. Cannot specify the followings together. Change one of the settings. Settings made conflict each other. (e.g. Selecting borderless printing on plain paper) Change the settings so that they will not conflict each other. Device memory is full. Reduce the amount of photos, films, and copies to scan. The memory is not sufficient to do the print job in copying. Reduce the amount of data to be printed, or print from a computer. Press <>. (<>: Color button icon) The Black button was pressed, but it is invalid. A temporary error. Press the Color button to continue the operation. Press <>. (<>: Black button icon) The Color button was pressed, but it is invalid. A temporary error. Press the Black button to continue the operation. There are no photos in memory card. Supported image files are not in the memory card. A temporary error. - Confirm that supported image files are in the memory card. - Images with double-byte characters used in the file name (or folder name) may not be recognized. Change the file (or folder) name so that it contains only single-byte alphanumeric characters. - If images are edited on the computer, print them from the computer. The value exceeds the number of copies you can print. During selecting images or specifying the number of copies, the total print quantity exceeds the prescribed value of 999. A temporary error. The last operation before the error is cancelled, and the total print quantity returns to the value before the error. Memory card is not set. Insert the card after checking the direction. The memory card is not inserted in the slot properly. Set a memory card. DPOF information is not saved in the memory card. DPOF print was selected in the menu, but no DPOF files are contained in the memory card. A temporary error. The LCD automatically returns to the display before the error occurrence. The number of copies to print is not set. Input the number of copies. Printing was attempted with the print quantity left "0" (zero). A temporary error. Specify the print quantity. This layout is available only for A4 or In Layout print, "Mixed 1, 2, or 3" which is A temporary error. The LCD automatically 8 / 45
You're Reading a Preview
What's Included?
Lifetime Access
Fast Download Speeds
Online & Offline Access
Access PDF Contents & Bookmarks
Full Search Facility
Print one or all pages of your manual
$35.99
Canon Pixma MP970 Service and Repair Manual + Parts Catalog
Is your Canon Pixma MP970 Printer letting you down?
Why replace when you can upgrade or repair? This service and repair manual is used by the Official Certified Canon Technicians. It will help you to troubleshoot and repair your Printer!
You will learn about:
Product Specifications
Disassembly & Reassembly
Troubleshooting
Maintenance
Repair
Adjustments
Exploded Views
Parts List/ Parts Catalog
This service manual is very detailed and illustrated with pictures and step-by-step instructions on how to repair/service this printer the best way there is!
Please note this is the OFFICIAL service and repair manual in .PDF format, no scanned-in or bootlegged copy. This manual is made in the highest resolution, so when you print the pages you need it is all in great quality!
You can easily print this manual from any printer and any computer!
INSTANT access! You will have instant access to your access. No shipping fee, no waiting on postal delivery, you can start doing your repairs right away!
Specifications
Language: English
Pages: 55
Platform: Windows and MAC
Looking for a service manual but can't find it anywhere? Please contact us with your request! As you can see we've got the largest & most comprehensive service manual database out there, so a good chance we can help you out!
Reviews
Q&A
Recently Viewed
5,521,897Happy Clients
2,594,462eManuals
1,120,453Trusted Sellers
15Years in Business
Price:
Actual Price:
Canon Pixma MP970 Service and Repair Manual + Parts Catalog





 Lifetime Access




