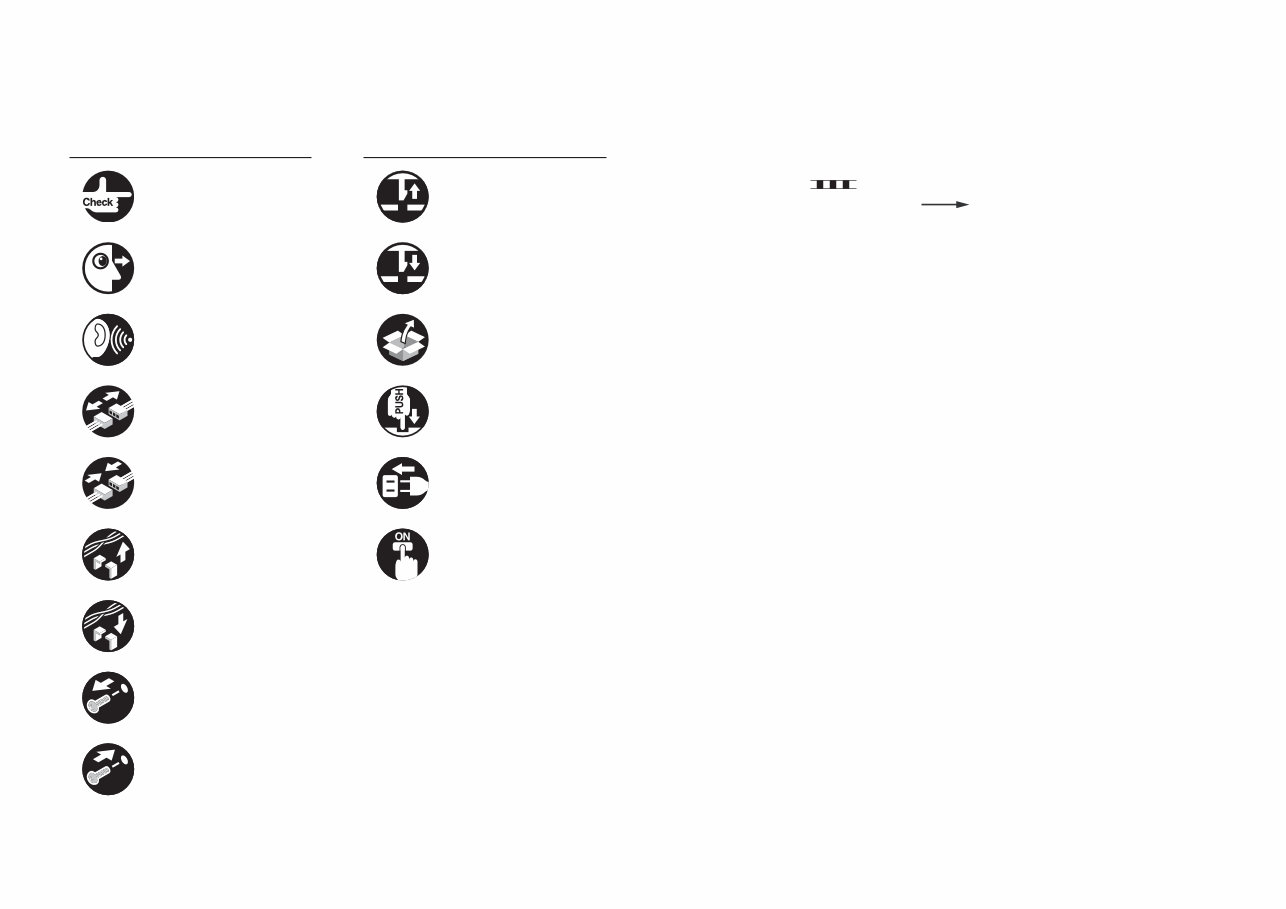
Explanation of Symbols The following symbols are used throughout this Service Manual. Symbols Explanation Symbols Explanation Check. Remove the claw. Check visually. Insert the claw. Check the noise. Use the bundled part. Disconnect the connector. Push the part. Connect the connector. Plug the power cable. Remove the cable/wire from the cable guide or wire saddle. Turn on the power. Set the cable/wire to the cable guide or wire saddle. Remove the screw. Tighten the screw. The following rules apply throughout this Service Manual: 1. Each chapter contains sections explaining the purpose of specific functions and the relationship between electrical and mechanical systems with reference to the timing of operation. In the diagrams, represents the path of mechanical drive; where a signal name accompanies the symbol, the arrow indicates the direction of the electric signal. The expression "turn on the power" means flipping on the power switch, closing the front door, and closing the delivery unit door, which results in supplying the machine with power. 2. In the digital circuits, '1' is used to indicate that the voltage level of a given signal is "High", while '0' is used to indicate "Low". (The voltage value, however, differs from circuit to circuit.) In addition, the asterisk (*) as in "DRMD*" indicates that the DRMD signal goes on when '0'. In practically all cases, the internal mechanisms of a microprocessor cannot be checked in the field. Therefore, the operations of the microprocessors used in the machines are not discussed: they are explained in terms of from sensors to the input of the DC controller PCB and from the output of the DC controller PCB to the loads. The descriptions in this Service Manual are subject to change without notice for product improvement or other purposes, and major changes will be communicated in the form of Service Information bulletins. All service persons are expected to have a good understanding of the contents of this Service Manual and all relevant Service Information bulletins and be able to identify and isolate faults in the machine.
Contents Safety Precautions CDRH Act -----------------------------------------------------------------------0-2 Laser Safety --------------------------------------------------------------------0-2 Handling of Laser System --------------------------------------------------0-2 Turn power switch ON -------------------------------------------------------0-3 Safety of Toner-----------------------------------------------------------------0-3 About Toner ------------------------------------------------------------------------- 0-3 Toner on Clothing or Skin-------------------------------------------------------- 0-3 Notes Before it Works Serving---------------------------------------------0-3 Points to Note at Cleaning --------------------------------------------------0-4 1 Product Overview Product Lineup-----------------------------------------------------------------1-2 Main Body --------------------------------------------------------------------------- 1-2 Pickup/Delivery System Option ------------------------------------------------ 1-2 Applicable Option for Each Model ------------------------------------------------------ 1-2 Required Options/Conditions ------------------------------------------------------------ 1-3 Scanning System Options ------------------------------------------------------- 1-4 Required Options and Conditions ------------------------------------------------------ 1-4 Function Expansion System Options ----------------------------------------- 1-5 Required Options and Conditions ------------------------------------------------------ 1-5 Features -------------------------------------------------------------------------1-7 Product Features------------------------------------------------------------------- 1-7 Service Features ------------------------------------------------------------------- 1-7 Improved Service Operability ------------------------------------------------------------ 1-7 New Service Mode ------------------------------------------------------------------------- 1-8 Improved Upgrading Operability -------------------------------------------------------- 1-8 Jam/Error Code Display Specifications ----------------------------------------------- 1-9 Applying New Connectors ---------------------------------------------------------------- 1-9 Specifications ---------------------------------------------------------------- 1-10 Product Specifications -----------------------------------------------------------1-10 Power Supply Specifications: -------------------------------------------------- 1-11 Weight and Size------------------------------------------------------------------- 1-11 Productivity (Print Speed)-------------------------------------------------------1-12 Paper Type -------------------------------------------------------------------------1-13 External View/Internal View ---------------------------------------------- 1-24 External View ----------------------------------------------------------------------1-24 External Cover------------------------------------------------------------------------------1-24 Switches, I/F, Others----------------------------------------------------------------------1-25 Cross-Section View --------------------------------------------------------------1-25 Operation---------------------------------------------------------------------- 1-26 Power Switch ----------------------------------------------------------------------1-26 Types of Power Switches ----------------------------------------------------------------1-26 Points to Note on Turning ON/OFF the Power Switch ---------------------------1-26 Control Panel ----------------------------------------------------------------------1-27 Control Panel -------------------------------------------------------------------------------1-27 Main Menu-----------------------------------------------------------------------------------1-27 Differences in Main Menu ---------------------------------------------------------------1-28 Settings/Registration Menu -------------------------------------------------------------1-28 Differences in Settings/Registration Menu ------------------------------------------1-29 2 Technology Basic Configuration -----------------------------------------------------------2-2 Functional Configuration --------------------------------------------------------- 2-2 Basic Sequence -------------------------------------------------------------------- 2-3 Basic sequence at power ON------------------------------------------------------------ 2-3 Basic sequence at printing <Condition: A4 1-sided (2 sheets), Right deck, Reverse delivery> -------------------------------------------------------------------------- 2-4 Basic sequence at printing <Condition: A4 2-sided (2 sheets), Right deck, Reverse delivery> -------------------------------------------------------------------------- 2-5 Main Controller ----------------------------------------------------------------2-6 Overview ----------------------------------------------------------------------------- 2-6 Features--------------------------------------------------------------------------------------- 2-6 Specifications/configuration -------------------------------------------------------------- 2-7 HDD------------------------------------------------------------------------------------------- 2-11 Boot/Shutdown sequence ---------------------------------------------------------------2-11 Controls -----------------------------------------------------------------------------2-14 Flow of Image Data -----------------------------------------------------------------------2-14
Security features (encryption key and certificate, password protection)-----2-15 High capacity HDD (Option) ------------------------------------------------------------2-24 HDD mirroring feature (option) ---------------------------------------------------------2-24 Removable HDD (option) ----------------------------------------------------------------2-29 HDD Encryption/ Mirroring Kit (optional)---------------------------------------------2-30 Service Operations ---------------------------------------------------------------2-33 HDD -------------------------------------------------------------------------------------------2-33 Main Controller PCB 1--------------------------------------------------------------------2-34 Main Controller PCB 2--------------------------------------------------------------------2-35 TPM PCB ------------------------------------------------------------------------------------2-36 Flash PCB -----------------------------------------------------------------------------------2-37 Laser Exposure System --------------------------------------------------- 2-38 Overview ----------------------------------------------------------------------------2-38 Overview -------------------------------------------------------------------------------------2-38 Specifications -------------------------------------------------------------------------------2-39 Parts Configuration------------------------------------------------------------------------2-39 Controls -----------------------------------------------------------------------------2-40 Overview -------------------------------------------------------------------------------------2-40 Laser ON Timing Control ----------------------------------------------------------------2-40 Laser Beam Intensity Control-----------------------------------------------------------2-42 Polygon Motor Control--------------------------------------------------------------------2-43 Laser Shutter Control ---------------------------------------------------------------------2-43 Servicing ----------------------------------------------------------------------------2-44 Periodically Replaced Parts-------------------------------------------------------------2-44 Consumable Parts-------------------------------------------------------------------------2-44 Periodical Servicing List------------------------------------------------------------------2-44 When Replacing Parts--------------------------------------------------------------------2-44 Major Adjustments-------------------------------------------------------------------------2-44 Practice---------------------------------------------------------------------------------------2-44 Image Formation System ------------------------------------------------- 2-45 Overview ----------------------------------------------------------------------------2-45 Overview -------------------------------------------------------------------------------------2-45 Specifications -------------------------------------------------------------------------------2-45 Parts Configuration------------------------------------------------------------------------2-46 Drive Configuration------------------------------------------------------------------------2-49 Print Process--------------------------------------------------------------------------------2-51 Controls -----------------------------------------------------------------------------2-53 Exposure-------------------------------------------------------------------------------------2-54 Primary Charging --------------------------------------------------------------------------2-55 Developing ----------------------------------------------------------------------------------2-57 Transfer --------------------------------------------------------------------------------------2-59 Separation -----------------------------------------------------------------------------------2-63 Drum Cleaning -----------------------------------------------------------------------------2-65 Drum-related Issues ----------------------------------------------------------------------2-66 Drum Heater Control----------------------------------------------------------------------2-67 Toner Supply Area-------------------------------------------------------------------------2-70 Waste Toner Feeding Area --------------------------------------------------------------2-72 Image Stabilization Control--------------------------------------------------------------2-74 Auxiliary Control----------------------------------------------------------------------------2-80 Servicing ----------------------------------------------------------------------------2-86 Periodically Replaced Parts-------------------------------------------------------------2-86 Consumable Parts-------------------------------------------------------------------------2-86 Periodical Servicing List------------------------------------------------------------------2-86 When Replacing Parts--------------------------------------------------------------------2-87 Major Adjustments-------------------------------------------------------------------------2-91 Troubleshooting ----------------------------------------------------------------------------2-92 Uneven density correction by 2D shading ----------------------------------2-93 Uneven density --------------------------------------------------------------------2-97 Smeared image -------------------------------------------------------------------2-98 Fixing--------------------------------------------------------------------------- 2-99 Overview ----------------------------------------------------------------------------2-99 Characteristics------------------------------------------------------------------------------2-99 Specifications ----------------------------------------------------------------------------- 2-100 Parts configuration ---------------------------------------------------------------------- 2-100 Drive configuration ---------------------------------------------------------------------- 2-101 Controls --------------------------------------------------------------------------- 2-103 Overview ----------------------------------------------------------------------------------- 2-103 Fixing temperature control------------------------------------------------------------- 2-103 Down sequence control ---------------------------------------------------------------- 2-108 Shutter Control --------------------------------------------------------------------------- 2-110 Paper Anti-wrapping Control---------------------------------------------------------- 2-111 Thermistor reciprocating control ----------------------------------------------------- 2-112 Upper separation claw reciprocating control-------------------------------------- 2-113 Cleaning web drive control ------------------------------------------------------------ 2-113 Cleaning web length detection ------------------------------------------------------- 2-114 Protective function----------------------------------------------------------------------- 2-115
Servicing -------------------------------------------------------------------------- 2-116 Periodically Replaced Parts----------------------------------------------------------- 2-116 Consumable Parts----------------------------------------------------------------------- 2-116 Periodical Servicing List---------------------------------------------------------------- 2-116 When Replacing Parts------------------------------------------------------------------ 2-117 Troubleshooting-------------------------------------------------------------------------- 2-118 Paper wrinkle -------------------------------------------------------------------- 2-118 Pickup / Feed System-----------------------------------------------------2-119 Overview -------------------------------------------------------------------------- 2-119 Overview----------------------------------------------------------------------------------- 2-119 Specifications ----------------------------------------------------------------------------- 2-120 Parts configuration ---------------------------------------------------------------------- 2-121 Drive Configuration---------------------------------------------------------------------- 2-123 Paper path--------------------------------------------------------------------------------- 2-124 Interval speed----------------------------------------------------------------------------- 2-125 Various types of control ---------------------------------------------------------------- 2-126 Deck/Cassette Pickup Unit --------------------------------------------------- 2-127 Basic Movement ------------------------------------------------------------------------- 2-127 Deck/Cassette detection --------------------------------------------------------------- 2-128 Paper Size Detection ------------------------------------------------ 2-129 Paper Level Detection ------------------------------------------------------------------ 2-131 Paper Detection -------------------------------------------------------------------------- 2-133 Lifter Control ------------------------------------------------------------------------------ 2-134 Pickup Retry Control -------------------------------------------------------------------- 2-135 Multi-purpose Tray Pickup Unit---------------------------------------------- 2-136 Basic Movement ------------------------------------------------------------------------- 2-136 Paper Size Detection ------------------------------------------------------------------- 2-137 Paper Detection -------------------------------------------------------------------------- 2-137 Registration Unit ---------------------------------------------------------------- 2-138 Pre-registration Control ---------------------------------------------------------------- 2-138 Registration Control --------------------------------------------------------------------- 2-139 Registration Deceleration Control --------------------------------------------------- 2-139 Registration Acceleration Control---------------------------------------------------- 2-140 Post-transfer Guide Attraction Control --------------------------------------------- 2-140 Delivery/Reverse Unit---------------------------------------------------------- 2-141 Basic Operation -------------------------------------------------------------------------- 2-141 Duplex Unit -------------------------------------------------------------------------------- 2-143 Side Registration Control -------------------------------------------------------------- 2-144 Circulation quantity and limit ---------------------------------------------------------- 2-145 Jam Dection ---------------------------------------------------------------------- 2-149 Jam Code List ---------------------------------------------------------------------------- 2-149 Forced Paper Feed Control ----------------------------------------------------------- 2-151 Servicing -------------------------------------------------------------------------- 2-152 Periodically Replaced Parts----------------------------------------------------------- 2-152 Consumable Parts----------------------------------------------------------------------- 2-152 Periodical Servicing List---------------------------------------------------------------- 2-152 When Replacing Parts------------------------------------------------------------------ 2-152 Major Adjustments----------------------------------------------------------------------- 2-152 Troubleshooting -------------------------------------------------------------------------- 2-152 External Auxiliary System ----------------------------------------------- 2-153 Overview -------------------------------------------------------------------------- 2-153 Power Supply Configuration ---------------------------------------------------------- 2-153 Controls --------------------------------------------------------------------------- 2-154 Power supply control-------------------------------------------------------------------- 2-154 Fan Control-------------------------------------------------------------------------------- 2-159 Counter control --------------------------------------------------------------------------- 2-160 Servicing -------------------------------------------------------------------------- 2-162 Periodically Replaced Parts----------------------------------------------------------- 2-162 Consumable Parts----------------------------------------------------------------------- 2-162 Periodical Servicing --------------------------------------------------------------------- 2-162 DC Controller PCB ---------------------------------------------------------------------- 2-162 Troubleshooting -------------------------------------------------------------------------- 2-162 Adjusting rotation of the Upright Control Panel Arm ------------------- 2-162 MEAP ------------------------------------------------------------------------ 2-165 Changes--------------------------------------------------------------------------- 2-165 Abolition of Supplying MEAP Administrator's CD with Machine ------------- 2-165 Checking the Operating Environment ------------------------------------- 2-165 Outline -------------------------------------------------------------------------------------- 2-165 SMS ----------------------------------------------------------------------------------------- 2-165 SSO-H Management-------------------------------------------------------------------- 2-166 Setting Up the Network-------------------------------------------------------- 2-168 Network configuration process ------------------------------------------------------- 2-168 Login to SMS--------------------------------------------------------------------- 2-169 Outline -------------------------------------------------------------------------------------- 2-169 Login by Password Authentication -------------------------------------------------- 2-169 Login by RLS Authentication---------------------------------------------------------- 2-170
Initial Display Languages of SMS --------------------------------------------------- 2-171 Setting the method to login to SMS ---------------------------------------- 2-172 Outline -------------------------------------------------------------------------------------- 2-172 Setting for login by Password Authentication ------------------------------------- 2-172 Setting for login by RLS Authentication -------------------------------------------- 2-173 Checking MEAP Application Management Page ----------------------- 2-174 About MEAP Application Management Page------------------------------------- 2-174 Starting and Stopping a MEAP Application------------------------------- 2-175 Procedure to start and stop a MEAP application -------------------------------- 2-175 Checking the Platform Information ----------------------------------------- 2-176 The check procedure of the platform information ------------------------------- 2-176 MEAP Specifications ----------------------------------------------------------- 2-176 What is MEAP Specifications (MEAP Spec Version)? ------------------------- 2-176 About Name------------------------------------------------------------------------------- 2-176 Mechanism -------------------------------------------------------------------------------- 2-176 MEAP Application System Information ------------------------------------ 2-178 Outline -------------------------------------------------------------------------------------- 2-178 Checking the System Information of a MEAP Application with SMS ------- 2-178 Printing the System Information of a MEAP Application ----------------------- 2-178 Content of MEAP system information ---------------------------------------------- 2-179 Installing an Application ------------------------------------------------------- 2-180 Resource----------------------------------------------------------------------------------- 2-180 Procedure to install applications ----------------------------------------------------- 2-180 Adding a License File ---------------------------------------------------------- 2-182 Procedure adding a license file ------------------------------------------------------ 2-182 Disabling a License File ------------------------------------------------------- 2-183 Procedure disabling a license file (suspending a license)--------------------- 2-183 Downloading / Removing an Invalidated License File ----------------- 2-185 Outline -------------------------------------------------------------------------------------- 2-185 Procedure downloading / removing an invalidated license file --------------- 2-185 Reusable license---------------------------------------------------------------- 2-186 Outline -------------------------------------------------------------------------------------- 2-186 License for forwarding --------------------------------------------------------- 2-187 Outline -------------------------------------------------------------------------------------- 2-187 Procedure to create license for forwarding---------------------------------------- 2-187 Uninstalling an Application---------------------------------------------------- 2-189 Procedure to uninstall an application ----------------------------------------------- 2-189 Login Service -------------------------------------------------------------------- 2-190 About Login Service--------------------------------------------------------------------- 2-190 Default Authentication overview------------------------------------------------------ 2-191 SSO-H (Single Sign-On-H) overview ----------------------------------------------- 2-191 Authentication methods of SSO-H -------------------------------------------------- 2-191 Access Mode in Sites------------------------------------------------------------------- 2-193 Environment confirmation ------------------------------------------------------------- 2-194 Specification of SSO-H----------------------------------------------------------------- 2-195 Changing Login Services ----------------------------------------------------- 2-195 Steps to Change Login Services ---------------------------------------------------- 2-195 Initializing the Password ------------------------------------------------------ 2-196 Outline -------------------------------------------------------------------------------------- 2-196 Procedure to initialize the SMS login password --------------------------------- 2-196 Creating a Backup, Formatting the Hard Disk, Restoring with the Backup data, Using the SST ------------------------------------------------- 2-197 Outline -------------------------------------------------------------------------------------- 2-197 Backup Items ----------------------------------------------------------------------------- 2-197 Requirements for Backup Using the SST ----------------------------------------- 2-198 Making a Backup and Formatting Hard Disk Drive with Service Support Tool--- 2-198 Procedures to Restore Backup Data ----------------------------------------------- 2-200 Replacing the Hard Disk Drive ---------------------------------------------- 2-200 Outline -------------------------------------------------------------------------------------- 2-200 HDD replacement procedure --------------------------------------------------------- 2-201 MEAP Safe Mode (level 2) --------------------------------------------------- 2-201 Outline -------------------------------------------------------------------------------------- 2-201 Starting in Safe Mode------------------------------------------------------------------- 2-201 How to cancel MEAP SAFE mode -------------------------------------------------- 2-202 Setting HTTP port for MEAP application (level 2) ---------------------- 2-203 Outline -------------------------------------------------------------------------------------- 2-203 Port setup procedure of HTTP Server---------------------------------------------- 2-203 Port setup procedure of HTTPS Server-------------------------------------------- 2-204 Using USB Devices ------------------------------------------------------------ 2-206 USB Driver -------------------------------------------------------------------------------- 2-206 Initialization of MEAP driver priority registration --------------------------------- 2-208 USB Device report print ---------------------------------------------------------------- 2-208 Reference material ------------------------------------------------------------- 2-211 Glossary------------------------------------------------------------------------------------ 2-211 Option for exclusive individual measure ---------------------------------- 2-213
Display Setting of Copy Icon (level2) ----------------------------------------------- 2-213 Error at starting up the MEAP application/Setting to hide JAM screen (level 2) - 2-213 Setting of Screen Transition from MEAP Screen to the Standard Screen (level2)-------------------------------------------------------------------------------------- 2-214 Embedded RDS ----------------------------------------------------------- 2-215 Product Overview --------------------------------------------------------------- 2-215 Overview ----------------------------------------------------------------------------------- 2-215 Features and benefits ------------------------------------------------------------------ 2-215 Major Functions -------------------------------------------------------------------------- 2-215 Limitations ------------------------------------------------------------------------ 2-216 Service Mode Menu Transmission Function-------------------------------------- 2-216 Service cautions----------------------------------------------------------------- 2-216 E-RDS Setup--------------------------------------------------------------------- 2-217 Confirmation and preparation in advance ----------------------------------------- 2-217 E-RDS-related setting items ---------------------------------------------------------- 2-220 Steps to E-RDS settings --------------------------------------------------------------- 2-221 Steps to Service Call button settings ----------------------------------------------- 2-224 Steps to Service Browser settings--------------------------------------------------- 2-226 Steps for sub-log creation settings -------------------------------------------------- 2-227 Initializing E-RDS settings ------------------------------------------------------------- 2-228 FAQ--------------------------------------------------------------------------------- 2-229 Troubleshooting ----------------------------------------------------------------- 2-231 Error code and strings --------------------------------------------------------- 2-234 3 Periodic Service Periodical Service Operation Item ----------------------------------------3-2 4 Parts Replacement and Clearning List of Parts ---------------------------------------------------------------------4-2 List of External / Internal Cover ------------------------------------------------ 4-2 List of Main Unit -------------------------------------------------------------------- 4-4 Periodic Replacing Parts,Durable Parts,Cleaning Parts ----------------4-10 Periodic Replacing Parts, Durable Parts --------------------------------------------4-10 List of Cleaning Parts ---------------------------------------------------------------------4-20 List of Fan---------------------------------------------------------------------------4-34 List of Clutch / Solenoid ---------------------------------------------------------4-36 List of Motor ------------------------------------------------------------------------4-40 List of Sensor ----------------------------------------------------------------------4-46 List of Switch -----------------------------------------------------------------------4-52 List of PCB--------------------------------------------------------------------------4-54 Heater,others-----------------------------------------------------------------------4-58 Connector List ---------------------------------------------------------------------4-60 Main Controller -------------------------------------------------------------- 4-81 Removing Main Controller PCB 1 --------------------------------------------4-81 Removing Main Controller PCB 2 --------------------------------------------4-86 Laser Exposure System --------------------------------------------------- 4-93 Removing the Laser Scanner Unit--------------------------------------------4-93 Cleaning the Dust Collecting Glass ------------------------------------------4-96 Image Formation System ------------------------------------------------- 4-97 Removing the Primary Charging Assembly --------------------------------4-97 Removing the Primary Charging Wire Cleaner, Cleaner Holder (Right/ Left)-----------------------------------------------------------------------------------4-98 Replacing the Primary Charging Assembly Grid Wire ----------------- 4-101 Replacing the Primary Charging Wire ------------------------------------- 4-104 Cleaning the Primary Charging Assembly Grid Wire ------------------ 4-106 Removing the Pre-transfer Charging Assembly------------------------- 4-107 Removing the Pre-transfer Charging Wire Cleaner, Cleaner Holder ------ 4-109 Replacing the Pre-transfer Charging Wire---------------------------------4-111 Cleaning the Pre-transfer Charging Wire --------------------------------- 4-113 Removing the Process Unit -------------------------------------------------- 4-114 Cleaning the Process Unit---------------------------------------------------- 4-115 Removing the Drum Cleaning Unit ----------------------------------------- 4-116 Removing the Drum Cleaning Blade--------------------------------------- 4-117 Cleaning the Drum Cleaning Unit------------------------------------------- 4-119 Replacing the Pre-exposure Plastic Film --------------------------------- 4-120 Removing the Drum Unit------------------------------------------------------ 4-121 Removing the Photosensitive Drum---------------------------------------- 4-122 Cleaning Photosensitive Drum ---------------------------------------------- 4-125 Cleaning the Drum edges----------------------------------------------------- 4-126 Removing the Cleaner Separation Claw ---------------------------------- 4-127 Removing the Side Seal ------------------------------------------------------ 4-127
Removing the Developing Assembly--------------------------------------- 4-128 Cleaning the Developing Assembly ---------------------------------------- 4-131 Removing the Developing Cylinder and the Developing Roller ----- 4-132 Removing the ETB Unit ------------------------------------------------------- 4-137 Removing the ETB ------------------------------------------------------------- 4-139 Cleaning the ETB --------------------------------------------------------------- 4-140 Removing the Transfer Roller------------------------------------------------ 4-141 Removing the ETB Cleaning Blade ---------------------------------------- 4-142 Removing the ETB Brush Roller -------------------------------------------- 4-142 Removing the Waste Toner Container------------------------------------- 4-145 Removing the Drum Heater -------------------------------------------------- 4-146 Removing the Primary Charging Shutter Unit --------------------------- 4-147 Removing the Pre-transfer Charging Assembly Shutter Unit -------- 4-150 Removing the Drum Brush Roller------------------------------------------- 4-152 Removing the ETB Drive Unit ----------------------------------------------- 4-153 Removing the Transfer Cleaning Unit ------------------------------------- 4-156 Removing the Post-transfer Static Eliminator---------------------------- 4-156 Removing the Toner Receptacle Tray ------------------------------------- 4-158 Removing the Hopper Unit --------------------------------------------------- 4-159 Removing the Buffer Unit ----------------------------------------------------- 4-162 Removing the Potential Control PCB Unit -------------------------------- 4-165 Removing the Waste Toner Feed Unit------------------------------------- 4-167 Removing the Drum Drive Unit ---------------------------------------------- 4-171 Removing the Developing Drive Unit -------------------------------------- 4-173 Fixing------------------------------------------------------------------------- 4-176 Removing the Fixing Assembly---------------------------------------------- 4-176 Cleaning the Fixing Inlet Guide,Fixing Inlet Sensor Flag, Fixing Right Stay, Dowel, Dowel Holder --------------------------------------------------- 4-178 Cleaning the Inner Delivery Roller------------------------------------------ 4-179 Cleaning the Fixing Oil Pan, Fixing Cleaning Web Guide ------------ 4-180 Removing the Fixing Cleaning Web---------------------------------------- 4-180 Separating the Fixing Upper Unit from the Fixing Lower Unit ------- 4-182 Removing the Fixing Roller, Insulating Bush and Thrust Stopper -- 4-186 Removing the Pressure Roller----------------------------------------------- 4-188 Removing the Pressure Roller Static Eliminator Unit ------------------ 4-189 Removing the Main Thermistor, Sub Thermistor2 ---------------------- 4-190 Removing the Sub Thermistor1 --------------------------------------------- 4-192 Removing the Upper Separation Claw ------------------------------------ 4-193 Cleaning the Upper Separation Claw -------------------------------------- 4-193 Removing the Thermoswitch------------------------------------------------- 4-195 Pickup/Feed System ----------------------------------------------------- 4-197 Removing the Left Pickup Deck--------------------------------------------- 4-197 Removing the Left Deck Pickup Roller ------------------------------------ 4-197 Removing the Left Deck Feed Roller -------------------------------------- 4-198 Removing the Right Pickup Deck------------------------------------------- 4-198 Removing the Left Deck Separation Roller------------------------------- 4-199 Removing the Right Deck Pickup Roller ---------------------------------- 4-199 Removing the Right Deck Feed Roller ------------------------------------ 4-200 Removing the Right Deck Separation Roller----------------------------- 4-200 Removing the Upper Cassette ---------------------------------------------- 4-201 Removing the Upper Cassette Pickup Roller ---------------------------- 4-201 Removing the Upper Cassette Feed Roller ------------------------------ 4-202 Removing the Upper Cassette Separation Roller ---------------------- 4-202 Removing the Lower Cassette ---------------------------------------------- 4-203 Removing the Lower Cassette Pickup Roller ---------------------------- 4-203 Removing the Lower Cassette Feed Roller ------------------------------ 4-204 Removing the Lower Cassette Separation Roller ---------------------- 4-204 Removing the Multi-purpose Tray Feed Roller -------------------------- 4-205 Removing the Multi-purpose Tray Separation Roller ------------------ 4-206 Cleaning the Pickup and Fixing Feed Assembly ------------------------ 4-207 Removing the Left Deck Pickup Unit--------------------------------------- 4-215 Removing the Right Deck Pickup Unit------------------------------------- 4-216 Removing the Cassettes 3 and 4 Pickup Unit --------------------------- 4-217 Removing the Vertical Path Cassette Pickup Drive Unit-------------- 4-218 Removing the Registration Unit --------------------------------------------- 4-221 Removing the Left Deck Pickup Drive Unit------------------------------- 4-224 Removing the Main Drive Unit----------------------------------------------- 4-225 External Auxiliary System ----------------------------------------------- 4-230 Removing the Filter (for primary charging) ------------------------------- 4-230 Removing the Ozone Filter --------------------------------------------------- 4-230 Removing the DC Controller PCB ------------------------------------------ 4-231 Removing the Power Supply Assembly ----------------------------------- 4-234
Removing the Fixing Power Unit-------------------------------------------- 4-235 Removing the Feed Driver PCB--------------------------------------------- 4-236 Removing the Upper High Voltage Unit ----------------------------------- 4-237 Removing the Flat Control Panel ------------------------------------------- 4-238 5 Adjustment Overview ------------------------------------------------------------------------5-2 When replacing parts --------------------------------------------------------5-2 Controller System------------------------------------------------------------------ 5-2 HDD -------------------------------------------------------------------------------------------- 5-2 Main Controller PCB 1--------------------------------------------------------------------- 5-4 Main Controller PCB 2--------------------------------------------------------------------- 5-4 TPM PCB ------------------------------------------------------------------------------------- 5-6 Flash PCB ------------------------------------------------------------------------------------ 5-6 Image Formation System -------------------------------------------------------- 5-7 Primary Charging Wire -------------------------------------------------------------------- 5-7 Primary Charging Assembly ------------------------------------------------------------- 5-7 Pre-transfer Charging Assembly -------------------------------------------------------- 5-9 Pre-transfer Charging Wire--------------------------------------------------------------- 5-9 Photosensitive Drum----------------------------------------------------------------------- 5-9 Drum Side Seals (Front and Rear) ----------------------------------------------------5-10 Developing Assembly, Developing Cylinder ----------------------------------------5-10 Potential Sensor / Potential Control PCB--------------------------------------------5-10 ETB Unit / ETB -----------------------------------------------------------------------------5-11 Waste Toner Container-------------------------------------------------------------------5-11 Fixing System---------------------------------------------------------------------- 5-11 Fixing Roller--------------------------------------------------------------------------------- 5-11 External Auxiliary System-------------------------------------------------------5-12 DC Controller PCB ------------------------------------------------------------------------5-12 6 Troubleshooting Test Print ------------------------------------------------------------------------6-2 Overview ----------------------------------------------------------------------------- 6-2 How to View the Test Print------------------------------------------------------- 6-3 Grid (TYPE=1)------------------------------------------------------------------------------- 6-3 17 gradations (TYPE=2/3)---------------------------------------------------------------- 6-3 Solid white (TYPE=4)---------------------------------------------------------------------- 6-4 Halftone (TYPE=5/6/11/12/13/14) ------------------------------------------------------ 6-4 Solid black (TYPE=7)---------------------------------------------------------------------- 6-5 Horizontal line (TYPE=8/9/10)----------------------------------------------------------- 6-5 Image Faults -------------------------------------------------------------------6-6 Trailing Edge Shock Imaget----------------------------------------------------- 6-6 Uneven density correction by 2D shading ----------------------------------- 6-7 ADF black line ---------------------------------------------------------------------6-10 Separation Failure Jam due to Deformation of Separation Claw ----- 6-11 Image error due to soil attached to the Cleaning Brushes for the Duplex Right Roller and the Duplex Outlet Roller ----------------------------------6-12 Uneven density --------------------------------------------------------------------6-19 Smeared image -------------------------------------------------------------------6-20 Feed Faults ------------------------------------------------------------------- 6-21 Paper wrinkle ----------------------------------------------------------------------6-21 Other --------------------------------------------------------------------------- 6-21 Adjusting rotation of the Upright Control Panel Arm ---------------------6-21 Remedy to be implemented when the ETB Disengage Member (Transfer Frame Stopper) is left unremoved --------------------------------------------6-23 Checking nip width ---------------------------------------------------------------6-25 Version upgrade ------------------------------------------------------------- 6-26 Overview ----------------------------------------------------------------------------6-26 Overview of Version Upgrade ----------------------------------------------------------6-26 Writing System Software-----------------------------------------------------------------6-27 System Software Components ---------------------------------------------------------6-28 Note on Download Process -------------------------------------------------------------6-29 Version Upgrade via SST -------------------------------------------------------6-30 Overview -------------------------------------------------------------------------------------6-30 Copying System Software ---------------------------------------------------------------6-31 Connection ----------------------------------------------------------------------------------6-32 Downloading System Software (Assist mode) -------------------------------------6-34 Downloading System Software (Single mode) -------------------------------------6-35 Formatting HDD----------------------------------------------------------------------------6-38 Backup ---------------------------------------------------------------------------------------6-42 Version Upgrade using USB memory Storage Device ------------------6-45 Relation between SST and USB memory storage device Storage Device -6-45 Copying System Software ---------------------------------------------------------------6-46 Connection ----------------------------------------------------------------------------------6-50
Upgrading System Software ------------------------------------------------------------6-51 Downloading/Writing System Software (Automatic) ------------------------------6-52 Downloading System Software (Confirmation) -------------------------------------6-54 Downloading System Software (Overwriting) --------------------------------------6-55 Formatting HDD----------------------------------------------------------------------------6-56 Backup ---------------------------------------------------------------------------------------6-58 Clearing Download File ------------------------------------------------------------------6-58 Download Menu 2 -------------------------------------------------------------------------6-58 Other Menu----------------------------------------------------------------------------------6-59 Troubleshooting -------------------------------------------------------------------6-59 Error Code: E753-0001 ------------------------------------------------------------------6-59 Making Initial Checks ------------------------------------------------------ 6-61 List of Initial Check Items -------------------------------------------------------6-61 7 Error Code Overview ------------------------------------------------------------------------7-2 Outline -------------------------------------------------------------------------------- 7-2 Location code-------------------------------------------------------------------------------- 7-2 Location code-------------------------------------------------------------------------------- 7-2 Points to Note When Clearing MN-CON---------------------------------------------- 7-2 Points to Note When Clearing HDD---------------------------------------------------- 7-2 Error Code ----------------------------------------------------------------------7-3 Error Code Details ----------------------------------------------------------------- 7-3 E000 to E069 -------------------------------------------------------------------------------- 7-3 E100 to E197 -------------------------------------------------------------------------------7-13 E202 to E280 -------------------------------------------------------------------------------7-17 E301 to E355 -------------------------------------------------------------------------------7-20 E400 to E490 -------------------------------------------------------------------------------7-22 E500 to E5F6 -------------------------------------------------------------------------------7-24 E602 ------------------------------------------------------------------------------------------7-34 E604 to E677 -------------------------------------------------------------------------------7-67 E710 to E753 -------------------------------------------------------------------------------7-69 E804 to E996 -------------------------------------------------------------------------------7-74 Jam Code --------------------------------------------------------------------- 7-77 Jam Type----------------------------------------------------------------------------7-77 Main Unit ----------------------------------------------------------------------------7-78 Color Image Reader-C1---------------------------------------------------------7-80 Paper Deck Unit – D1------------------------------------------------------------7-81 Paper Deck Unit– A1-------------------------------------------------------------7-81 Inserter・L1 ------------------------------------------------------------------------7-82 PaperFolding Inserter Unit・H1-----------------------------------------------7-83 IExternal 2-hole Puncher - A1 -------------------------------------------------7-84 Staple Finisher・E1/Booklet Finisher・E1 ---------------------------------7-85 Alarm Code ------------------------------------------------------------------- 7-86 List of Alarm Code ----------------------------------------------------------------7-86 8 Service Mode Overview ------------------------------------------------------------------------8-2 Service Mode Menu --------------------------------------------------------------- 8-2 Service mode item explanations ----------------------------------------------- 8-2 I/O information enhancement --------------------------------------------------- 8-3 Display of Error Code/Alarm Code description ----------------------------- 8-3 COPIER > OPTION > BODY, Item Segmentation------------------------- 8-4 Security features ------------------------------------------------------------------- 8-4 Related service modes -------------------------------------------------------------------- 8-4 Switching Screen (Level 1 < - > 2) -------------------------------------------- 8-5 Language switch ------------------------------------------------------------------- 8-6 Back-up of service mode--------------------------------------------------------- 8-6 COPIER -------------------------------------------------------------------------8-7 DISPLAY ----------------------------------------------------------------------------- 8-7 VERSION ------------------------------------------------------------------------------------- 8-7 USER -----------------------------------------------------------------------------------------8-29 ACC-STS ------------------------------------------------------------------------------------8-29 ANALOG -------------------------------------------------------------------------------------8-31 CST-STS-------------------------------------------------------------------------------------8-32 HV-STS---------------------------------------------------------------------------------------8-33 CCD -------------------------------------------------------------------------------------------8-34 DPOT -----------------------------------------------------------------------------------------8-37 SENSOR-------------------------------------------------------------------------------------8-38 MISC ------------------------------------------------------------------------------------------8-39 2D-SHADE ----------------------------------------------------------------------------------8-39 I/O (I/O display mode) -----------------------------------------------------------8-40 Host Machine_Main Controller (DC-CON>P001 to P005)) ---------------------8-49 Reader (R-CON>P001 to P005) -------------------------------------------------------8-50
Is your Canon imageRUNNER ADVANCE Office Copier/Printer letting you down?
Why replace when you can upgrade or repair? This service and repair manual is used by the Official Certified Canon Technicians. It will help you to troubleshoot and repair your Printer!
Contents:
Product Overview
Product Lineup
Features
Specifications
External View/Internal View
Operation
Technology
Basic Configuration
Main Controller
Laser Exposure System
Image Formation System
Fixing
Pickup / Feed System
External Auxiliary System
MEAP
Embedded RDS
Periodic Service
Periodical Service Operation Item
Parts Replacement and Clearning
List of Parts
Main Controller
Laser Exposure System
Image Formation System
Fixing
Pickup/Feed System
External Auxiliary System
Adjustments
Overview
When replacing parts
Troubleshooting
Test Print
Image Faults
Feed Faults
Version upgrade
Making Initial Checks
Error Codes
Overview
Error Code
Jam Code
Alarm Code
Service Mode
Overview
COPIER
FEEDER
SOATER
BOARD
Installation
Complete Installation Procedures
Appendix
Service Tools
General Timing Chart
General Circuit Diagram
List of User Mode
Backup Data
Detail of HDD partition
Soft Counter List
This manual covers the following models:
Canon imageRUNNER ADVANCE iR6075
Canon imageRUNNER ADVANCE iR6075i
Canon imageRUNNER ADVANCE iR6065
Canon imageRUNNER ADVANCE iR6065i
Canon imageRUNNER ADVANCE iR6055
Canon imageRUNNER ADVANCE iR6055i
This service manual is very detailed and illustrated with pictures and step-by-step instructions on how to repair/service this printer the best way there is!
Please note this is the OFFICIAL service and repair manual in .PDF format, no scanned-in or bootlegged copy. This manual is made in the highest resolution, so when you print the pages you need it is all in great quality!
You can easily print this manual from any printer and any computer!
***INSTANT access*** After your payment, you will have instant access to your access. No shipping fee, no waiting on postal delivery, you can start doing your repairs right away!
Specifications
Language: English
Pages: 1511
Files: Service Manual + Parts List Catalog + All Service Bulletins
Platform: Windows and MAC
Looking for a service manual but can't find it anywhere? Please contact us with your request! As you can see we've got the largest & most comprehensive service manual database out there, so a good chance we can help you out!
Tags: Canon iR imageRUNNER ADVANCE 6075/6065/6055
Recently Viewed
5,521,897Happy Clients
2,594,462eManuals
1,120,453Trusted Sellers
15Years in Business
Price:
Actual Price:
Canon imageRUNNER ADVANCE iR 6075 6065 6055 Service Manual & Repair Guide + Parts List Catalog