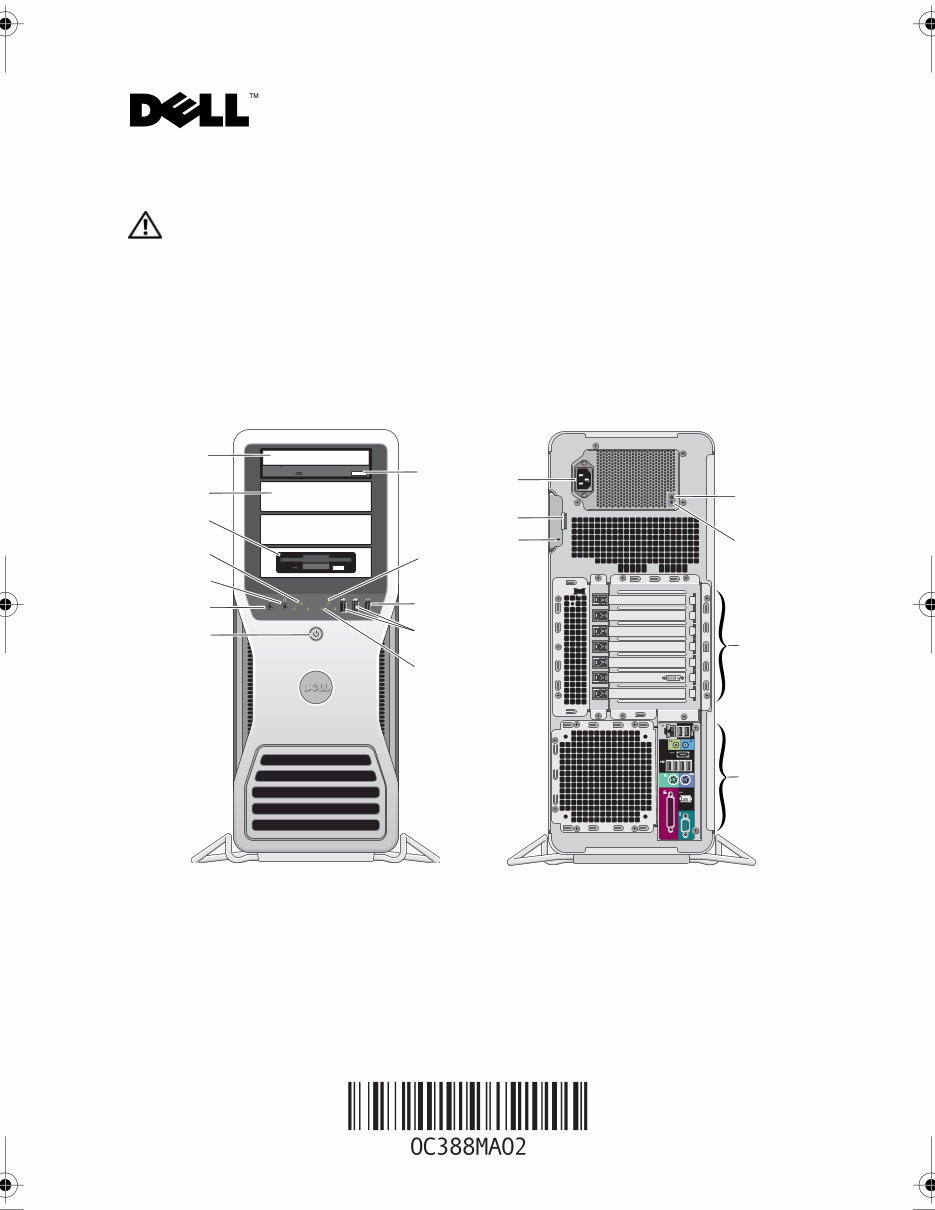
About Warnings WARNING: A WARNING indicates a potential for property damage, personal injury, or death. Dell Precision™ Workstation T7500/T7500n Setup and Features Information Front and Back View 1 optical drive 2 optical drive filler panel 3 flex bay 4 link integrity light 5 headphone connector 6 microphone connector 7 power button, power light 8 diagnostic lights (4) 9 USB 2.0 connectors (2) 10 IEEE 1394 connector 1 2 5 6 7 12 10 9 11 3 4 8 13 14 15 16 17 18 19 June 2009 Model: DCDO
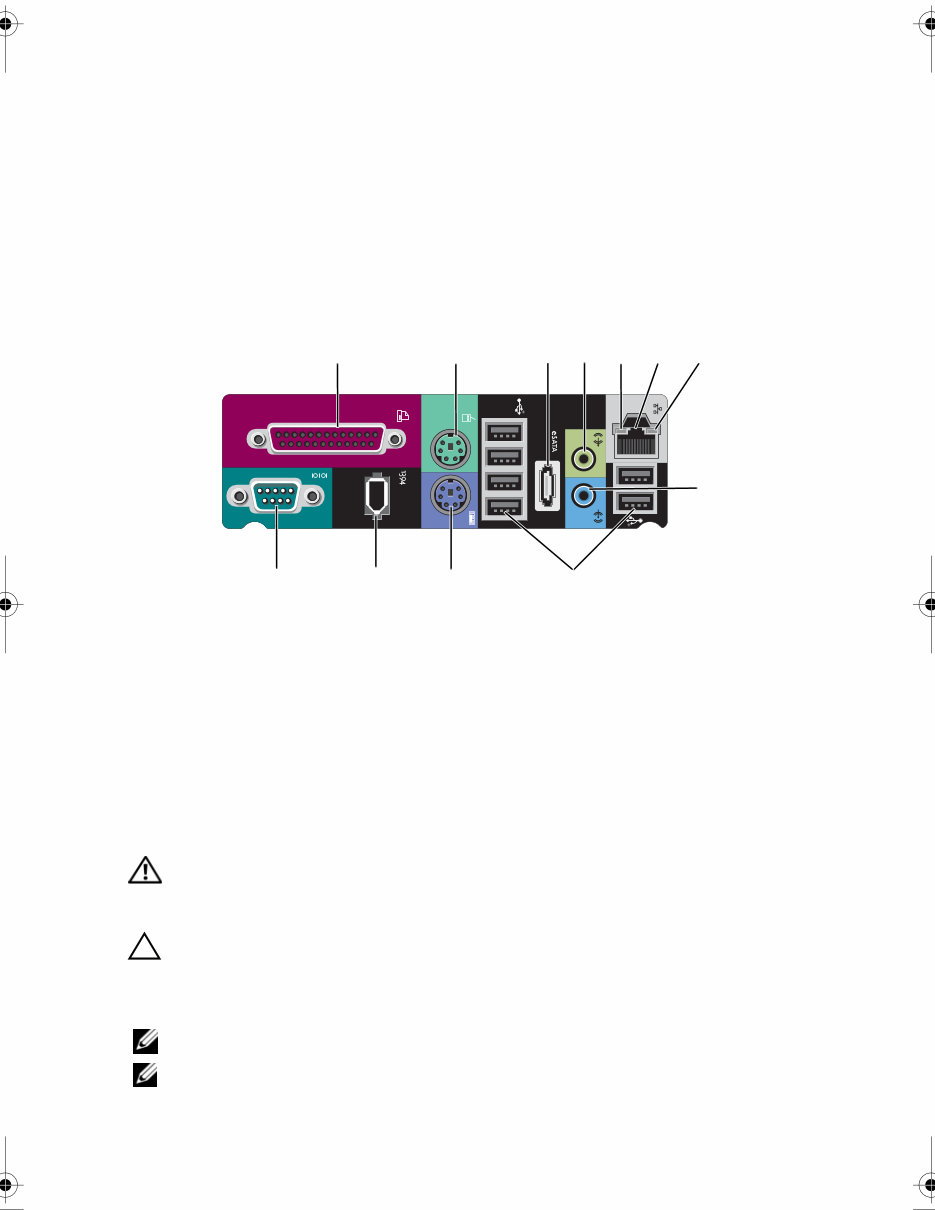
Back Panel Connectors Quick Setup WARNING: Before you begin any of the procedures in this section, read the safety information that shipped with your computer. For additional best practices information see www.dell.com/regulatory_compliance. CAUTION: Do not install your computer in an enclosure where there is limited, restricted or no airflow. Restricting the airflow impacts your computer’s performance, possibly causing it to overheat. If your computer is installed in a corner on a desk leave at least 5.1 cm (2 in) clearance from the back of the computer to the wall to permit the airflow required for proper ventilation. NOTE: Clean dust off the grill at the back of the computer whenever it is dusty. NOTE: Some devices shown below may not be included if you did not order them. 11 drive activity light 12 optical drive eject button 13 power connector 14 cover-release latch and padlock ring 15 security cable slot 16 back panel connectors 17 expansion card slots (7) 18 power supply diagnostic button 19 power supply diagnostic light 1 parallel connector 2 PS/2 mouse connector 3 eSATA connector 4 line-out connector 5 network activity light 6 network adapter connector 7 link integrity light 8 line-in connector 9 USB 2.0 connectors (6) 10 PS/2 keyboard connector 11 IEEE 1394 connector 12 serial connector 1 10 2 7 11 12 3 6 4 5 9 8
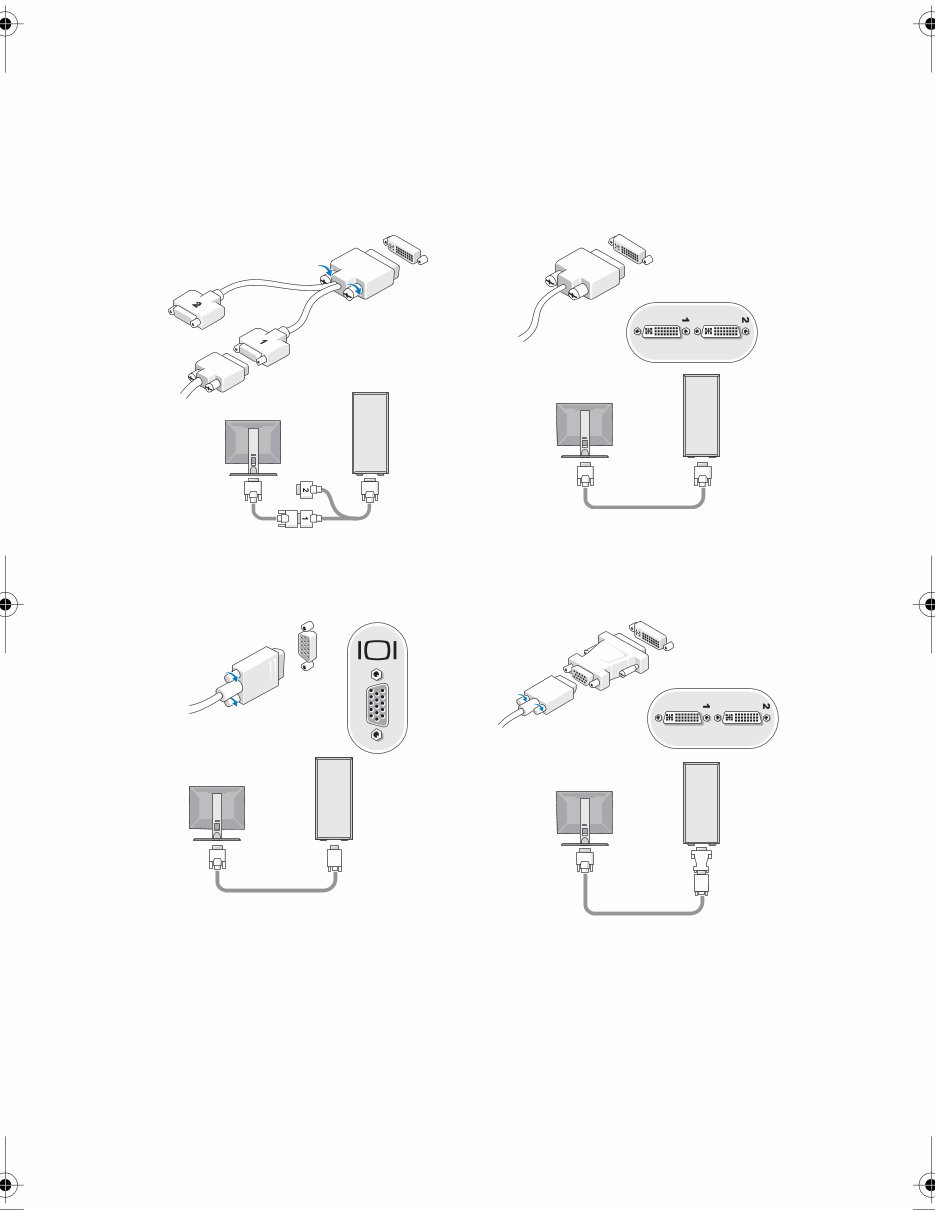
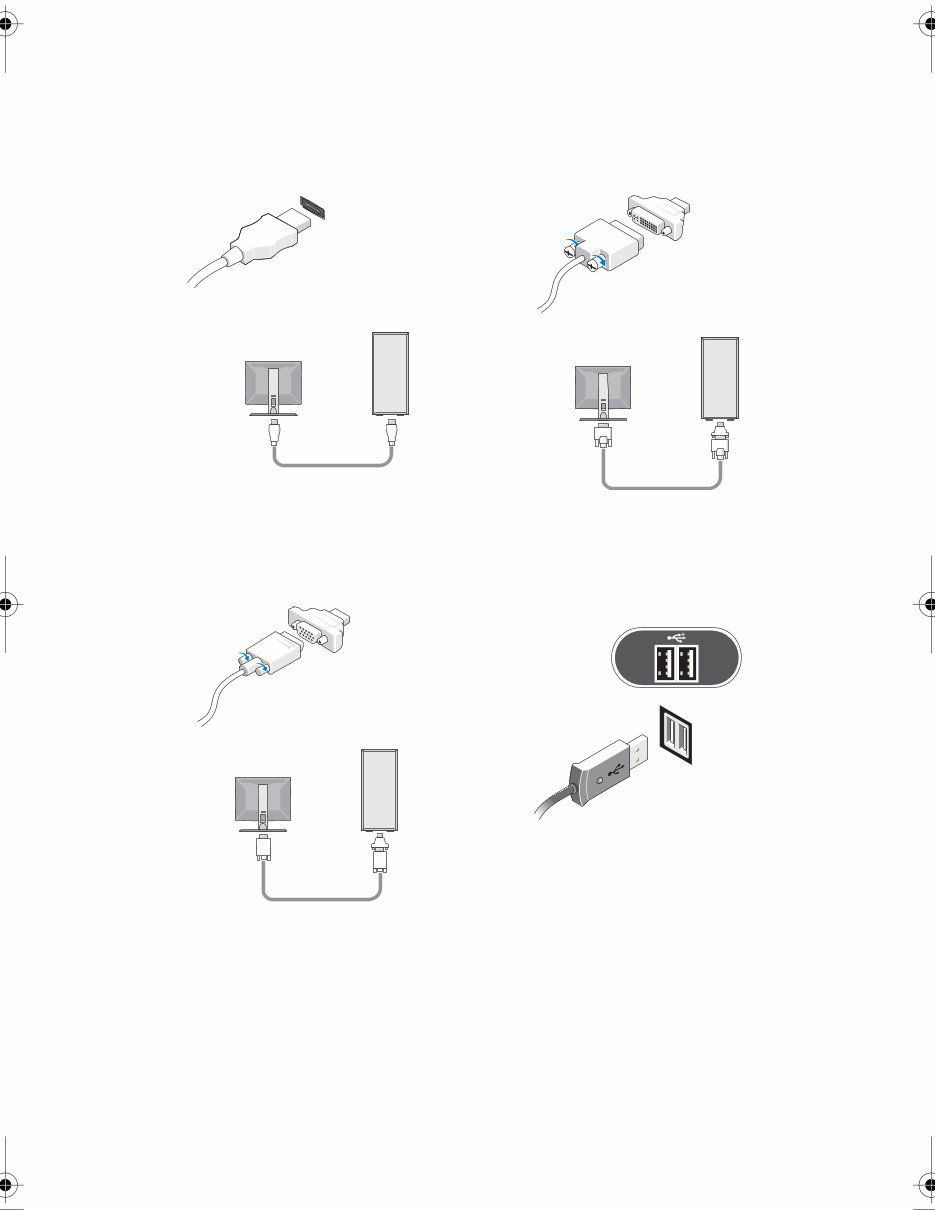
1 Connect the monitor using one of the following cables: a The dual monitor Y-adapter cable b The white DVI cable c The blue VGA cable d The blue VGA cable to a DVI adapter
e The DisplayPort cable f The DisplayPort to a DVI adapter g The DisplayPort to a VGA adapter 2 Connect a USB device, such as a keyboard or mouse.
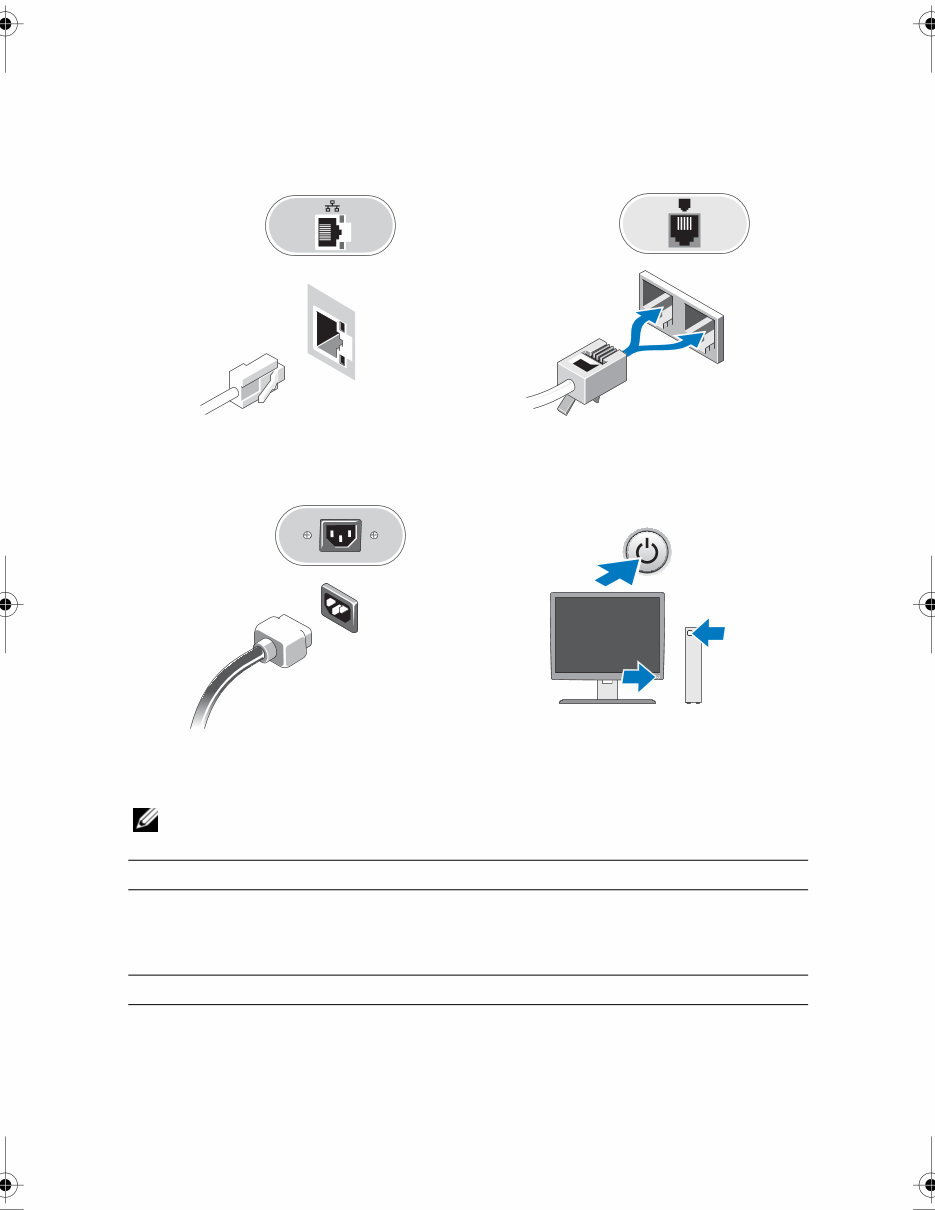
Specifications NOTE: The following specifications are only those required by law to ship with your computer. For a complete and current listing of the specifications for your computer, go to support.dell.com. 3 Connect the network cable. 4 Connect the modem (if installed). 5 Connect the power cable(s). 6 Press the power buttons on the monitor and the computer. Processor Type Dual-Core Intel ® Xeon ® Processor 5500 series Quad-Core Intel ® Xeon ® Processor 5500 series System Information System chipset Intel 5500/5520 Data bus width 64 bits
Video Type: Discrete PCI Express 2.0 x16 (two slots) NOTE: Support for two full height, full length graphics cards using the PCIe x16 graphics card slot Drives Externally accessible four 5.25 inch drive bays (can support 3.5 inch flex bay) Internally accessible four 3.5 inch drive bays Available devices • up to five 3.5 inch SATA or four SAS hard drives • up to three of the following 5.25-inch drives: SATA DVD-ROM, DVD+/-RW super multi drive/Blu-ray™ drive • one 3.5-inch USB media card reader or • one 3.5-inch FDD drive NOTE: Supports a maximum of five hard drives Controls and Lights Front of the computer: Power button push button Power light green light — Blinking green in sleep state; solid green for power-on state amber light — A blinking amber light indicates a problem with the system board. A solid amber light when the computer does not start indicates that the system board cannot start initialization but that the power supply is good - in normal operating state no light — System is in the off state Drive activity light green light — indicates that the computer is reading data from or writing data to the SATA hard drive or CD/DVD Link integrity light green light — A good connection exists between the network and the computer off (no light) — The computer is not detecting a physical connection to the network
Back of the computer: Link integrity light (on integrated network adapter) green light — A good connection at 10Mbs exists between the network and the computer orange light — A good connection at 100Mbs exists between the network and the computer yellow light — A good connection at 1000Mbs exists between the network and the computer off (no light) — The computer is not detecting a physical connection to the network Network activity light (on integrated network adapter) yellow blinking light Power supply diagnostic LED green light — Indicates the power supply is working properly off (no light) — Indicates that no power is available for the power supply Power AC power supply: Voltage (see the safety information that shipped with your computer for important voltage setting information) 100–240 VAC, 50–60 Hz, 12.0 A Coin-cell battery 3 V CR2032 lithium coin cell Physical Height 56.50 cm (22.25 inches) Width 21.60 cm (8.50 inches) Depth 55.30 cm (21.80 inches) Weight at least 24.90 kg (55 lbs) WARNING: Your computer is heavy and can be difficult to maneuver. Seek assistance before attempting to lift, move, or tilt it. This computer requires a two-man lift. Always lift correctly to avoid injury. Avoid bending over while lifting. Controls and Lights (continued)
The Precision T7500 Service Manual provides detailed step-by-step methods for repairing or replacing internal parts of your Desktop-PC. This repair-service guide includes text instructions and high-quality graphics and pictures where necessary. It offers valuable assistance in disassembly/reassembly, repair/upgrades, part replacement notices, service information, troubleshooting, part replacement and disassembly, software updating, and adjustments/corrections.
These manuals are highly detailed and are utilized by both professional technicians and DIY enthusiasts. They are fully illustrated with pictures and provide comprehensive, printable instructions. Whether at home, in the office, or at a repair shop, you can use this manual to perform your own repairs and save money.
There are various ways to utilize this guide:
Repair your Desktop-PC and save money.
Earn money by repairing others' Desktop-PCs.
Use this guide to modify your Desktop-PC.
Gain knowledge about your Desktop-PC's internal parts.



 Lifetime Access




