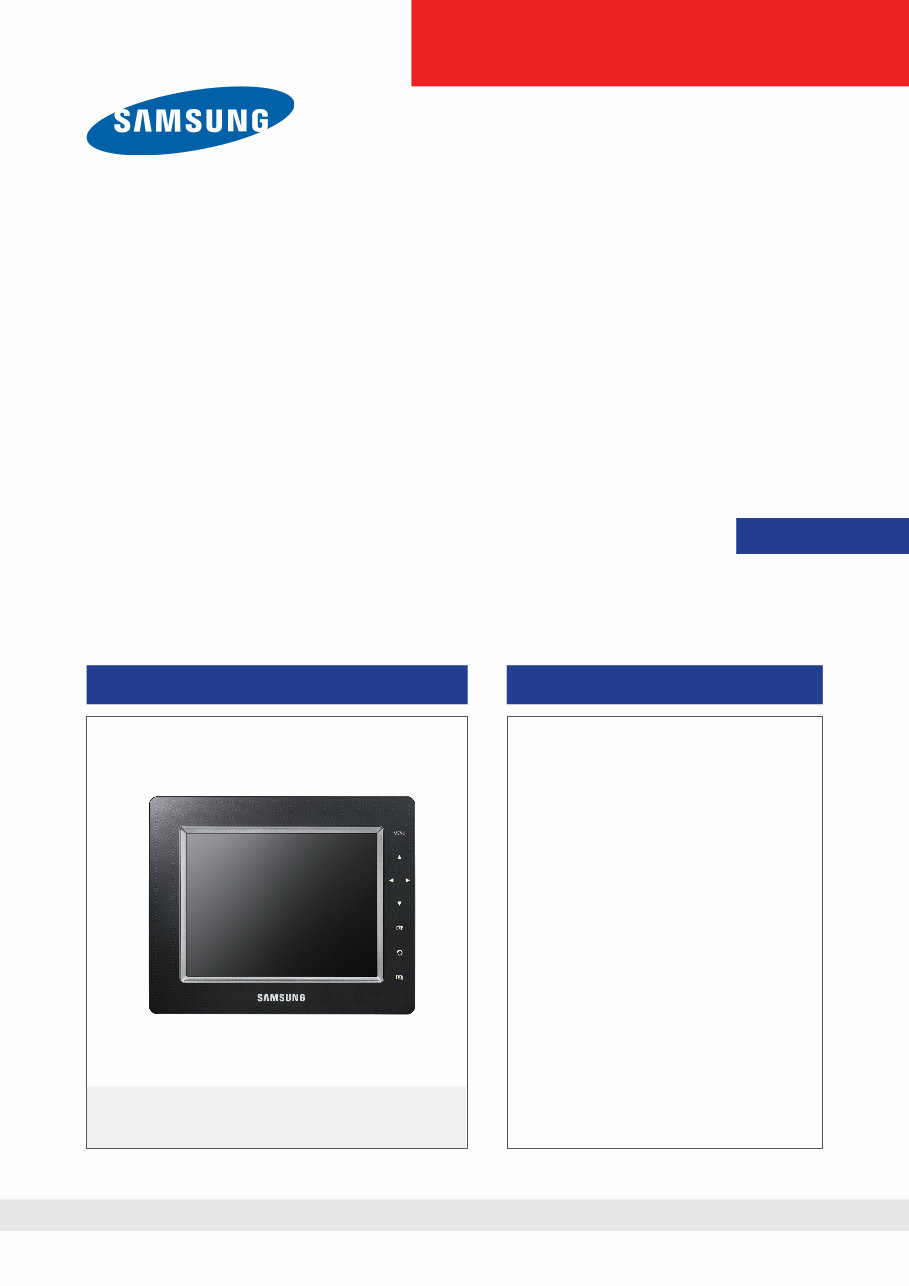
Digital Photo Frame Chassis : LMN07LS Model : LMN08LS LMN08MS SPF-75H SPF-85H SPF-85P SERVICE Manual DIGITAL PHOTO FRAME COMTENTS SPF-75H/SPF-85H/SPF-85P SPF-86H/SPF-86P Refer to the service manual in the GSPN (see the rear cover) for the more information. 1. Precautions 2. Product specifications 3. Disassembly & Reassembly 4. Troubleshooting 5. Exploded View & Part List 6. Wiring Diagram 7. Schematic Diagram
Table of Contents 1. Precautions................................................................................................................ 1-1 1-1. Safety Precautions ......................................................................................................... 1-1 1-2. Servicing Precautions ..................................................................................................... 1-2 1-3. Static Electricity Precautions .......................................................................................... 1-2 1-4. Installation Precautions .................................................................................................. 1-3 2. Product specifications................................................................................................ 2-1 2-1. Feature & Specifications................................................................................................. 2-1 2-2. Spec Comparison to the Old Models .............................................................................. 2-2 2-3. Accessories .................................................................................................................... 2-3 2-4. Accessories (Sold Separately) ........................................................................................ 2-3 2-5. The Control Panel and Its Functions .............................................................................. 2-4 3. Disassembly & Reassembly ...................................................................................... 3-1 3-1. Caution before disassembly ........................................................................................... 3-1 3-2. Disassembly & Reassembly (For all 8” models) ............................................................. 3-2 3-3. Disassembly & Reassembly (For all 7” models) ............................................................. 3-4 4. Troubleshooting ......................................................................................................... 4-1 4-1. First Checklist for Troubleshooting ................................................................................. 4-1 4-2. No Power ........................................................................................................................ 4-2 4-3. No Panel ON .................................................................................................................. 4-3 4-4. Faults and Corrective Actions ......................................................................................... 4-4 4-5. Upgrade .......................................................................................................................... 4-5 5. Exploded View & Part List ......................................................................................... 5-1 5-1. Exploded View (For all 7” models) .................................................................................. 5-1 5-2. Part List .......................................................................................................................... 5-3 5-3. Exploded View (For all 8” models) ................................................................................ 5-14 5-4. Part List ........................................................................................................................ 5-16 6. Wiring Diagram.......................................................................................................... 6-1 6-1. Wiring Diagram ............................................................................................................... 6-1 6-2. Key Control ..................................................................................................................... 6-2 7. Schematic Diagram ................................................................................................... 7-1 7-1. Circuit Descriptions......................................................................................................... 7-1 7-1-1. Circuit Description ....................................................................................................... 7-2 7-2. Schematic Diagram (For all 8” models) .......................................................................... 7-3 7-3. Schematic Diagram (For all 7” models) ........................................................................ 7-11
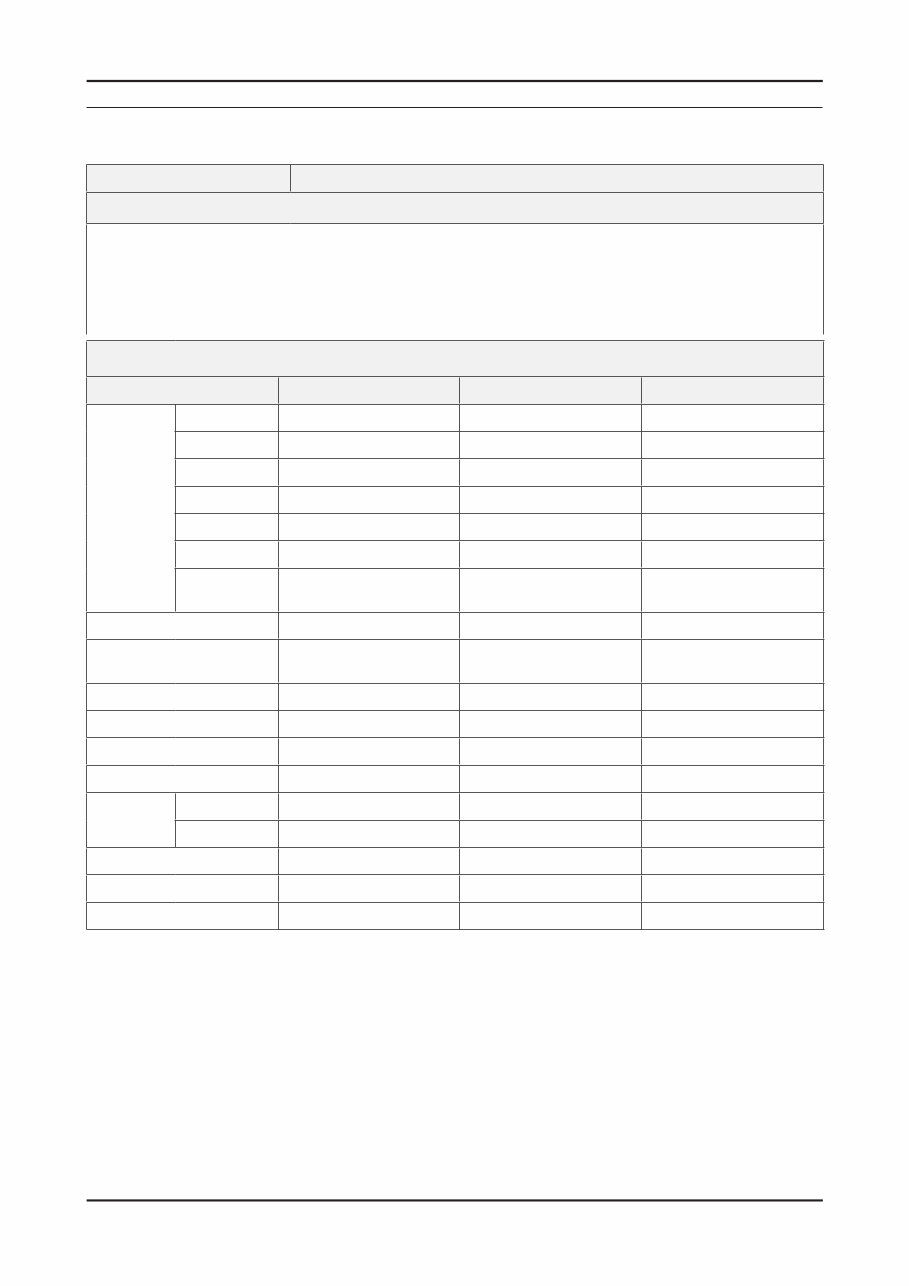
2-1 2. Product specifications 2. Product specifications 2-1. Feature & Specifications Model SPF-75H/SPF-76H/SPF-85H/SPF-85P/SPF-86H/SPF-86P Feature Two kinds of slide show effects Provide 12 slide show effects Provide 1G Byte internal memory Able to play MP3 file (Only 85P, 86P) Provide 1 Hour operation battery without power � � � � � Specifications Item 75H/76H 85H/86H 85P/86P Panel Type 7” TFT LCD/AUO 8” TFT LCD/INNOLUX 8” TFT LCD/INNOLUX Resolution 800 x 600 800 x 600 800 x 600 Brightness 200cd/m 2 200cd/m 2 200cd/m 2 Contrast Ratio 300:1 400:1 400:1 Viewing Angle 50/65/65/65 50/70/70/70 50/70/70/70 Interface Digital 8bit TTL Digital 6bit Digital 6bit Response Time 30mS 25mS 25mS Internal Memory 1G byte 1G byte 1G byte Support Contents Format JPEG (MAX Image Resolution 8000x8000) JPEG (MAX Image Resolution 8000x8000) JPEG (MAX Image Resolution 8000x8000) Music N/A N/A MP3 Battery N/A N/A Included(7.4V, 760mAh) USB Host(1.1) , Device(2.0) Host(1.1) , Device(2.0) Host(1.1) , Device(2.0) Memorys SD/MMC/XD/MS SD/MMC/XD/MS SD/MMC/XD/MS Power Rating Power Adapter (12V, 2A) Power Adapter (12V, 2A) Power Adapter (12V, 2A) Consumption Normal Less then 12W Normal Less then 12W Normal Less then 12W I/O Device Touch Sense Key Touch Sense Key Touch Sense Key Dimensions (mm) 215.5(W)X156.5(H)X43(D) 228(W) X 187.5(H) X 46(D) 228(W) X 187.5(H) X 46(D) Weight 525g 700g 785g
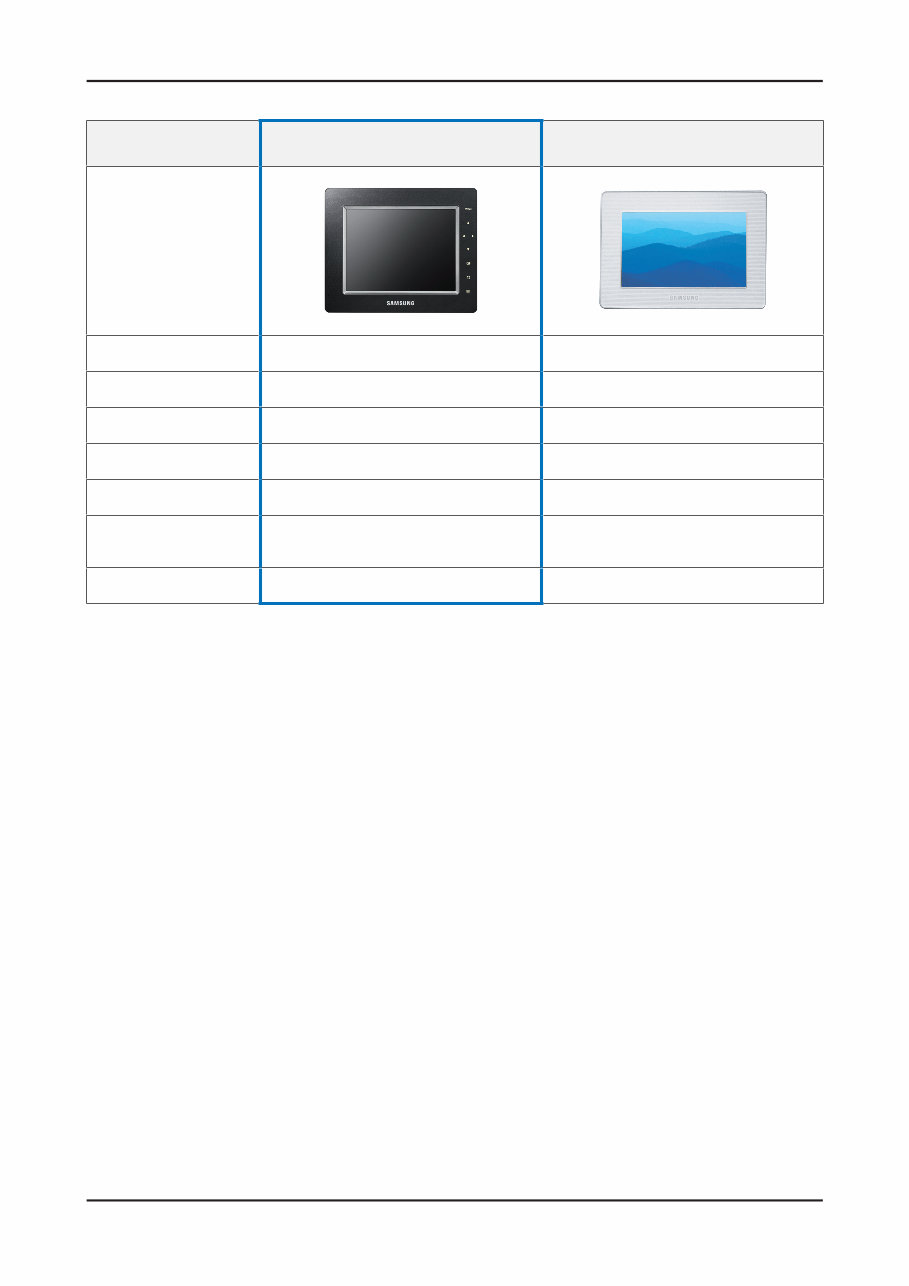
2-2 2. Product specifications 2-2. Spec Comparison to the Old Models Model SPF-75H/SPF-76H/SPF-85H/SPF-85P SPF-86H/SPF-86P CRETA (SPF-72H) Design Penel Type 8” TFT/AUO 8” TFT/AUO Response Time 25mS 25mS Contrast Ratio 400 : 1 400 : 1 Viewing Angle 50/70/70/70 50/70/70/70 Color Black / White / Brown 3 Type White Support Contents Format JPG / MP3 JPG Battery Included ( 7.4V, 760mAh) X
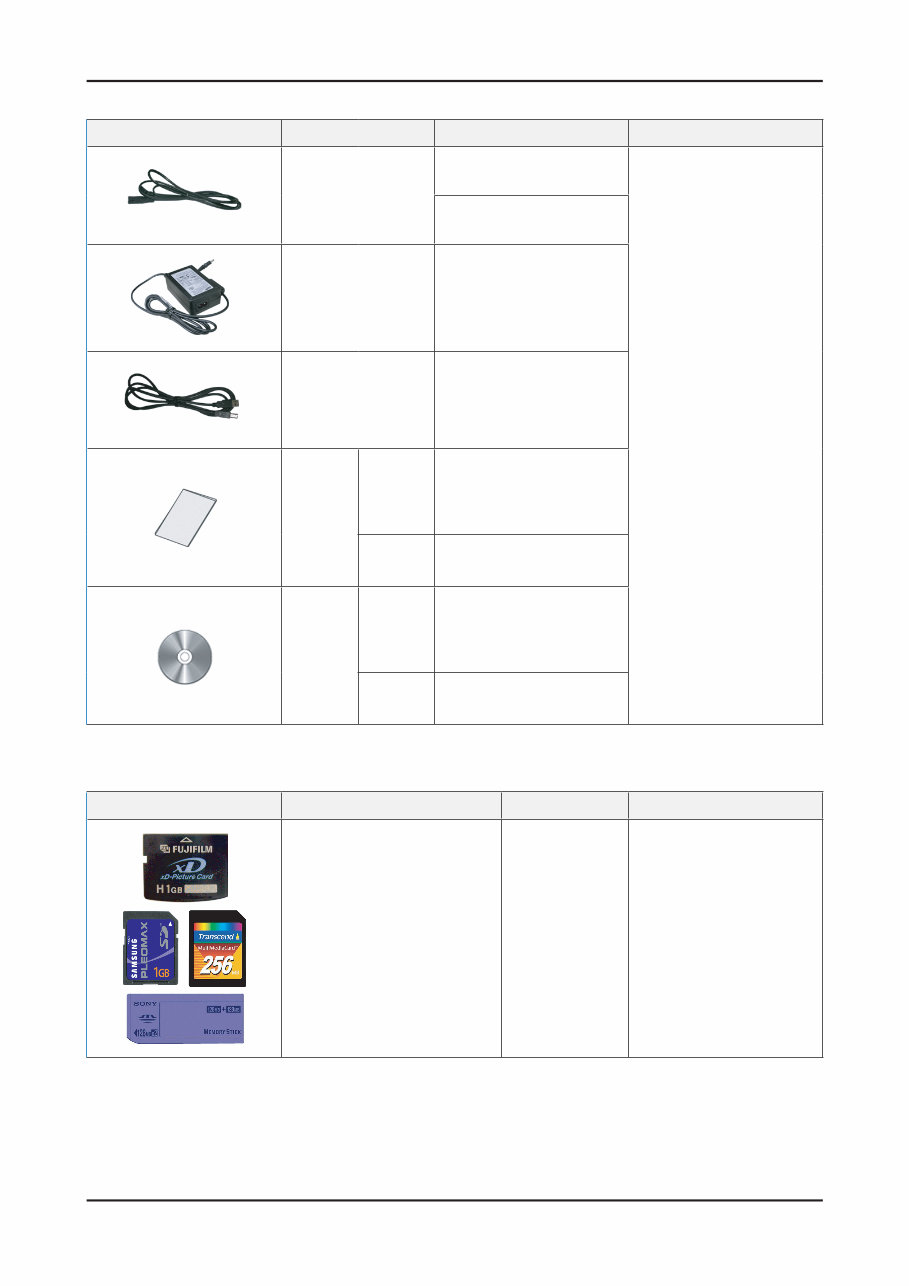
2-3 2. Product specifications 2-3. Accessories Product Description Ccde. No Remark Power Cord United States : 3903-000192 Samsung Electronics Service center Hongkong : 3903-000130 Adapter BN44-00133A USB Cable BN39-00397B User’s Guide SPF-75H SPF-85H SPF-76H SPF-86H BN68-01568A SPF-85P SPF-86P BN68-01567A CD SPF-75H SPF-85H SPF-76H SPF-86H BN59-00733A SPF-85P SPF-86P BN59-00732A 2-4. Accessories (Sold Separately) Product Description Code. No Remark SD/MMC/MS/XD/CF - Electronics Store/ Internal shopping mall
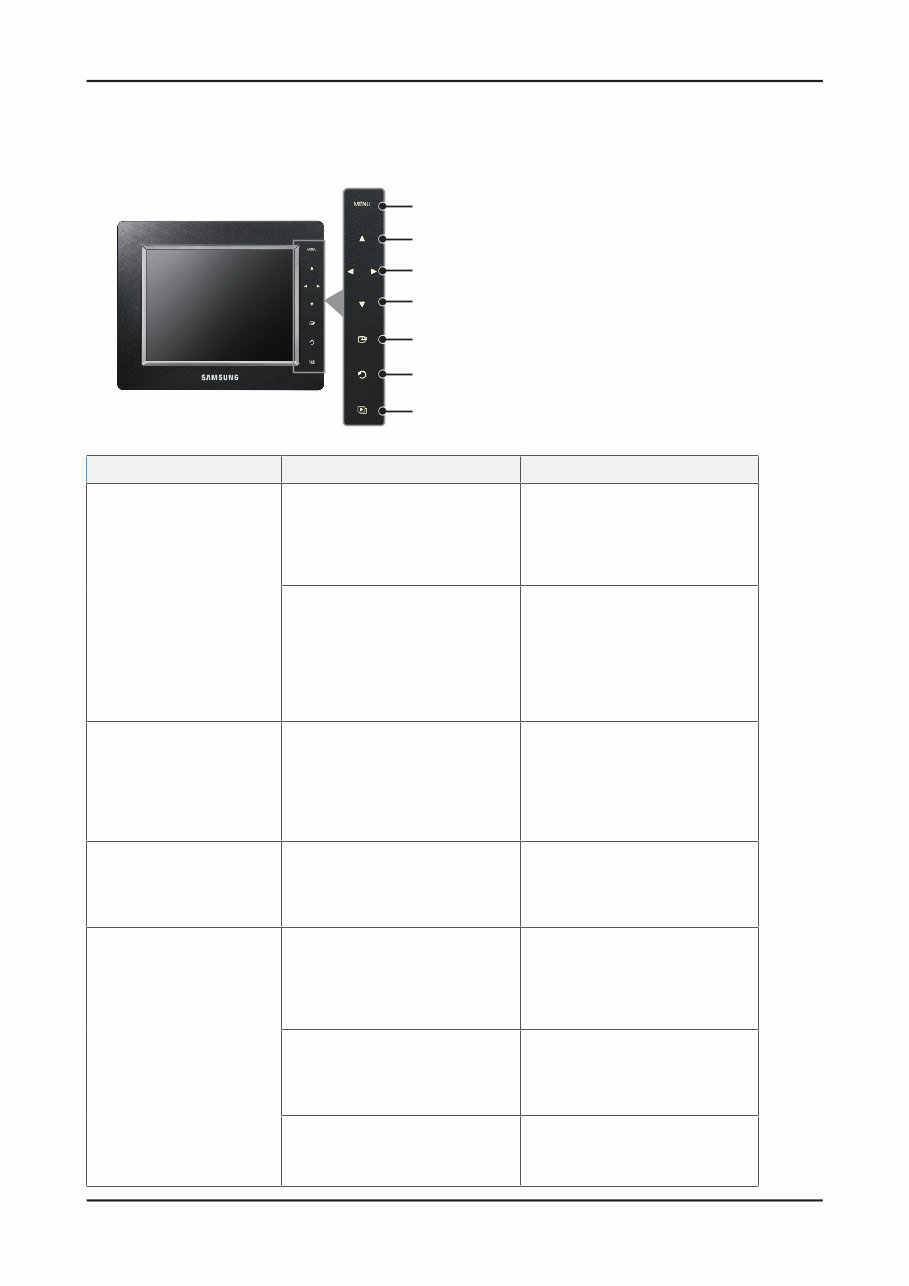
2-4 2. Product specifications 2-5. The Control Panel and Its Functions The OSD function buttons are touch sense type buttons. If you touch a button once, the LED is turned on, and if you touch it again, it operates Function Button Descriptions Menu Up Left / Right Down Enter Return (Hold down this button for three (3) seconds to move to the initial screen) Slideshow Shortcut Button OSD Menu Structure Initial screen SUB1 SUB2 Photo Frame Memory Memory Card (4 in 1) USB Start Slideshow Copy Copy All Files Delete Delete All Files Slide Show Mode Start Slideshow Slideshow Settings Adjust Brightness Rotate Zoom in Screen Ratio Delete Music (For the 85P model only) Frame Memory Memory Card (4 in 1) USB Play Play Mode Copy Copy All Files Delete Delete All Files Clock (85H) Clock & Alarm (85P) Time Alarm (Only 85P) Date and Time Display Time Display Date Clock Typ Settings Custom Language Brightness Play Photos First Auto Fit Portrait Photos Frame Memory Copy Preference Start Mode Clock Screen Saver Auto Picture On/Off Home Background Update/Reset Firmware Update Reset About � �
3-1 3. Disassembly and Reassemble 3. Disassembly & Reassembly This section describes the procedures for removal and reassembly. WARNING: This monitor contains electrostatically sensitive devices. Use caution when handling these components 3-1. Caution before disassembly Cautions: 1. Check clean Plat Table. 2. When upside down the Photo Frame, prepare clean cloth for anti-scratch. 3. Disconnect Power connector before Disassembly. 4. Check SD/MMC Card or USB.(SD/MMC, USB socket protection.) 5. When change LCD Panel, please avoid from DUST place.
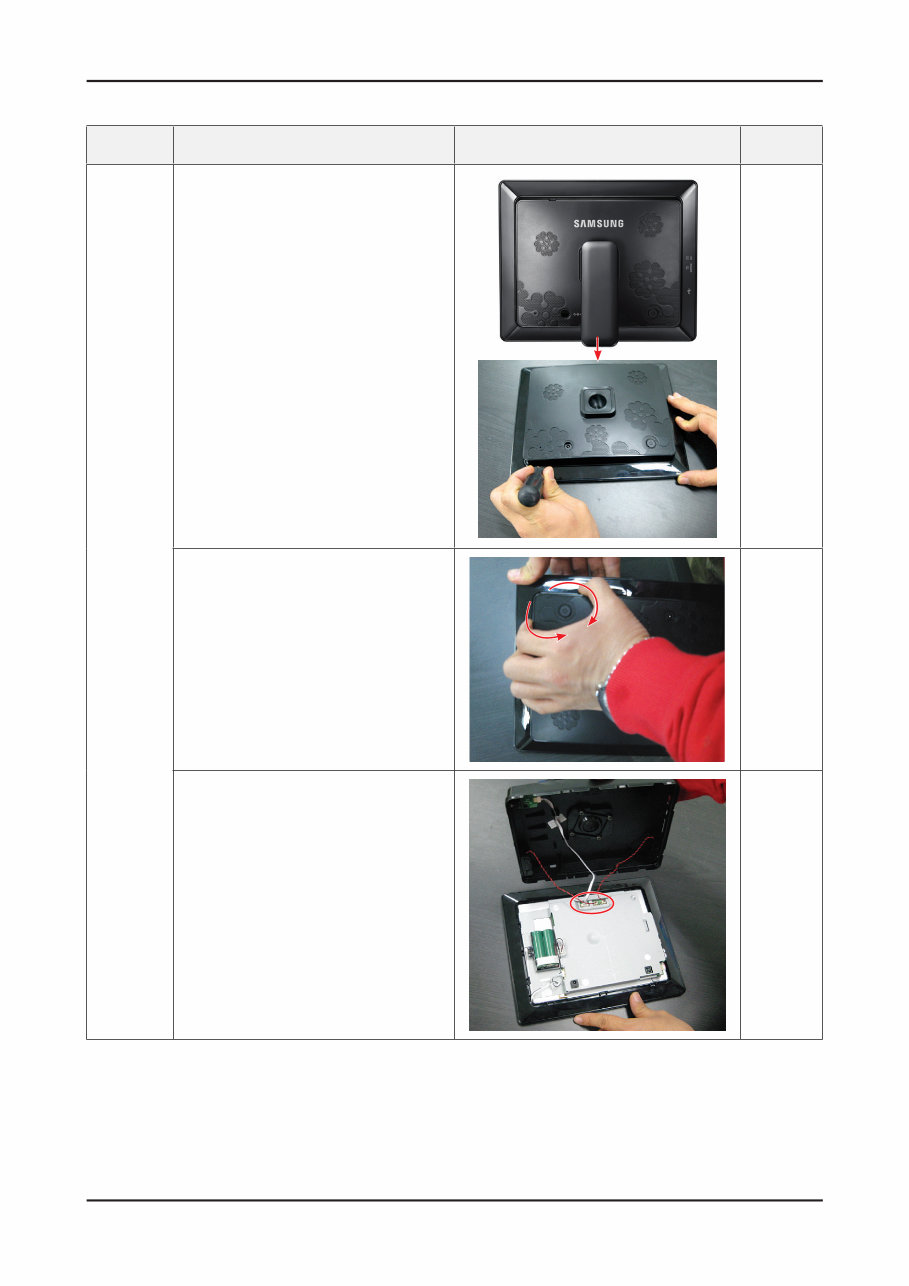
3-2 3. Disassembly and Reassemble 3-2. Disassembly & Reassembly (For all 8” models) Part Description Description Photo Screws COVER REAR 1. Place the set with the front on the floor. Remove the left and right hooks at the bottom using a tool such as a pair of tweezers. * You can remove the rear cover while the stand is engaged. To remove the stand first, lift it up before removing it. 2. Remove the rear cover in an outwards direction. 3. Remove the connector at the top.
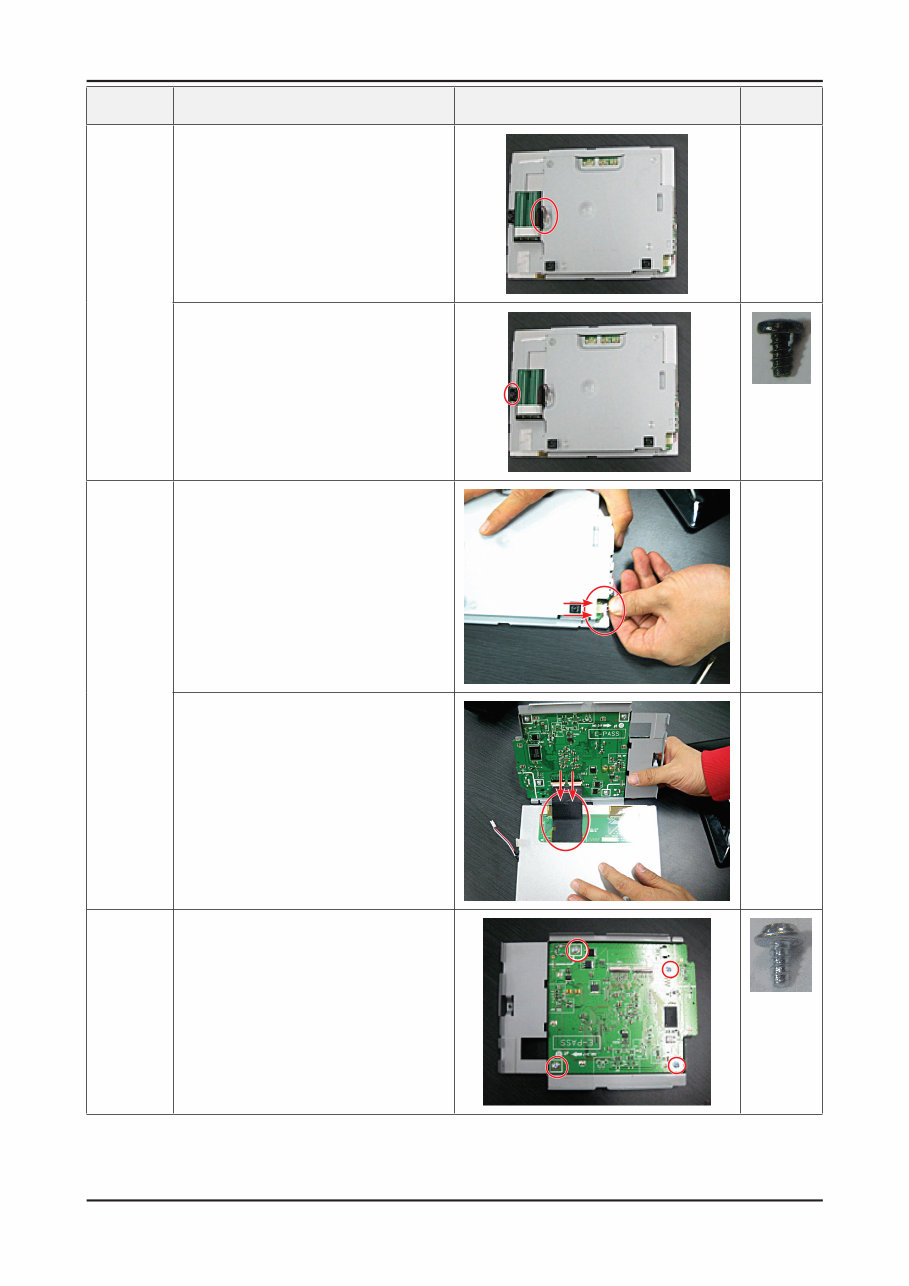
3-3 3. Disassembly and Reassemble Part Description Description Photo Screws BATTERY 4. Remove the battery connector. 5. Remove the One (1) screws. <BH,+,-,B,M3,L8,ZPC(BLK),SWRCH18 A,-.> PANEL 6. Remove the lamp connector from the panel in the direction of the arrow. 7. Place the PCB connected to the LCD panel so that the PCB connector is facing downwards. Then remove the PCB connector. SHIELD 8. Remove the four (4) screws. <PWH,+,-,B,M3,L6,ZPC(WHT),SWRCH 18A,-> ※Reassembly procedures are in the reverse order of disassembly procedures.
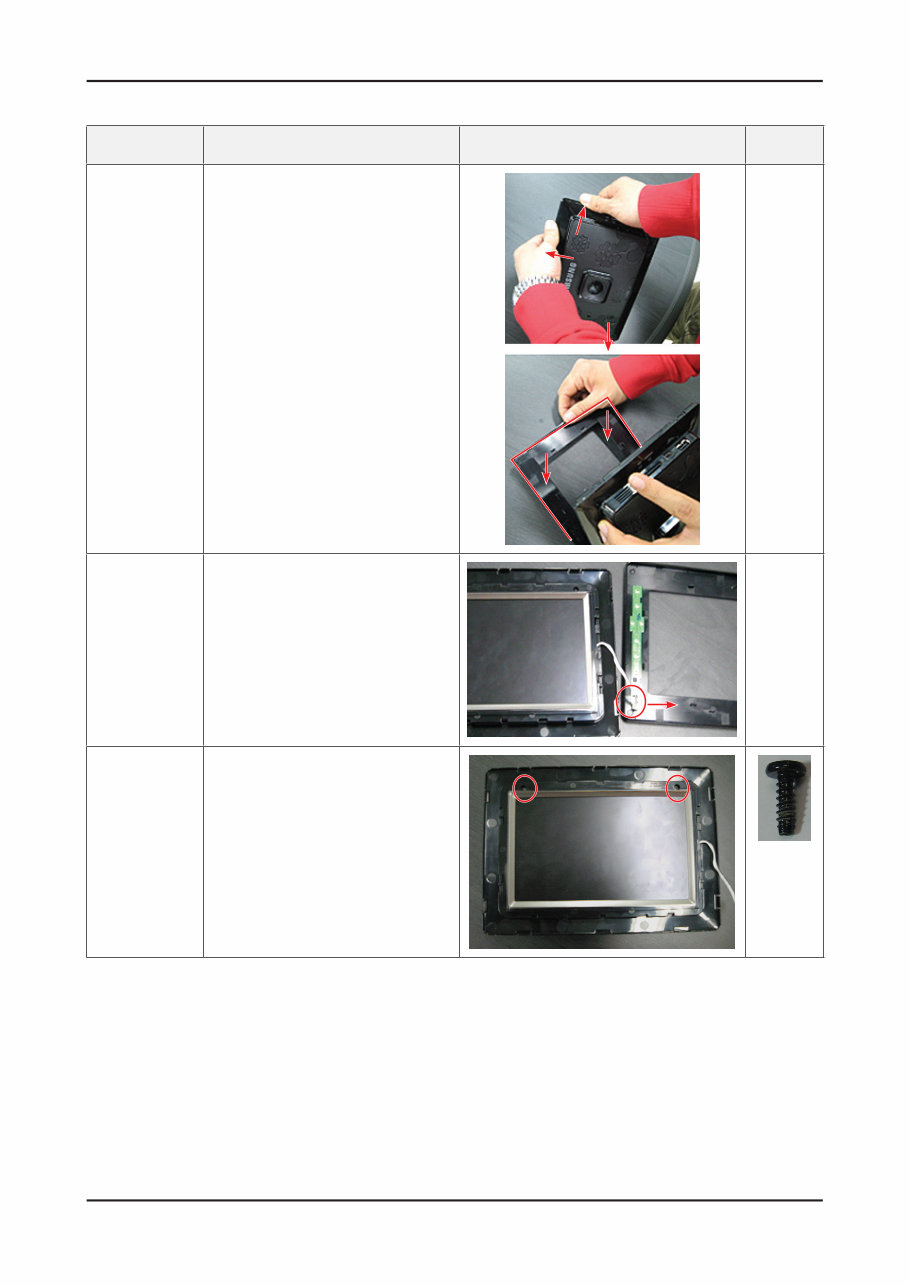
3-4 3. Disassembly and Reassemble 3-3. Disassembly & Reassembly (For all 7” models) Part Description Description Photo Screws COVER FRONT 1. Place the set with the front on the floor. Lift the set and remove the front cover as shown in the figure on the right. TOUCH CONNECTOR 2. Remove the function connector in the direction of the arrow. COVER MIDDLE 3. Remove the two (2) screws at the top. <BH,+,B,M2.6,L8 ZPC(BLK)>
You're Reading a Preview
What's Included?
Lifetime Access
Fast Download Speeds
Online & Offline Access
Access PDF Contents & Bookmarks
Full Search Facility
Print one or all pages of your manual
$30.99
Samsung SPF-85P + 86P Service Manual & Repair Guide
Why replace or spend lots of money on repairs while you can fix it yourself? This service and repair manual is used by the Official Certified Samsung Technicians. It will help you to troubleshoot and repair your photo frame!
You will learn about:
Safety & Precautions
Product Specifications
Troubleshooting
Maintenance
Disassembly & Reassembly
Adjustments
Schematic Diagram
Wiring Diagram
Exploded Views
Replacement Parts list
This service manual is very detailed with colored pictures and step-by-step instructions on how to repair/service this device the best way there is! Please note; this is the OFFICIAL service and repair manual in PDF format, no scanned-in or bootlegged copy. This manual is made in high resolution, so when you print the pages you need it is all in great quality!
***INSTANT access*** After your payment, you will have instant access to your access! No shipping fee, no waiting on postal delivery, you can start doing your repairs right away!
Specifications Language: English Format: PDF Platform: Windows and MAC
Looking for a service manual but can't find it anywhere? Please contact us with your request! As you can see we've got one of the largest service manual databases out there, so a good chance we can help you out!
Reviews
Q&A
Recently Viewed
5,521,897Happy Clients
2,594,462eManuals
1,120,453Trusted Sellers
15Years in Business
Price:
Actual Price:
Samsung SPF-85P + 86P Service Manual & Repair Guide




 Lifetime Access




