


m
0
-t
e
I,,
'0
m
5
t
' r -
6 '7 ,
& : -
& -6 " I
Preparations
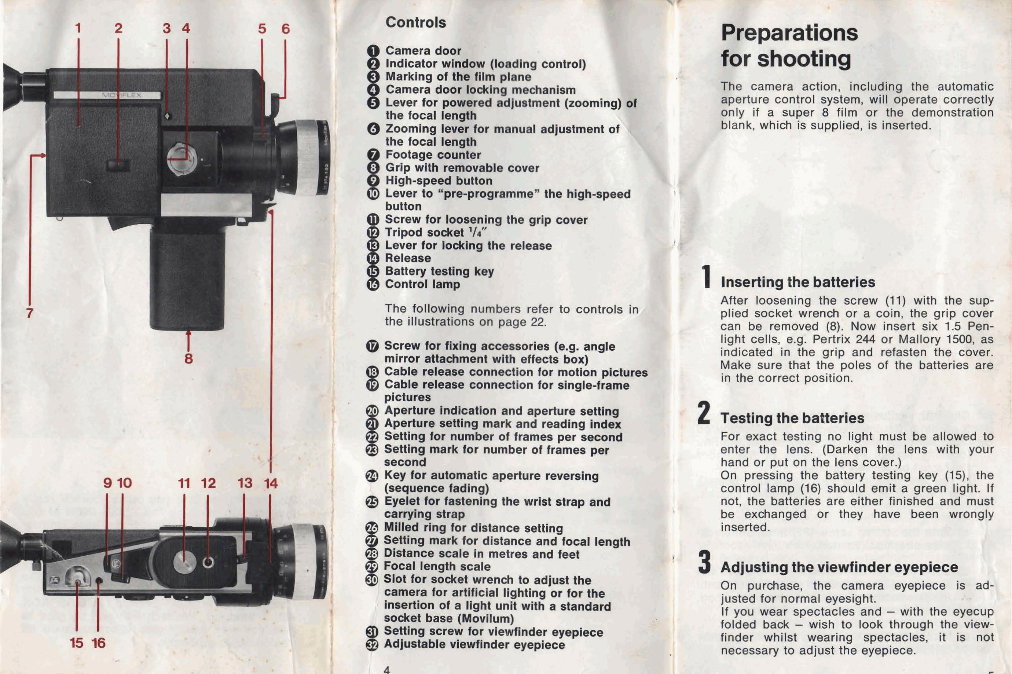
Indicator wlndow (lordlng control)
for shooting
Marking of tlre fllm plane
Camera door kocklng mechanism
The camera action, including the automatic
aperture control system, will operate correctly
only if a super 8 film or the demo stration
blank, which is supplied, is inserted.
f hi
R
Inserting the batteries
After loosening the screw (11) with the sup-
The following numbers refer to controls in
plied socket wrench or a coin, the grip cover
the illustrations on page 22.
can be removed (8). Now insert six 1.5 Pen-
@ Screw for M n g acoeasorles (e.g. angle
light cells, e.g. Pertrix 244 or Mallory 1500, as
mirror attachment wlth effects box)
indicated in the grip and refasten the cover.
Cable release connection for motion picturn
Make sure that the poles of the batteries are
Cable release connection for single-frame
in the correct position.
pictures
Aperture fndlcallon and aperture setting
Aperture s m n g mark and reading index
Settlng for number of frames per second
Setting mark for number of frames per
second
@ Key for automatic aperture reverslng
(sequence fadlng)
@ Eyelet for faetenlng the wrist strap and
carylng strap
MMeB rlng for distance setting
S d & g mark for dlstance and focal length
Dlgiance scale in metres and feet
Foal length scale
Slat for sodcet wrench to adjust the
camera for artlflclal llghtlng or for the
insertion of a llght unit with a standard
ma* base (Movilum)
Settlng rcrew for vlewflnder eyepiece
Adjustable vlewflnder eyeplece
Testing the batteries
For exact testing no light must be allowed to
enter the lens. (Darken the lens with your
hand or put on the lens cover.)
On pressing the battery testing key (15), the
control lamp (16) should emit a green light. if
not, the batteries are either finished and must
be exchanged or they have been wrongly
inserted.
Adjusting the viewfinder eyepiece
On purchase, the camera eyepiece is ad-
justed for normal eyesight.
. .
If you wear spectacles and - with the eyecup
folded back - wish to look through the view-
finder whilst wearing spectacles, it is not
necessary to adjust the eyepiece.
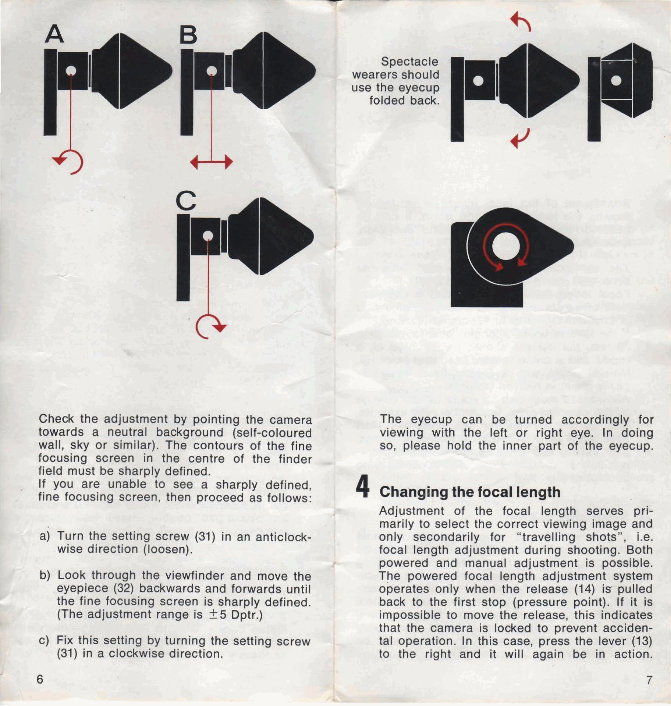
Spectacle
wearers
use the t .
folded back.
Check the adjustment by pointing the camera The eyecup can be turned accordingly for
towards a neutral background (self-coloured viewing with the left or right eye. In doing
wall, sky or similar). The contours of the fine so, please hold the inner part of the eyecup.
focusing screen in the centre of the finder ,
field must be sharply defined.
.
If you are unable to see a sharply defined,
fine focusing screen, then proceed as follows:
4 Changing the focal length
1
Adjustment of the focal length serves pri-
marily to select the correct viewing image and
a) Turn the setting screw (31) in an anticlock- only secondarily for "travelling shots", i.e.
wise direction (loosen).
I
focal length adjustment during shooting. Both
powered and manual adjustment is possible.
b) Look through the viewfinder and move the The powered focal length adjustment system
eyepiece (32) backwards and forwards until operates only when the release (14) is pulled
the fine focusing screen is sharply defined. back to the first stop (pressure point). If it is
i
(The adjustment range is k5 Dptr.) impossible to move the release, this indicates
that the camera is locked to prevent acciden-
tal operation. In this case, press the lever (13)
II aaain be in action.
r
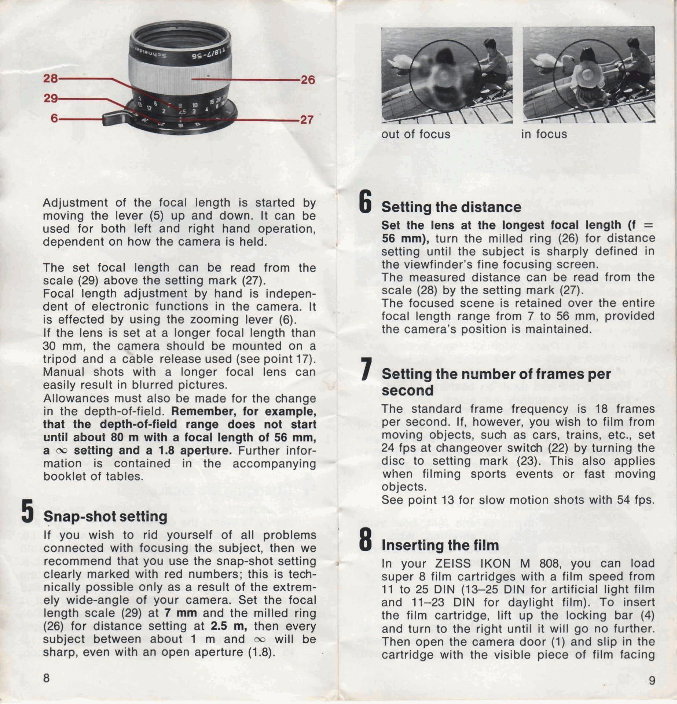
Adjustment of the focal length is started by
moving the lever (5) up and down. It can be
used for both left and right hand operation,
dependent on how the camera is held.
I
The set focal length can be read from the
scale (29) above the setting mark (27).
Focal length adjustment by hand is indepen-
dent of electronic functions in the camera. It
is effected by using the zooming lever (6).
If the lens is set at a longer focal length than
30 mm, the c mera should be mounted on a
tripod and a S b l e release used (see point 17).
Manual shots with a longer focal lens can
easily result in blurred pictures.
Allowances must also be made for the change
in the depth-of-field. Remember, for example,
that the depthsf-field range does not start
untll about 80 m wlth a focal length of 56 mm,
a m setting and a 1.8 aperture. Further infor-
mation is contained in the accompanying
booklet of tables.
5 Snap-shot setting
If you wish to rid yourself of all problems
connected with focusing the subject, then we
recommend that you use the snap-shot setting
clearly marked with red numbers; this is tech-
nically possible only as a result of the extrem-
I
ely wide-angle of your camera. Set the focal
length scale (29) at 7 mm and the milled ring
/
(26) for distance setting at 2.5 m, then every
subject between about 1 m and m will be
sharp, even with an open aperture (1.8).
out of focus in f
' 6 Setting the distance
I
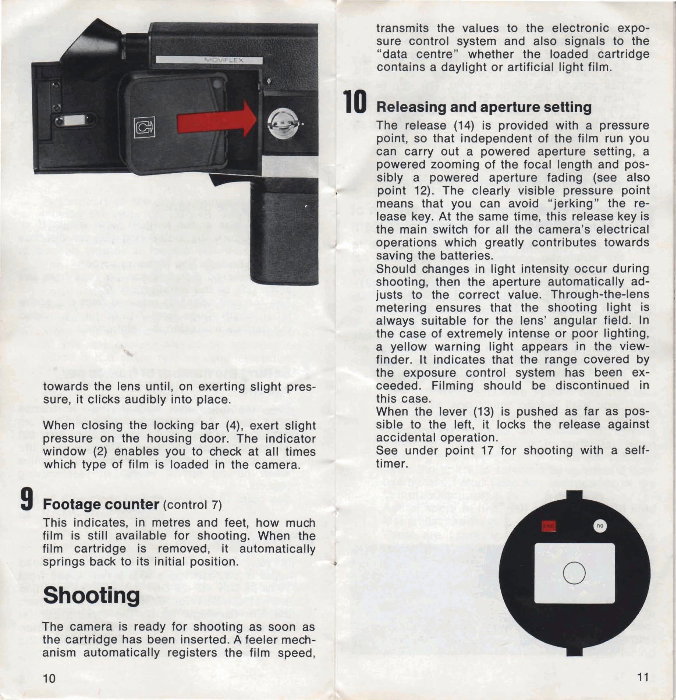
Set the lens at the longest focal length (f =
56 mm), turn the milled ring (26) for distance
setting until the subject is sharply defined in
the viewfinder's fine focusing screen.
The measured distance can be read from the
scale (28) by the setting mark (27).
The focused scene is retained over the entire
focal length range from 7 to 56 mm, provided
the camera's position is maintained.
7 Setting the number of frames per
second
The standard frame frequency is 18 frames
per second. If, however, you wish to film from
moving objects, such as cars, trains, etc., set
24 fps at changeover switch (22) by turning the
- disc to setting mark (23). This also applies
when filming sports events or fast moving
: : ! : t i n t 13 for slow motion shots with 54 fps.
-
: 8 insertingthe film
s In your ZElSS IKON M 808, you can load
super 8 film cartridges with a film speed from
11 to 25 DIN (13-25 DIN for artificial light film
and 11-23 DIN for daylight film). To insert
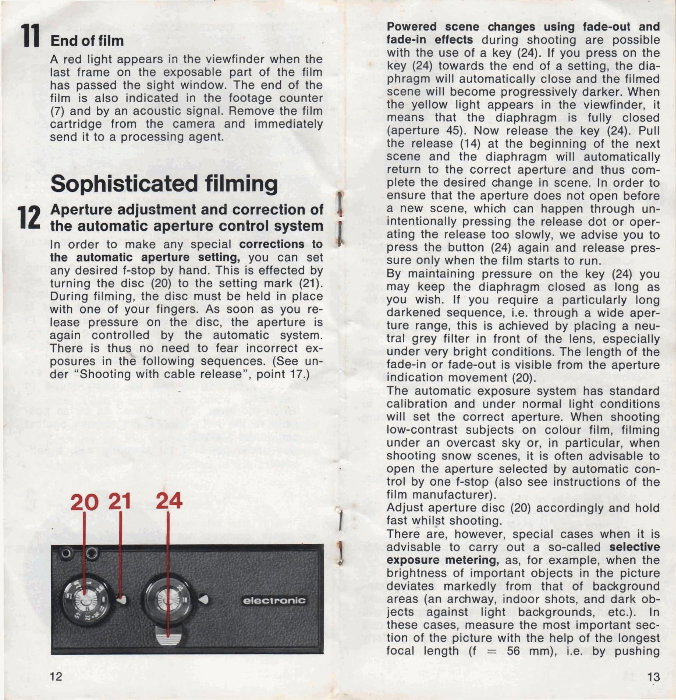
the film cartridge, lift up the locking bar (4)
and turn to the right until it will go no further.
Then open the camera door (1) and slip in the
cartridge with the visible piece of film facing
I
-
towards the lens until, on exerting slight pres-
sure, it clicks audibly into place.
When closing the locking bar (4), exert slight
pressure on the housing door. The indicator
window (2) enables you to check at all times
which type of film is loaded in the camera.
transmits the values to the electronic expo-
sure control system and also signals to the
"data centre" whether the loaded cartridge
contains a daylight or artificial light film.
10 Releasingand aperture setting
The release (14) is provided with a pressure
point, so that independent of the film run you
can carry out a powered aperture setting, a
powered zooming of the focal length and pos-
sibly a powered aperture fading (see also
point 12). The clearly visible pressure point
means that you can avoid "jerking" the re-
lease key. At the same time, this release key is
the main switch for all the camera's electrical
operations which greatly contributes towards
bb - aving the batteries.
Should changes in light intensity occur during
shooting, then the aperture automatically ad-
justs to the correct value. Through-the-lens
metering ensures that the shooting light is
always suitable for the lens' angular field. In
the case of extremely intense or poor lighting,
a yellow warning light appears in the view-
finder. It indicates that the range covered by
the exposure control system has been ex-
ceeded. Filming should be discontinued in
this case.
When the lever (13) is pushed as far as pos-
sible to the left, it locks the release against
accidental operation.
See under point 17 for shooting with a self-
timer.
9 Footage counter (control 7)
'= 'w, 'l-4 -.
This indicates, in metres and feet, how much
film is still available for shootina. When the
film cartridge is removed, it automatically
springs back to its initial position. 1
Shooting
The camera is ready for shooting as soon as
the cartridge has been inserted. A feeler mech-
anism automatically registers the film speed,
A red light appears in the viewfinder when the
last frame on the exposable part of the film
has passed the sight window. The end of the
film is also indicated in the footage counter
(7) and by an acoustic signal. Remove the film
cartridge from the camera and immediately
send it to a processing agent.
Sophisticated filming
Aperture adjustment and correction of &
the automatic aperture control system 1
In order to make any special corrections to 6
the automatic aperture setting, you can set
any desired f-stop by hand. This is effected by
turning the disc (20) to the setting mark (21).
During filming, the disc must be held in place
with one of your fingers. As soon as you re-
lease pressure on the disc, the aperture is
again controlled by the automatic system.
There is thus no need to fear incorrect ex-
posures in th8 following sequences. (See un-
der "Shooting with cable release", point 17.)
Powered scene changes using fade-out and
fade-in effects during shooting are possible
with the use of a key (24). If you press on the
key (24) towards the end of a setting, the dia-
phragm will automatically close and the filmed
scene will become progressively darker. When
the yellow light appears in the viewfinder, it
means that the diaphragm is fully closed
(aperture 45). Now release the key (24). Pull
the release (14) at the beginning of the next
scene and the diaphragm will automatically
return to the correct aperture and thus com-
plete the desired change in scene. In order to
ensure that the aperture does not open before
a new scene, which can happen through un-
intentionally pressing the release dot or oper-
ating the release too slowly, we advise you to
press the button (24) again and release pres-
sure only when the film starts to run.
By maintaining pressure on the key (24) you
may keep the diaphragm closed as long as
you wish. If you require a particularly long
darkened sequence, i.e. through a wide aper-
ture range, this is achieved by placing a neu-
tral grey filter in front of the lens, especially
under very bright conditions. The length of the
fade-in or fade-out is visible from the aperture
indication movement (20).
The automatic exposure system has standard
calibration and under normal light conditions
will set the correct aperture. When shooting
low-contrast subjects on colour film, filming
under an overcast sky or, in particular, when
shooting snow scenes, it is often advisable to
,
open the aperture selected by automatic con-
trol by one f-stop (also see instructions of the
film manufacturer).
Adjust aperture disc (20) accordingly and hold
fast whilst shooting.
There are, however, special cases when it is
advisable to carry out a so-called selective
exposure metering, as, for example, when the
brightness of important objects in the picture
deviates markedly from that of background
areas (an archway, indoor shots, and dark ob-
jects against light backgrounds, etc.). In
these cases, measure the most important sec-
tion of the picture with the help of the longest
focal length (f = 56 mm), i.e. by pushing
13
the release (14) down to the pressure point
and then removing pressure. Now adjust the de-
sired section of the picture by hand with the
zooming lever (6). Without altering your posi-
tion, you can now film the scene with the
previously adjusted lens aperture which is
maintained by keeping your finger on the
aperture disc (20) (or you can use a cable
release - see point 17).
13
Slow motion with high-speed
automatic control
The ZElSS IKON M 808 features a built-in
slow-motion gear operating at 54 fps (triple
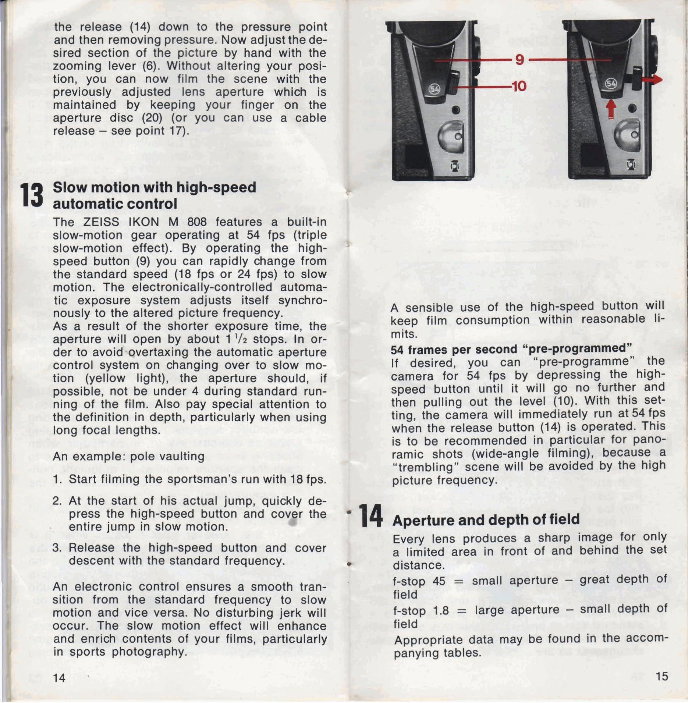
slow-motion effect). By operating the high-
speed button (9) you can rapidly change from
the standard speed (18 fps or 24 fps) to slow
motion. The electronically-controlled automa-
tic exposure system adjusts itself synchro-
nously to the altered picture frequency.
As a result of the shorter exposure time, the
aperture will open by about 1'12 stops. In or-
der to avoid.overtaxing the automatic aperture
control system on changing over to slow mo-
tion (yellow light), the aperture should, if
possible, not be under 4 during standard run-
ning of the film. Also pay special attention to
the definition in depth, particularly when using
long focal lengths.
An example: pole vaulting
1. Start filming the sportsman's run with 18 fps.
2. At the start of his actual jump, quickly de-
press the high-speed button and cov r the
. entire jump in slow motion. 8
3. Release the high-speed button and cover
descent with the standard frequency.
An electronic control ensures a smooth tran-
sition from the standard frequency to slow
motion and vice versa. No disturbing jerk will
occur. The slow motion effect will enhance
and enrich contents of your films, particularly
in sports photography.
A sensible use of the high-speed button will
keep film consumption within reasonable li-
mits.
54 frames per second "pre-programmed"
If desired, you can "pre-programme" the
camera for 54 fps by depressing the high-
speed button until it will go no further and
then pulling out the level (10). With this set-
ting, the camera will immediately run at 54 fps
when the release button (14) is operated. This
is to be recommended in particular for pano-
ramic shots (wide-angle filming), because a
"trembling" scene will be avoided by the high
picture frequency.
14 Aperture and depth of field
Every lens produces a sharp image for only
a limited area in front of and behind the set
distance.
f-stop 45 = small aperture - great depth of
field
f-stop 1.8 = large aperture - small depth of
field
Appropriate data may be found in the accom-
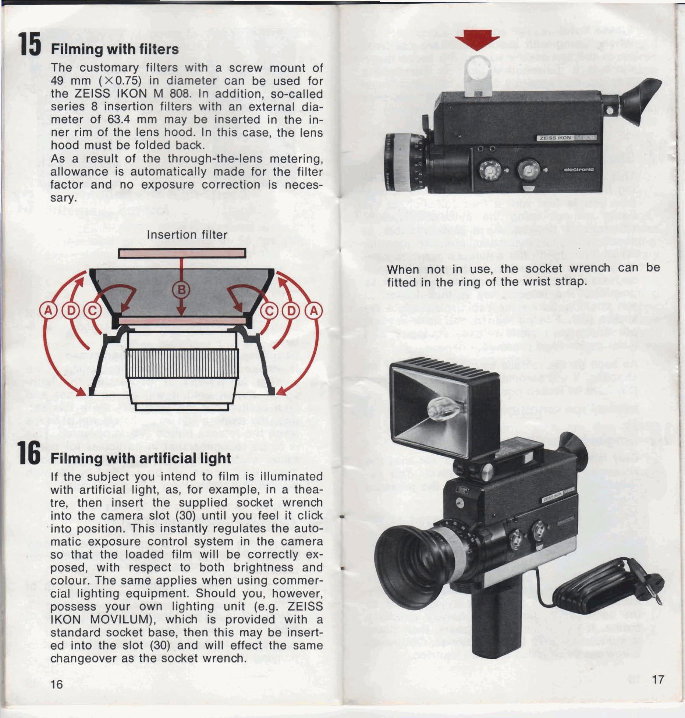
15 Filming with filters
The customary filters with a screw mount of
49 mm (X0.75) in diameter can be used for
the ZElSS IKON M 808. In addition, so-called
series 8 insertion filters with an external dia-
meter of 63.4 mm may be inserted in the in-
ner rim of the lens hood. In this case, the lens
hood must be folded back.
As a result of the through-the-lens metering,
1-
allowance is automatically made for the filter
j
factor and no exposure correction is neces-
sary. w
1
i &
Insertion filter
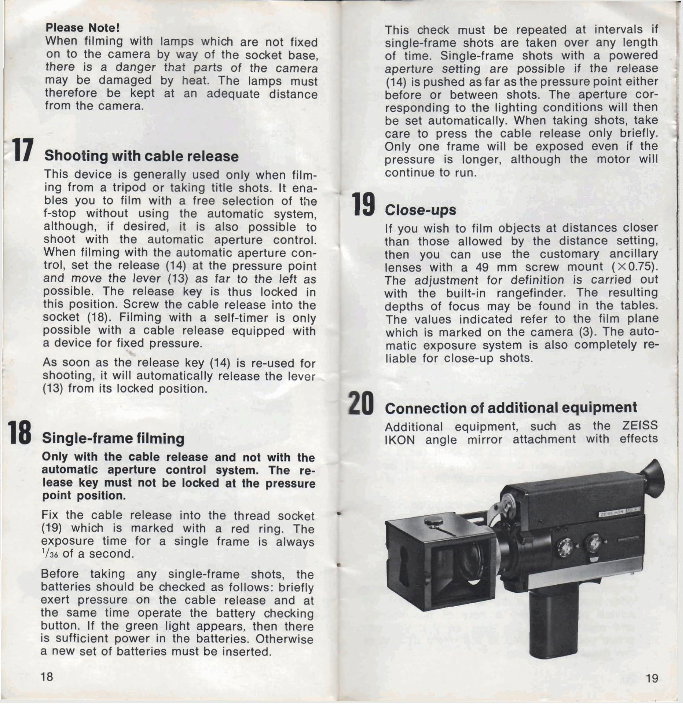
16 Filming with artificial light
When not in use, the socket wrench can be
fitted in the ring of the wrist strap.
If the subject you intend to film is illuminated
with artificial light, as, for example, in a thea-
tre, then insert the supplied socket wrench
into the camera slot (30) until you feel it click *
.into position. This instantly regulates the auto-
matic exposure control system in the camera
so that the loaded film will be correctly ex- I
posed, with respect to both brightness and b
colour. The same applies when using commer-
cial lighting equipment. Should you, however,
possess your own lighting unit (e.g. ZElSS
IKON MOVILUM), which is provided with a
Y I-
standard socket base, then this may be insert-
ed into the slot (30) and will effect the same
Please Note!
When filming with lamps which are not fixed
.
on to the camera by way of the socket base,
there is a danger that parts of the camera
may be damaged by hait The lamps must
therefore be kept at an adequate distance
from the camera.
1 17 Shooting with a b t e nleaae
This device is generally used only when film-
ing from a tripod or taking title shots. It ena-
bles you to film with a free selection of the
f-stop without using the automatic system,
although, if desired, it is also possible to
shoot with the automatic aperture control.
When filming with the automatic aperture con-
trol, set the release (14) at the pressure point
and move the lever (13) as far to the left as
possible. The release key is thus locked in
this position. Screw the cable release into the
'
socket (18). Filming with a self-timer is only
I
possible with a cable release equipped with
a device for fixed pressure.
'5
! As soon as the release key (14) is re-used for
t shooting, it will automatically release the lever
(13) from its locked position.
Only with the cable release and not wlth the
automatic aperture control system. The re-
lease key must not be locked at the pressure
point position.
Fix the cable release into the thread socket
(1.9) which is marked with a red ring. The
exposure time for a single frame is always
'136 of a second.
Before taking any single-frame shots, the
batteries should be checked as follows: briefly
exert pressure on the cable release and at
the same time operate the battery checking
button. If the green light appears, then there
is sufficient power in the batteries. Otherwise
This charck must be repeated at intervals it
single-frame shots are taken over any length
of time. Single-frame shots with a powered
aperture setting are possible if the release
(14) is pushed as far as the pressure point either
before or between shots. The aperture cor-
responding to the lighting condifions will then
be set automatically. When taking shots, take
care to press the cable release Only briefly.
Only one frame will be exposed even if the
pressure is longer, although the 'motor will
continue to run.
If you wish to film objects at distances closer
I
than those allowed by the distance setting,
then you can use the customary ancillary
lenses with a 49 mm screw mount (X0.75).
The adjustment for definition is carried out
with the built-in rangefinder. The resulting
depths of focus may be found in the tables.
The values indicated refer to the film plane
which is marked on the camera (3). The auto-
matic exposure system is also completely re-
liable for close-up shots.
Connectionof additional equlprnent
Additional equipment, such as the ZElSS
. .
I K ttachment with effects
i A
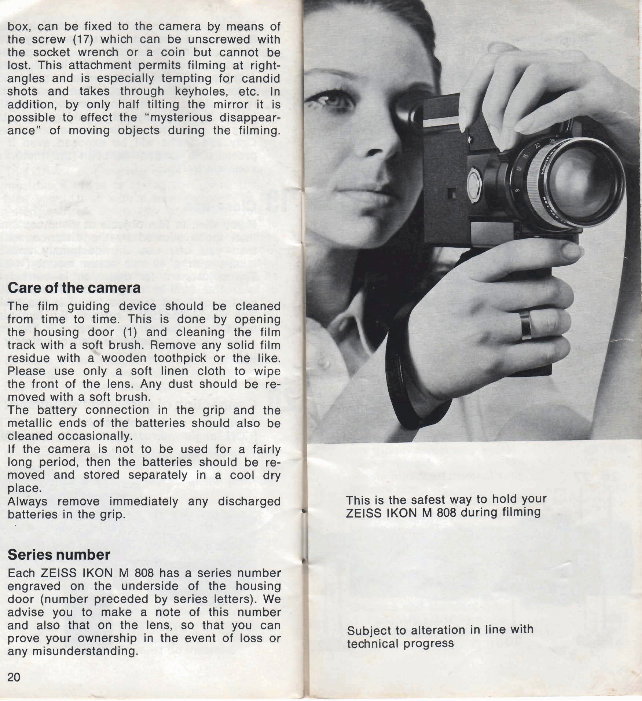
box, can be fixed to the camera by means of
the screw (17) which mn be unscrewed with
the socket wrench rsr a coin but cannot be
lost. This attachmed perm#@ fibming at right-
angles and is espeofefEy" tempting f ~ r candid
shots and takes through wholes, etc. In
addition, by only half tlMn@ the mirror it is
pomible to effect the "myste~ws disappear-
ance" of moving objecTs during the filming.
Care of the camera
The film guiding device should be cleaned
from time to time. This is done by opening
the housing door (1) and cleaning the film
track with a ~ f i brush. Remove any solid film
residue with a wooden toothpick or the like.
Please use only a soft linen cloth to wipe
the front of the lens. Any dust should be re-
moved with a soft brush.
The battery connection in the grip and the
metallic ends of the batteries should also be
cleaned occasionally.
If the camera is not to be used for a fairly
long period, then the batteries should be re-
moved and stored separately in a cool dry
place.
Always remove immediately any discharged
batteries in the grip.
This is the safest way to hold your
ZElSS IKON M 808 during filming
.
Series number
Each ZElSS IKON M 808 has a series number
engraved on the underside of the housing
door (number preceded by series letters). We
advise vou to make a note of this number 1
and alsb that on the lens, so that you can
Subject to alteration in line with
prove your ownership in the event of loss or
technical progress
20
You're Reading a Preview
What's Included?
 Lifetime Access
Fast Download Speeds
Online & Offline Access
Access PDF Contents & Bookmarks
Full Search Facility
Print one or all pages of your manual
$31.99
ZEISS IKON M 808 MOVIFLEX SUPER 8 CAMERA
Viewed 99 Times Today

What's Included?
Lifetime Access
Fast Download Speeds
Online & Offline Access
Access PDF Contents & Bookmarks
Full Search Facility
Print one or all pages of your manual
$31.99

Secure transaction
What's Included?
Lifetime Access
Fast Download Speeds
Online & Offline Access
Access PDF Contents & Bookmarks
Full Search Facility
Print one or all pages of your manual
Description
Get access to a comprehensive digital manual for your vehicle, available in English. This manual is a valuable resource for both professional mechanics and DIY enthusiasts. It includes detailed information and diagrams to assist with car repairs and maintenance. The file format is either .PDF or .OVA, providing easy access to the information you need.


