Volvo L45B Compact Wheel Loader OEM Service & Repair Manual
What's Included?
Lifetime Access
Fast Download Speeds
Offline Viewing
Access Contents & Bookmarks
Full Search Facility
Print one or all pages of your manual
Service Information Document Title: Function Group: Information Type: Date: Cab description 800 Service Information 2014/3/11 Profile: CWL, L45B [GB] Cab description The cab is mounted resiliently and complies with ROPS regulations ISO 3471 and SAE 1040, and the cab is also FOPS – certified to ISO 3449 and SAE J231. This guarantees optimum driver safety in the event of the machine overturning or if objects fall onto the cab roof. As well as driver safety, the large curved panoramic screen gives the driver excellent all-round visibility. In particular a good forward view of the attachments and fast changer, and rearward over the compact machine rear, contribute substantially to the operating safety. The cab interior is very spacious and offers good storage facilities. On the clear instrument panel the driver has a constant view of all important machine information. The driver's seat has multiple adjustments and offers drivers of all sizes comfortable seating. The adjustable steering column contributes to driving comfort, together with the individually adjustable control panels with height-adjustable arm rest. A powerful three-stage heater fan provides the cab with filtered external air. Optimum heating and defrosting are ensured via seven adjustable fresh air vents. A sliding window, fitted in the left-hand door as standard, provides additional fresh air. Air conditioning is available on request (optional).
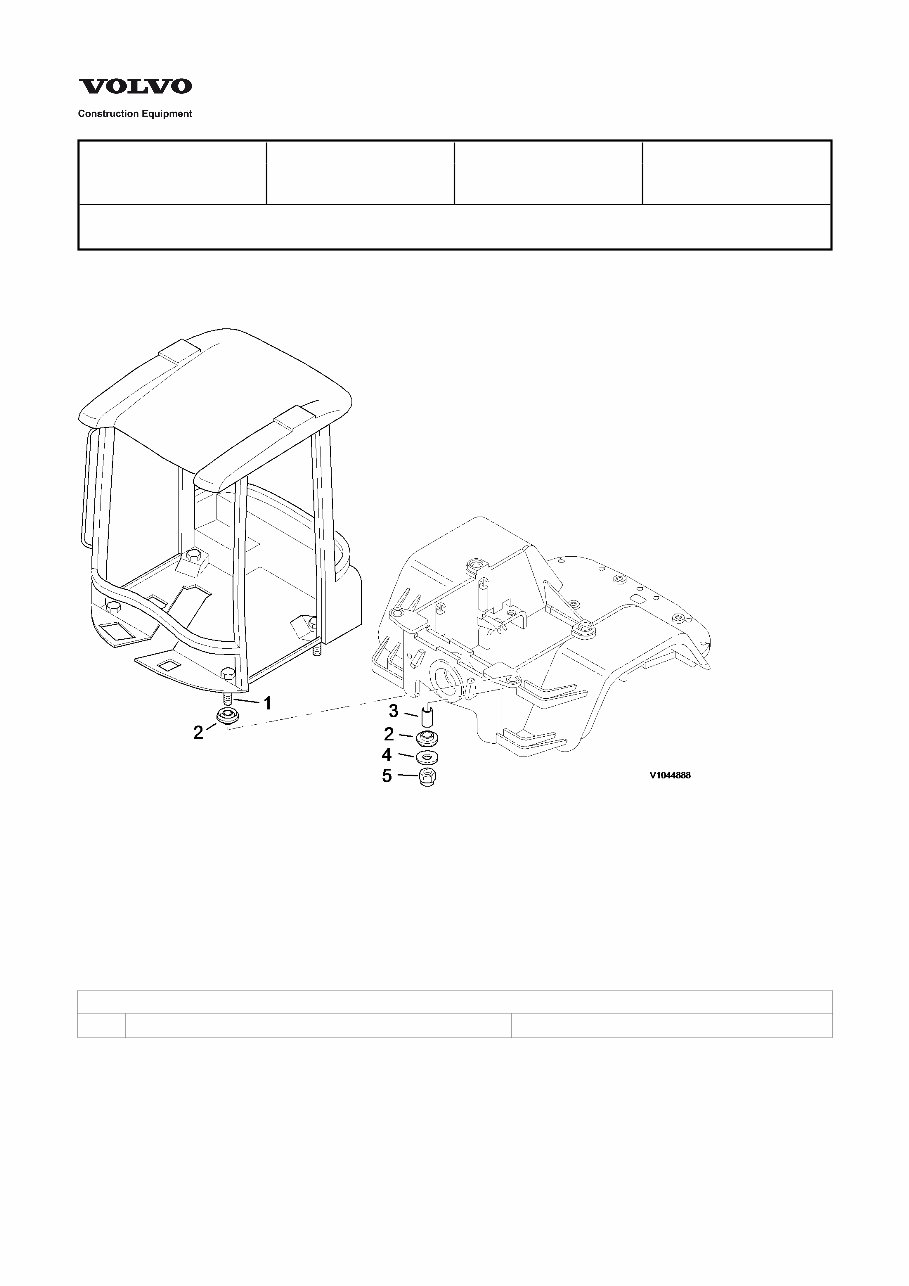
Service Information Document Title: Function Group: Information Type: Date: Cab mounts, tightening torques 800 Service Information 2014/3/11 Profile: CWL, L45B [GB] Cab mounts, tightening torques Figure 1 Cab suspension, fixing element 1. 2. 3. 4. 5. Screw Puffer Pipe Washer Nut Fixing element, tightening torque 5 Fixing nuts on frame 200 Nm (148 lbf ft)
Service Information Document Title: Function Group: Information Type: Date: Repairs of minor damage on internal and external plastic parts (scratches, dents, breaks) 810 Service Information 2014/3/11 Profile: CWL, L45B [GB] Repairs of minor damage on internal and external plastic parts (scratches, dents, breaks) The plastic parts repair kit, order no. 2815630, consists of: Pos. Order no. Description 1 2809720 Universal cleaner, 1 ltr. 2 2809721 1K plastic adhesive primer, 1 ltr. 3 2809722 Quick filler white, 1 ltr. 4 2809723 Hardener standard, 0.5 ltr. 5 2809724 Thinners, 1 ltr. 6 2809725 Fibreglass filler, 1 kg 7 2809726 Tube hardening paste 50 g Smooth broken edges, sand down cracks and clean with universal cleaner (item 1). Apply a thin layer of bonding primer (item 2) to the contact surface and leave to flash dry for 15 minutes. Mix quick filler (item 3) with hardener (item 4) and thinners (item 5) thoroughly in a mixing container in mixing ratio 4 : 1 : 1. Apply quick filler to the contact surface and leave to dry (dry at 20 °C for around 2 hours). Mix fibreglass filler (item 6) with hardener, around 2 .. 3% (item 7), in a mixing vessel. Apply fibreglass filler, if necessary use extra fibreglass matting (dry at 20 °C for around 20 min). Sand down fibreglass filler, then clean the filled area. Apply a thin layer of bonding primer (item 2) and top coat (2K-PUR acrylic paint). NOTE! Repairs are evident on plastic interior parts due to the grained finish.
Service Information Document Title: Function Group: Information Type: Date: Cab mounts, tightening torques 818 Service Information 2014/3/11 Profile: CWL, L45B [GB] Cab mounts, tightening torques Figure 1 Cab suspension, fixing element 1. 2. 3. 4. 5. Screw Puffer Pipe Washer Nut Fixing element, tightening torque 5 Fixing nuts on frame 200 Nm (148 lbf ft)
Service Information Document Title: Function Group: Information Type: Date: Cab mounts, tightening torques 818 Service Information 2014/3/11 Profile: CWL, L45B [GB] Cab mounts, tightening torques Figure 1 Cab suspension, fixing element 1. 2. 3. 4. 5. Screw Puffer Pipe Washer Nut Fixing element, tightening torque 5 Fixing nuts on frame 200 Nm (148 lbf ft)
Service Information Document Title: Function Group: Information Type: Date: Windows, general 843 Service Information 2014/3/11 Profile: CWL, L45B [GB] Windows, general All windows in the cab are glued directly to the window cut-out of the cab frame. When replacing the cab windows, wear safety goggles and gloves. Use clean tools because dirt residue and lubricant can reduce adhesion, which is extremely important for the seal and strength of the window adhesion. The adhesive hardening process is dependent on temperature and relative humidity. At temperatures close to freezing point and low humidity, a longer hardening time is required. Consumables To replace the cab windows, use commercial adhesives and consumables. Activator The activator is a cleaning and activation fluid which is used for pretreatment of the contact area (adhesive area of the new screen) before application of the polyurethane adhesive. Primer The primer is a moisture-repellent primer of low viscosity which is used to prime the contact area (adhesive area of the new screen) before application of the polyurethane adhesive. NOTE! Never use primer on old adhesive residues. Polyurethane adhesive The polyurethane adhesive is a fast drying, cold applied adhesive which hardens by contact with the humidity in the air. Reduced humidity which occurs at low temperatures leads to longer hardening times. Under these conditions, allow the vehicle to idle and switch on the cab heating fan. To increase the air humidity in the cab, place a bucket of water in the cab. To check the drying time under different weather conditions, apply a bead of adhesive to a piece of cardboard.
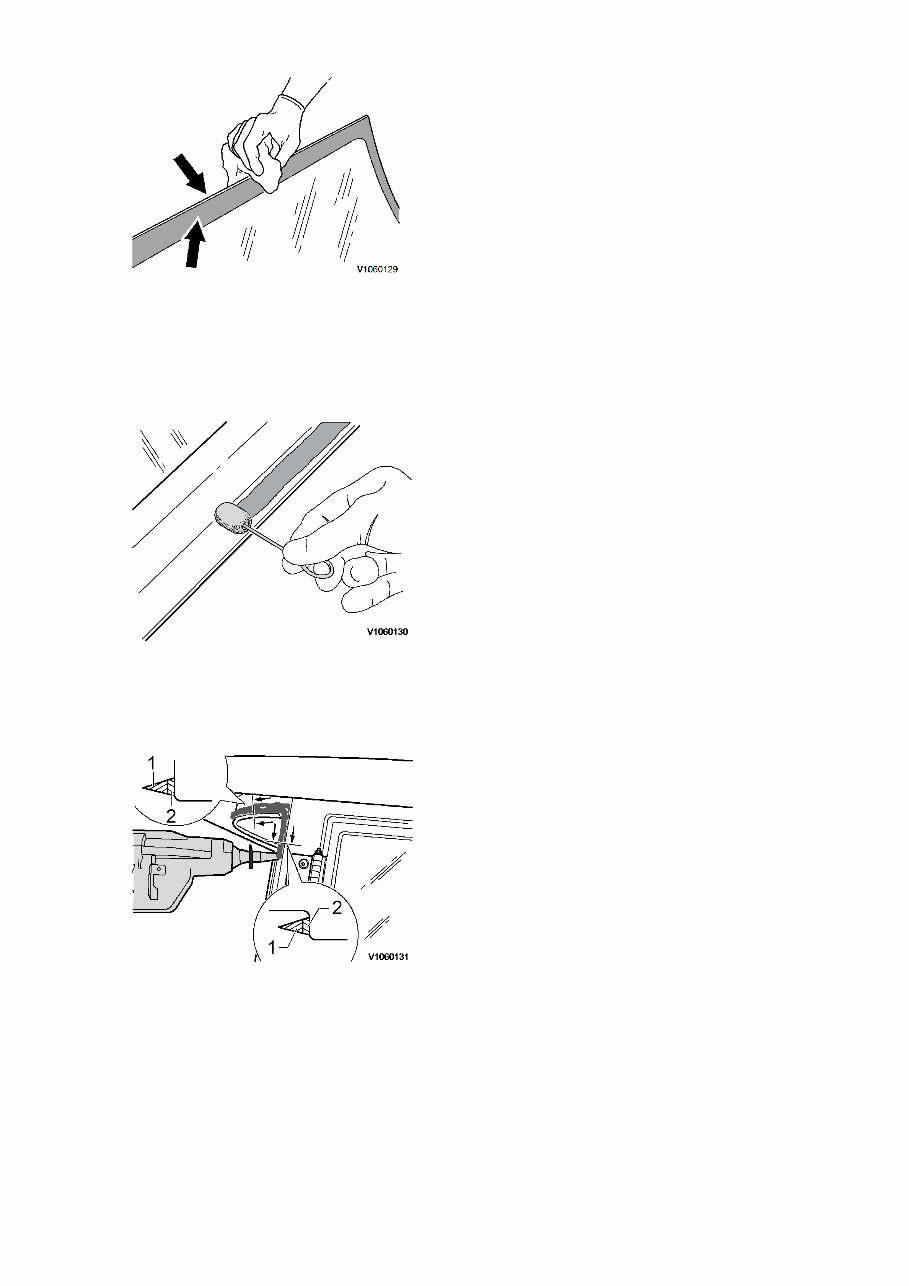
Service Information Document Title: Function Group: Information Type: Date: Windscreen, replacing 843 Service Information 2014/3/11 Profile: CWL, L45B [GB] Windscreen, replacing Op nbr 843-002 88830060 Disassembly tool 88830062 Wire unvinding device 1. Place the machine in service position. WARNING Risk of cuts! Wear safety glasses and use protective gloves. Remove damaged windscreen. 2. Protect cab interior and other components from splintering glass (cover with a tarpaulin). 3. Remove windscreen wipers (1), work light lamps (2) and front cab panel (3). Figure 1 4. Remove all glass components down to the adhesive. 5. Using a sharp knife, cut out the old adhesive on the frame flange. NOTE! Do not cut out old adhesive completely, leave approx. 1 - 2 mm (0.0039 - 0.079 in) residual material on the contact surface. The residual material serves as an adhesive base for the new adhesive. 6. Lay new window on a suitable base. NOTE! Weight of windscreen approx. 24 kg (53 lb). 7. Clean/activate the screen contact surfaces (arrows) (outer edge and ceramic layer on inside) with activator and then wipe with a dry, lint-free cloth.
Figure 2 8. Apply primer thinly to the contact surface (arrows) of the screen (outer edge and ceramic layer on the inside) and allow to dry to at least 15 minutes. 9. Clean/activate contact surface of the frame flange with activator before inserting the new window. Figure 3 10. Apply the new adhesive (1) with the glue gun at even height (approx. 12 mm / 0.47 in) all round, without gaps, on the old residual material (2). Figure 4 NOTE! The adhesive must be applied steadily without interruption, and the screen must be inserted within 10 minutes after the start of the adhesive application otherwise the adhesive joint cannot be guaranteed. 11. Insert screen using the suction lift and bring to installation dimensions immediately. To the left and right, leave a gap of approx. 5 - 6 mm (0.19 - 0.24 in). If necessary, attach windscreen with adhesive tape until the adhesive hardens.
Figure 5 NOTE! If the adhesive bead is applied too thickly and the adhesive extrudes below the screen, remove the surplus adhesive as soon as possible using a wooden spatula. 12. Fill the gap between the screen and frame with sealant and spread evenly with a suitable tool. NOTE! Allow adhesive to harden for at least 2 hours. 13. Refit windscreen wipers (1), work light lamps (2) and front cab panel (3). NOTE! Dispose of remaining adhesive, primer and activator.
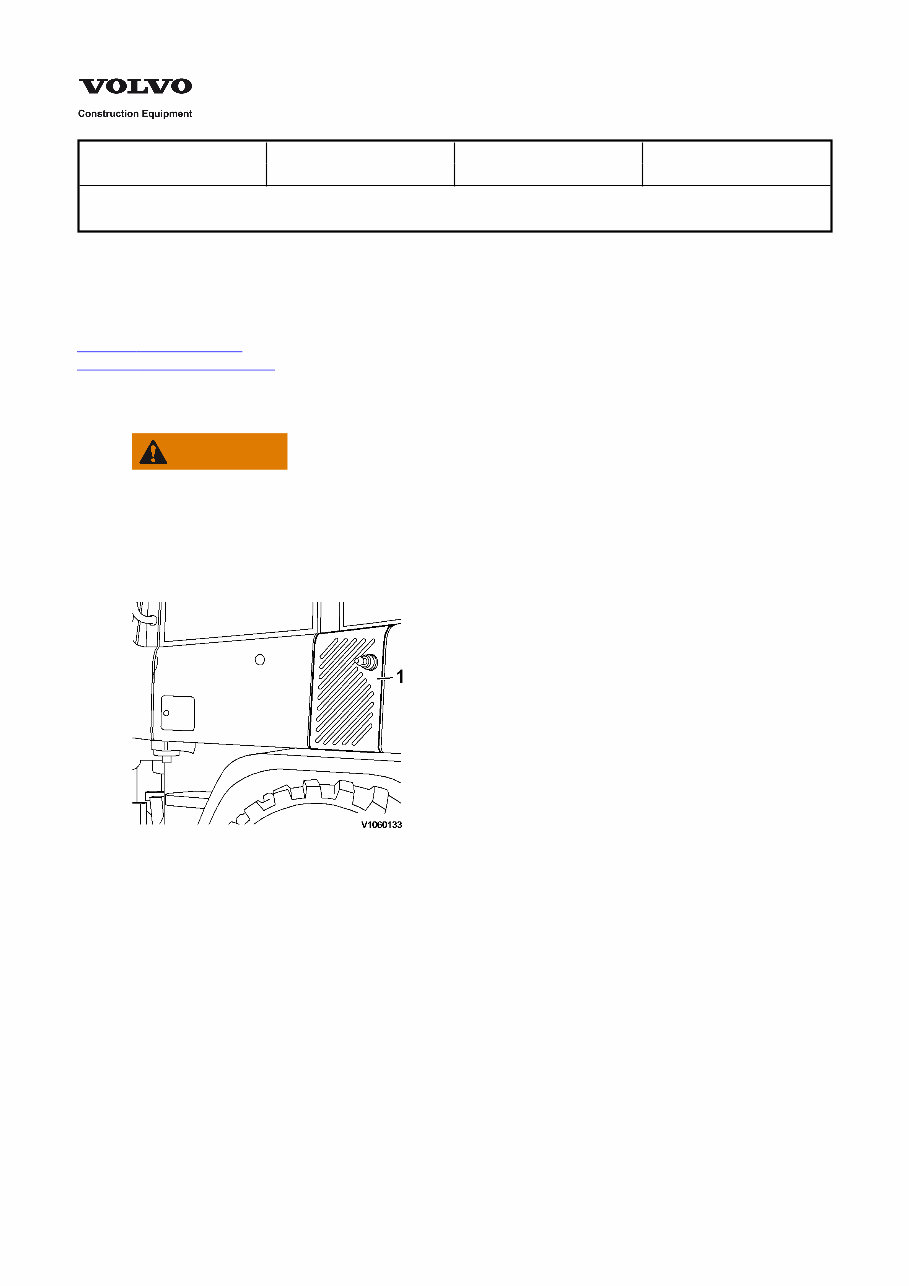
Service Information Document Title: Function Group: Information Type: Date: Rear window, replacing 843 Service Information 2014/3/11 Profile: CWL, L45B [GB] Rear window, replacing Op nbr 843-012 88830060 Disassembly tool 88830062 Wire unvinding device 1. Place the machine in service position. WARNING Risk of cuts! Wear safety glasses and use protective gloves. Remove damaged rear screen. 2. Protect cab interior and other components from splintering glass (cover with a tarpaulin). 3. Remove screen wiper and work light lamps. Figure 1 4. Open bonnet and remove side panelling (1) on right and left. 5. Remove all glass components down to the adhesive. 6. Using a sharp knife, cut out the old adhesive on the frame flange. NOTE! Do not cut out old adhesive completely, leave approx. 1 - 2 mm (0.0039 - 0.079 in) residual material on the contact surface. The residual material serves as an adhesive base for the new adhesive. 7. Lay new window on a suitable base. NOTE! Weight of rear screen approx. 27 kg (60 lb). 8. Clean/activate the screen contact surfaces (arrows) (outer edge and ceramic layer on inside) with activator and then wipe with a dry, lint-free cloth.
The Volvo L45B Compact Wheel Loader OEM Service & Repair Manual is a comprehensive factory workshop manual designed for instant access on your computer, tablet, or smartphone. This professional manual is an invaluable resource for both professional mechanics and DIY enthusiasts, covering all repair, servicing, and troubleshooting procedures with detailed step-by-step instructions, exploded diagrams, and clear photographs specific to OEM requirements.
Key features of this manual:
Complete factory OEM service repair workshop manual
No extra fees or expiry dates
Printable pages for convenience
Multi-computer usage support
Full, unlimited access without trial periods or renewal fees
Compatibility with Windows and MAC computers
Whether you need to print a single page or the entire manual, this resource offers flexibility and convenience for all your repair and servicing needs without any limitations. Click the button to access this invaluable OEM manual tailored for the Volvo L45B Compact Wheel Loader.
Recently Viewed
5,521,897Happy Clients
2,594,462eManuals
1,120,453Trusted Sellers
15Years in Business
Price:
Actual Price:
Volvo L45B Compact Wheel Loader OEM Service & Repair Manual