R420S, 520S . . . . . . . . . KTC, KCL, KTA version R420α, 520α . . . . . . . . . EU-version Record of Revisions Symbol Date Main Revised Points & Corrective Measures Person-in-charge 2008 Feb. 1. New emissions control engine 2. Turbo-charger I. Okae 1 2 3 4 5 6 7 8
CONTENTS Service Chapter 1. General ................................................................................................................................. 1-1 2. Machine Body & Front Attachment ....................................................................................... 2-1 3. Engine................................................................................................................................... 3-1 4. Hydraulic System .................................................................................................................. 4-1 5. Brake System and power train.............................................................................................. 5-1 6. Electrical System .................................................................................................................. 6-1
CONTENTS 1. General ................................................................................................................................. 1-1 [1] Body and engine identification marks ................................................................................. 1-1 [2] Safety precautions for servicing, disassembly and reassembly .......................................... 1-2 (1) Safety measures before starting work ........................................................................ 1-2 (2) Safety measures during work ..................................................................................... 1-2 (3) Preparation for disassembly ....................................................................................... 1-3 (4) Precautions for disassembly and reassembly ............................................................ 1-3 [3] Important safety process and critical functional process .................................................... 1-4 [4] Important inspection items after reassembling ................................................................... 1-5 (1) Operate the machine and check for unusual noise and vibrations............................. 1-5 (2) Make sure the safety decals and wireharness clamps are in their specified positions. ......................................................................................... 1-5 (3) With the machine front in a specified posture, check the amount of hydraulic oil. ..... 1-5 [5] Service fundamentals ......................................................................................................... 1-6 (1) Service intervals ......................................................................................................... 1-6 (2) Lubricants ................................................................................................................... 1-8 (3) Notices for servicing items..........................................................................................1-9 (4) Tightening torque......................................................................................................1-10
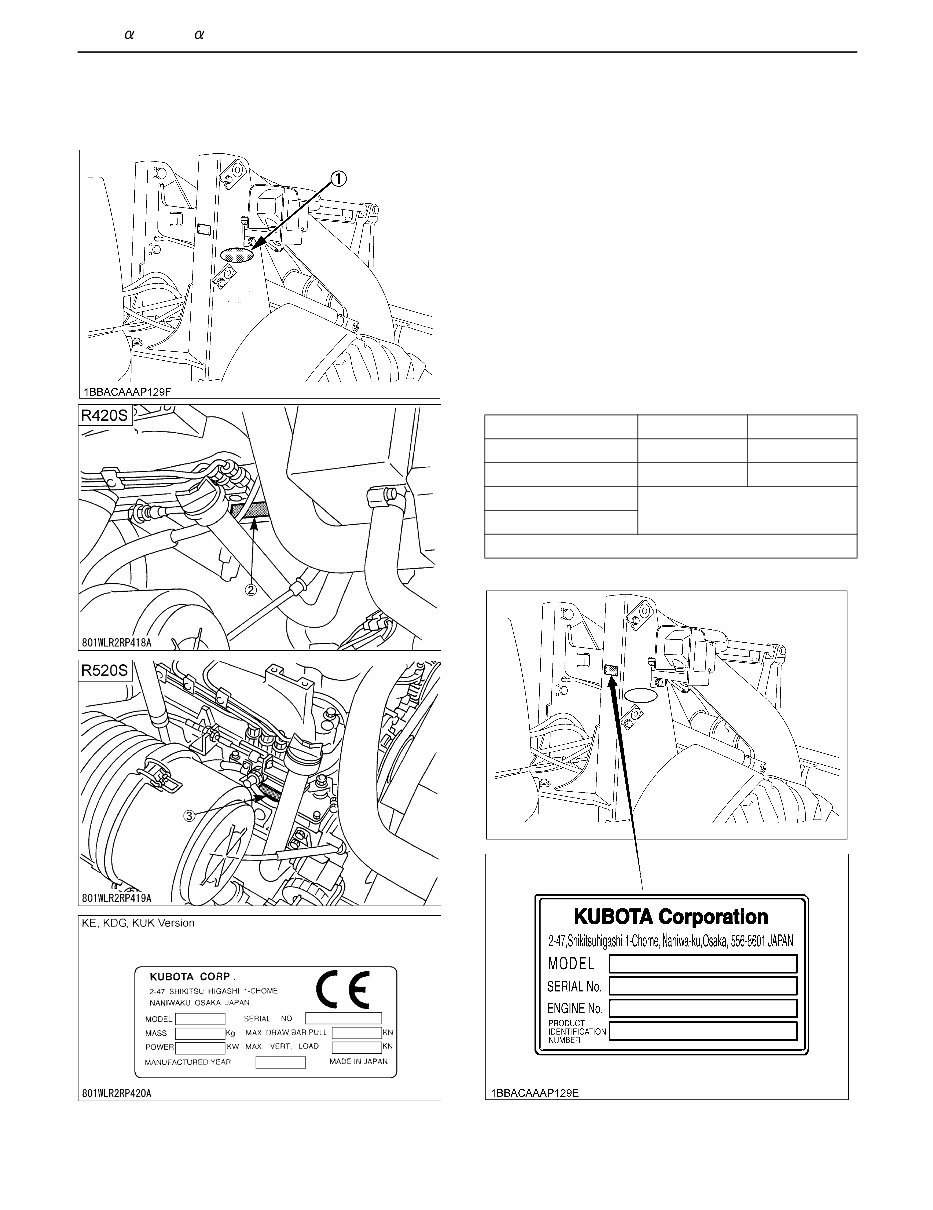
1. General 1-1 R420S( ), R520S( ), WSM 1. General [1] Body and engine identification marks Your dealer is interested in your new wheel loader and has the desire to help you get the most value from it. After reading this manual thoroughly, you will find that you can do some of the regular maintenance yourself. However, when in need of parts or major service, be sure to see your KUBOTA dealer. For service, contact the KUBOTA dealer/Dealership from which you purchased your wheel loader or your local authorized KUBOTA dealer. When in need of parts, be prepared to give your dealer both the machine and engine serial numbers. Locate the serial numbers now and record them in the space provided. (1) Machine serial No. (2) Engine serial No. (3) Engine serial No. Model Serial No. Wheel Loader Engine Date of Purchase Name of Dealer (To be filled in by purchaser)
1. General 1-2 R420S( ), R520S( ), WSM [2] Safety precautions for servicing, disassembly and reassembly (1) Safety measures before starting work (2) Safety measures during work A Most accidents during servicing arise from carelessness. Please remember that safety involves both the welfare of the employees and improved work efficiency. A Machines must be disassembled and assembled efficiently and safely. It is very important to thoroughly understand the construction and function of the machine, to make all appropriate preparations, and start operations according to the specified working procedures. [1] Work clothes 1. Wear specified work cap and clothed. (Under no circumstances may workers wear undershirts only.) Cuffs must be kept buttoned, and any tears must be mended.) 2. Wear safety shoes. 3. Do not wear cotton gloves when working on the internal section of engine, reduction gears or hydraulic units for repair or others, or when using a hammer. Wear leather gloves, however, when hoisting wires. [2] Inspecting equipment and tools 1. Prepare equipment (cranes, fork lifts, tool, etc.) requires for servicing and inspect for any problems before starting work. 2. Hammer heads (metal parts) must be firmly secured to their handles. 3. Check hosting tools (wire ropes, hosting chains, etc.) before use. [3] Keep workshop in order 1. Secure appropriate space needed for disassembly to the job. 2. Secure a clean, safe place for arranging disassembled parts. 3. Store volatile substances (gasoline, light oil, thinner, oily articles, etc.) in appropriate containers at selected locations to prevent fire hazards. [1] Protectors 1. Wear goggles when using chisels for chipping. 2. Use appropriate protectors during welding. 3. Wear a helmet when working with a crane or at elevated locations. [2] Team work 1. When working with two or more people, divide the work and maintain close communication. 2. Clean work must be carried out using predetermined signals.
1. General 1-3 R420S( ), R520S( ), WSM (3) Preparation for disassembly (4) Precautions for disassembly and reassembly [3] Disassembly and assembly 1. Do not wear gloves when using hammers. 2. Use rods of the specified soft material for removing pins. Do not use a hammer as a pad. 3. Do not place fingers in holes when centering. 4. Heavy parts must be adequately supported before removing bolts. [4] Cranes 1. In principle, use a crane for objects heavier than 44 lb (20 kg) 2. Crane operation and hoisting must be performed only by qualified personal. 3. Pay careful attention to the center of gravity when hoisting, and do not stand under the lifted objects. [5] Others 1. To work under a jacked-up carrier, be sure to place wood pieces under it. 2. When charging batteries, make sure there are no open flames in the immediate vicinity. 3. All electric tools must be grounded. 4. Before welding the machine, remove the battery. A When removing the battery, be sure to disconnect negative (-) cord first. A When mounting the battery, be sure to connect the positive (+) cord first. [1] Cleaning Remove mud and dirt from the body before disassembly. [2] Acceptance inspection The machine must be checked before it is disassembled to record existing conditions, such as those listed below. Model, serial number, and hourmeter reading A Reason for repair and repair history A Element stains A Fuel and oil condition A Parts damage *(Take photographs if necessary.) [3] Equipment and tools Prepare equipment, tools, cranes and parts storage racks as required. [1] Disassembly 1. Follow the specified disassembly procedures. 2. Make alignment marks to insure correct reassembly. 3. Arrange disassembled parts in an orderly way, and attach identification tags or put marks if needed.
1. General 1-4 R420S( ), R520S( ), WSM [3] Important safety process and critical functional process [2] Reassembly 1. Clean all parts before assembly. Repair any scratches or dents. Take special precautions against dirt and dust. 2. Parts with rust-preventive coatings must be assembles only after removing the corting. 3. Separated parts must be correctly reassembled using alignment marks. 4. As a rule, use a press to reassembled bearings, bushing and oil seals. Use pads when using a hammer. The following instructions are related to essential adhesives, important safety process and critical functional process . Pay special attention in servicing these process. (Pay also close attention in reconnecting the electrical cables.) (1) Important safety process 1. Assembling and adjustment of brake & inching components. 2. Reconnecting the fuel hose (clearance, hose routes, clamps, etc.) 3. Electrical cabling (engine, instrument panel, controls, etc.) (wiring routes, clamps and couplers) (2) Important critical functional process 1. Assembling and installing the differential assy. 2. Assembling the center shaft. 3. Fitting the pump couplings (tightening torque). 4. Installing the LST pump (tightening torque). 5. Installing the LST motor (tightening torque) (3) Essential adhesives Type of screw adhesive Unless otherwise specified, use Three-Bond 1324 adhesive (medium-duty type). Keep the screw threads free of oil and water. Type of instantaneous adhesive Use Three-Bond 1733 or Three-Bond 1741E adhesive. Keep the bond areas free of oil and water.
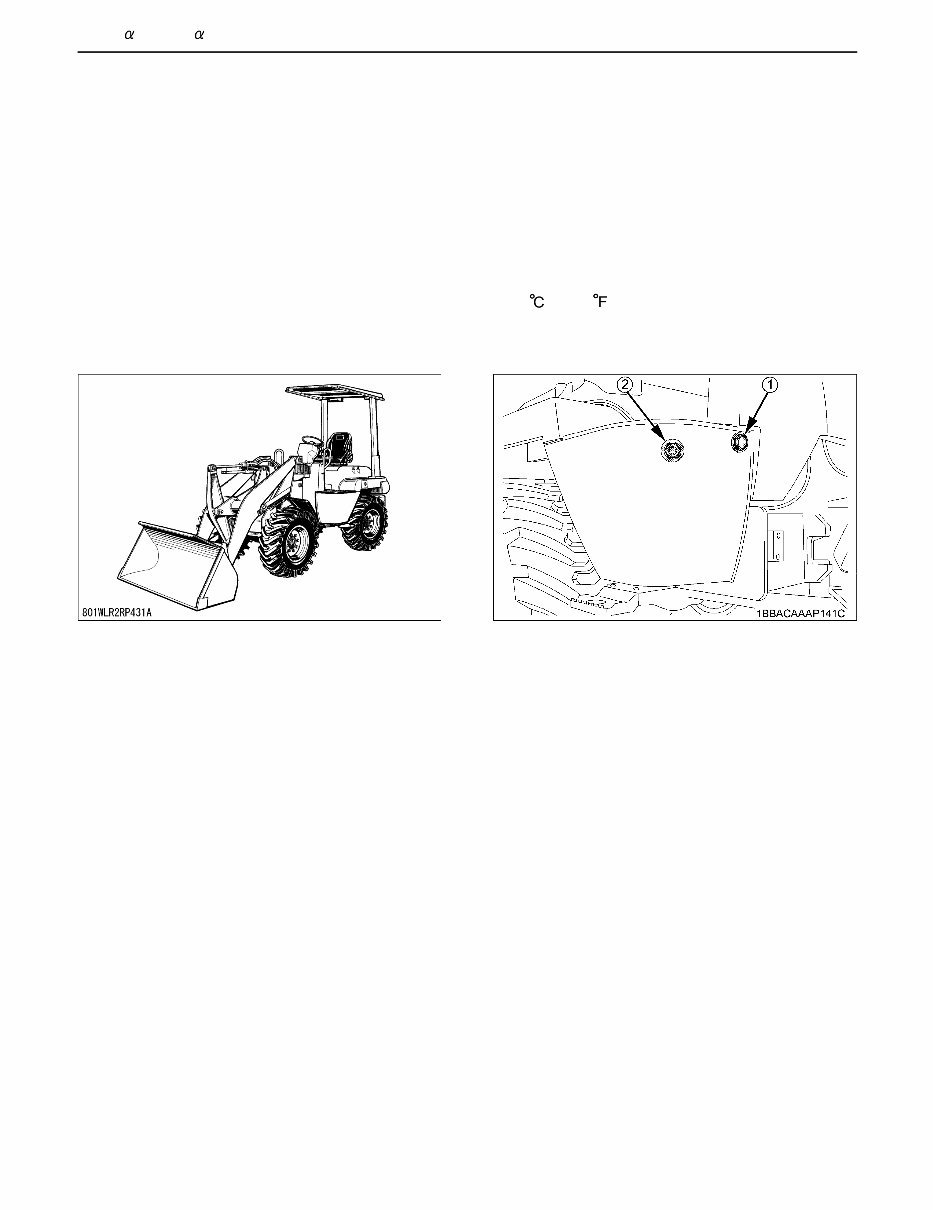
1. General 1-5 R420S( ), R520S( ), WSM [4] Important inspection items after reassembling (1) Operate the machine and check for unusual noise and vibrations. (2) Make sure the safety decals and wireharness clamps are in their specified positions. (3) With the machine front in a specified posture, check the amount of hydraulic oil. Checking the oil level (For further details, refer to the Operator's Manual of each model.) 1) Park the machine on a level ground, stop engine and lower the bucket to the ground. 2) Make sure the hydraulic oil temperature is in the range of 10-30 (50-86 ) and see if the oil level is within the specified zone of the oil level gauge. 3) Keep the machine front as shown as following posture. (1) Oil port (2) Oil level gauge
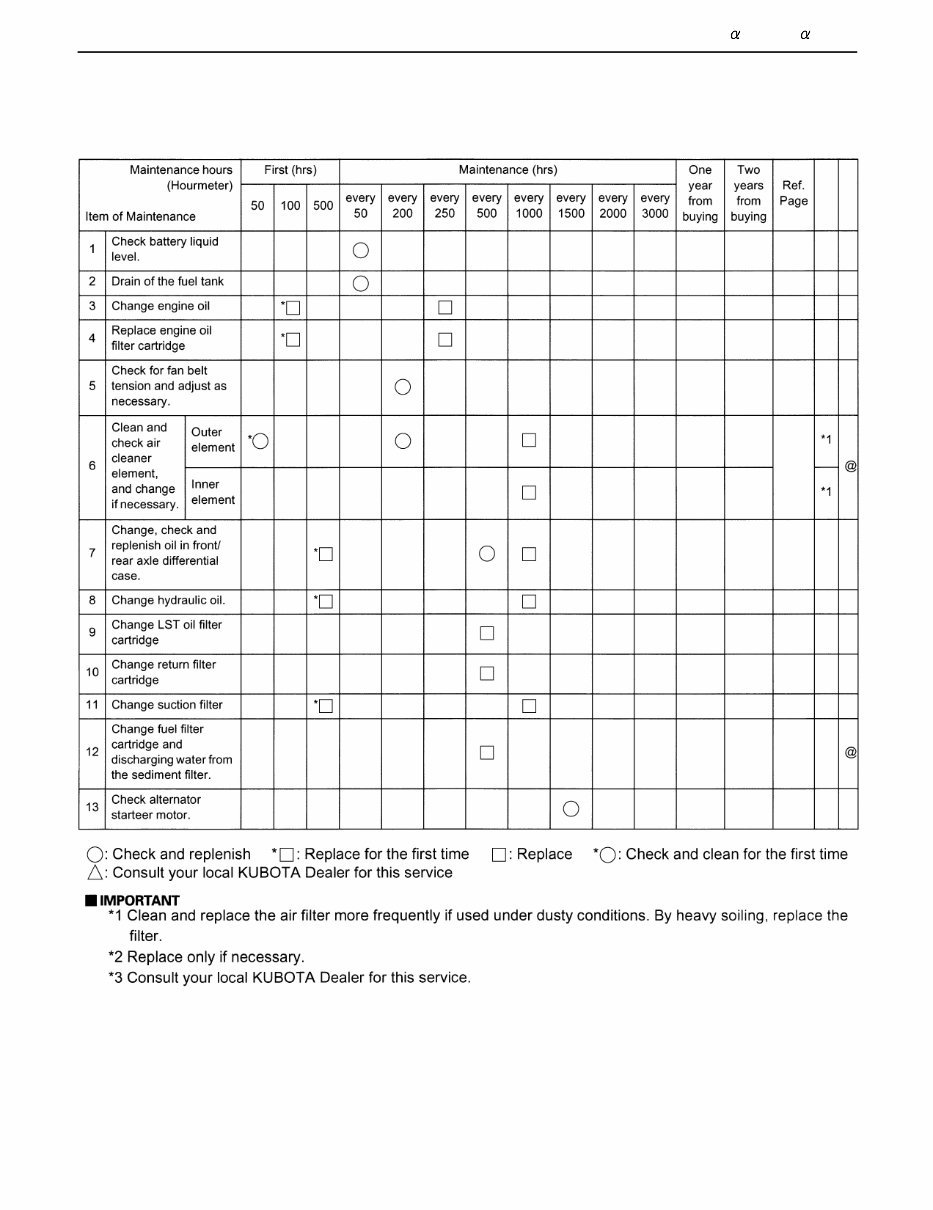
1. General 1-6 R420S( ), R520S( ), WSM [5] Service fundamentals (1) Service intervals Service Interval Chart (Do all previous checks in addition to New checks.)
The Kubota R420S, 520S, R420α, 520α Wheel Loaders OEM Service & Repair Manual delivers comprehensive technical documentation for these compact yet powerful workhorses. This factory resource contains detailed specifications and procedures developed by Kubota engineers specifically for maintaining these specialized material handlers across both standard and Alpha-series variants.
Hunting down that intermittent hydraulic drift or struggling with loader arm synchronization? This manual dissects each system with detailed cutaway illustrations, component specifications, and step-by-step service procedures. You'll find precise hydraulic pressure settings, articulation joint maintenance procedures, planetary gear service intervals, and critical torque values organized by component—from engine to drivetrain, hydraulics to braking systems.
These compact Kubotas have their integrated systems that require specific knowledge. Whether you're rebuilding the hydraulic pump, servicing the articulation joint, or just performing routine maintenance, this manual provides the exact procedures these specialized machines require. Skip the expensive dealer visits and maintain your loader with confidence using factory-specified methods and specifications.
Printable: Yes Language: English Compatibility: Pretty much any electronic device, incl. PC & Mac computers, Android and Apple smartphones & tablet, etc. Requirements: Adobe Reader (free)