



June 2006 Copyright 2006 Komatsu
Printed in USA DataKom Publishing Division
00-1
CEBM017100
Shop
Manual
CK30-1
COMPACT TRACK LOADER
This material is proprietary to Komatsu America Corp. and is not to be reproduced, used, or disclosed except in
accordance with written authorization from Komatsu America Corp.
It is our policy to improve our products whenever it is possible and practical to do so. We reserve the right to make changes or
add improvements at any time without incurring any obligation to install such changes on products sold previously.
Due to this continuous program of research and development, periodic revisions may be made to this publication. It is
recommended that customers contact their distributor for information on the latest revision.
SERIAL NUMBERS
CK30-1 A30001
and UP
SK1020-5N, SK1020-5NA

CK30-1
00-2
CONTENTS
CONTENTS
Page
10. STRUCTURE AND FUNCTION....................................................................................... 10-1
20. TESTING AND ADJUSTING ........................................................................................... 20-1
30. REMOVAL AND INSTALLATION ................................................................................... 30-1
40. MAINTENANCE STANDARD.......................................................................................... 40-1
90. OTHER ...................................................................................................................... 90-1
CK30-1
00-3
REVISED PAGES
REVISED PAGES
The affected pages are indicated by the use of the
following marks. It is requested that necessary actions
be taken to these pages according to table below.
Pages having no marks are those previously revised or
made additions.
Symbol Indication Action required
Q Page to be newly Add
q Page to be replaced Replace
( ) Page to be delete Discard
Symbol Page
Time of
revision
Symbol Page
Time of
revision
Symbol Page
Time of
revision
Symbol Page
Time of
revision
Symbol Page
Time of
revision
00-1
00-2
00-3
00-4
00-5
00-6
00-7
00-8
00-9
00-10
00-11
00-12
00-13
00-14
00-15
00-16
00-17
00-18
00-19
00-20
00-21
00-22
00-23
00-24
10-1
10-2
10-3
10-4
10-5
10-6
10-7
10-8
10-9
10-10
10-11
10-12
10-13
10-14
10-15
10-16
10-17
10-18
10-19
10-20
10-21
10-22
10-23
10-24
10-25
10-26
10-27
10-28
10-29
10-30
10-31
10-32
10-33
10-34
10-35
10-36
10-37
10-38
10-39
10-40
10-41
10-42
10-43
10-44
10-45
10-46
10-47
10-48
10-49
10-50
10-51
10-52
10-53
10-54
10-55
10-56
10-57
10-58
10-59
10-60
10-61
10-62
10-63
10-64
10-65
10-66
10-67
10-68
10-69
10-70
10-71
10-72
10-73
10-74
10-75
10-76
10-77
10-78
10-79
10-80
10-81
10-82
10-83
10-84
10-85
10-86
10-87
10-88
10-89
10-90
10-91
10-92
10-93
10-94
10-95
10-96
10-97
10-98
10-99
10-100
10-101
10-102
10-103
10-104
10-105
10-106
10-107
10-108
20-1
20-2
20-3
20-4
20-5
20-6
20-7
20-8
20-9
20-10
20-11
20-12
20-13
20-14
20-15
20-16
20-17
20-18
20-19
20-20
20-21
20-22
20-23
20-24
20-25
20-26
20-27
20-28
20-29
20-30
20-31
20-32
20-33
20-34
20-35
20-36
20-37
20-38
30-1
30-2
30-3
30-4
30-5
30-6
30-7
30-8
30-9
30-10
30-11
30-12
30-13
30-14
30-15
30-16
30-17
30-18
30-19
30-20
30-21
30-22
30-23
30-24
30-25
30-26
30-27
30-28
30-29
30-30
30-31
30-32
30-33
30-34
30-35
30-36
30-37
30-38
30-39

CK30-1
00-4
REVISED PAGES
Symbol Page
Time of
revision
Symbol Page
Time of
revision
Symbol Page
Time of
revision
Symbol Page
Time of
revision
Symbol Page
Time of
revision
30-40
30-41
30-42
30-43
30-44
30-45
30-46
30-47
30-48
30-49
30-50
30-51
30-52
30-53
30-54
30-55
30-56
30-57
30-58
30-59
30-60
30-61
30-62
30-63
30-64
30-65
30-66
30-67
30-68
30-69
30-70
30-71
30-72
30-73
30-74
30-75
30-76
30-77
30-78
30-79
30-80
30-81
30-82
30-83
30-84
30-85
30-86
30-87
30-88
30-89
30-90
30-91
30-92
30-93
30-94
40-1
40-2
40-3
40-4
40-5
40-6
40-7
40-8
40-9
40-10
40-11
40-12
40-13
40-14
40-15
40-16
40-17
40-18
40-19
40-20
40-21
40-22
40-23
40-24
40-25
40-26
40-27
40-28
40-29
40-30
90-1
90-2
90-3
90-4
90-5
90-6

CK30-1
00-5
k SAFETY
k IMPORTANT SAFETY NOTICE
Proper service and repair is extremely important for the safe operation of your machine.
The service and repair techniques recommended by Komatsu Utility and describe in this manual are both
effective and safe methods of operation. Some of these operations require the use of tools specially designed
by Komatsu Utility for the purpose.
To prevent injury to workers, the symbol kis used to mark safety precautions in this manual. The cautions
accompanying these symbols should always be carefully followed. If any danger arises or may possibly arise,
first consider safety, and take necessary steps to face.
GENERAL PRECAUTIONS
Mistakes in operation extremely dangerous. Read all the
Operation and Maintenance Manual carefully BEFORE
operating the machine.
1. Before carrying out any greasing or repairs, read all
the precautions written on the decals which are suck
on the machine.
2. When carrying out any operation, always wear safety
shoes and helmet. Do not wear loose work clothes, or
clothes with buttons missing.
• Always wear safety glasses when hitting parts
with a hammer.
• Always wear safety glasses when grinding parts
with a grinder, etc.
3. If welding repairs are needed, always have a trained,
experienced welder carry out the work. When carrying
out welding work, always wear welding gloves, apron,
glasses, cap and other clothes suited for welding
work.
4. When carrying out any operation with two or more
workers, always agree on the operating procedure
before starting. Always inform your fellow workers
before starting any step of the operation. Before
starting work, hang UNDER REPAIR signs on the
controls in the operator’s compartment.
5. Keep all tools in good condition and learn the correct
way to use them.
6. Decide a place in the repair workshop to keep tools
and removed parts. Always keep the tools and parts in
their correct places. Always keep the work area clean
and make sure that there is no dirt or oil on the floor.
Smoke only in the areas provided for smoking. Never
smoke while working.
PREPARATIONS FOR WORK
7. Before adding or making any repairs, park the
machine on hard, level ground, and block the wheels
to prevent the machine from moving.
8. Before starting work, lower outrigger, bucket or any
other work equipment to the ground. If this is not
possible, use blocks to prevent the work equipment
from falling down. In addition, be sure to lock all the
control levers and hang warning sign on them.
9. When disassembling or assembling, support the
machine with blocks, jacks or stands before starting
work.
10. Remove all mud and oil from the steps or other places
used to get on and off the machine. Always use the
handrails, ladders or steps when getting on or off the
machine. Never jump on or off the machine. If it is
impossible to use the handrails, ladders or steps, use
a stand to provide safe footing.
PRECAUTIONS DURING WORK
11. When removing the oil filler cap, drain plug or
hydraulic pressure measuring plugs, loosen them
slowly to prevent the oil from spurting out.
Before disconnecting or removing components of the
hydraulic circuit and engine cooling circuit, first
remove the pressure completely from the circuit.
12. The water and oil in the circuits are not hot when the
engine in stopped, so be careful not to get burned.
Wait for the oil water to cool before carrying out any
work on the cooling water circuits.
13. Before starting work, remove the leads from the
battery. Always remove the lead from the negative ( –
) terminal first.
k SAFETY

CK30-1
00-6
k SAFETY
14. When raising heavy components, use a hoist or
crane. Check that the wire rope, chains and hooks
are free from damage.
Always use lifting equipment which has ample
capacity. Install the lifting equipment at the correct
places. Use a hoist or crane and operate slowly to
prevent the component from hitting any other part.
Do not work with any part still raised by the hoist or
crane.
15. When removing covers which are under internal
pressure or under pressure from a spring, always
leave two bolts in position on opposite sides. Slowly
release the pressure, then slowly loosen the bolts to
remove.
16. When removing components, be careful not to
break or damage the wiring.
Damage wiring may cause electrical fires.
17. When removing piping, stop the fuel or oil from
spilling out. If any fuel or oil drips on to the floor, wipe
it up immediately.
Fuel or oil on the floor can cause you to slip, or can
even start fires.
18. As a general rule, do not use gasoline to wash parts.
In particular, use only the minimum of gasoline when
washing electrical parts.
19. Be sure to assemble all parts again in their original
places. Replace any damage parts with new parts.
When installing hoses and wires, be sure that they
will not be damaged by contact with other parts
when the machine is being operated.
20. When installing high pressure hoses, make sure
that they are not twisted. Damaged tubes are
dangerous, so be extremely careful when installing
tubes for high pressure circuits. Also, check that
connecting parts are correctly tightened.
21. When assembling or installing parts, always use
specified tightening torques. When installing the
parts which vibrate violently or rotate at high speed,
be particulary careful to check that they are correctly
installed.
22. When aligning two holes, never insert your fingers or
hand.
23. When measuring hydraulic pressure, check that the
measuring tool is correctly assembled before taking
any measurement.
24. Take sure when removing or installing tracks. When
removing the track, the track separates suddenly, so
never let anyone stand at either end of the track.

CK30-1
00-7
FOREWORD
FOREWORD
This shop manual has been prepared as an aid to improve the quality of repairs by giving the operator an accurate
understanding of the product and by showing him the correct way to perform repairs and make judgements. Make sure
you understand the contents of this manual and use it to full effect at every opportunity.
This shop manual mainly contains the necessary technical information for operations performed in a service
workshop.
The manual is divided into chapters on each main group of components; these chapters are further divided into the
following sections.
STRUCTURE AND FUNCTION
This section explains the structure and function of each component. It serves not only to give an understanding
of the structure, but also serves as reference material for troubleshooting.
TESTING AND ADJUSTMENTS
This sections explains checks to be made before and after performing repairs, as well as adjustments to be
made at completion of the checks and repairs.
Troubleshooting charts correlating «Problems» to «Causes» are also included in this section.
REMOVAL AND INSTALLATION
This section explains the order to be followed when removing, installing, disassembling or assembling each
component, as well as precautions to be taken for these operations.
STANDARD MAINTENANCE
This section gives the judgement standards when inspecting disassembled parts.
NOTE
The specifications contained in this shop manual are subject to change at any time and without any
notice.
Contact your Komatsu Utility distributor for the latest information.
CK30-1
00-8
HOW TO READ THE SHOP MANUAL
HOW TO READ THE SHOP MANUAL
VOLUMES
Shop manual are issued as a guide to carry out repairs.
These various volumes are designed to avoid
duplicating the same information.
DISTRIBUTION AND UPDATING
Any additions, amendments or other changes will be
sent to Komatsu Utility distributors. Get the most up-to-
date information before you start any work.
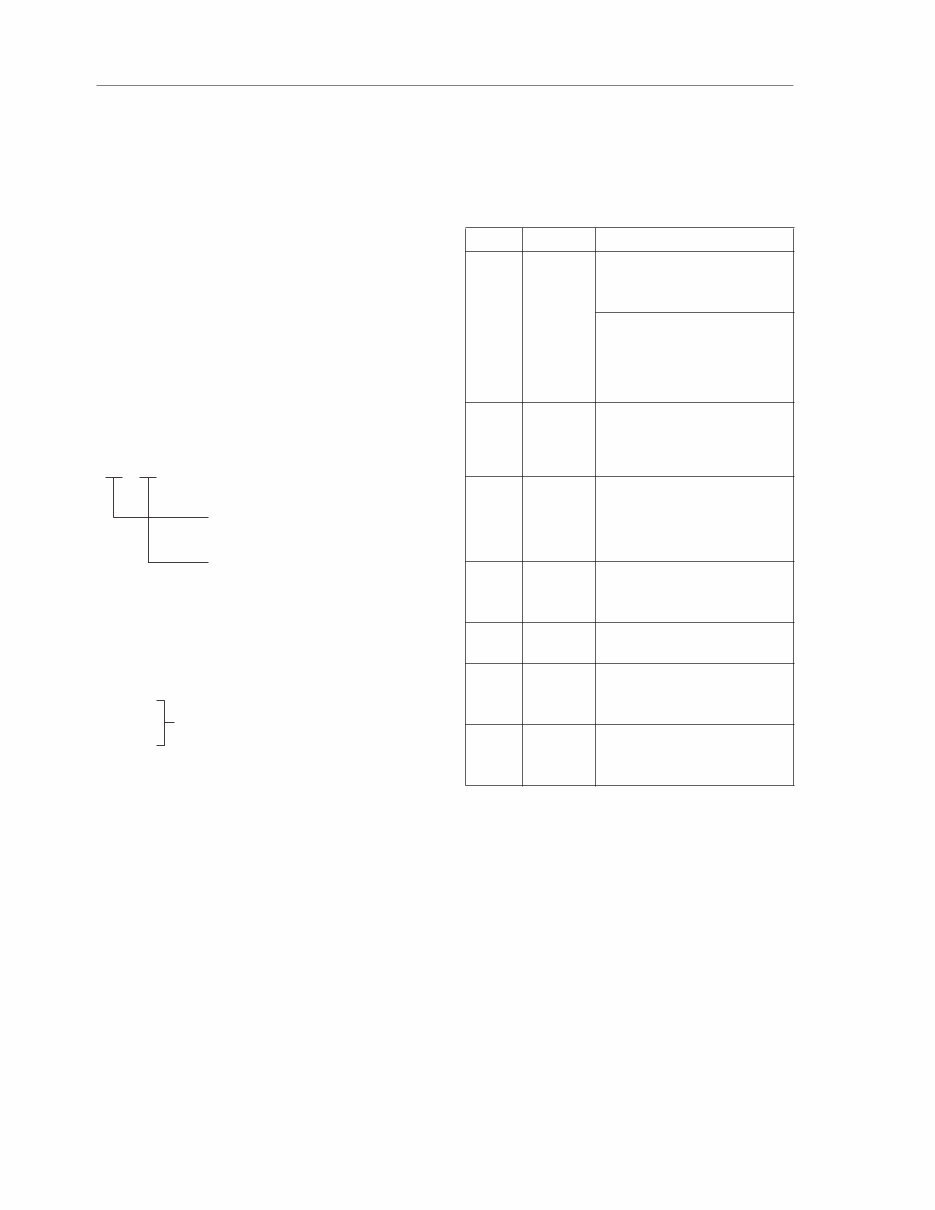
FILING METHOD
1. See the page number on the bottom of the page. File
the pages in correct order.
2. Following examples show you how to read the page
number.
Example:
3. Additional pages: additional pages are indicated by
a hyphen (–) and number after the page number. Fle
as in the example.
Example:
REVISED EDITION MARK
When a manual is revised, an edition mark is recorded
on the bottom outside corner of the pages.
REVISIONS
Revised pages are shown on the LIST OF REVISED
PAGES between the title page and SAFETY page.
SYMBOLS
In order to make the shop manual greatly chelpful,
important points about safety and quality are marked
with the following symbols.
10 3
Item number (10. Structure and
Function)
Consecutive page number for each
item
-
10-4
10-4-1
10-4-2
10-5
Added pages
Symbol Item Remarks
k Safety
Special safety precautionsare
necessary whenperforming the
work.
Extra special safety precautions
are necessary when performing
the work because it is under
internal pressure.
a Caution
Special technical precautions or
other precautions for preserving
standards are necessary when
performing the work.
4 Weight
Weight of parts or systems.
Caution necessary when selecting
hoisting wire, or when working
posture is important, etc.
3
Tightening
torque
Parts that require special attention
for the tightening torque during
assembly.
2 Coat
Parts to be coated with adhesives
and lubricants etc.
5 Oil, water
Places where oil, water or fuel
must be added, and their quantity.
6 Drain
Places where oil or water must be
drained, and quantity to be
drained.
CK30-1
00-9
HOISTING INSTRUCTIONS
HOISTING INSTRUCTIONS
4
1. If a part cannot be smoothly removed from the
machine by hoisting, the following checks should be
made:
• Check for removal of all bolts fastening the part to
the relative parts.
• Check for any part causing interference with the
part to be removed.
2. Wire ropes
1) Use adequate ropes depending on the weight of
parts to be hoisted, referring to the table below:
The allowable load value is estimated to be one-
sixth or one-seventh of the breaking strength of the
rope used.
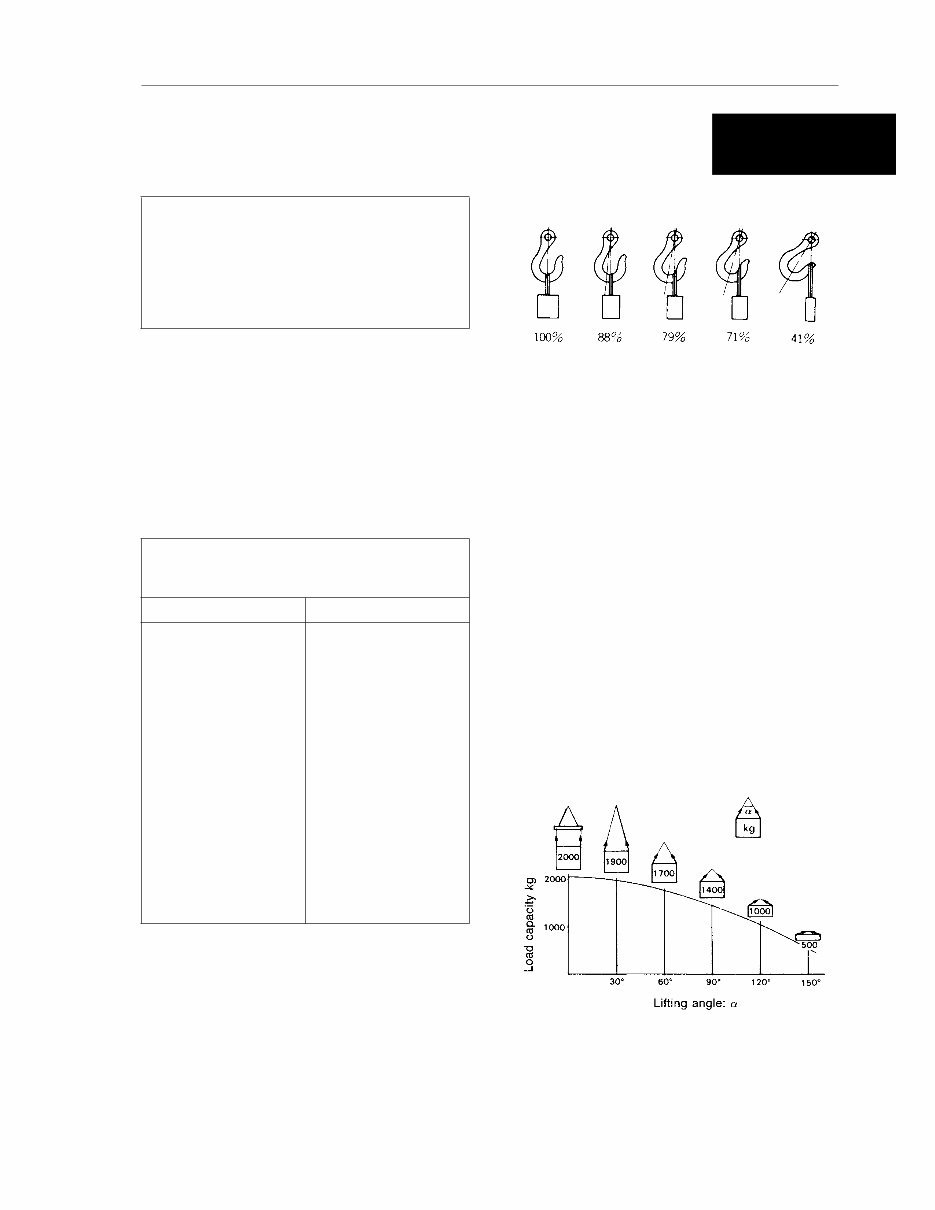
2) Sling wire ropes from the middle portion of the hook.
Slinging near the edge of the hook may cause the
rope to slip off the hook during hoisting, and a
serious accident can result. Hooks have maximum
strength at the middle portion.
3) Do not sling a heavy load with one rope alone, but
sling with two or more ropes symmetrically wound
on to the load.
kSlinging with one rope may cause turning of the load
during hoisting, untwisting of the rope, or slipping of
the rope from its original winding position on the
load, which can cause dangerous accidents.
4) Do not sling a heavy load with ropes forming a wide
hanging angle from the hook.
When hoisting a load with two or more ropes, the
force subjected to each rope will increase with the
hanging angles. The table below shows the
variation of allowable load (kg) when hoisting is
made with two ropes, each of which is allowed to
sling up to 1000 kg vertically, at various handing
angles. When two ropes sling a load vertically, up to
2000 kg of total weight can be suspended.
This weight becomes 1000 kg when two ropes make
a 120° hanging angle. On the other hand, two ropes
are subjected to an excessive force as large as 4000
kg if they sling a 2000 kg load at a lifting angle of
150°.
k Heavy parts (25 kg or more) must be lifted with a
hoist etc. In the Removal and Installation section,
every part weighing 25 kg or more is clearly indicated
with the symbol 4
WIRE ROPES
(Standard «S» or «Z» twist ropes
without galvanizing)
Rope diameter (mm) Allowable load (tons)
10.0
11.2
12.5
14.0
16.0
18.0
20.0
22.4
30.0
40.0
50.0
60.0
1.0
1.4
1.6
2.2
2.8
3.6
4.4
5.6
10.0
18.0
28.0
40.0
CK30-1
00-10
STANDARD TIGHTENING TORQUE
STANDARD TIGHTENING TORQUE
3
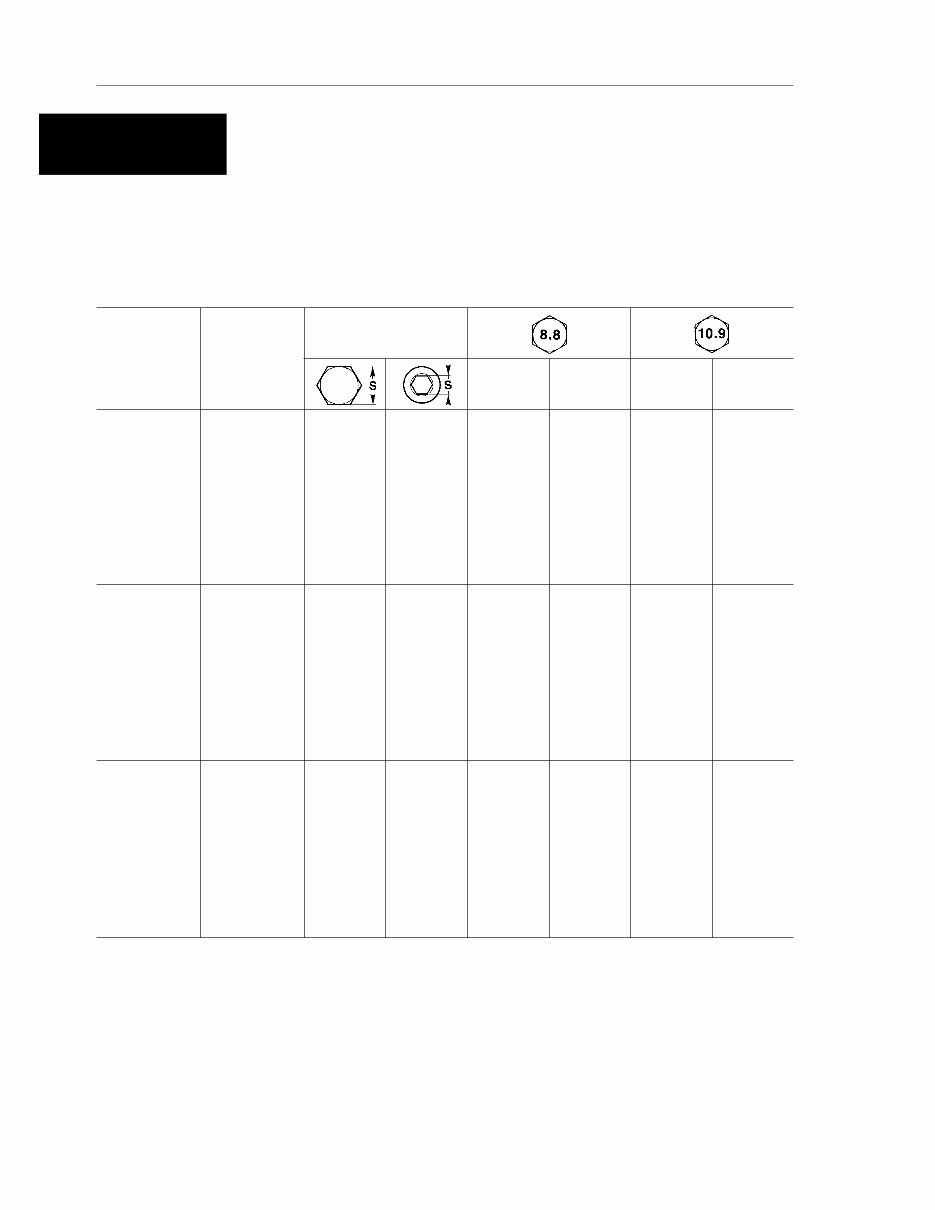
The following charts give the standard tightening torques of bolts and nuts.
Exceptions are given in section of «Disassembly and Assembly».
1. STANDARD TIGHTENING TORQUE OF BOLTS AND NUT
This torque table does not apply to bolts or nuts which have to fasten nylon or other parts non-ferrous metal washer.
a Nm (newton meter): 1 Nm = 0.102 kgm
Thread
diameter of
bolts
(mm)
Pitch of
bolts
(mm)
Width across flat
(mm)
kgm Nm kgm Nm
6
8
10
12
14
1
1.25
1.5
1.75
2
10
13
17
19
22
8
6
8
10
12
0.96±0.1
2.3±0.2
4.6±0.5
7.8±0.8
12.5±1
9.5±1
23±2
45±4.9
77±8
122±13
1.3±0.15
3.2±0.3
6.5±0.6
11±1
17.5±2
13.5±1.5
32.2±3.5
63±6.5
108±11
172±18
16
18
20
22
24
2
2.5
2.5
2.5
3
24
27
30
32
36
14
14
17
17
19
19.5±2
27±3
38±4
52±6
66±7
191±21
262±28
372±40
511±57
644±70
27±3
37±4
53±6
73±8
92±10
268±29
366±36
524±57
719±80
905±98
27
30
33
36
39
3
3.5
3.5
4
4
41
46
50
55
60
19
22
24
27
----
96±10
131±14
177±20
230±25
295±33
945±100
1287±140
1740±200
2250±250
2900±330
135±15
184±20
250±27
320±35
410±45
1329±140
1810±190
2455±270
3150±350
4050±450
You're Reading a Preview
What's Included?
 Lifetime Access
Fast Download Speeds
Online & Offline Access
Access PDF Contents & Bookmarks
Full Search Facility
Print one or all pages of your manual
$41.99
Komatsu CK30-1 Compact Track Loader Complete Workshop Service Repair Manual
Viewed 81 Times Today

What's Included?
Lifetime Access
Fast Download Speeds
Online & Offline Access
Access PDF Contents & Bookmarks
Full Search Facility
Print one or all pages of your manual
$41.99

Secure transaction
What's Included?
Lifetime Access
Fast Download Speeds
Online & Offline Access
Access PDF Contents & Bookmarks
Full Search Facility
Print one or all pages of your manual
Description
Thank you for considering this comprehensive Service Repair Workshop Manual for the Komatsu CK30-1 Compact Track Loader.
This manual is an invaluable resource, covering every Service & Repair Procedure necessary for professional mechanics and DIY enthusiasts alike.
With easy-to-follow step-by-step instructions and detailed pictures, this manual empowers you to save money by performing your own repairs.
Upon purchase, the manual is yours to keep forever. You have the flexibility to print out specific pages, chapters, or the entire manual. Additionally, you can conveniently access it on your tablet or smartphone.
MODELS COVERED:
- All Models/Engines/Trim/Transmissions Types Are Covered
CONTENTS:
- This high-quality Service Repair Workshop Manual encompasses all repair procedures from A to Z.
- Every repair and service procedure is comprehensively detailed.
COMPUTER REQUIREMENTS:
- This downloadable Manual is compatible with All PC & MAC Computers, tablets, and mobile phones.
- The only software required is Adobe Reader, which is typically pre-installed on your computer. If not, it can be downloaded for free.
INSTANT DELIVERY:
- Upon payment confirmation via Visa, MasterCard, or PayPal, the manual will be instantly emailed to the address provided during checkout.
Customer Satisfaction Guaranteed.


