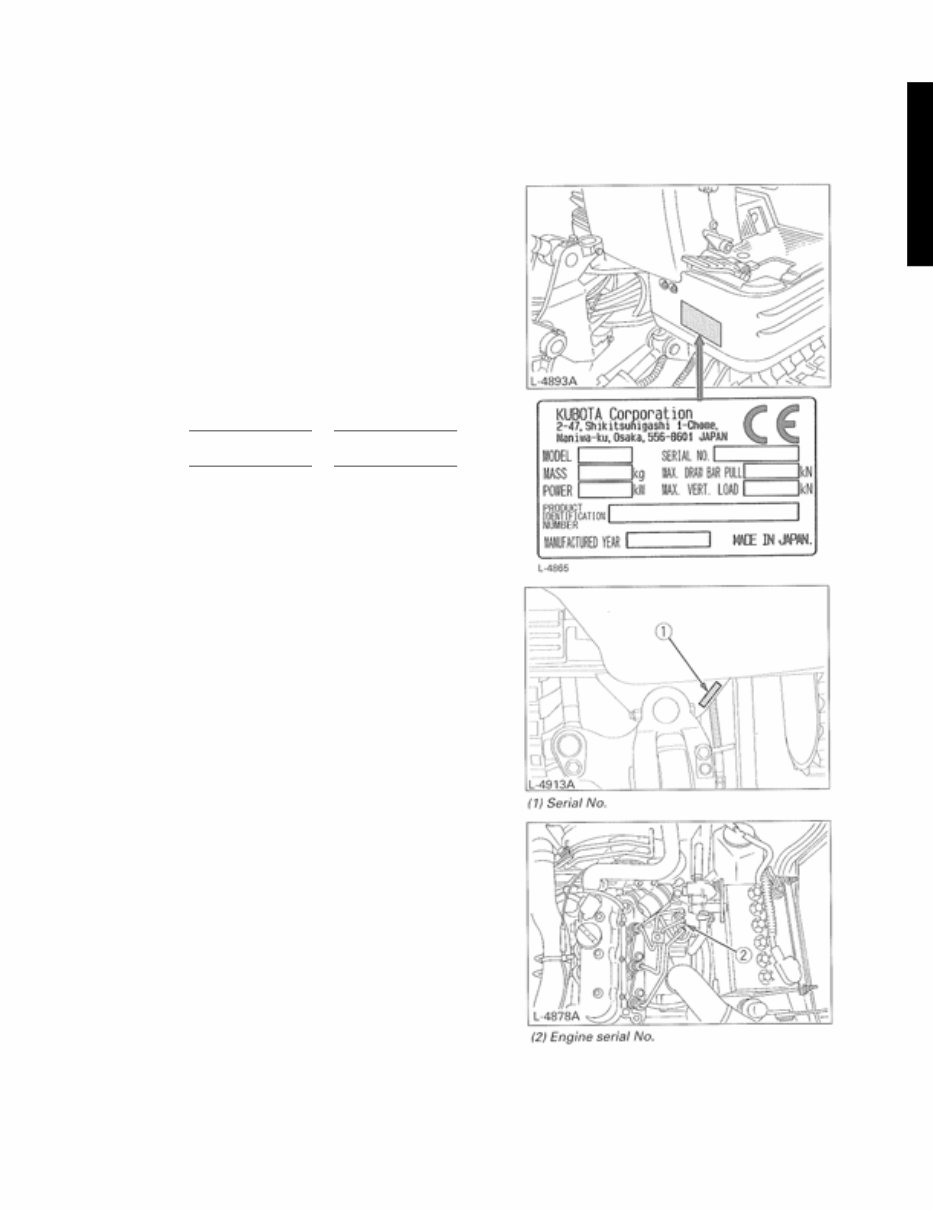
I-S-2 A.Body and engine identification marks K008-3, U10-3 EU-Version Your KUBOTA dealer is always ready to help so that your excavator offers the best performance. After having carefully read this manual, you will realize that much of the routine maintenance can be done by yourself. Your KUBOTA dealer is responsible for ser- vicing and the derivery of sopare parts. When order- ring spare parts from your KUBOTA dealer, always mention the serial number of the excavator and the engine. Note these numbers right away in the supplied lines. Excavator Engine Excavator Excavator Dealer’s name (To be filled in through the owner)
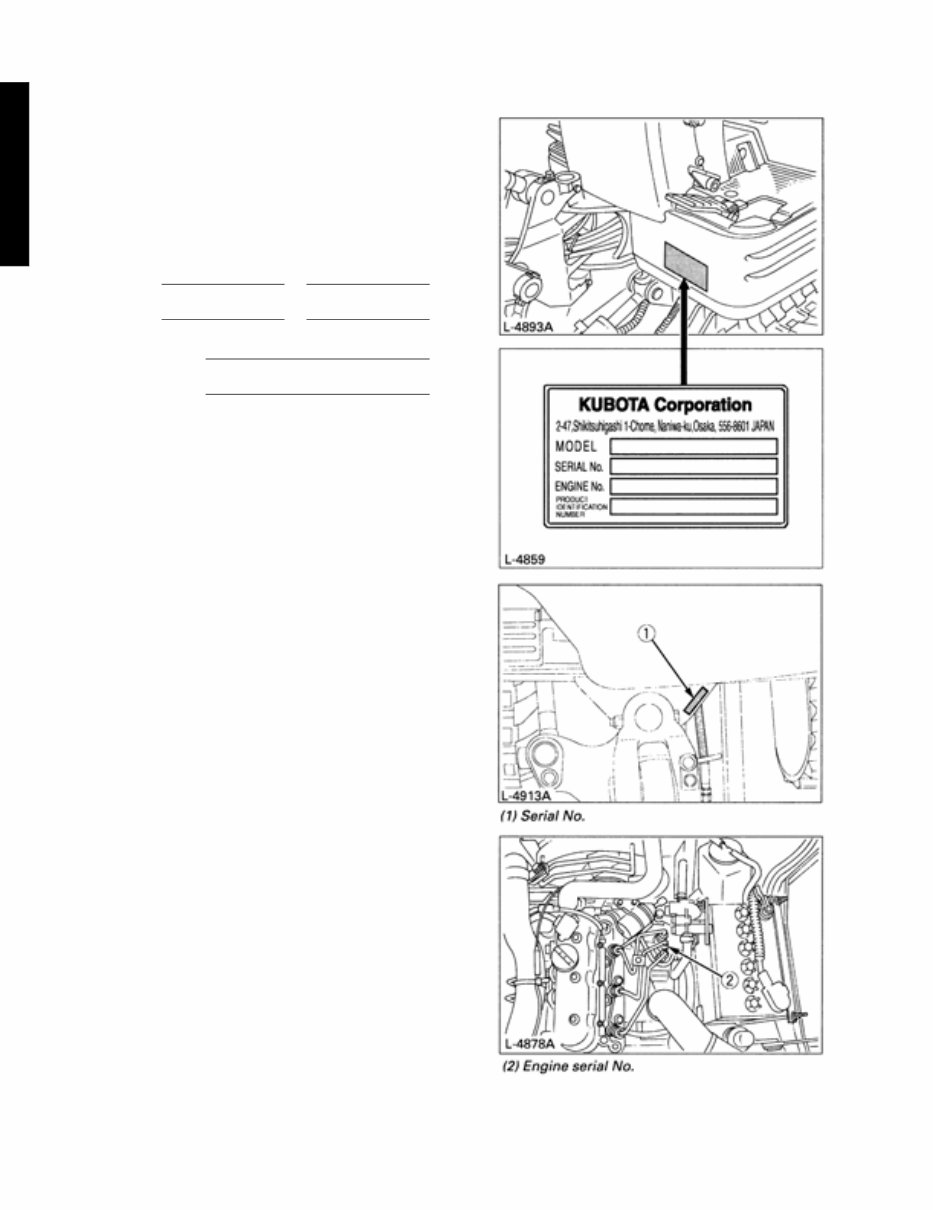
I-S-3 K008-3 KTC, KCL, KTA-Version The model name, machine number and engine num- ber of this product are described in their respective positions, as shown below. Note that their positions may be different depending on the specifications. Chech the specification of the product. Excavator Engine Excavator Excavator Name of Dealer (To be filled in by purchaser) Date of Purchase
I-S-4 B.Safty precautions for servicing, disassembly and reassembly Safty precautions for servicing Most accidents during servicing arise from carelessness. Please remember that safty involves both the wel- fare of the employees and improved work efficiency. Safty precautions for Disassembly and reassembly Machines must be diassembled and assembled efficiently and safely. It is very important to thoroughly understand the construction and function of the machine, to make all appro- priate preparations, and start operations according to the specified working procedures. a. Safty measures before starting work (1)Work clothes 1. Wear specified work cap and clothed. (Under no circumstances may workers wear undershirts only.) Cuffs must be kept buttoned, and any tears must be mended.) 2. Wear safety shoes. 3. Do not wear cotton gloves when working on the internal section of engine, reduction gears or hydrauricunits for repair or others, or when using a hammer. Wear leather gloves, however, when hoisting wires. (2)Inspecting equipment and tools 1. Prepare equipment (cranes, fork lifts, tool, etc.) required for servicing and inspect for any problems before starting work. 2. Hammer heads (metal parts) must be firmly secured to their handles. 3. Check hosting tools (wire ropes, hoisting chains, etc.) before use. (3)Keep workshop in order 1. Secure appropriate space needed for disas- sembly to the job. 2. Secure a clean, safe place for arranging dis- assembled parts. 3. Store volatile substances (gasoline, light oil, thinner, oily articles, etc.) in appropriate con- tainers at selected locations to prevent fire hazards. b. Safty measures during work (1)Protectors 1. Wear goggles when using chisels for chip- ping. 2. Use appropriate protectors during welding. 3. Wear a helmet when working with a crane or at elevated locations. (2)Team work 1. When working with two or more people, divide the work and maintain close commu- nication. 2. Clane work must be carried out using prede- termined signals. (3)Disassembly and assembly 1. Do not wear gloves when using hammers. 2. Use rods of the specified soft material for removing pins. Do not use a hammer as a pad. 3. Do not place fingers in holes when center- ing. 4. Heavy parts must be adequately supported before removingbolts. (4)Cranes 1. In principle, use a crane for objects heavier than 44lb (20kg). 2. Crane operation and hoisting must be per- formed only by qualified personal. 3. Pay careful attention to the center of gravity when hoisting, and do not stand under the lifted objects. (5)Others 1. To work under a jacked-up carrier, be sure to place wood pieces under it. 2. When charging batteris, make sure there are no open flames in the immediate vicinity. 3. All electric tools must be grounded. 4. Before welding the machine, remove the battery. • When removing the battery, be sure to dis- connect negative (-) cord first. • When mounting the battery, be sure tp connect the positive (+) cord first.
I-S-5 c. Preparation for disassembly (1)Cleaning Remove mud and dirt from the body before disassembly. (2)Acceptance inspection The machine must be checked before it is disassembled to record existing conditions, such as those listed below. Model, serial number, and hourmeter reading • Reason for repair and repair history • Element stains • Fuel and oil condition • Parts damage *(Take photographs if nessesary.) (3)Equipment and tools prepare equipment, tools, cranes and parts storage racks as required. d. Precautions for disassembly and reassembly (1)Disassembly 1. Follow the specified disassembly procedures. 2. Make alignment marks to insure correct reassembly. 3. Arrange disassembled parts in an orderly way, and attach identification tags or put marks if needed. (2)Reassembly 1. Clean all parts before assembly. Repair any scratches or dents. Take special precautions against dirt and dust. 2. Parts with rust-preventive coatings must be assembles only after removing the corting. 3. Separated parts must be correctly reassembled using alignment marks. 4. As a rule, use a press to reassembled bearings, bushing and oil seals. Use pads when using a ham- mer.
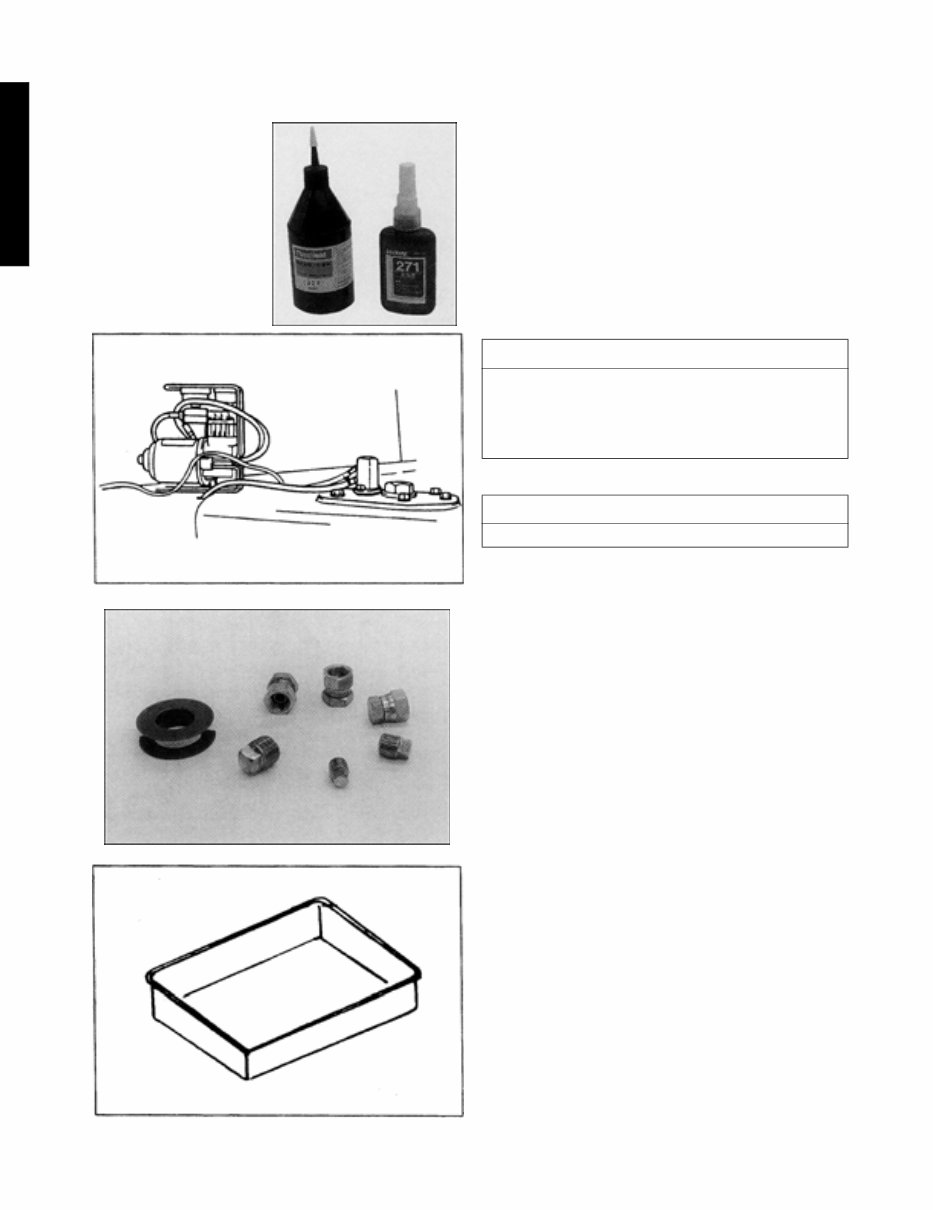
I-S-6 C.IMPORTANT SAFTY PROCESS AND CRITICAL FUNCTIONAL PROCESS The following instructions are related to essential adhesives, important safety process and critical func- tional process .Pay special attention in servicing these process. (Pay also close attention in reconnecting the electrical cables.) a. Essential Adhesives Type of screw adhesive • Unless otherwise specified, use Three-Bond 1324 adhesive (medium-duty type). Keep the screw threads free of oil and water. Type of instantaneous adhesive • Use Three-Bond 1733 or Three-Bond 1741E adhesive. Keep the bond areas free of oil and water. b. Important Safety Process . 1. Reconnecting the fuel hose (clearance, hose routes, clamps, etc.) 2. Electrical cabling (engine, instrument panal, controls, etc.) (wiring routes, clamps and couplers) c. Important Critical Functional Process . 1. Setting up the travel wheel motor (tightening torque) 2. Reassembling the rotary joints (joint direction and shaft set-up) 3. Installing the swivel base bearing and the swivel motor (tightening torque) 4. Fitting the pump couplings (tightening torque) 5. Installing the counter weight. D.IMPORTANT INSPECTION ITEMS AFTER REASSEMBLING a Operate the Machine and check for Unusual Noise and Vibrations. b Make Sure the Safety decals and Wireharness Clamps are in their Specified Posi- tions. c With the Machine Front in a Specified Posture, Check the Amount of Hydrauric Oil Checking the oil level (For further datails, refer to the Operator’s Manual of each model.) 1) Park the machine on a level ground. 2) Make sure the hydrauric oil temperature is in the range of 10-30°C (50-86°F) and see if the oil level is within the specified zone of the oil level gauge. 3) Keep the machine front as shown as following posture. Posture: Extend the rods of the arm and bucket cylinders nealy half. Place the bucket on the ground, the offset swing at the center, and the dozer also on the ground. S A S A
I-S-7 E.SERVICING FUNDAMENTALS a.Items for Servicing 1) Tighten bolts, nuts, adapters,and similar parts to their specified torques which are given in the list of tightening torques and adhesive as well as in this manual. Be sure to observe the specified torques for important tightened parts and components. 2) Wipe out water, oil and grease off the screws on which loctite adhesive is to be applied. Be sure to apply the adhesive to specified loca- tions. The word “LOCTITE“ in this manual denotes the red-color type. 3) Precautions in disassembling the hydraulic equipment • Use a vacuum pump, pulgs, oil pans, waste cloth and the like to prevent oil from running out or splashing. • Wipe out leaking oil completely first and then add oil as required. • Protect the openings with plugs, covers or the like to keep off foreign matters. Most of hydraulic system troubles are caused by the entry of foreign matters. • Before reassembling, clean up the parts and components and apply hydraulic oil on them. • The system consists of precision parts. Be careful not to scratch them and apply exces- sive force on them. Types of screw adhesive Equivalent to LOCTITE 271 (Heavy-duty) Equivalent to THREE-BOND 1305P (Heavy-duty) Equivalent to THREE-BOND TB1401B (Light-duty) Unless specified otherwise, use THREE-BOND 1324 (Medium-duty). Type of instantaneous adhesive Use THREE-BOND 1733 or 1741E Locking adhesive
This is the complete official full factory service repair manual for the Kubota K008-3 Excavator. It contains hundreds of pages that cover all styles and allow you to print the entire manual or just the specific pages you need. This manual is a genuine repair service factory manual, providing essential guidance for maintaining and repairing the Kubota K008-3 Excavator.
The manual covers various aspects including the engine, lubrication system, cooling system, fuel system, disassembly and servicing, general maintenance, clutch, transmission, drive chain & sprockets, rear axle, brakes, front axle, steering, shocks, body work, intake & exhaust, hydraulic system, electrical system, routine maintenance, advanced troubleshooting, wiring diagrams, and more.
It contains necessary illustrations, diagrams, and specifications to guide mechanics through any repair procedure. Additionally, an advanced troubleshooting guide is included to help diagnose and correct any problem. The manual also provides detailed substeps, notes, cautions, warnings, numbered instructions, bold figure numbers, detailed illustrations, and enlarged insets to aid in the repair process.
Furthermore, it makes it easy to diagnose and repair problems with the machine's electrical system, as troubleshooting and electrical service procedures are combined with detailed wiring diagrams for ease of use.
The manual is available in English and can be printed without any restrictions. It is compatible with all PC-based Windows operating systems and Mac, and can be saved to a hard drive or burned to a CD-ROM. This comprehensive manual is fully printable, allowing users to print specific pages or the entire manual as needed.
With this Kubota K008-3 Excavator Factory Service Repair Manual, owners, professional technicians, and mechanics have access to detailed, step-by-step instructions and photos to guide them through all service, maintenance, repairs, and tuning. The search function makes it easy to find specific information, and users can print only the pages they need.
Recently Viewed
5,521,897Happy Clients
2,594,462eManuals
1,120,453Trusted Sellers
15Years in Business
Price:
Actual Price:
Kubota K008-3 Excavator Factory Service Repair Manual