INTRODUCTION To insure a long life for the machine and the engine and to prevent failure and prob- lems, proper operation, maintenance and repairs are indispensable. This service manual includes an “outline,” “structure and operation,” “inspection and adjustment,” “disassembly and assembly,” “standard maintenance,” and “repair and re- placement of parts” of the machine which are necessary to carry out the inspections and repairs in the repair shop. We hope that this manual helps you to efficiently and effectively carry out repairs by providing and accurate description of the product and the correct repair techniques.
CONTENTS 1. Precautions on Maintenance 2. Outline 3. Attachment 4. Engine 5. Main Pump 6. Hydraulic Oil Filter 7. Control Valve 8. Joystick 9. Slew Motor 10. Travelling Motor 11. Hydraulic Cylinder 12. Swivel Joint 13. Crawler 14. Spring Case and Grease Cylinder 15. Idler 16. Sprocket 17. Track Roller 18. Electrical Equipment 19. Troubleshooting
1 PRECAUTIONS ON MAINTENANCE 1. Correct operation Correct operation means to follow the correct “procedure” and “method.” Procedure focuses on speed and accuracy of each job. In the method, are addressed what type of facility, tools, instruments, materials, oil should be used, how and which part should be checked, adjusted or disassembled, and what matters to attend to. 2. Precautions on operation 1. Safety check Check that stoppers and sleepers are correctly installed for the vehicle jack-up operation. 2. Preparation Prepare all of the tools and inspect and adjust the instruments. 3. For efficiency 1) Understand the state before disassembly. What is the problem? Is disassembly absolutely necessary? 2) Before disassembly Determine whether match marks are necessary. For the electrical system, disconnect the cable from the battery terminal. 3) Precautions for disassembly In stead of checking all of the disassembled parts at once, check each part individually as it is disassembled. When removing the hydraulic unit or the hoses, mount a dust cap on the connection. 4) Repair of disassembled parts Keep the disassembled parts in order. Clearly distinguish the parts to be replaced with new parts from those to be reused. Packings, seals, rings, split pins must be replaced. NOTE: Electrical equipment, rubbers and V belts (which are easily affected by water and oil) must be handled carefully in order to prevent soiling them. 5) Clean disassembled parts Thoroughly clean the disassembled parts. 6) Assembly Perform the assembly correctly (tightening torque, application of Three Bond, screw lock, grease, use of seal tape, etc.). Also install the hose correctly. 1-1 Hose mark Hose mark
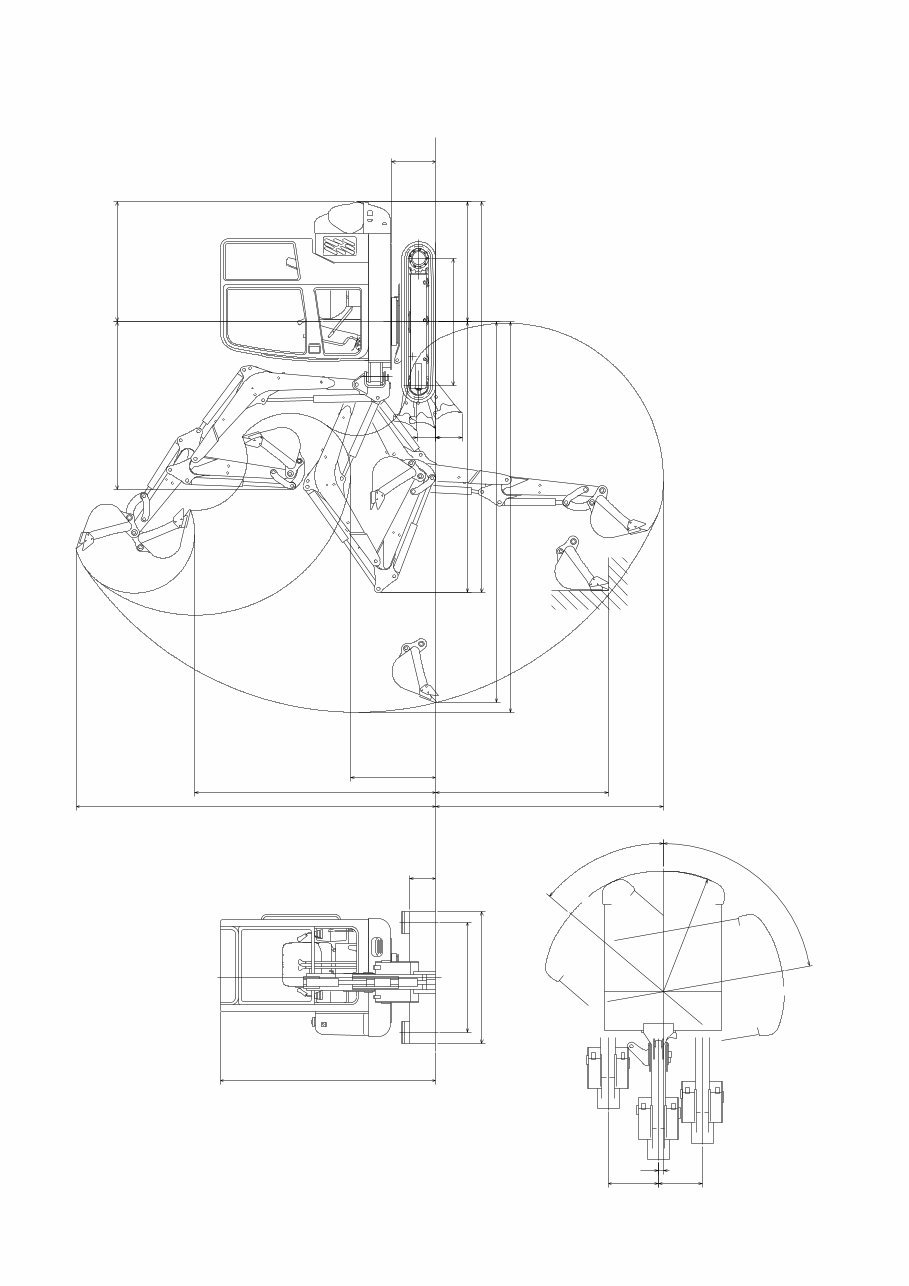
2 OUTLINE CONTENTS 2-1 Location of serial No. 2-2 Name of each part 2-3 Dimensions and specification 2-4 Weight list 2-5 Oil and grease supply points 2-6 List of supply oil and grease 2-7 When to repair 2-8 Hydraulic circuit diagram
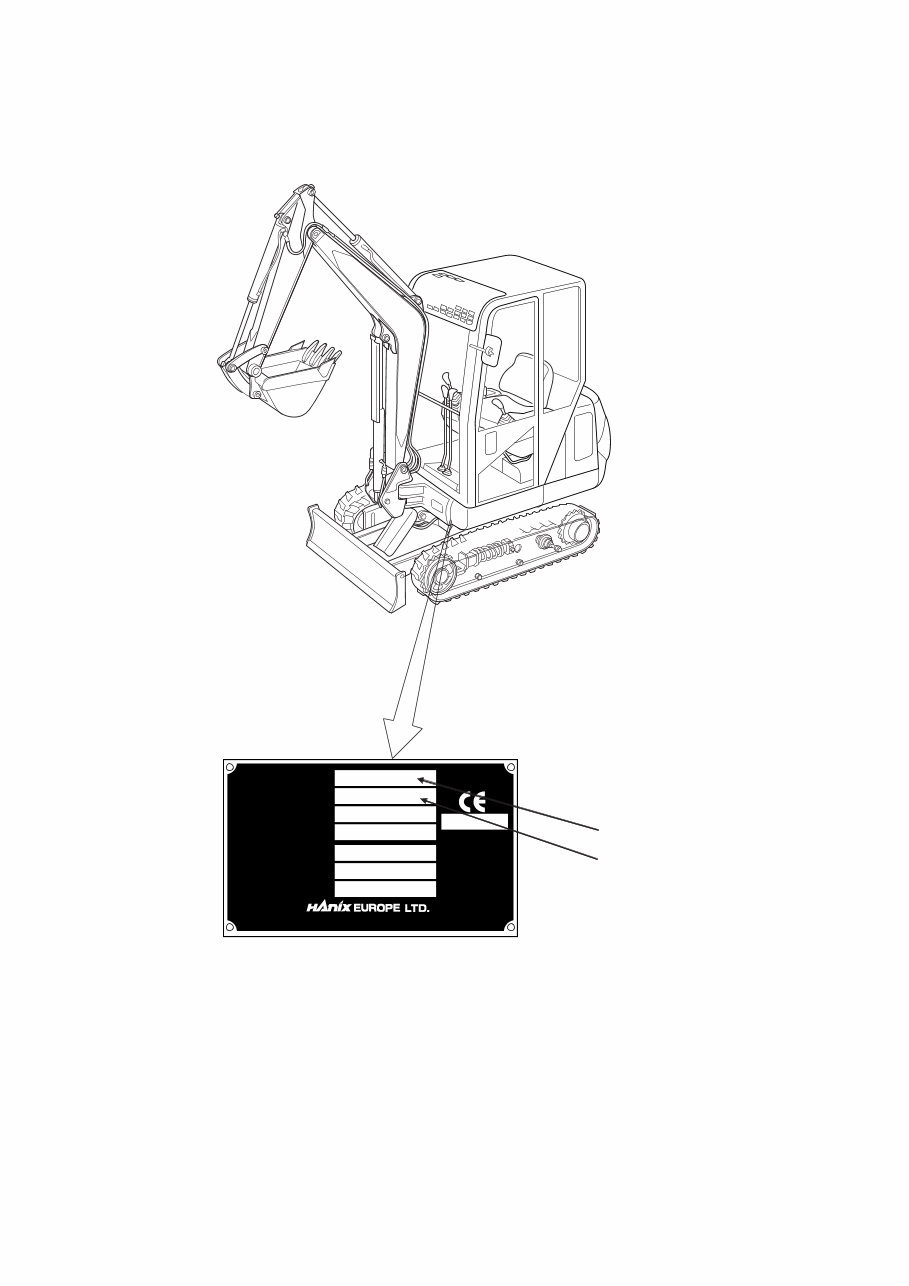
2-1 Location of Serial Number 2-1 Model name Serial No. MACHINE MODEL NO. WEIGHT YEAR MODEL NO. POEWER ENGINE Oldham Street,Denton,Manchester M34 3SW,United Kingdom. MADE IN U.K.
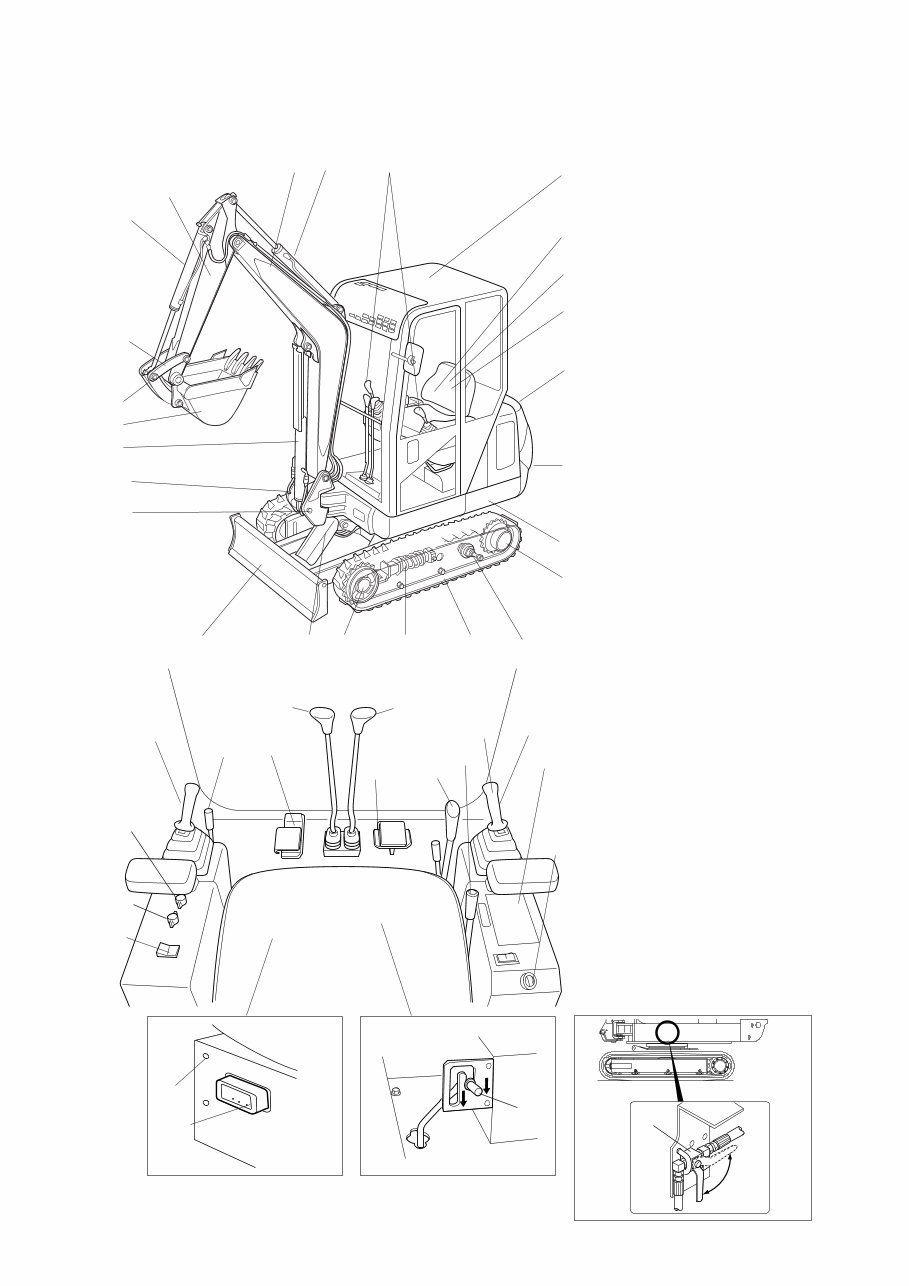
2-2 Name of each part 1. Boom 2. Boom cylinder 3. Arm cylinder 4. Arm 5. Bucket cylinder 6. Bucket links 7. Dump link 8. Bucket 9. Swing frame 10. Engine cover 11. Fuel tank 12. Hydraulic tank 13. Roof 14. Counter weight 15. Operator's seat 16. Crawler 17. Dozer blade 18. Dozer cylinder 19. Travelling motor 20. Track roller 21. Front idler 22. Grease cylinder 23. Swing post 24. Swing cylinder 25. Operation levers 1. Meter unit 2. Starter switch 3. Horn switch 4. Fuse box 5. Right operation lever 6. Left operation lever 7. Accelerator lever 8. Dozer operation lever 9. Right travelling lever 10. Left travelling lever 11. Swing pedal 12. P.T.O. pedal 13. Operation lock lever 14. Swing lock pin 15. Overdrive switch 16. Heater switch(for Cabin) 17. Wiper switch(for Cabin) 18. Manual boom lowering lever 19. Cigarette lighters 2-2 5 6 7 8 1 4 2 23 17 18 21 24 22 20 19 9 16 10 14 3 11 12 25 15 13 FUSE 18 8 7 14 10 9 2 5 4 6 3 1 13 12 15 17 16 11 19
Thank you for considering this comprehensive Service Repair Workshop Manual for the Hanix H22B Mini Excavator Parts. This manual is an invaluable resource for both professional mechanics and DIY enthusiasts.
DESCRIPTION:
This manual provides detailed instructions and illustrations for all Service & Repair Procedures, enabling you to save money by performing repairs yourself. The step-by-step guidance covers all areas of servicing and repairs, making any job easy to accomplish.
Once downloaded, the manual is yours to keep forever. You have the flexibility to print individual pages, chapters, or the entire manual. It can also be saved to your tablet or smartphone for easy access.
MODELS COVERED:
All Models/Engines/Trim/Transmissions Types Are Covered.
CONTENTS:
This high-quality manual covers all repair procedures from A-Z, ensuring that every repair and service procedure is comprehensively addressed.
COMPUTER REQUIREMENTS:
This downloadable manual is compatible with all PC & MAC Computers, tablets, and mobile phones. The only software required is Adobe Reader, which is typically pre-installed on most computers or can be downloaded for free.
INSTANT DELIVERY:
Upon payment confirmation via Visa, MasterCard, or PayPal, the manual will be instantly emailed to the address provided during checkout.
Customer Satisfaction Guaranteed.
Reviews
Q&A
Recently Viewed
5,521,897Happy Clients
2,594,462eManuals
1,120,453Trusted Sellers
15Years in Business
Price:
Actual Price:
Hanix H22B Mini Excavator Parts & Complete Workshop Service Repair Manual (2 Manual Set)

")