00-2 D65EX,PX-15 (2) CONTENTS No. of page 01 GENERAL ......................................................................................... 01-1 10 STRUCTURE, FUNCTION AND MAINTENANCE STANDARD ...... 10-1 20 TESTING AND ADJUSTING ............................................................ 20-1 30 DISASSEMBLY AND ASSEMBLY .................................................. 30-1 90 OTHERS ........................................................................................... 90-1
D65EX, PX-15 00-3 FOREWORD SAFETY NOTICE (8) SAFETY NOTICE Important safety notice Proper service and repair are extremely important for safe machine operation. The service and repair techniques recommended by Komatsu and described in this manual are both effective and safe. Some of these techniques require the use of tools specially designed by Komatsu for the specific purpose. To prevent injury to workers, the symbol k is used to mark safety precautions in this manual. The cau- tions accompanying these symbols should always be followed carefully. If any dangerous situation arises or may possibly arise, first consider safety, and take the necessary actions to deal with the situa- tion. 1. General precautions k Mistakes in operation are extremely dan- gerous. Read the Operation and Mainte- nance Manual carefully before operating the machine. 1) Before carrying out any greasing or repairs, read all the safety plates stuck to the machine. For the locations of the safety plates and detailed explanation of precau- tions, see the Operation and Maintenance Manual. 2) Decide a place in the repair workshop to keep tools and removed parts. Always keep the tools and parts in their correct places. Always keep the work area clean and make sure that there is no dirt, water, or oil on the floor. Smoke only in the areas provided for smoking. Never smoke while working. 3) When carrying out any operation, always wear safety shoes and helmet. Do not wear loose work clothes, or clothes with buttons missing. • Always wear safety glasses when hitting parts with a hammer. • Always wear safety glasses when grind- ing parts with a grinder, etc. 4) When carrying out any operation with 2 or more workers, always agree on the operat- ing procedure before starting. Always inform your fellow workers before starting any step of the operation. Before starting work, hang UNDER REPAIR warning signs in the oper- ator's compartment. 5) Only qualified workers must carry out work and operation which require license or quali- fication. 6) Keep all tools in good condition, learn the correct way to use them, and use the proper ones of them. Before starting work, thor- oughly check the tools, machine, forklift, service car, etc. 7) If welding repairs are needed, always have a trained and experienced welder carry out the work. When carrying out welding work, always wear welding gloves, apron, shield- ing goggles, cap and other clothes suited for welding work. 8) Before starting work, warm up your body thoroughly to start work under good condi- tion. 2. Preparations for work 1) Before adding oil or making any repairs, park the machine on hard and level ground, and apply the parking brake and block the wheels or tracks to prevent the machine from moving. 2) Before starting work, lower the work equip- ment (blade, ripper, bucket, etc.) to the ground. If this is not possible, insert the lock pin or use blocks to prevent the work equip- ment from falling. In addition, be sure to lock all the control levers and hang warning signs on them. 3) When disassembling or assembling, support the machine with blocks, jacks, or stands before starting work. 4) Remove all mud and oil from the steps or other places used to get on and off the machine. Always use the handrails, ladders or steps when getting on or off the machine. Never jump on or off the machine. If it is impossible to use the handrails, ladders or steps, use a stand to provide safe footing. Safety points 1 Good arrangement 2 Correct work clothes 3 Following work standard 4 Making and checking signs 5 Prohibition of operation and handling by unlicensed workers 6 Safety check before starting work 7 Wearing protective goggles (for cleaning or grinding work) 8 Wearing shielding goggles and protectors (for welding work) 9 Good physical condition and preparation 10 Precautions against work which you are not used to or you are used to too much (Rev. 2007/03)
00-4 D65EX, PX-15 FOREWORD SAFETY NOTICE (8) 3. Precautions during work 1) Before disconnecting or removing compo- nents of the oil, water, or air circuits, first release the pressure completely from the circuit. When removing the oil filler cap, a drain plug, or an oil pressure pickup plug, loosen it slowly to prevent the oil from spurt- ing out. 2) The coolant and oil in the circuits are hot when the engine is stopped, so be careful not to get scalded. Wait for the oil and cool- ant to cool before carrying out any work on the oil or water circuits. 3) Before starting work, stop the engine. When working on or around a rotating part, in par- ticular, stop the engine. When checking the machine without stopping the engine (meas- uring oil pressure, revolving speed, temper- ature, etc.), take extreme care not to get rolled or caught in rotating parts or moving parts. 4) Before starting work, remove the leads from the battery. Always remove the lead from the negative (–) terminal first. 5) When raising a heavy component (heavier than 25 kg), use a hoist or crane. Before starting work, check that the slings (wire ropes, chains, and hooks) are free from damage. Always use slings which have ample capacity and install them to proper places. Operate the hoist or crane slowly to prevent the component from hitting any other part. Do not work with any part still raised by the hoist or crane. 6) When removing a cover which is under internal pressure or under pressure from a spring, always leave 2 bolts in diagonal positions. Loosen those bolts gradually and alternately to release the pressure, and then remove the cover. 7) When removing components, be careful not to break or damage the electrical wiring. Damaged wiring may cause electrical fires. 8) When removing piping, stop the fuel or oil from spilling out. If any fuel or oil drips onto the floor, wipe it up immediately. Fuel or oil on the floor can cause you to slip and can even start fires. 9) As a general rule, do not use gasoline to wash parts. Do not use it to clean electrical parts, in particular. 10) Be sure to assemble all parts again in their original places. Replace any damaged parts and parts which must not be reused with new parts. When installing hoses and wires, be sure that they will not be damaged by contact with other parts when the machine is operated. 11) When installing high pressure hoses, make sure that they are not twisted. Damaged tubes are dangerous, so be extremely care- ful when installing tubes for high pressure circuits. In addition, check that connecting parts are correctly installed. 12) When assembling or installing parts, always tighten them to the specified torques. When installing protective parts such as guards, or parts which vibrate violently or rotate at high speed, be particularly careful to check that they are installed correctly. 13) When aligning 2 holes, never insert your fin- gers or hand. Be careful not to get your fin- gers caught in a hole. 14) When measuring hydraulic pressure, check that the measuring tools are correctly assembled. 15) Take care when removing or installing the tracks of track-type machines. When remov- ing the track, the track separates suddenly, so never let anyone stand at either end of the track. 16) If the engine is operated for a long time in a place which is not ventilated well, you may suffer from gas poisoning. Accordingly, open the windows and doors to ventilate well.
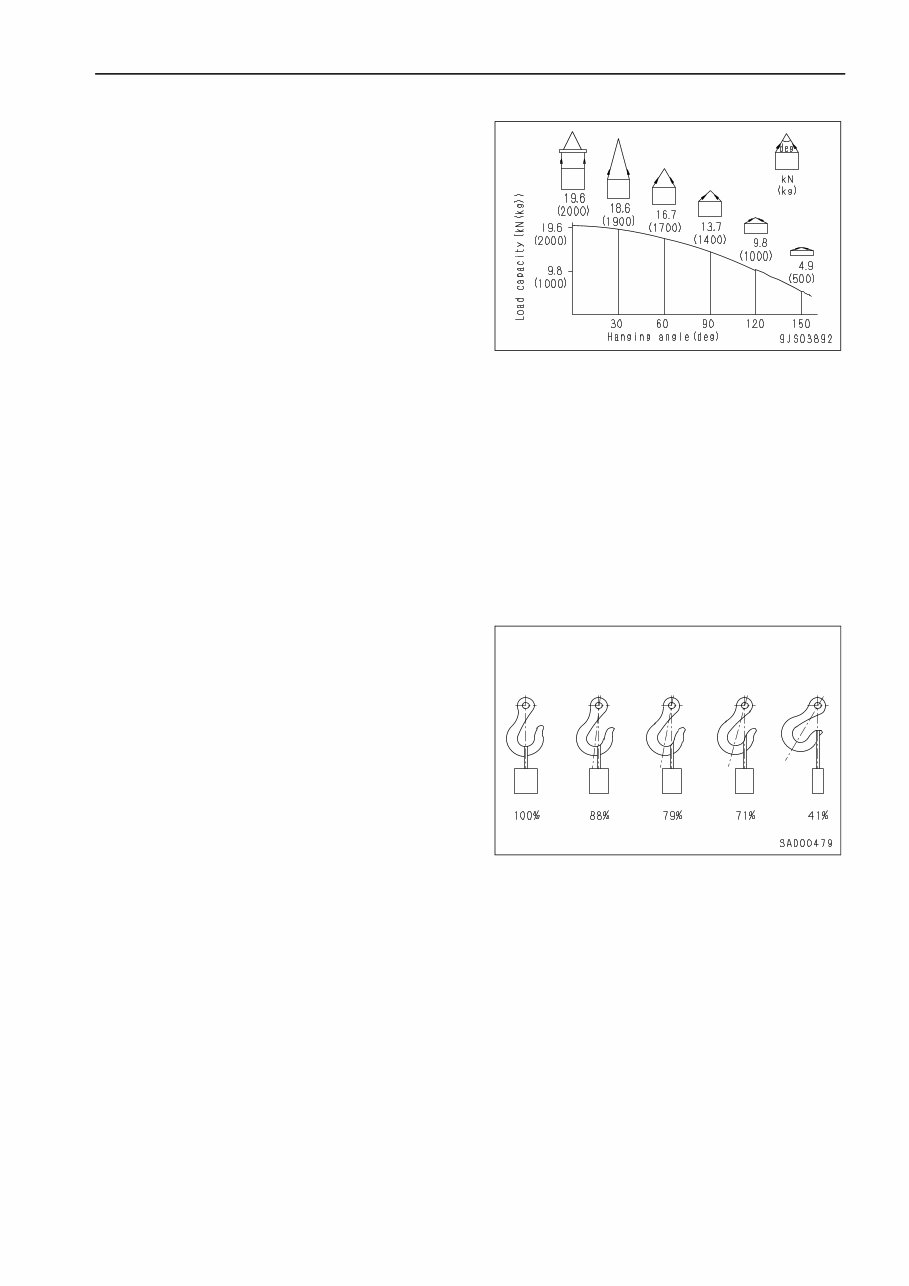
D65EX, PX-15 00-5 FOREWORD SAFETY NOTICE (8) 4. Precautions for sling work and making signs 1) Only one appointed worker must make signs and co-workers must communicate with each other frequently. The appointed sign maker must make specified signs clearly at a place where he is seen well from the operator's seat and where he can see the working condition easily. The sign maker must always stand in front of the load and guide the operator safely. • Do not stand under the load. • Do not step on the load. 2) Check the slings before starting sling work. 3) Keep putting on gloves during sling work. (Put on leather gloves, if available.) 4) Measure the weight of the load by the eye and check its center of gravity. 5) Use proper sling according to the weight of the load and method of slinging. If too thick wire ropes are used to sling a light load, the load may slip and fall. 6) Do not sling a load with 1 wire rope alone. If it is slung so, it may rotate and may slip out of the rope. Install 2 or more wire ropes symmetrically. k Slinging with 1 rope may cause turn- ing of the load during hoisting, un- twisting of the rope, or slipping of the rope from its original winding po- sition on the load, which can result in a dangerous accident. 7) Limit the hanging angle to 60°, as a rule. Do not sling a heavy load with ropes forming a wide hanging angle from the hook. When hoisting a load with 2 or more ropes, the force subjected to each rope will increase with the hanging angle. The table below shows the variation of allowable load in kN {kg} when hoisting is made with 2 ropes, each of which is allowed to sling up to 9.8 kN {1,000 kg} vertically, at various hanging angles. When the 2 ropes sling a load vertically, up to 19.6 kN {2,000 kg} of total weight can be suspended. This weight is reduced to 9.8 kN {1,000 kg} when the 2 ropes make a hanging angle of 120°. If the 2 ropes sling a 19.6 kN {2,000 kg} load at a lifting angle of 150°, each of them is sub- jected to a force as large as 39.2 kN {4,000 kg}. 8) When installing wire ropes to an angular load, apply pads to protect the wire ropes. If the load is slippery, apply proper material to prevent the wire rope from slipping. 9) Use the specified eyebolts and fix wire ropes, chains, etc. to them with shackles, etc. 10) Apply wire ropes to the middle portion of the hook. • Slinging near the tip of the hook may cause the rope to slip off the hook during hoisting. The hook has the maximum strength at the middle portion. 11) Do not use twisted or kinked wire ropes. 12) When lifting up a load, observe the follow- ing. • Wind in the crane slowly until wire ropes are stretched. When settling the wire ropes with the hand, do not grasp them but press them from above. If you grasp them, your fingers may be caught. • After the wire ropes are stretched, stop the crane and check the condition of the slung load, wire ropes, and pads. • If the load is unstable or the wire rope or chains are twisted, lower the load and lift it up again. • Do not lift up the load slantingly.
00-6 D65EX, PX-15 FOREWORD SAFETY NOTICE (8) 13) When lifting down a load, observe the fol- lowing. • When lifting down a load, stop it tempo- rarily at 30 cm above the floor, and then lower it slowly. • Check that the load is stable, and then remove the sling. • Remove kinks and dirt from the wire ropes and chains used for the sling work, and put them in the specified place. 5. Precautions for using mobile crane ★ Read the Operation and Maintenance Manu- al of the crane carefully in advance and op- erate the crane safely. 6. Precautions for using overhead hoist crane k When raising a heavy part (heavier than 25 kg), use a hoist, etc. In Disassembly and assembly, the weight of a part heav- ier than 25 kg is indicated after the mark of 4. 1) Before starting work, inspect the wire ropes, brake, clutch, controller, rails, over wind stop device, electric shock prevention earth leak- age breaker, crane collision prevention device, and power application warning lamp, and check safety. 2) Observe the signs for sling work. 3) Operate the hoist at a safe place. 4) Check the direction indicator plates (east, west, south, and north) and the directions of the control buttons without fail. 5) Do not sling a load slantingly. Do not move the crane while the slung load is swinging. 6) Do not raise or lower a load while the crane is moving longitudinally or laterally. 7) Do not drag a sling. 8) When lifting up a load, stop it just after it leaves the ground and check safety, and then lift it up. 9) Consider the travel route in advance and lift up a load to a safe height. 10) Place the control switch on a position where it will not be an obstacle to work and pas- sage. 11) After operating the hoist, do not swing the control switch. 12) Remember the position of the main switch so that you can turn off the power immedi- ately in an emergency. 13) If the hoist stops because of a power failure, turn the power switch OFF. When turning on a switch which was turned OFF by the elec- tric shock prevention earth leakage breaker, check that the devices related to that switch are not in operation state. 14) If you find an obstacle around the hoist, stop the operation. 15) After finishing the work, stop the hoist at the specified position and raise the hook to at least 2 m above the floor. Do not leave the sling installed to the hook. 7. Selecting wire ropes 1) Select adequate ropes depending on the weight of parts to be hoisted, referring to the table below. ★ The allowable load is one-sixth of the breaking strength of the rope used (Safety coefficient: 6). Wire ropes (Standard “Z” twist ropes without galvanizing) (JIS G3525, No. 6, Type 6X37-A) Nominal diameter of rope Allowable load mm kN ton 10 8.8 0.9 12 12.7 1.3 14 17.3 1.7 16 22.6 2.3 18 28.6 2.9 20 35.3 3.6 25 55.3 5.6 30 79.6 8.1 40 141.6 14.4 50 221.6 22.6 60 318.3 32.4
The Komatsu D65EX-15 D65PX-15 D65WX-15 Bulldozer Workshop Service Manual for Repair is an essential resource for both professional mechanics and DIY enthusiasts. This comprehensive manual provides data, characteristics, instructions, and methodology to perform repair interventions on the vehicle and its components.
It includes special notes, important points, service data, precautions, and detailed, comprehensive step-by-step procedures, explanations, and pictorial diagrams from bumper to bumper. The manual meets all information needs to repair or make adjustments to the bulldozer. It is intended as a handy, easy-to-read reference book with comprehensive explanations of all installation, removal, disassembly, assembly, repair, and check procedures laid out in sequential order.
Detailed illustrations, exploded diagrams, drawings, and photos guide you through every service repair procedure. Adjustment and repair operations include reference to service tool numbers, and the associated illustration depicts the tool for the bulldozer. The manual can be viewed on any computer, zoomed, and printed.
It has been specially prepared so that the explanation is very simple, making it suitable for comparatively new personnel to give satisfactory after-services to customers as well as disassemble and maintain the vehicle. All service and repair instructions are included, and it provides general descriptions for accomplishing service and repair work with tested, effective techniques.
The manual also contains information on construction, function, troubleshooting, servicing specification lists, tightening torque, checking and adjusting, disassembling and assembling, and servicing procedures. The illustrations are used to highlight the fundamental principles and procedures of basic interventions. Adjustment and repair operations also include reference to wear limits and relevant data, useful assembly details.
To maximize the life of the bulldozer, it is important to accurately follow the maintenance requirements, investigate unusual noises and changes in riding characteristics, use genuine parts, follow procedures carefully, keep complete records of all maintenance and repairs, and use approved lubricants as specified in the manual.
This manual is designed primarily for use by trained technicians in a properly equipped workshop but contains enough detail and basic information to make it useful to the owner who desires to perform basic maintenance and repair work. A basic knowledge of mechanics, including the proper use of tools and workshop procedures, is necessary to carry out maintenance and repair work satisfactorily.
It provides technical information regarding the design, function, disassembly, adjusting work, and troubleshooting on the components and model of the bulldozer. The descriptions are brief but precise and are supported by photographs, notes, drawings, schematics, as well as exploded and sectional drawings. This manual also contains information about adjusting work and valuable reference data for such adjustment values.
For all maintenance and repair work, all accident prevention guidelines must be strictly observed. To perform all repairs listed in this manual, a complete set of standard tools, as well as the special tools and fixtures shown and listed, are necessary. No special emphasis is put on replacing sealing components as it is assumed that these items are replaced during any repair.
This Komatsu D65EX-15 D65PX-15 D65WX-15 Bulldozer Service Manual for Workshop Repair is a quality manual that is 100% complete and intact, with no missing/corrupt pages/sections. It is an invaluable resource for anyone involved in the maintenance and repair of the bulldozer.
Recently Viewed
5,521,897Happy Clients
2,594,462eManuals
1,120,453Trusted Sellers
15Years in Business
Price:
Actual Price:
Komatsu D65EX-15 D65PX-15 D65WX-15 Bulldozer Service Manual