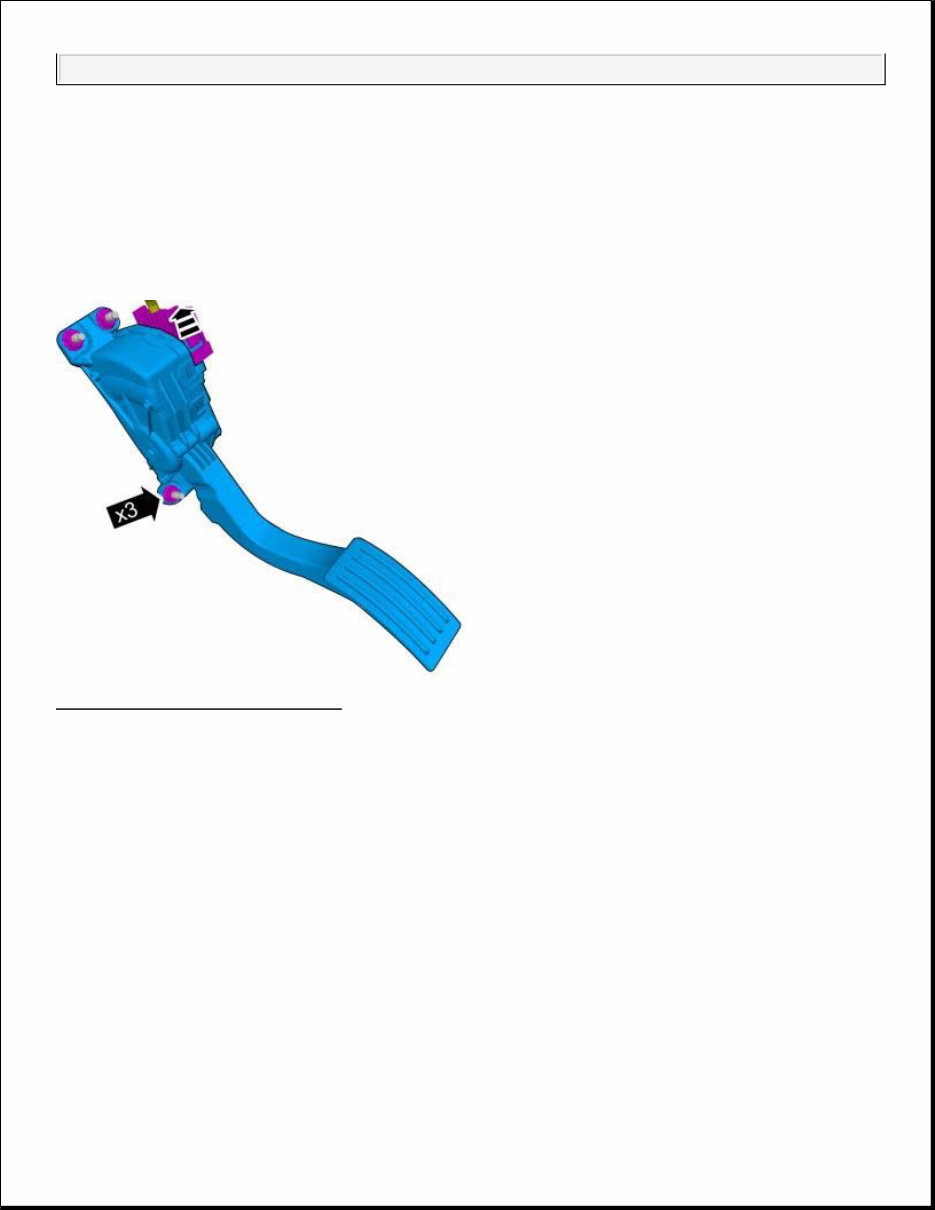
ENGINE Engine Control - Removal, Replacement And Installation ACCELERATOR PEDAL REMOVAL AND INSTALLATION Fig. 1: Identifying Accelerator Pedal Courtesy of VOLVO CARS CORPORATION Torque: M6 10 Nm ENGINE Engine Control - Removal, Replacement And Installation
ACCESSORIES AND BODY, CAB Other Electrical Equipment - Symptom Verification ALARM, CHECKING FUNCTION CHECKING ALARM SYSTEM FUNCTIONS Central electronic module (CEM) is the main module for the alarm functions. When a locking command is received by the Central electronic module (CEM), the Central electronic module (CEM) will first lock the central locking system and then activate the alarm. A long flashing signal, from the vehicle's direction indicators, confirms that the alarm is activated and that the doors are locked. The alarm LED will start to flash directly after the system has been activated. How the vehicle confirms that the alarm is activated can be adapted to the customer's wishes by programming the Infotainment control module (ICM). The alarm should trip when: Door, bonnet or boot lid are opened. A non-approved key is used in the keyhole or if the key has been tampered with. Movement detected in the passenger compartment (only applies if the vehicle is equipped with a movement sensor). The vehicle is lifted or towed away (only applies if the vehicle is equipped with a level movement sensor). Someone attempts to disconnect the siren or battery. The panic function is activated via the remote key. The siren is used as the sound source for the alarm function. The siren includes an internal battery which is charged when the lights are on. The climate affects the life of the battery. Consequently the siren should be replaced at regular intervals. Remote key includes an internal battery. When the battery in the remote key runs down a message is shown on the driver information module (DIM). Another indication that the remote key's battery is running down is a reduction in the remote key's range. Check the different alarm system functions as follows: Testing the movement sensor Sit in the vehicle. NOTE: The alarm shall trip during each test, a siren shall sound and all direction indicators flash. It should be possible to deactivate the alarm using the remote key's unlock button or by inserting the remote key in the starter switch. A signal confirming alarm deactivation must be given by the direction indicators (two short flashes). ACCESSORIES AND BODY, CAB Other Electrical Equipment - Symptom Verification
Deactivate the movement sensor, then activate the alarm. Wait 30 seconds. Without moving. Test the movement senor in the passenger compartment by moving. Testing the function of the indicator LED Check the LED status before and after alarm activation and with the ignition switched on. Interpret LED indication flashing as follows: Unlit LED, indicates that the alarm is deactivated The LED flashes rapidly, after the alarm has been deactivated, up until the ignition is switched on. Indicates that the alarm has been tripped. The LED flashes once per second after the vehicle's direction indicators have produced one long flashing signal. Flashing indicates that the alarm is activated. Testing the panic function Hold in the button with the red triangle for at least three seconds or press the button twice within three seconds. The function is switched off using the same button after the function has been activated for at least five seconds. Testing the doors Open all windows. Deactivate the movement sensor, then activate the alarm. Wait 30 seconds. Open one of the doors by using the handle on the inside of the door. Testing the hood Sit in the vehicle. Deactivate the movement sensor, then activate the alarm. Wait 30 seconds. Open the bonnet with the handle below the instrument panel. Test of automatic activation (market dependent) Activate the alarm. Wait 30 seconds. Deactivate the alarm with the remote key. Do not open the doors or hoods. Wait two minutes. The vehicle shall automatically activate the alarm and lock the doors. ACCESSORIES AND BODY, CAB Other Electrical Equipment - Symptom Verification
Verification If the customer experiences frequent false alarms it is advisable to let a mechanic fault trace the system. ALCOLOCK (ALCOHOL ANALYZING START INHIBITOR), CHECKING FUNCTION CHECKING FUNCTION, ALCOLOCK (ALCOHOL ANALYZING START INHIBITOR) In a vehicle with Alcoguard (Alcolock, Alcohol Analyzing Start Inhibitor) installed, the driver must perform a breath test in the alcolock's hand unit. If the test is approved (alcohol content less than 0.2 percent alcohol), vehicle start is allowed. The alcolock's (Alcohol Analyzing Start Inhibitor) hand unit is located behind the instrument panel in a holder that also functions as a charger. If the hand unit has been securely fastened in the holder, it shall be activated when it is removed. Otherwise it can be turned on with the ON/OFF-button (5). A test result can be sent from the alcolock's (Alcohol Analyzing Start Inhibitor) hand unit within a radius of 10 meters from the vehicle. The result from breath test is stored in the alcolock (Alcohol Analyzing Start Inhibitor) for 30 seconds and can be sent again with the send button (4) on the hand unit. Driver information module (DIM) gives information about what shall be done for the vehicle to start. However, the information is only shown in case of incorrect handling. If a new start attempt is made within 30 minutes after the engine last was turned off, a new breath test does not have to be performed to enable vehicle start. HINT: For the alcolock (Alcohol Analyzing Start Inhibitor) to work correctly for breath test, radio transmitting objects should not be close by. It is possible to by-pass the alcolock, so that the vehicle can be started without an approved breath test, by pressing and holding in the -button (located on direction indicator) and the button for hazard flashers at the same time for 5 seconds. When installing the system, choose if it shall be possible to by-pass the vehicle more than once. In addition to the light-emitting diode (2) which responds to the driver's breath test, there are two light-emitting diodes that show the battery's charge level (1) and if the hand unit is ready for testing (3). For the alcolock (Alcohol Analyzing Start Inhibitor) to work, it must be calibrated every year. A message in the Driver information module (DIM) 30 days before last calibration date is shown when calibration is to take NOTE: If a vehicle gives a false alarm this can be due to: Alarm system failure. That different layers of air form in the vehicle's passenger compartment on account of changes in temperature. The alarm can trip when the layers of air begin to move in the passenger compartment. ACCESSORIES AND BODY, CAB Other Electrical Equipment - Symptom Verification
place. HINT: Start problems for vehicles with alcolock (Alcohol Analyzing Start Inhibitor) do not have mean that the problem is with the alcolock. Alcolock (Alcohol Analyzing Start Inhibitor) cannot be used in vehicles with keyless entry system. Verification Access to the vehicle is necessary for the following checks. Ignition on. Activate the alcolock (Alcohol Analyzing Start Inhibitor) if it is turned off. Wait until the hand unit's right light (3) is green. Press the ON/OFF-button (5) and the send button (4) at the same time to exclude possibility of restart without approved breath test. Blow in the hand unit until the sound stops (takes approx. 5 seconds). Check that the indicator diode (2) is green, yellow, or red. Press the send button (4) on the hand unit (must be within a radius of 10 meters of the vehicle). Check that the vehicle can be started. Fig. 1: Identifying Alcolock (Alcohol Analyzing Start Inhibitor) ACCESSORIES AND BODY, CAB Other Electrical Equipment - Symptom Verification
Courtesy of VOLVO CARS CORPORATION PARKING ASSISTANCE FRONT/REAR, CHECKING FUNCTION CHECKING FUNCTION, FRONT/REAR PARKING ASSISTANCE The parking assistance system is activated automatically, when the vehicle is started and the text message "Parking assistance active, Switch off with Exit" is displayed in the display of the center console. Parking assistance is active at speeds below 15 km/h. At higher speeds, the system deactivates. When the speed drops below 10 km/h, the system is activated again. The closer the vehicle gets to the object in front or behind, the more frequent the signals become. At a distance of approx. 30 cm, the tone should be constant. Rear parking assistance Parking assistance in reverse activates when reverse is engaged. The measurement range behind the vehicle is approximately 1.5 m. The minimum size of the object that can be detected is a pipe shaped object with a minimum length of 850 mm and a minimum diameter of 85 mm. Front parking assistance Parking assistance forwards is active at speeds below 15 km/h. The measurement range in front of the vehicle is approximately 0.8 m. The minimum size of the object that can be detected is a pipe shaped object with a minimum length of 850 mm and a minimum diameter of 85 mm. A message is shown in the text display, in the driver information module, in case of many malfunctions in the parking assistance system. Snow and ice on the sensors can impair the function. If a trailer is connected or a bicycle holder is on the tow hitch, the system must be switched off. The front parking assistance cannot be combined with auxiliary lamps as the sensors react to them. Verification Access to the vehicle is necessary for the following checks. Ignition on or start the engine. Engage reverse gear. Does the text "Parking assistance active, switch off with Exit" appear in the display? If the text "Parking assistance inactive, activate with Enter" appears, press Enter to activate. ACCESSORIES AND BODY, CAB Other Electrical Equipment - Symptom Verification
Is sound emitted from the loudspeakers, if there is an object behind the vehicle? Test by placing an object or having a person stand behind the vehicle. Move the object/person both closer to and further away from the vehicle and check that the sound frequency increases the closer one gets. At a distance of approx. 30 cm, the tone should be constant. The sound is emitted from the right-hand rear loudspeakers. If the vehicle is equipped with front parking warning, this is tested in the same way, by placing an object or having a person stand in front of the vehicle. The sound must come from the front loudspeaker on the driver's side of the vehicle. REAR WINDOW WIPER/UNUSUAL NOISE, SYMPTOM VERIFICATION REAR WINDOW WIPER/UNUSUAL NOISE SYMPTOM VERIFICATION The following tip may be of help to decide if the symptom is due to a product feature or if continued troubleshooting is needed. TIP: Working sound from wiper motor is OK up to vehicle speed of approx. 70 km/h. WINDSHIELD WIPER/UNUSUAL NOISE, SYMPTOM VERIFICATION WINDSHIELD WIPER/UNUSUAL NOISE SYMPTOM VERIFICATION The following tip may be of help to decide if the symptom is due to a product feature or if continued troubleshooting is needed. TIP: Sound from windshield wipers may appear after car wash with wax. NOTE: The symptom should always be verified together with the customer. NOTE: The symptom should always be verified together with the customer. ACCESSORIES AND BODY, CAB Other Electrical Equipment - Symptom Verification
ACCESSORIES AND BODY, CAB Other Electrical Equipment - Design and Function ALARM DESIGN see DESIGN DIAGNOSTIC FUNCTIONS see DIAGNOSTIC FUNCTIONS FUNCTION see FUNCTION SYSTEM OVERVIEW see SYSTEM OVERVIEW ALCOHOL ANALYZING START INHIBITOR DESIGN see DESIGN DIAGNOSTIC FUNCTIONS see DIAGNOSTIC FUNCTIONS DOWNLOADING SOFTWARE AND REPLACING THE CONTROL MODULE see DOWNLOADING SOFTWARE AND REPLACING THE CONTROL MODULE FUNCTION see FUNCTION SYSTEM OVERVIEW see SYSTEM OVERVIEW GENERAL DIAGNOSTICS ACCESSORIES AND BODY, CAB Other Electrical Equipment - Design and Function
BACKGROUND see BACKGROUND DIAGNOSTIC VERSIONS AND COMMUNICATION METHODS see DIAGNOSTIC VERSIONS AND COMMUNICATION METHODS DIAGNOSTICS AND SERVICES see DIAGNOSTICS AND SERVICES INTRODUCTION see INTRODUCTION PRACTICAL USE OF DIAGNOSTICS see PRACTICAL USE OF DIAGNOSTICS TOOLS FOR DIAGNOSTICS see TOOLS FOR DIAGNOSTICS WHERE DO I FIND THE INFORMATION IN VIDA (VOLVO SCAN TOOL) see WHERE DO I FIND THE INFORMATION IN VIDA IMMOBILIZER/START INHIBITION DESIGN see DESIGN DIAGNOSTIC FUNCTIONS see DIAGNOSTIC FUNCTIONS FUNCTION see FUNCTION SYSTEM OVERVIEW see SYSTEM OVERVIEW ACCESSORIES AND BODY, CAB Other Electrical Equipment - Design and Function
Get your hands on the 2012 Volvo C70 Service & Repair Manual, a comprehensive guide dedicated to fixing issues with your 2012 Volvo C70. Whether you're a professional mechanic or a DIY enthusiast, this manual offers detailed instructions and procedures to help you confidently tackle various repair and maintenance tasks on your Volvo C70.
This vehicle-specific guide is designed to assist you in maintaining, servicing, diagnosing, and repairing your 2012 Volvo C70 with ease. It features step-by-step instructions, detailed diagrams, illustrations, wiring schematics, and specifications covering:
Maintenance procedures
Engine repair and servicing
Control system diagnostics
Mechanical repairs
Fuel service specifications
Emission control methods
Whether you're working on the engine, cooling system, brake system, steering, electrical components, or other parts of your vehicle, this repair manual provides the same valuable insights and information that dealership technicians rely on. It includes hundreds of photos along with technical data, diagrams, and a complete list of car parts, making it easy for even novice car mechanics to achieve professional results.
Available in both .PDF and .OVA file formats, this manual is compatible with a wide range of operating systems including Windows Vista (32 and 64 bit), XP, ME, 98, NT, 2000, and Mac. The printable format and free preview options ensure that you have quick and easy access to the information you need using Adobe Reader and Win.
Invest in the 2012 Volvo C70 Service & Repair Manual and enjoy the satisfaction of do-it-yourself car projects, enhance your vehicle's performance, and effectively handle immediate and ongoing repairs. With dedicated customer support via email and a satisfaction guarantee, you can purchase with confidence knowing that any questions will be answered within 24 hours.