


P
rote
cte
d
b
y
c
o
p
yrig
ht.
C
o
p
yin
g
fo
r
p
riv
a
t
e
o
r
c
o
m
m
e
r
c
i
a
l
p
u
r
p
o
s
e
s
,
i
n
p
a
r
t
o
r
i
n
wh
o
l
e
,
i
s
n
o
t
p
e
r
m
itte
d
u
n
le
s
s
a
uth
o
ris
e
d
b
y
V
olk
s
w
a
g
e
n
A
G
.
V
olks
w
a
g
e
n
A
G
d
o
e
s
n
ot
g
u
ara
nte
e
o
r
a
c
c
e
p
t
a
n
y
lia
b
ilit
y
w
it
h
r
e
s
p
e
c
t
t
o
t
h
e
c
o
r
r
e
c
t
n
e
s
s
o
f
i
n
f
o
r
m
a
ti
o
n
in
t
h
is
d
o
c
u
m
e
n
t.
C
o
p
yrig
ht
b
y
V
olk
s
w
a
g
e
n
A
G
.
General InformationBody Repairs,
General Body Repairs
Edition 05.2019
Service
Service Department. Technical Information

P
rote
cte
d
b
y
c
o
p
yrig
ht.
C
o
p
yin
g
fo
r
p
riv
a
t
e
o
r
c
o
m
m
e
r
c
i
a
l
p
u
r
p
o
s
e
s
,
i
n
p
a
r
t
o
r
i
n
wh
o
l
e
,
i
s
n
o
t
p
e
r
m
itte
d
u
n
le
s
s
a
uth
o
ris
e
d
b
y
V
olk
s
w
a
g
e
n
A
G
.
V
olks
w
a
g
e
n
A
G
d
o
e
s
n
ot
g
u
ara
nte
e
o
r
a
c
c
e
p
t
a
n
y
lia
b
ilit
y
w
it
h
r
e
s
p
e
c
t
t
o
t
h
e
c
o
r
r
e
c
t
n
e
s
s
o
f
i
n
f
o
r
m
a
ti
o
n
in
t
h
is
d
o
c
u
m
e
n
t.
C
o
p
yrig
ht
b
y
V
olk
s
w
a
g
e
n
A
G
.
Repair Group
Technical information should always be available to the foremen and mechanics, because their
careful and constant adherence to the instructions is essential to ensure vehicle road-worthiness
and safety. In addition, the normal basic safety precautions for working on motor vehicles must, as
a matter of course, be observed.
Service
All rights reserved.
No reproduction without prior agreement from publisher.
Copyright © 2020 Volkswagen AG, Wolfsburg D4B807E3B5B

P
rote
cte
d
b
y
c
o
p
yrig
ht.
C
o
p
yin
g
fo
r
p
riv
a
t
e
o
r
c
o
m
m
e
r
c
i
a
l
p
u
r
p
o
s
e
s
,
i
n
p
a
r
t
o
r
i
n
wh
o
l
e
,
i
s
n
o
t
p
e
r
m
itte
d
u
n
le
s
s
a
uth
o
ris
e
d
b
y
V
olk
s
w
a
g
e
n
A
G
.
V
olks
w
a
g
e
n
A
G
d
o
e
s
n
ot
g
u
ara
nte
e
o
r
a
c
c
e
p
t
a
n
y
lia
b
ilit
y
w
it
h
r
e
s
p
e
c
t
t
o
t
h
e
c
o
r
r
e
c
t
n
e
s
s
o
f
i
n
f
o
r
m
a
ti
o
n
in
t
h
is
d
o
c
u
m
e
n
t.
C
o
p
yrig
ht
b
y
V
olk
s
w
a
g
e
n
A
G
.
Contents
1 Safety instructions . . . . . . . . . . . . . . . . . . . . . . . . . . . . . . . . . . . . . . . . . . . . . . . . . . . . . . . . 1
1.1 Part removal . . . . . . . . . . . . . . . . . . . . . . . . . . . . . . . . . . . . . . . . . . . . . . . . . . . . . . . . . . . . 1
1.2 Battery and welding operation . . . . . . . . . . . . . . . . . . . . . . . . . . . . . . . . . . . . . . . . . . . . . . 1
1.3 Electronic control unit . . . . . . . . . . . . . . . . . . . . . . . . . . . . . . . . . . . . . . . . . . . . . . . . . . . . . . 1
1.4 Paint, glass, soft pad and trim . . . . . . . . . . . . . . . . . . . . . . . . . . . . . . . . . . . . . . . . . . . . . . 2
1.5 Fuel tank or fuel delivery pipeline . . . . . . . . . . . . . . . . . . . . . . . . . . . . . . . . . . . . . . . . . . . . 2
1.6 Air conditioner . . . . . . . . . . . . . . . . . . . . . . . . . . . . . . . . . . . . . . . . . . . . . . . . . . . . . . . . . . 2
1.7 Airbag System . . . . . . . . . . . . . . . . . . . . . . . . . . . . . . . . . . . . . . . . . . . . . . . . . . . . . . . . . . 3
1.8 Check the seat belts . . . . . . . . . . . . . . . . . . . . . . . . . . . . . . . . . . . . . . . . . . . . . . . . . . . . . . 3
1.9 Safety specifications for the seat belt tensioner . . . . . . . . . . . . . . . . . . . . . . . . . . . . . . . . . . 6
1.10 Body repair on a vehicle equipped with the seat belt tensioners . . . . . . . . . . . . . . . . . . . . 7
1.11 Perform cutting off, correcting and/or leveling on a vehicle equipped with airbags . . . . . . 8
1.12 Remove the front seats with a side airbag . . . . . . . . . . . . . . . . . . . . . . . . . . . . . . . . . . . . . . 8
2 Basic instruction . . . . . . . . . . . . . . . . . . . . . . . . . . . . . . . . . . . . . . . . . . . . . . . . . . . . . . . . . . 9
2.1 Diagnosis of the accident vehicle . . . . . . . . . . . . . . . . . . . . . . . . . . . . . . . . . . . . . . . . . . . . 9
2.2 Condition of the body and/or the parts for delivery to the painting workshop . . . . . . . . . . . . 9
2.3 Correction . . . . . . . . . . . . . . . . . . . . . . . . . . . . . . . . . . . . . . . . . . . . . . . . . . . . . . . . . . . . . . 9
2.4 Cutting . . . . . . . . . . . . . . . . . . . . . . . . . . . . . . . . . . . . . . . . . . . . . . . . . . . . . . . . . . . . . . . . 9
2.5 Body-cut part and part section . . . . . . . . . . . . . . . . . . . . . . . . . . . . . . . . . . . . . . . . . . . . . . 9
2.6 Original connection . . . . . . . . . . . . . . . . . . . . . . . . . . . . . . . . . . . . . . . . . . . . . . . . . . . . . . . . 10
2.7 Galvanized body parts . . . . . . . . . . . . . . . . . . . . . . . . . . . . . . . . . . . . . . . . . . . . . . . . . . . . 10
2.8 Remove the rest part . . . . . . . . . . . . . . . . . . . . . . . . . . . . . . . . . . . . . . . . . . . . . . . . . . . . . . 10
2.9 New parts . . . . . . . . . . . . . . . . . . . . . . . . . . . . . . . . . . . . . . . . . . . . . . . . . . . . . . . . . . . . . . 10
2.10 Parts . . . . . . . . . . . . . . . . . . . . . . . . . . . . . . . . . . . . . . . . . . . . . . . . . . . . . . . . . . . . . . . . . . 10
2.11 Molded foam plastic pads . . . . . . . . . . . . . . . . . . . . . . . . . . . . . . . . . . . . . . . . . . . . . . . . . . 11
3 Symbolic interpretation . . . . . . . . . . . . . . . . . . . . . . . . . . . . . . . . . . . . . . . . . . . . . . . . . . . . 12
3.1 Symbolic interpretation for welding . . . . . . . . . . . . . . . . . . . . . . . . . . . . . . . . . . . . . . . . . . 12
3.2 Symbolic interpretation for the operation method . . . . . . . . . . . . . . . . . . . . . . . . . . . . . . . . 12
4 Body repair tools . . . . . . . . . . . . . . . . . . . . . . . . . . . . . . . . . . . . . . . . . . . . . . . . . . . . . . . . 16
4.1 Flaring tool V.A.G 1317 . . . . . . . . . . . . . . . . . . . . . . . . . . . . . . . . . . . . . . . . . . . . . . . . . . . . 16
4.2 Punching pliers V.A.G 1329 . . . . . . . . . . . . . . . . . . . . . . . . . . . . . . . . . . . . . . . . . . . . . . . . 16
4.3 Basic equipment V.A.G 1366/3 . . . . . . . . . . . . . . . . . . . . . . . . . . . . . . . . . . . . . . . . . . . . . . 16
4.4 Bottom protection layer spray gun V.A.G 1379 . . . . . . . . . . . . . . . . . . . . . . . . . . . . . . . . . . 17
4.5 Electric blower V.A.G 1416 . . . . . . . . . . . . . . . . . . . . . . . . . . . . . . . . . . . . . . . . . . . . . . . . 17
4.6 Door tensioner V.A.G 1438 . . . . . . . . . . . . . . . . . . . . . . . . . . . . . . . . . . . . . . . . . . . . . . . . 17
4.7 Body equipment component V.A.G 1439 . . . . . . . . . . . . . . . . . . . . . . . . . . . . . . . . . . . . . . 18
4.8 Pneumatic cutting knife V.A.G 1523 A . . . . . . . . . . . . . . . . . . . . . . . . . . . . . . . . . . . . . . . . 18
4.9 Air chisel V.A.G 1577 . . . . . . . . . . . . . . . . . . . . . . . . . . . . . . . . . . . . . . . . . . . . . . . . . . . . . . 18
4.10 Edge closing iron block V.A.G 1585 . . . . . . . . . . . . . . . . . . . . . . . . . . . . . . . . . . . . . . . . . . 19
4.11 Welding fume ventilator V.A.G 1586 . . . . . . . . . . . . . . . . . . . . . . . . . . . . . . . . . . . . . . . . . . 19
4.12 Welding spot releasing device V.A.G 1731 . . . . . . . . . . . . . . . . . . . . . . . . . . . . . . . . . . . . 19
4.13 Pneumatic spray gun V.A.G 1761/1 . . . . . . . . . . . . . . . . . . . . . . . . . . . . . . . . . . . . . . . . . . 20
4.14 Pneumatic punching and thinning pliers VAS 1996 . . . . . . . . . . . . . . . . . . . . . . . . . . . . . . 20
4.15 Pneumatic adhesive spray gun V.A.G 2005 . . . . . . . . . . . . . . . . . . . . . . . . . . . . . . . . . . . . 20
4.16 Door hinge correction tool . . . . . . . . . . . . . . . . . . . . . . . . . . . . . . . . . . . . . . . . . . . . . . . . . . 21
4.17 Hose kit 5023 for the inert gas protection welding . . . . . . . . . . . . . . . . . . . . . . . . . . . . . . . . 21
4.18 Angle grinder VAS 5174 . . . . . . . . . . . . . . . . . . . . . . . . . . . . . . . . . . . . . . . . . . . . . . . . . . . . 21
4.19 Angle grinder VAS 5175 . . . . . . . . . . . . . . . . . . . . . . . . . . . . . . . . . . . . . . . . . . . . . . . . . . . . 22
4.20 Wire brush VAS 5182 . . . . . . . . . . . . . . . . . . . . . . . . . . . . . . . . . . . . . . . . . . . . . . . . . . . . . . 22
5 Body bonding . . . . . . . . . . . . . . . . . . . . . . . . . . . . . . . . . . . . . . . . . . . . . . . . . . . . . . . . . . . . 23
5.1 Transporter 1991 → . . . . . . . . . . . . . . . . . . . . . . . . . . . . . . . . . . . . . . . . . . . . . . . . . . . . . . 23
5.2 Bonding types . . . . . . . . . . . . . . . . . . . . . . . . . . . . . . . . . . . . . . . . . . . . . . . . . . . . . . . . . . . . 23
5.3 Repair method for replacing the parts . . . . . . . . . . . . . . . . . . . . . . . . . . . . . . . . . . . . . . . . 24
General InformationBody Repairs, General Body Repairs - Edition 05.2019
Contents i

P
rote
cte
d
b
y
c
o
p
yrig
ht.
C
o
p
yin
g
fo
r
p
riv
a
t
e
o
r
c
o
m
m
e
r
c
i
a
l
p
u
r
p
o
s
e
s
,
i
n
p
a
r
t
o
r
i
n
wh
o
l
e
,
i
s
n
o
t
p
e
r
m
itte
d
u
n
le
s
s
a
uth
o
ris
e
d
b
y
V
olk
s
w
a
g
e
n
A
G
.
V
olks
w
a
g
e
n
A
G
d
o
e
s
n
ot
g
u
ara
nte
e
o
r
a
c
c
e
p
t
a
n
y
lia
b
ilit
y
w
it
h
r
e
s
p
e
c
t
t
o
t
h
e
c
o
r
r
e
c
t
n
e
s
s
o
f
i
n
f
o
r
m
a
ti
o
n
in
t
h
is
d
o
c
u
m
e
n
t.
C
o
p
yrig
ht
b
y
V
olk
s
w
a
g
e
n
A
G
.
6 Corrosion protection measures . . . . . . . . . . . . . . . . . . . . . . . . . . . . . . . . . . . . . . . . . . . . . . 26
6.1 Corrosion protection . . . . . . . . . . . . . . . . . . . . . . . . . . . . . . . . . . . . . . . . . . . . . . . . . . . . . . 26
7 Waste disposal instructions . . . . . . . . . . . . . . . . . . . . . . . . . . . . . . . . . . . . . . . . . . . . . . . . 27
7.1 Waste disposal . . . . . . . . . . . . . . . . . . . . . . . . . . . . . . . . . . . . . . . . . . . . . . . . . . . . . . . . . . 27
7.2 Air pressure tappet exhaust . . . . . . . . . . . . . . . . . . . . . . . . . . . . . . . . . . . . . . . . . . . . . . . . 27
7.3 Airbag . . . . . . . . . . . . . . . . . . . . . . . . . . . . . . . . . . . . . . . . . . . . . . . . . . . . . . . . . . . . . . . . . . 28
8 Contact corrosion protection . . . . . . . . . . . . . . . . . . . . . . . . . . . . . . . . . . . . . . . . . . . . . . . . 29
8.1 Connection of aluminum alloy/magnesium alloy with steel . . . . . . . . . . . . . . . . . . . . . . . . 29
9 Steel plate repair . . . . . . . . . . . . . . . . . . . . . . . . . . . . . . . . . . . . . . . . . . . . . . . . . . . . . . . . 30
9.1 High-strength body plate . . . . . . . . . . . . . . . . . . . . . . . . . . . . . . . . . . . . . . . . . . . . . . . . . . 30
9.2 Galvanized body parts . . . . . . . . . . . . . . . . . . . . . . . . . . . . . . . . . . . . . . . . . . . . . . . . . . . . 30
9.3 Welding on the galvanized body steel plate . . . . . . . . . . . . . . . . . . . . . . . . . . . . . . . . . . . . 31
9.4 Tearing test . . . . . . . . . . . . . . . . . . . . . . . . . . . . . . . . . . . . . . . . . . . . . . . . . . . . . . . . . . . . 32
10 Aluminum repair . . . . . . . . . . . . . . . . . . . . . . . . . . . . . . . . . . . . . . . . . . . . . . . . . . . . . . . . . . 33
10.1 Painting . . . . . . . . . . . . . . . . . . . . . . . . . . . . . . . . . . . . . . . . . . . . . . . . . . . . . . . . . . . . . . . . 33
10.2 Surface treatment . . . . . . . . . . . . . . . . . . . . . . . . . . . . . . . . . . . . . . . . . . . . . . . . . . . . . . . . 33
10.3 Leveling . . . . . . . . . . . . . . . . . . . . . . . . . . . . . . . . . . . . . . . . . . . . . . . . . . . . . . . . . . . . . . . . 34
10.4 Temperature control for heating . . . . . . . . . . . . . . . . . . . . . . . . . . . . . . . . . . . . . . . . . . . . . . 34
11 Plastic repair method . . . . . . . . . . . . . . . . . . . . . . . . . . . . . . . . . . . . . . . . . . . . . . . . . . . . . . 35
11.1 Material . . . . . . . . . . . . . . . . . . . . . . . . . . . . . . . . . . . . . . . . . . . . . . . . . . . . . . . . . . . . . . . . 35
11.2 Repairing the pit . . . . . . . . . . . . . . . . . . . . . . . . . . . . . . . . . . . . . . . . . . . . . . . . . . . . . . . . . . 36
11.3 Repairing the scratch . . . . . . . . . . . . . . . . . . . . . . . . . . . . . . . . . . . . . . . . . . . . . . . . . . . . . . 37
11.4 Repair the crack . . . . . . . . . . . . . . . . . . . . . . . . . . . . . . . . . . . . . . . . . . . . . . . . . . . . . . . . . . 39
11.5 Repairing the small hole (the diameter is more than 30 mm) . . . . . . . . . . . . . . . . . . . . . . . . 40
11.6 Plastic repair (glass fibre material) . . . . . . . . . . . . . . . . . . . . . . . . . . . . . . . . . . . . . . . . . . . . 41
11.7 Repair process . . . . . . . . . . . . . . . . . . . . . . . . . . . . . . . . . . . . . . . . . . . . . . . . . . . . . . . . . . 42
12 Glass repair . . . . . . . . . . . . . . . . . . . . . . . . . . . . . . . . . . . . . . . . . . . . . . . . . . . . . . . . . . . . 45
12.1 Repairing the windshield . . . . . . . . . . . . . . . . . . . . . . . . . . . . . . . . . . . . . . . . . . . . . . . . . . 45
General InformationBody Repairs, General Body Repairs - Edition 05.2019
ii Contents
P
rote
cte
d
b
y
c
o
p
yrig
ht.
C
o
p
yin
g
fo
r
p
riv
a
t
e
o
r
c
o
m
m
e
r
c
i
a
l
p
u
r
p
o
s
e
s
,
i
n
p
a
r
t
o
r
i
n
wh
o
l
e
,
i
s
n
o
t
p
e
r
m
itte
d
u
n
le
s
s
a
uth
o
ris
e
d
b
y
V
olk
s
w
a
g
e
n
A
G
.
V
olks
w
a
g
e
n
A
G
d
o
e
s
n
ot
g
u
ara
nte
e
o
r
a
c
c
e
p
t
a
n
y
lia
b
ilit
y
w
it
h
r
e
s
p
e
c
t
t
o
t
h
e
c
o
r
r
e
c
t
n
e
s
s
o
f
i
n
f
o
r
m
a
ti
o
n
in
t
h
is
d
o
c
u
m
e
n
t.
C
o
p
yrig
ht
b
y
V
olk
s
w
a
g
e
n
A
G
.
1 Safety instructions
(ELSA-Konverter; Edition 05.2019)
1.1 Part removal
Before the gravity centre position of the vehicle changes greatly
due to the removal, the vehicle must be securely fixed on the
lifting platform.
1.2 Battery and welding operation
Note
Before disconnecting the battery grounding, first obtain the
code of the radio. Before handing over the vehicle to the cus‐
tomer, make the radio ready for playing through entering the
correct code.
Before carrying out any welding, always disconnect the two
terminals of the battery, and then cover the two poles of the
battery.
Before carrying out any operation producing possible sparks
near the battery, always remove the vehicle battery.
WARNING
Switch on the ignition before connecting the battery!
When the battery is connected, do not allow anyone in the
vehicle!
1.3 Electronic control unit
The grounding terminal of the welding machine is directly con‐
nected to parts to be welded. In addition, there shall be no
electrical insulation part between the grounding terminal and
the welding area.
The electronic control unit and the electrical wire are not al‐
lowed to come into contact with the grounding terminal or the
welding electrode.
1.3.1 Processing of the electronic control
unit after repair due to a traffic accident
After the traffic accident occurs, change of the electric control
unit will not be necessary until there is at least one of the follow‐
ing situations:
♦ The housing is significantly deformed or damaged.
♦ The instrument appearance is not damaged, but the bearing
surface or holder is deformed.
♦ The plug connection is damaged or rusted due to moisture.
♦ The functional check or unit self-diagnosis procedure may
show fault“Control Unit Damaged”.
If an electronic part is removed as required by the service oper‐
ation, such as ABS control unit, and then reused, its function
shall be tested according to existing materials after installation,
such as using V.A.G self-diagnosis procedure.
General InformationBody Repairs, General Body Repairs - Edition 05.2019
1. Safety instructions 1
P
rote
cte
d
b
y
c
o
p
yrig
ht.
C
o
p
yin
g
fo
r
p
riv
a
t
e
o
r
c
o
m
m
e
r
c
i
a
l
p
u
r
p
o
s
e
s
,
i
n
p
a
r
t
o
r
i
n
wh
o
l
e
,
i
s
n
o
t
p
e
r
m
itte
d
u
n
le
s
s
a
uth
o
ris
e
d
b
y
V
olk
s
w
a
g
e
n
A
G
.
V
olks
w
a
g
e
n
A
G
d
o
e
s
n
ot
g
u
ara
nte
e
o
r
a
c
c
e
p
t
a
n
y
lia
b
ilit
y
w
it
h
r
e
s
p
e
c
t
t
o
t
h
e
c
o
r
r
e
c
t
n
e
s
s
o
f
i
n
f
o
r
m
a
ti
o
n
in
t
h
is
d
o
c
u
m
e
n
t.
C
o
p
yrig
ht
b
y
V
olk
s
w
a
g
e
n
A
G
.
1.4 Paint, glass, soft pad and trim
Other vehicles under no protection are not allowed to be parked
in the operation area for the body repair. (There is a risk of fire
due to spark, battery, paint and damaged glass).
1.5 Fuel tank or fuel delivery pipeline
An extreme care shall be exercised in case that grinding and
welding operations are carried out in the fuel tank or other fuel
delivery part area. These parts must be removed in case of
potential safety hazards.
1.6 Air conditioner
After refrigerant is added into the air conditioner, its compo‐
nents are allowed to be neither welded, nor brazed or soldered.
If there is a risk to heat the air conditioner components during
welding and soldering on the vehicle, welding is not allowed
either. In term of paint repair, temperature of the object in the
drying oven or the preheating area is only allowed to reach
80°C, as there will be a large overpressure in the heated equip‐
ment, which may cause an equipment burst.
Note
In case that welding is performed near the refrigerant hose, it
is also necessary to withdraw the refrigerant in the refrigerant
circuit. Invisible ultraviolet will be released during welding, and
they may infiltrate into the refrigerant hose and break down the
refrigerant.
1.6.1 Remedial measures:
Suck the refrigerant circuit ⇒ heater and air conditioner; Rep.
gr. 87.
The drained air conditioner may only be filled in a maintenance
shop equipped with special V.A.G equipment. In case of re‐
quired safety measures, the equipment must be turned on to
drain the refrigerant.
If necessary during repairing the vehicle, drain the refrigerant
circuit, and avoid contact with the refrigerant or the refrigerant
vapour!
Wear rubber gloves and goggles to protect your hands and
eyes! The reason is that refrigerant split onto the unprotected
human body parts may cause a frostbite in a serious situation.
WARNING
It is suggested to prepare a rinsing bottle for flushing your
eyes. If liquid refrigerant enters your eyes, rinse immediately
with water for 15 minutes.
Then wash your eyes with eye drop, and go to see an oph‐
thalmologist right away even if your eyes do not hurt. You
must tell the doctor that the frostbite is caused by refrigerant
R12 or R134a.
If the refrigerant is still in contact with other parts of the body
even though the safety measures are followed, these areas
also need to be thoroughly rinsed with cold water immediate‐
ly for at least 15 minutes.
General InformationBody Repairs, General Body Repairs - Edition 05.2019
2 1. Safety instructions
P
rote
cte
d
b
y
c
o
p
yrig
ht.
C
o
p
yin
g
fo
r
p
riv
a
t
e
o
r
c
o
m
m
e
r
c
i
a
l
p
u
r
p
o
s
e
s
,
i
n
p
a
r
t
o
r
i
n
wh
o
l
e
,
i
s
n
o
t
p
e
r
m
itte
d
u
n
le
s
s
a
uth
o
ris
e
d
b
y
V
olk
s
w
a
g
e
n
A
G
.
V
olks
w
a
g
e
n
A
G
d
o
e
s
n
ot
g
u
ara
nte
e
o
r
a
c
c
e
p
t
a
n
y
lia
b
ilit
y
w
it
h
r
e
s
p
e
c
t
t
o
t
h
e
c
o
r
r
e
c
t
n
e
s
s
o
f
i
n
f
o
r
m
a
ti
o
n
in
t
h
is
d
o
c
u
m
e
n
t.
C
o
p
yrig
ht
b
y
V
olk
s
w
a
g
e
n
A
G
.
Although refrigerant causes no fire risk, smoking is not allowed
in a room where the refrigerant is placed. The reason is that a
lit cigarette has a high temperature which may cause chemical
decomposition of the refrigerant gas. Inhalation of the toxic de‐
composition generated by this will result in an irritable cough
and nausea.
1.7 Airbag System
Repair instructions ⇒ internal body repair; Rep. gr. 69.
During operation on the airbag system as well as correction
operation within the body repair scope, the battery grounding
must be disconnected.
WARNING
Switch on the ignition before connecting the battery!
When the battery is connected, do not allow anyone in the
vehicle!
The temperature of the airbag components must not exceed
100°C, not even instantaneously.
The airbag components are not allowed to come into contact
with grease, cleaning agent, oil or the like.
The mechanically damaged airbag components must be re‐
placed. =>Disposal instructions ⇒ page 27 .
After coming in to contact with a triggered airbag unit, wash
your hands!
1.8 Check the seat belts
WARNING
Systematically check the seat belt system every time after
an accident! If one item is found damaged according to the
items to be checked, the customer must be informed of the
necessity to replace the seat belt.
Items to be checked:
♦ Belt body
♦ Automatic retractor (locking function)
♦ Visual inspection of the seat belt buckle
♦ Seat belt buckle function
♦ Seat belt guide member and tongue
♦ Fixing piece and fixing point
♦ Automatic waist seat belt retractor
Note
If the customer refuses to replace a damaged seat belt, corre‐
sponding notes must be made.
General InformationBody Repairs, General Body Repairs - Edition 05.2019
1. Safety instructions 3
P
rote
cte
d
b
y
c
o
p
yrig
ht.
C
o
p
yin
g
fo
r
p
riv
a
t
e
o
r
c
o
m
m
e
r
c
i
a
l
p
u
r
p
o
s
e
s
,
i
n
p
a
r
t
o
r
i
n
wh
o
l
e
,
i
s
n
o
t
p
e
r
m
itte
d
u
n
le
s
s
a
uth
o
ris
e
d
b
y
V
olk
s
w
a
g
e
n
A
G
.
V
olks
w
a
g
e
n
A
G
d
o
e
s
n
ot
g
u
ara
nte
e
o
r
a
c
c
e
p
t
a
n
y
lia
b
ilit
y
w
it
h
r
e
s
p
e
c
t
t
o
t
h
e
c
o
r
r
e
c
t
n
e
s
s
o
f
i
n
f
o
r
m
a
ti
o
n
in
t
h
is
d
o
c
u
m
e
n
t.
C
o
p
yrig
ht
b
y
V
olk
s
w
a
g
e
n
A
G
.
1.8.1 Belt body
– Pull the seat belt completely out of the automatic seat belt
retractor or the waist seat belt adjuster.
– Check that whether the seat belt is dirty, and if necessary,
clean it with neutral soap solution=>see the instructions for
use.
• If one of the damages (1 and 2) indicated in the following is
confirmed on a traffic accident vehicle, replace the seat belt
together with the seat belt buckle.
• Even there is no accident, the damaged seat belt must be
replaced if there is any confirmed damage as shown in the
following 1, 2 or 3.
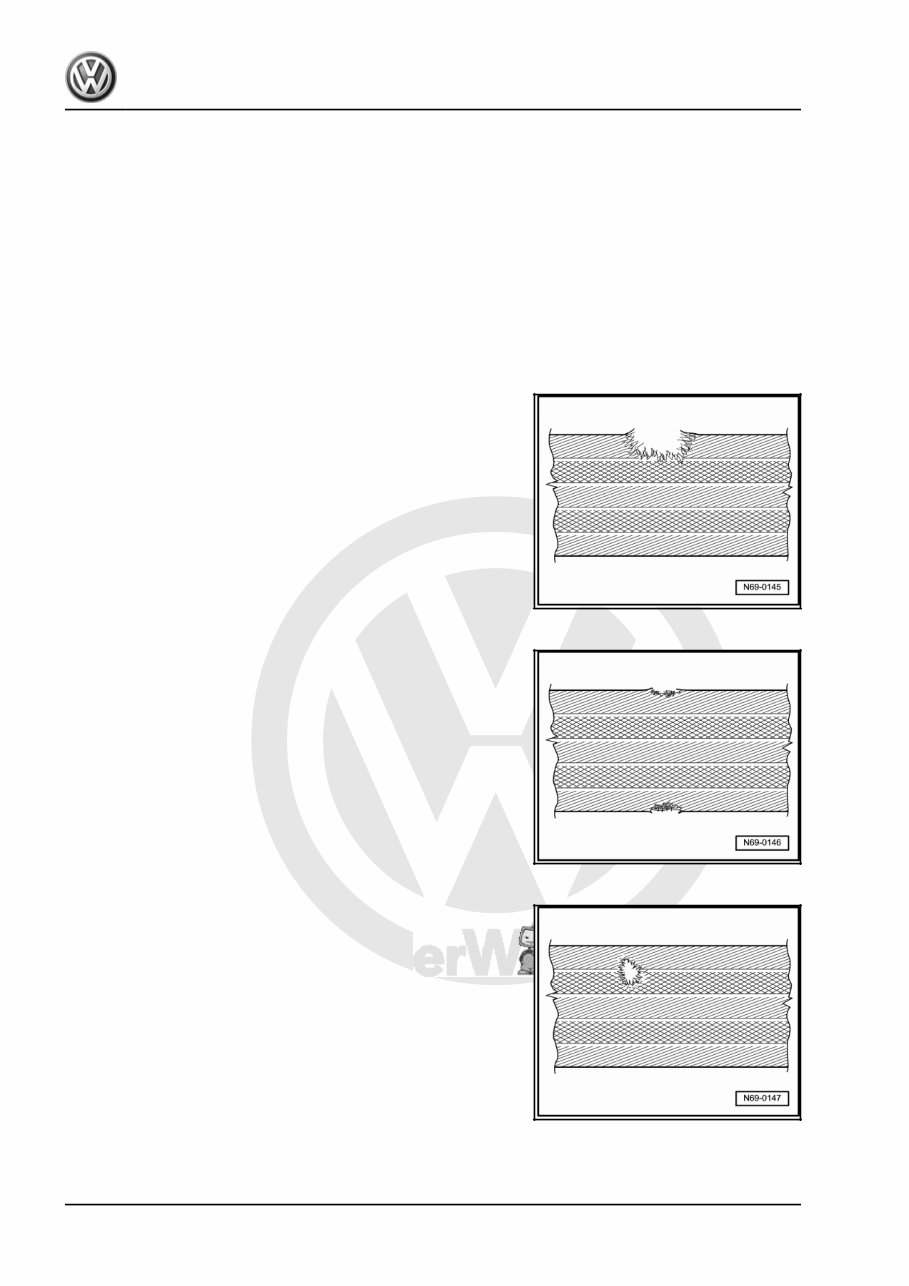
1-The belt body is cut, torn or scratched.
2-The fabric on the belt edge is torn.
3-There are burns by cigarettes and the like.
1.8.2 Automatic retractor (locking function)
The automatic seat belt retractor has two locking functions.
General InformationBody Repairs, General Body Repairs - Edition 05.2019
4 1. Safety instructions
P
rote
cte
d
b
y
c
o
p
yrig
ht.
C
o
p
yin
g
fo
r
p
riv
a
t
e
o
r
c
o
m
m
e
r
c
i
a
l
p
u
r
p
o
s
e
s
,
i
n
p
a
r
t
o
r
i
n
wh
o
l
e
,
i
s
n
o
t
p
e
r
m
itte
d
u
n
le
s
s
a
uth
o
ris
e
d
b
y
V
olk
s
w
a
g
e
n
A
G
.
V
olks
w
a
g
e
n
A
G
d
o
e
s
n
ot
g
u
ara
nte
e
o
r
a
c
c
e
p
t
a
n
y
lia
b
ilit
y
w
it
h
r
e
s
p
e
c
t
t
o
t
h
e
c
o
r
r
e
c
t
n
e
s
s
o
f
i
n
f
o
r
m
a
ti
o
n
in
t
h
is
d
o
c
u
m
e
n
t.
C
o
p
yrig
ht
b
y
V
olk
s
w
a
g
e
n
A
G
.
♦ The first locking function is triggered when the seat belt is
quickly extracted from the automatic seat belt retractor (belt
extraction acceleration).
Checking
– Vigorously pull the seat belt out of the automatic retractor.
• No locking function-replace the seat belt together with the
seat belt buckle.
• If the seat belt extraction or retraction function does not
work, first check that whether the automatic seat belt retrac‐
tor is in the correct position.
• The second locking function is triggered through change of
the vehicle operation process (locking function associated
with the vehicle).
Checking
– Fasten the seat belts.
– Accelerate the vehicle to 20 km/h, and then perform an
emergency braking using the foot brake.
• If the seat belt is not locked by the locking mechanism dur‐
ing the braking process, replace the seat belt together with
the seat belt buckle.
WARNING
For safety reason, this driving test shall be performed on
a road segment without other running vehicles, in order to
avoid posing a danger to the other road users.
1.8.3 Visual inspection of the seat belt buck‐
le
– Check whether there is cracking and peeling in the seat belt
buckle.
• Replace the seat belt together with the seat belt buckle in
case of damage.
1.8.4 Seat belt buckle function
Check the seat belt locking mechanism:
– Push the tongue into the seat belt buckle till you hear the
engagement sound. Vigorously pull the seat belt to check
whether the closing mechanism locks.
• Even there is only one locking failure of the tongue in the
seat belt buckle for over 5 inspections, the seat belt must be
replaced together with the seat belt buckle.
Check the unlocking mechanism:
– Use your finger to press the button on the seat belt buckle
to release the seat belt. When the belt body is released, the
tongue must automatically come out of the seat belt buckle.
• Check for least 5 times. As long as the latch does not pop
out for at least one time, replace the seat belt together with
the seat belt buckle.
General InformationBody Repairs, General Body Repairs - Edition 05.2019
1. Safety instructions 5
P
rote
cte
d
b
y
c
o
p
yrig
ht.
C
o
p
yin
g
fo
r
p
riv
a
t
e
o
r
c
o
m
m
e
r
c
i
a
l
p
u
r
p
o
s
e
s
,
i
n
p
a
r
t
o
r
i
n
wh
o
l
e
,
i
s
n
o
t
p
e
r
m
itte
d
u
n
le
s
s
a
uth
o
ris
e
d
b
y
V
olk
s
w
a
g
e
n
A
G
.
V
olks
w
a
g
e
n
A
G
d
o
e
s
n
ot
g
u
ara
nte
e
o
r
a
c
c
e
p
t
a
n
y
lia
b
ilit
y
w
it
h
r
e
s
p
e
c
t
t
o
t
h
e
c
o
r
r
e
c
t
n
e
s
s
o
f
i
n
f
o
r
m
a
ti
o
n
in
t
h
is
d
o
c
u
m
e
n
t.
C
o
p
yrig
ht
b
y
V
olk
s
w
a
g
e
n
A
G
.
WARNING
it is not never permissible to use lubricant on the button of
the seat belt buckle to eliminate the noise or blockage in
case of the seat belt operation.
1.8.5 Seat belt guide member and tongue
After the seat belt system is stressed (when the seat belt is
damaged in an accident), there will be some small parallel clefts
on the guide member with a plastic coating. (This is different
from the wear often seen, and the latter shows smooth wear
without fine patterns).
– Check the plastic materials for deformation, peeling and
cracking.
• Replace the seat belt together with the seat belt buckle in
case of clefts and/or damages.
1.8.6 Fixing piece and fixing point
♦ The fixing strip/bracket is deformed (stretched).
♦ The height adjustment device does not work.
♦ Fixing points (seat, door post or vehicle floor) are deformed
or the threads are damaged.
• Replace the seat belt together with the seat belt buckle in
case of damage found on these parts.
• Replace the fixing points.
Note
For damage (such as wear) not caused by a traffic accident,
only replace corresponding damaged parts.
1.9 Safety specifications for the seat belt
tensioner
♦ Test, removal, installation and maintenance shall only be
performed by trained personnel.
♦ Blasting ignition material has no expiration date, and that
is to say it may be kept without time limit and requires no
maintenance.
♦ The components of the seat belt tensioner are allowed to be
neither opened nor repaired; only new components may be
used in principle.
♦ A seat belt tensioner unit falling to the ground is not allowed
to be reinstalled in the vehicle.
♦ In case of mechanical damage (buckling deformation and
crack) to the seat belt tensioner, it must be replaced.
♦ The tensioner unit must be installed immediately after it is
taken out of the shipping container.
♦ When the work is interrupted, the seat belt tensioner unit
shall be put back into the shipping container.
♦ Do not randomly place the seat belt tensioner unit.
♦ Do not use grease, cleaning agent or similar media to proc‐
ess the seat belt tensioner unit, and do not expose it to a
General InformationBody Repairs, General Body Repairs - Edition 05.2019
6 1. Safety instructions
You're Reading a Preview
What's Included?
 Lifetime Access
Fast Download Speeds
Online & Offline Access
Access PDF Contents & Bookmarks
Full Search Facility
Print one or all pages of your manual
$52.99
2023 Volkswagen Touareg R Download Service & Repair Manual
Viewed 47 Times Today

What's Included?
Lifetime Access
Fast Download Speeds
Online & Offline Access
Access PDF Contents & Bookmarks
Full Search Facility
Print one or all pages of your manual
$52.99

Secure transaction
What's Included?
Lifetime Access
Fast Download Speeds
Online & Offline Access
Access PDF Contents & Bookmarks
Full Search Facility
Print one or all pages of your manual
Description
The 2023 Volkswagen Touareg R Digital Service & Repair Manual is a comprehensive guide designed for both professional mechanics and DIY enthusiasts. It provides detailed instructions on troubleshooting, repair, and maintenance of the vehicle, making it an essential tool for anyone who wants to keep their Touareg R in top condition.
- Avoid costly repairs by performing routine maintenance and repairs yourself.
- Features step-by-step instructions, diagrams, and specifications for troubleshooting and replacing components.
- Contains wiring diagrams, exploded-view illustrations, and clear images for easy reference.
- Suitable for professional mechanics and DIY enthusiasts.
- Fully printable and compatible with most electronic devices.
- Topics covered include engine, transmission, basic maintenance, suspension, starting & charging, steering, fuel, supplemental restraint, cooling, braking, HVAC, electric, exhaust, and more.
This digital manual is an invaluable resource for anyone who wants to understand and maintain their Volkswagen Touareg R. With its comprehensive coverage and easy-to-follow instructions, you'll be able to keep your vehicle running smoothly and efficiently.


