ACCESSORIES & EQUIPMENT Passenger Protection, Airbags, Seat Belts 69 PASSENGER PROTECTION, AIRBAGS, SEAT BELTS GENERAL INFORMATION SEAT BELTS GENERAL INFORMATION Check Points: Belt Webbing, Checking Retractor, Checking Locking Function Belt Latch, Visual Inspection Belt Latch, Checking Function Belt Guide Rings and Locking Tongue, Checking Checking the mounting components and mounting points AIRBAG UNITS, REMOVING AND INSTALLING AFTER AN ACCIDENT ACCIDENT WITH AIRBAG DEPLOYMENT Always replace the following components after an accident when airbag has deployed: All deployed airbag units. Supporting the front passenger airbag unit when deployed. Coil connector with slip ring, if driver airbag is deployed. All seat belts with deployed seat belt tensioners. If needed (visual inspection), the following must also be replaced: all faulty components. ACCIDENT WITHOUT AIRBAG DEPLOYMENT If the airbag malfunction indicator lamp (K5) does not indicate a malfunction, the airbag components do not need to be replaced. Check seat belts separately. AIRBAG SYSTEM SAFETY PRECAUTIONS AIRBAG SAFETY PRECAUTIONS WARNING: After every accident the seat belt system must be inspected systematically! If damage is determined when inspecting the check points, customer must be informed regarding necessity of changing belts. CAUTION: Testing, removing, installing and repair work may only be performed by qualified personnel. ACCESSORIES & EQUIPMENT Passenger Protection, Airbags, Seat Belts ACCESSORIES & EQUIPMENT Passenger Protection, Airbags, Seat Belts
ADDITIONAL SAFETY PRECAUTIONS FOR SIDE CURTAIN AIRBAG AIRBAG UNITS DISPOSAL COMPONENTS, ADAPTING When working on the airbag system, the battery ground strap must be disconnected. No waiting time is necessary after disconnecting battery. When connecting the airbag system to a voltage source, there must be no person present inside the vehicle. Before picking up (touching) the airbag unit, the mechanic/technician must electrostatically discharge him/herself. This is achieved by touching a suitable metal part, for example, a water pipe, heater pipe or metal frame. Airbag units should be installed immediately upon removal from shipping package. Airbag unit is to be returned to shipping package when there is an interruption in work. It is not acceptable to leave airbag unit unattended. Airbag units which have been removed should be stored so that padded side is facing up. Airbag units that have fallen onto a hard surface or show signs of damage must not be installed in vehicle. CAUTION: Always replace damaged pillar trim panels, never repair. Head curtain airbags must not be kinked or twisted. After body repairs, inspect the body for weld splatter, deformations and chafing areas near the head curtain airbag (compare with opposite side if necessary). If a deployed head curtain airbag is replaced, the headliner, door seals with weather stripping, curtain airbag guides, grab handle brackets, and the A, B, C and (if equipped) D-pillar trim must be replaced. If damaged, the rear interior lights, the roof grab handles and the roof end strip must be replaced. NOTE: Airbag units that have not ignited must be returned in original packaging for proper recycling/disposal in accordance with national legislation! If questions arise, contact the distributor or importer! Airbag units that have ignited can be disposed of with industrial waste. ACCESSORIES & EQUIPMENT Passenger Protection, Airbags, Seat Belts
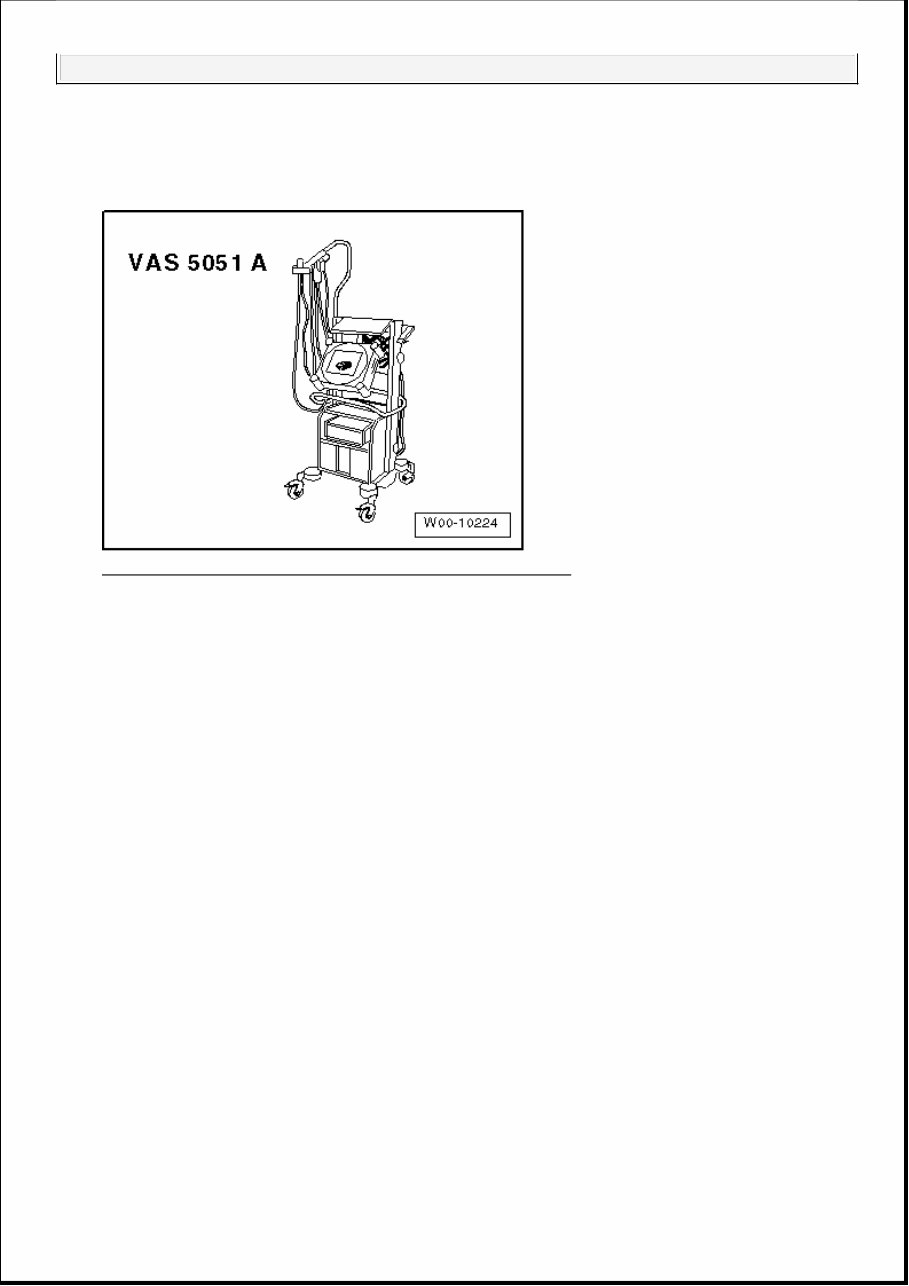
Special tools and workshop equipment required Vehicle diagnosis, testing and information system VAS 5051 A Fig. 1: Identifying Diagnostic Operation System VAS 5051A Courtesy of AUDI OF AMERICA, LLC Diagnostic cable VAS 5051/1 or VAS 5051/3 Select "Guided Fault Finding" on vehicle diagnosis, testing and information system VAS 5051 A. After all control modules have been interrogated: -- Press "Go to" button -- Select "Function/Component selection" -- Select "Body" -- "Body Repairs" -- Select "01 - On Board Diagnostic (OBD) capable systems" -- Select "Airbag" -- Select "Functions" -- Select "Action" SEAT BELT TENSIONERS SAFETY PRECAUTIONS CAUTION: Testing, removing, installing and repair work may only be performed by qualified personnel. ACCESSORIES & EQUIPMENT Passenger Protection, Airbags, Seat Belts
SEAT BELT TENSIONER UNIT DISPOSAL DESCRIPTION AND OPERATION INSPECTION POINTS After an accident, child seat anchors must be inspected for damage and deformation. Child seat anchors that are welded into the body cannot be repaired or corrected. Child seat anchors that are bolted to the body must be replaced if damaged or deformed. BELT WEBBING, CHECKING -- Pull belt webbing completely off automatic belt retractor. -- Inspect the belt webbing for contamination and, if necessary, wash with mild soap solution. Belt tensioner components may not be opened nor repaired; always use new parts (risk of injury). Belt tensioners that were subject to hard blows or have been dropped on the floor, must not be installed in a vehicle. Belt tensioners that are mechanically damaged (dents, cracks) must always be replaced. Storage and transport is subject to laws governing explosive materials. Belt tensioners should be installed immediately after removing them from the shipping package. An impact wrench may not be used to remove the belt tensioner. Belt tensioner is to be returned to shipping package when work is interrupted. It is not acceptable to leave belt tensioner unattended. The belt tensioner may not be treated with grease, cleaning agents, or similar materials, and may not be exposed, even briefly, to temperatures above 212° F (100° C). The pyrotechnic propellant has no expiration date, i.e. it has unlimited service life and is maintenance-free. NOTE: Belt tensioner units with pyrotechnic ignition charge that have not ignited must be returned in original packaging for proper recycling/disposal in accordance with national legislation! If questions arise, contact the distributor or importer! Belt tensioner units that have ignited can be disposed of as industrial waste. ACCESSORIES & EQUIPMENT Passenger Protection, Airbags, Seat Belts
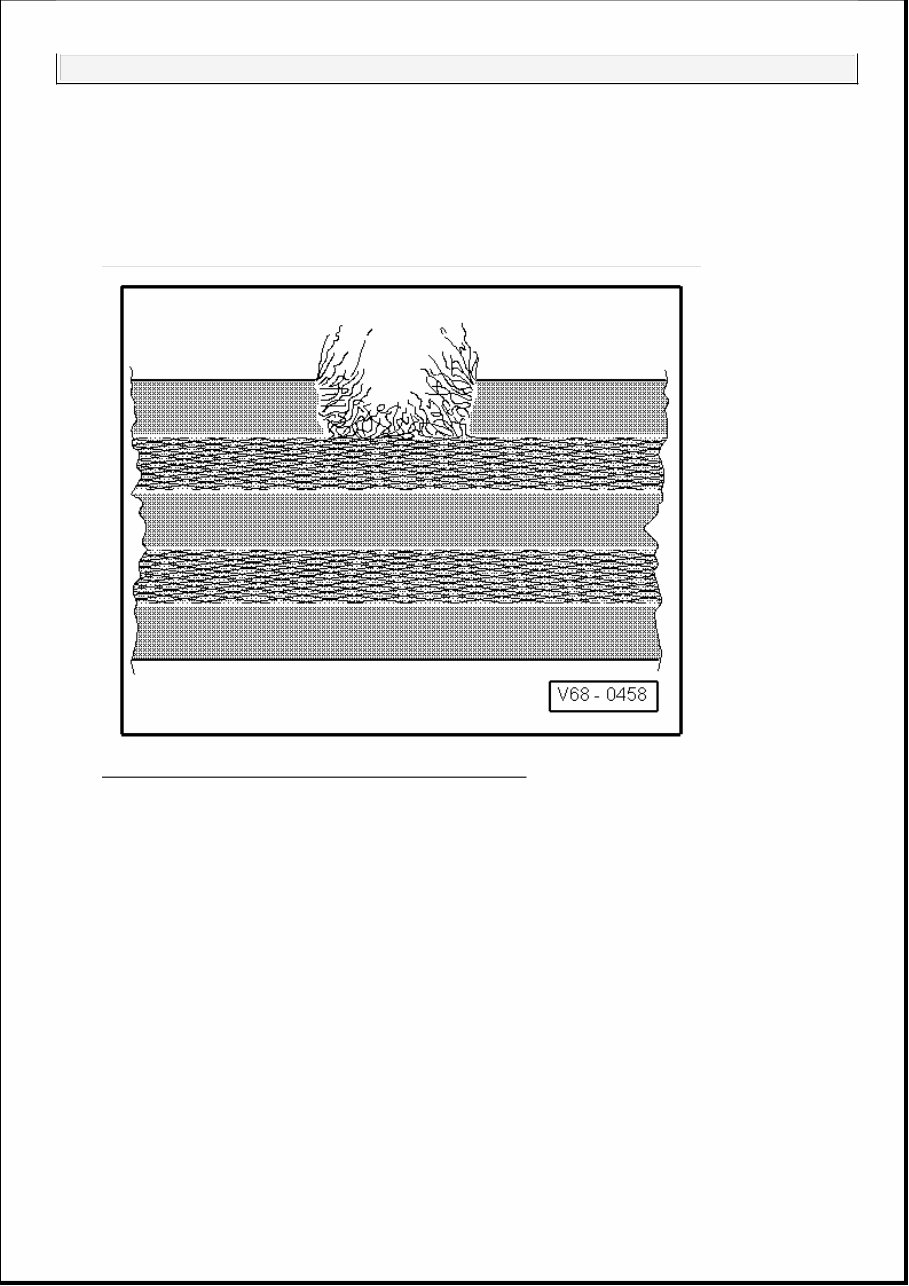
If one of the types of damage (1 or 2) shown in the following is detected on a vehicle which has been in an accident - seat belt must be replaced completely with seat belt latch and seat belt height adjuster. If one kind of damage under points 1, 2, 3 and 4 is detected on a vehicle which has not been in an accident, only the damaged seat belt needs to be replaced. Belt webbing cut, torn or chafed. Fig. 2: Identifying Belt Webbing Cut, Torn Or Chafed Courtesy of AUDI OF AMERICA, LLC Webbing loops on belt edge torn. ACCESSORIES & EQUIPMENT Passenger Protection, Airbags, Seat Belts
Fig. 3: Checking Belt Webbing - Webbing Loops On Belt Edge Torn Courtesy of AUDI OF AMERICA, LLC Burn marks from cigarettes or similar. ACCESSORIES & EQUIPMENT Passenger Protection, Airbags, Seat Belts
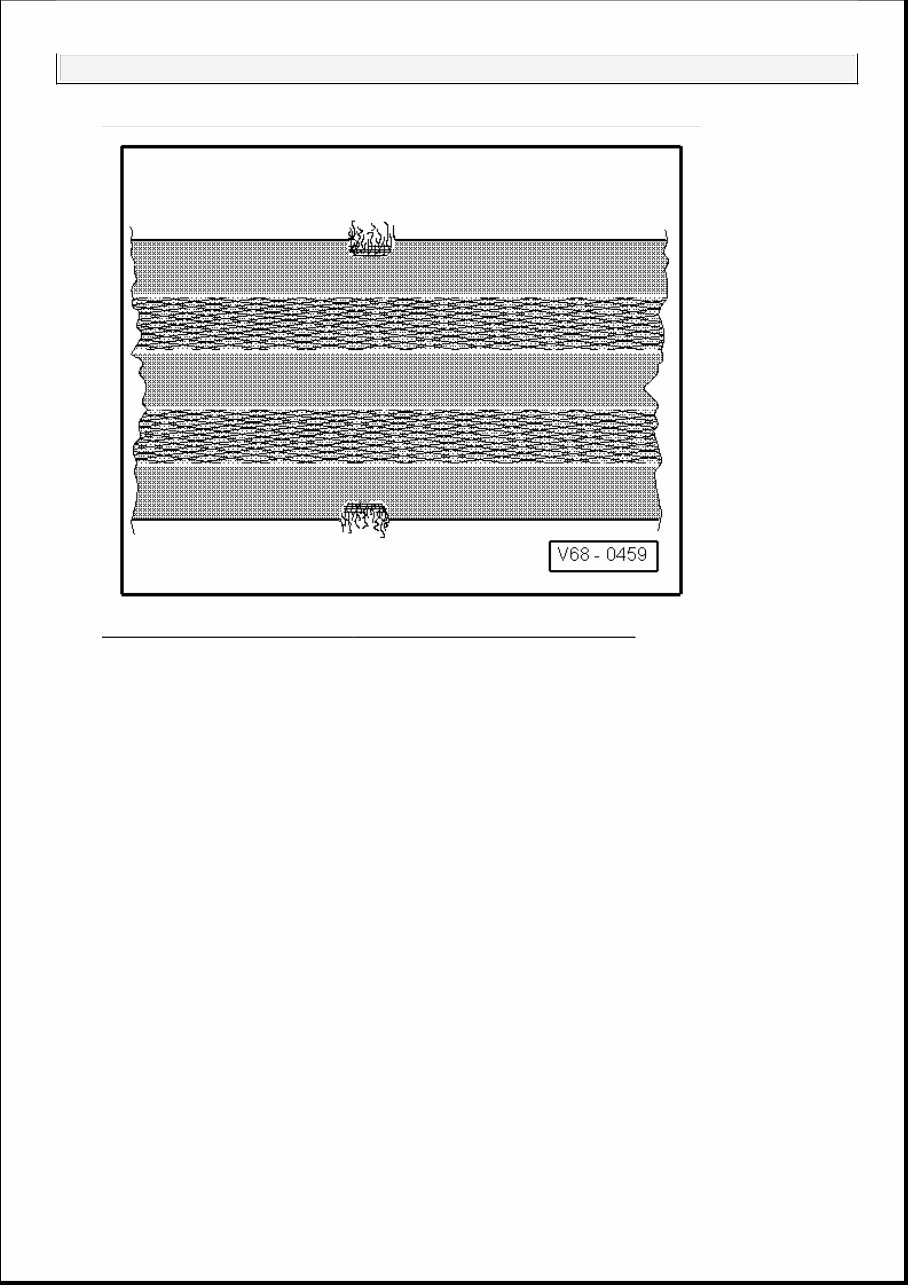
Fig. 4: Identifying Burn Marks From Cigarettes Or Similar Courtesy of AUDI OF AMERICA, LLC One side of belt edge deformed or area of belt edge is wavy. Fig. 5: Identifying Belt Edge Deformed On One Side And/Or Belt Edge Area Is Wavy Courtesy of AUDI OF AMERICA, LLC RETRACTOR, CHECKING LOCKING FUNCTION The belt retractor has two locking functions. ACCESSORIES & EQUIPMENT Passenger Protection, Airbags, Seat Belts
The first locking function is initiated by belt being jerked out of the retractor (belt extraction acceleration). Checking -- Pull belt webbing out of retractor with a firm jerk. No locking effect - replace seat belt complete with belt buckle. If difficulties are experienced when pulling out or retracting belt, first check whether position of retractor has been altered. The second locking function is initiated by change in vehicle velocity (vehicle-dependent locking function). For this, the vehicle must be moved on a level surface. Checking -- Fasten seat belt. -- Accelerate vehicle to 12 mph (20 km/h) and then perform a full braking maneuver with foot brake. Replace seat belt complete with seat belt latch if seat belt is not locked by locking mechanism during braking procedure. BELT LATCH, INSPECTION -- Inspect belt buckle for cracks and fracturing. If damaged, replace seat belt complete with belt buckle. BELT LATCH, CHECKING FUNCTION Checking seat belt latch: -- Slide the latch tongue into the belt latch until it clicks in place. Pull on the belt webbing strongly to make sure the latch mechanism is engaged. Replace seat belt complete with seat belt latch if belt tongue fails even only once to engage properly in seat belt latch during at least 5 tests. Check release mechanism: -- Press the seat belt latch to release the seat belt. -- With the seat belt relaxed, the lock tongue must spring out of seat belt latch without assistance. Perform the test at least five times. If the latch tongue does not spring out even one time, replace the entire seat belt, including the belt latch. WARNING: For safety reasons, road test should be carried out on traffic-free stretch to ensure that other motorists/pedestrians etc. are not endangered. ACCESSORIES & EQUIPMENT Passenger Protection, Airbags, Seat Belts
BELT GUIDE RINGS AND LOCKING TONGUE, CHECKING Plastic-coated fittings face the load (seat belt on during accident) of the belt system parallel to the small grooves (wear created by significant usage, in contrast, is recognizable on the basis of the smooth, stripe- free abrasion). -- Check plastic for deformation, rupture and tearing. For groove build-up and/or damage, replace seat belt completely with lock. CHECKING MOUNTING COMPONENTS AND MOUNTING POINTS Latch bracket deformed (stretched) Height adjuster not functional Mounting points (seat, pillar, vehicle floor) distorted or thread damaged If damage is found at components, replace the seat belt completely with lock. Replace anchorage points. PASSIVE OCCUPANT DETECTION SYSTEM SAFETY PRECAUTIONS Seat occupied recognition controls automatic passenger airbag deactivation. This equipment is only installed on vehicles released in the USA and Canada. WARNING: Under no circumstances may grease be used to eliminate noise or stiffness at belt buckle buttons. NOTE: In damage is discovered that is not accident-related, for example, wear, replace the particular part which is damaged. CAUTION: After every repair on the passenger seat in which the seat and/or backrest cover was "disengaged" basic setting on Seat Occupied Recognition Control Module -J706- must be performed. Perform basic setting with a diagnostic tester that has "Guided Fault Finding". Do not bend the passenger occupant detection system mat. A leaking mat must be replaced (repair kit). Do not bend the passenger occupant detection system pressure hose. Seat occupied recognition (repair kit) components must not fall on hard surfaces. Seat occupied recognition components must not come in contact with grease. There is the danger that the seat occupied recognition components ACCESSORIES & EQUIPMENT Passenger Protection, Airbags, Seat Belts
The 2009 Volkswagen Tiguan Service & Repair Manual is a comprehensive guide for maintaining and repairing the 2009 Volkswagen Tiguan model. It provides detailed instructions and diagrams for various service and repair procedures, making it useful for professional mechanics and Volkswagen owners who prefer DIY maintenance.
This manual is suitable for the following model:
2009 Volkswagen Tiguan
Whether you are a professional mechanic or a Volkswagen owner who prefers to perform their own maintenance, this service and repair manual is a valuable resource. It allows you to confidently tackle various tasks, from routine maintenance to complex repairs, saving you time and money.
Get the 2009 Volkswagen Tiguan Service & Repair Manual today to ensure your vehicle stays in top condition.