Engine, Installing Vehicles with Manual Transmission – Lightly coat the drive axle splines with Lubricating Grease -G 000 100-. – Install the clutch and the clutch mechanism. Continuation for All Vehicles – Secure the engine mounts on the engine, shake the engine/transmission assembly to align it and tighten the subframe mount. – Install the front exhaust pipe. Refer to → Chapter „Catalytic Converter, Removing and Installing“. – Install the right drive axle and attach the left drive axle to the transmission. Refer to →Suspension, Wheels, Steering; Rep. Gr.40. – Install the power steering pump. Refer to →Suspension, Wheels, Steering; Rep. Gr.48. – Install the A/C compressor. Refer to →Heating, Ventilation and Air Conditioning; Rep. Gr.87. – Install the ribbed belt. Refer to → Chapter „Ribbed Belt, Removing and Installing“. – Install the fan shroud. Refer to → Chapter „Fan Shroud, Removing and Installing“. – Reset the service position. Refer to →Body Exterior; Rep. Gr.50. – Install the noise insulation. Refer to →Body Exterior; Rep. Gr.66. Vehicles with Manual Transmission – Install the gearshift mechanism and adjust it. Refer to →Rep. Gr.34. – Install the hydraulic clutch slave cylinder. Refer to →Rep. Gr.30. Vehicles with an Automatic Transmission – Install the selector lever cable and adjust it. Refer to →Rep. Gr.37. Continuation for All Vehicles – Install the battery and the battery tray. Refer to →Electrical Equipment; Rep. Gr.27. – Bleed the fuel system. Refer to → Chapter „Fuel System, Filling/Bleeding“. – Fill the coolant. Refer to → Chapter „Coolant, Draining and Filling“. – Adapt the engine control module see Vehicle Diagnostic Tester“Guided Fault Finding” function. – Perform a vehicle system test see Vehicle Diagnostic Tester“Guided Fault Finding” function. – End the “Guided Fault Finding”. Follow all safety precautions when performing the road test. Refer to → Chapter „Safety Precautions During Road Test with Testing Equipment“. – Perform a road test. Refer to → Chapter „Safety Precautions During Road Test with Testing Equipment“. – Perform another vehicle system test and correct any faults. Tightening Specifications Bolted Connections Tightening Specifications Bolts and Nuts M6 10 Nm M7 15 Nm M8 25 Nm M10 40 Nm 9/15/2015 Page 1 of 2
M12 60 Nm t Refer to → Chapter „Overview - Subframe Mount“ 9/15/2015 Page 2 of 2
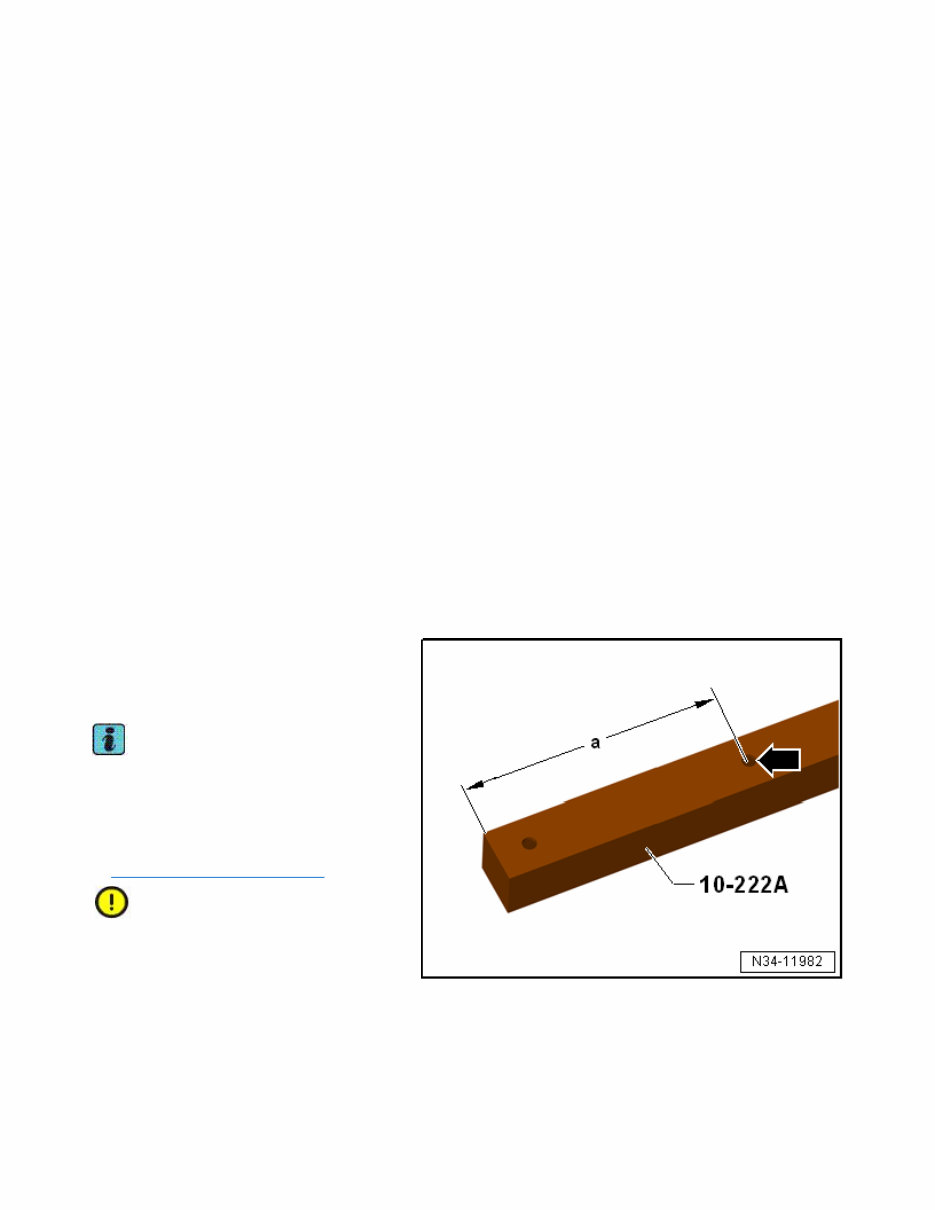
Engine Mount, Removing and Installing Special tools and workshop equipment required t Engine Support Bridge -10-222A- t Engine Support - Automatic Transmission Hook -10-222A/7- t Engine Support - Bracket w/Spindle and Hook -10-222A/10- t Engine Support Bridge - Engine Support 28 -10-222A/28- t Engine Support Bridge - Engine Support 31 -10-222A/31- t Rail with Holes -T40091/2- from Engine Support - Basic Set -T40091- t Engine Support - Supplement Kit Mount 5 -T40093/5- from the Engine Support - Supplement Kit -T40093A- t Engine Support Bridge - Engine Support 28-2 -10-222A/28-2-, quantity: 2 t Square Pipe -T40091/1- (quantity 2) from the Engine Support - Basic Set -T40091- t Movable Joint -T40091/3- (quantity 2) from the Engine Support - Basic Set -T40091- t Movable Joint -T40093/4- (quantity 2) from the Engine Support - Basic Set -T40091- t Torque Wrench 1331 5-50Nm -VAG1331- t Union Nut Socket - T40055- Tool Development – If the adapter for Engine Support Bridge - Engine Support 4 -10-222A/4- does not have the indicated holes -arrow- shown they must be added. l Dimension -a- = 225 mm. l Hole diameter = 12.5 mm Procedure Note Without removing the battery and battery tray Removing – Remove the noise insulation. Refer to →Body Exterior; Rep. Gr.66. Caution Danger of causing damage to the decoupling element: t Do not bend the decoupling element more than 10°. t Do not stretch the decoupling element. t Do not damage the wire mesh on the decoupling element. 9/15/2015 Page 1 of 7
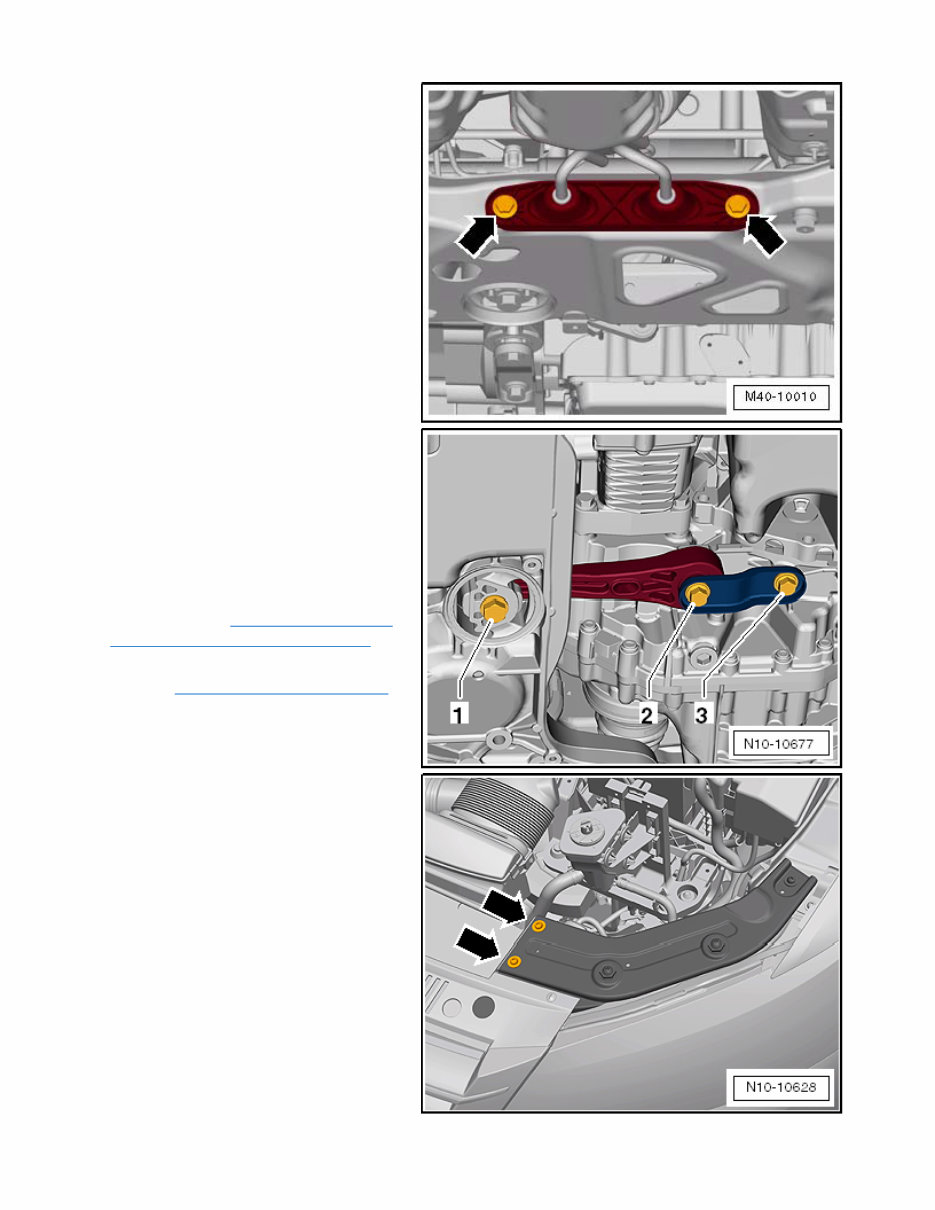
– Remove the exhaust system bracket from the subframe -arrows-. – Remove the bolt -1-. – Remove the bolts -2- and -3-. – Remove the pendulum support. – Remove the air filter housing (engine cover). Refer to → Chapter „Air Filter Housing, Removing and Installing“. – Remove the plenum chamber cover. Refer to →Body Exterior; Rep. Gr.50. – Remove the bolts -arrows- from the left and right sides of the lock carrier bracket. 9/15/2015 Page 2 of 7
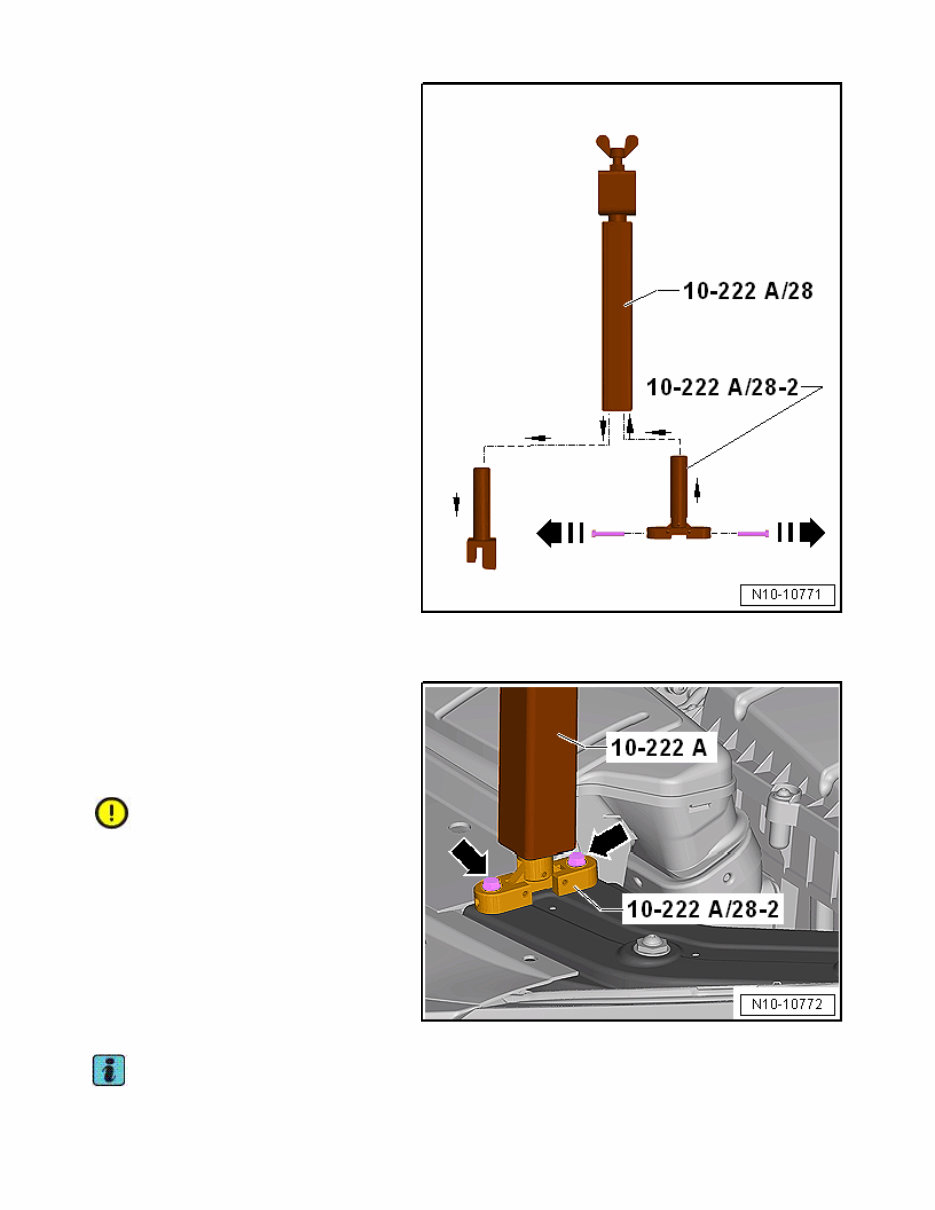
– Remove the lower mounts on the Engine Support Bridge - Engine Support 28 - 10 -222A/28- and replace with the Engine Support 28-2 -10-222A/28-2-. – Remove the bolts in direction of -arrows - for securing the engine support bridge on the lock carrier from the Engine Support Bridge - Engine Support 28-2 - 10-222A/28-2-. – Use the bolts from the Engine Support Bridge - Engine Support 28-2 -10- 222A/28-2- for attaching the Engine Support Bridge - Engine Support 28 -10- 222A/28-. Do not use the bolts for the bracket. – Tighten the fastening bolts -arrows- to 8 Nm. Caution A second technician is needed when positioning the Engine Support Bridge - 10-222A- on the vehicle to keep the Engine Support Bridge from tipping. – Install the Engine Support Bridge - Engine Support 31-2 -10-222A/31-2- on the inner hole from the Engine Support Bridge -10-222A- and slide two Engine Support - Basic Set - Moveable Joint - T40091/3- from the left side. Note 9/15/2015 Page 3 of 7
You're Reading a Preview
What's Included?
Lifetime Access
Fast Download Speeds
Offline Viewing
Access Contents & Bookmarks
Full Search Facility
Print one or all pages of your manual
$52.99
2012 Volkswagen Jetta Download Service & Repair Manual
The 2012 Volkswagen Jetta Download Service & Repair Manual is a comprehensive guide designed to assist owners in maintaining and repairing their Jetta vehicles. This manual provides detailed instructions, diagrams, and specifications to help tackle any repair or service task efficiently and accurately.
Whether you are a professional mechanic or a DIY enthusiast, this manual is a valuable resource for troubleshooting, diagnosing, and fixing various issues in your 2012 Volkswagen Jetta. It covers a wide range of topics, including engine, transmission, electrical systems, brakes, suspension, and many more.
Some of the key features of this manual include:
Step-by-step instructions for all repair and maintenance procedures
Detailed diagrams and illustrations to aid in understanding
Clear explanations of technical specifications and adjustments
Troubleshooting tips and common problem solutions
Estimated repair times for different tasks
With this manual at your disposal, you can confidently tackle various repairs and maintenance tasks on your 2012 Volkswagen Jetta, saving time and money. Keep your vehicle in top condition and ensure its longevity with the help of this comprehensive service and repair manual.
Reviews
Q&A
Recently Viewed
5,521,897Happy Clients
2,594,462eManuals
1,120,453Trusted Sellers
15Years in Business
Price:
Actual Price:
2012 Volkswagen Jetta Download Service & Repair Manual