


P
rote
cte
d
b
y
c
o
p
yrig
ht.
C
o
p
yin
g
fo
r
p
riv
a
t
e
o
r
c
o
m
m
e
r
c
i
a
l
p
u
r
p
o
s
e
s
,
i
n
p
a
r
t
o
r
i
n
wh
o
l
e
,
i
s
n
o
t
p
e
r
m
itte
d
u
n
le
s
s
a
uth
o
ris
e
d
b
y
V
olk
s
w
a
g
e
n
A
G
.
V
olks
w
a
g
e
n
A
G
d
o
e
s
n
ot
g
u
ara
nte
e
o
r
a
c
c
e
p
t
a
n
y
lia
b
ilit
y
w
it
h
r
e
s
p
e
c
t
t
o
t
h
e
c
o
r
r
e
c
t
n
e
s
s
o
f
i
n
f
o
r
m
a
ti
o
n
in
t
h
is
d
o
c
u
m
e
n
t.
C
o
p
yrig
ht
b
y
V
olk
s
w
a
g
e
n
A
G
.
Workshop Manual
Jetta 2005 ➤
Bora 2006 ➤
Golf Variant 2007 ➤
4-cylinder diesel engine with unit injector
Engine ID
BKC BLS BRM BXE
Edition 05.2007
Service
Service Department. Technical Information

P
rote
cte
d
b
y
c
o
p
yrig
ht.
C
o
p
yin
g
fo
r
p
riv
a
t
e
o
r
c
o
m
m
e
r
c
i
a
l
p
u
r
p
o
s
e
s
,
i
n
p
a
r
t
o
r
i
n
wh
o
l
e
,
i
s
n
o
t
p
e
r
m
itte
d
u
n
le
s
s
a
uth
o
ris
e
d
b
y
V
olk
s
w
a
g
e
n
A
G
.
V
olks
w
a
g
e
n
A
G
d
o
e
s
n
ot
g
u
ara
nte
e
o
r
a
c
c
e
p
t
a
n
y
lia
b
ilit
y
w
it
h
r
e
s
p
e
c
t
t
o
t
h
e
c
o
r
r
e
c
t
n
e
s
s
o
f
i
n
f
o
r
m
a
ti
o
n
in
t
h
is
d
o
c
u
m
e
n
t.
C
o
p
yrig
ht
b
y
V
olk
s
w
a
g
e
n
A
G
.
List of Workshop Manual Repair GroupsList of Workshop Manual
Repair GroupsList of Workshop Manual Repair Groups
Repair Group
00 - Technical data
10 - Removing and installing engine
13 - Crankshaft group
15 - Cylinder head, valve gear
17 - Lubrication
19 - Cooling
20 - Fuel supply system
21 - Turbocharging/supercharging
23 - Mixture preparation - injection
26 - Exhaust system
28 - Glow plug system
Technical information should always be available to the foremen and mechanics, because their
careful and constant adherence to the instructions is essential to ensure vehicle road-worthiness and
safety. In addition, the normal basic safety precautions for working on motor vehicles must, as a
matter of course, be observed.
Service
All rights reserved.
No reproduction without prior agreement from publisher.
Copyright © 2010 Volkswagen AG, Wolfsburg MEX5R006420

P
rote
cte
d
b
y
c
o
p
yrig
ht.
C
o
p
yin
g
fo
r
p
riv
a
t
e
o
r
c
o
m
m
e
r
c
i
a
l
p
u
r
p
o
s
e
s
,
i
n
p
a
r
t
o
r
i
n
wh
o
l
e
,
i
s
n
o
t
p
e
r
m
itte
d
u
n
le
s
s
a
uth
o
ris
e
d
b
y
V
olk
s
w
a
g
e
n
A
G
.
V
olks
w
a
g
e
n
A
G
d
o
e
s
n
ot
g
u
ara
nte
e
o
r
a
c
c
e
p
t
a
n
y
lia
b
ilit
y
w
it
h
r
e
s
p
e
c
t
t
o
t
h
e
c
o
r
r
e
c
t
n
e
s
s
o
f
i
n
f
o
r
m
a
ti
o
n
in
t
h
is
d
o
c
u
m
e
n
t.
C
o
p
yrig
ht
b
y
V
olk
s
w
a
g
e
n
A
G
.
Contents
00 - Technical data . . . . . . . . . . . . . . . . . . . . . . . . . . . . . . . . . . . . . . . . . . . . . . . . . . . . 1
1 Technical data . . . . . . . . . . . . . . . . . . . . . . . . . . . . . . . . . . . . . . . . . . . . . . . . . . . . . . . . . . 1
1.1 Engine number . . . . . . . . . . . . . . . . . . . . . . . . . . . . . . . . . . . . . . . . . . . . . . . . . . . . . . . . . . 1
1.2 Engine data . . . . . . . . . . . . . . . . . . . . . . . . . . . . . . . . . . . . . . . . . . . . . . . . . . . . . . . . . . . . 1
10 - Removing and installing engine . . . . . . . . . . . . . . . . . . . . . . . . . . . . . . . . . . . . . . 2
1 Removing and installing engine . . . . . . . . . . . . . . . . . . . . . . . . . . . . . . . . . . . . . . . . . . . . . . 2
1.1 Removing engine . . . . . . . . . . . . . . . . . . . . . . . . . . . . . . . . . . . . . . . . . . . . . . . . . . . . . . . . 2
1.2 Securing engine to assembly stand . . . . . . . . . . . . . . . . . . . . . . . . . . . . . . . . . . . . . . . . . . 15
1.3 Installing engine . . . . . . . . . . . . . . . . . . . . . . . . . . . . . . . . . . . . . . . . . . . . . . . . . . . . . . . . . . 16
1.4 Checking and adjusting assembly mounting . . . . . . . . . . . . . . . . . . . . . . . . . . . . . . . . . . . . 19
1.5 Assembly mounting - Torque settings . . . . . . . . . . . . . . . . . . . . . . . . . . . . . . . . . . . . . . . . 23
13 - Crankshaft group . . . . . . . . . . . . . . . . . . . . . . . . . . . . . . . . . . . . . . . . . . . . . . . . . . 24
1 Dismantling and assembling engine . . . . . . . . . . . . . . . . . . . . . . . . . . . . . . . . . . . . . . . . . . 24
1.1 Assembly overview . . . . . . . . . . . . . . . . . . . . . . . . . . . . . . . . . . . . . . . . . . . . . . . . . . . . . . . . 25
1.2 Assembly overview - toothed belt drive . . . . . . . . . . . . . . . . . . . . . . . . . . . . . . . . . . . . . . . . 26
1.3 Assembly overview - poly-V-belt drive . . . . . . . . . . . . . . . . . . . . . . . . . . . . . . . . . . . . . . . . 27
1.4 Assembly overview - cylinder block . . . . . . . . . . . . . . . . . . . . . . . . . . . . . . . . . . . . . . . . . . 28
1.5 Removing and installing poly-V-belt . . . . . . . . . . . . . . . . . . . . . . . . . . . . . . . . . . . . . . . . . . 29
2 Removing and installing sealing flange and flywheel . . . . . . . . . . . . . . . . . . . . . . . . . . . . . . 32
2.1 Assembly overview - sealing flange and flywheel . . . . . . . . . . . . . . . . . . . . . . . . . . . . . . . . 32
2.2 Renewing crankshaft oil seal (pulley end) . . . . . . . . . . . . . . . . . . . . . . . . . . . . . . . . . . . . . . 33
2.3 Removing and installing sealing flange - pulley end . . . . . . . . . . . . . . . . . . . . . . . . . . . . . . 35
2.4 Renewing crankshaft sealing flange - flywheel end . . . . . . . . . . . . . . . . . . . . . . . . . . . . . . 38
2.5 Removing and installing dual-mass flywheel . . . . . . . . . . . . . . . . . . . . . . . . . . . . . . . . . . . . 45
3 Crankshaft . . . . . . . . . . . . . . . . . . . . . . . . . . . . . . . . . . . . . . . . . . . . . . . . . . . . . . . . . . . . . . 48
3.1 Assembly overview - crankshaft . . . . . . . . . . . . . . . . . . . . . . . . . . . . . . . . . . . . . . . . . . . . . . 48
3.2 Crankshaft dimensions . . . . . . . . . . . . . . . . . . . . . . . . . . . . . . . . . . . . . . . . . . . . . . . . . . . . 49
3.3 Identification of upper crankshaft bearing . . . . . . . . . . . . . . . . . . . . . . . . . . . . . . . . . . . . . . 49
3.4 Pulling needle bearing out of and driving into crankshaft . . . . . . . . . . . . . . . . . . . . . . . . . . 49
4 Pistons and connecting rods . . . . . . . . . . . . . . . . . . . . . . . . . . . . . . . . . . . . . . . . . . . . . . . . 52
4.1 Assembly overview - pistons and conrods . . . . . . . . . . . . . . . . . . . . . . . . . . . . . . . . . . . . . . 52
4.2 Checking piston projection at TDC . . . . . . . . . . . . . . . . . . . . . . . . . . . . . . . . . . . . . . . . . . . . 53
4.3 Piston and cylinder dimensions . . . . . . . . . . . . . . . . . . . . . . . . . . . . . . . . . . . . . . . . . . . . . . 54
4.4 Piston rings, cylinder bore and piston installation position . . . . . . . . . . . . . . . . . . . . . . . . . . 54
15 - Cylinder head, valve gear . . . . . . . . . . . . . . . . . . . . . . . . . . . . . . . . . . . . . . . . . . 57
1 Cylinder head . . . . . . . . . . . . . . . . . . . . . . . . . . . . . . . . . . . . . . . . . . . . . . . . . . . . . . . . . . . . 57
1.1 Assembly overview - cylinder head . . . . . . . . . . . . . . . . . . . . . . . . . . . . . . . . . . . . . . . . . . 58
1.2 Removing and installing cylinder head cover . . . . . . . . . . . . . . . . . . . . . . . . . . . . . . . . . . . . 61
1.3 Removing, installing and tensioning toothed belt . . . . . . . . . . . . . . . . . . . . . . . . . . . . . . . . 62
1.4 Removing and installing cylinder head . . . . . . . . . . . . . . . . . . . . . . . . . . . . . . . . . . . . . . . . 79
1.5 Checking compression . . . . . . . . . . . . . . . . . . . . . . . . . . . . . . . . . . . . . . . . . . . . . . . . . . . . 83
2 Valve gear . . . . . . . . . . . . . . . . . . . . . . . . . . . . . . . . . . . . . . . . . . . . . . . . . . . . . . . . . . . . . . 86
2.1 Assembly overview - valve gear . . . . . . . . . . . . . . . . . . . . . . . . . . . . . . . . . . . . . . . . . . . . . . 87
2.2 Checking axial clearance of camshaft . . . . . . . . . . . . . . . . . . . . . . . . . . . . . . . . . . . . . . . . 88
2.3 Seal bearing caps 1 and 5 contact surfaces . . . . . . . . . . . . . . . . . . . . . . . . . . . . . . . . . . . . 89
2.4 Valve dimensions . . . . . . . . . . . . . . . . . . . . . . . . . . . . . . . . . . . . . . . . . . . . . . . . . . . . . . . . 89
2.5 Checking valve guides . . . . . . . . . . . . . . . . . . . . . . . . . . . . . . . . . . . . . . . . . . . . . . . . . . . . 89
2.6 Renewing valve stem oil seals . . . . . . . . . . . . . . . . . . . . . . . . . . . . . . . . . . . . . . . . . . . . . . 90
2.7 Removing and installing camshaft . . . . . . . . . . . . . . . . . . . . . . . . . . . . . . . . . . . . . . . . . . . . 92
Jetta 2005 ➤ , Bora 2006 ➤ , Golf Variant 2007 ➤
4-cylinder diesel engine with unit injector - Edition 05.2007
Contents i

P
rote
cte
d
b
y
c
o
p
yrig
ht.
C
o
p
yin
g
fo
r
p
riv
a
t
e
o
r
c
o
m
m
e
r
c
i
a
l
p
u
r
p
o
s
e
s
,
i
n
p
a
r
t
o
r
i
n
wh
o
l
e
,
i
s
n
o
t
p
e
r
m
itte
d
u
n
le
s
s
a
uth
o
ris
e
d
b
y
V
olk
s
w
a
g
e
n
A
G
.
V
olks
w
a
g
e
n
A
G
d
o
e
s
n
ot
g
u
ara
nte
e
o
r
a
c
c
e
p
t
a
n
y
lia
b
ilit
y
w
it
h
r
e
s
p
e
c
t
t
o
t
h
e
c
o
r
r
e
c
t
n
e
s
s
o
f
i
n
f
o
r
m
a
ti
o
n
in
t
h
is
d
o
c
u
m
e
n
t.
C
o
p
yrig
ht
b
y
V
olk
s
w
a
g
e
n
A
G
.
2.8 Removing and installing camshaft oil seal . . . . . . . . . . . . . . . . . . . . . . . . . . . . . . . . . . . . . . 95
17 - Lubrication . . . . . . . . . . . . . . . . . . . . . . . . . . . . . . . . . . . . . . . . . . . . . . . . . . . . . . 97
1 Engine oil . . . . . . . . . . . . . . . . . . . . . . . . . . . . . . . . . . . . . . . . . . . . . . . . . . . . . . . . . . . . . . 97
1.1 Engine oil specification . . . . . . . . . . . . . . . . . . . . . . . . . . . . . . . . . . . . . . . . . . . . . . . . . . . . 97
1.2 Oil capacities . . . . . . . . . . . . . . . . . . . . . . . . . . . . . . . . . . . . . . . . . . . . . . . . . . . . . . . . . . . . 97
1.3 Checking engine oil level . . . . . . . . . . . . . . . . . . . . . . . . . . . . . . . . . . . . . . . . . . . . . . . . . . 97
2 Parts of lubrication system . . . . . . . . . . . . . . . . . . . . . . . . . . . . . . . . . . . . . . . . . . . . . . . . . . 98
2.1 Oil pump, oil sump - assembly overview, engine codes BKC, BLS, BXE . . . . . . . . . . . . . . 98
2.2 Oil pump, oil sump - assembly overview, engine codes BRM . . . . . . . . . . . . . . . . . . . . . . 100
2.3 Removing and installing sump . . . . . . . . . . . . . . . . . . . . . . . . . . . . . . . . . . . . . . . . . . . . . . 101
2.4 Removing and installing oil pump . . . . . . . . . . . . . . . . . . . . . . . . . . . . . . . . . . . . . . . . . . . . 104
3 Oil filter bracket, oil pressure, oil cooler and oil supply line . . . . . . . . . . . . . . . . . . . . . . . . 106
3.1 Assembly overview - oil filter bracket and oil cooler . . . . . . . . . . . . . . . . . . . . . . . . . . . . . . 106
3.2 Removing and installing oil filter bracket with oil cooler . . . . . . . . . . . . . . . . . . . . . . . . . . . . 107
3.3 Checking oil pressure and oil pressure switch . . . . . . . . . . . . . . . . . . . . . . . . . . . . . . . . . . 112
3.4 Assembly overview - oil supply line to turbocharger . . . . . . . . . . . . . . . . . . . . . . . . . . . . . . 113
3.5 Removing and installing oil supply line to turbocharger . . . . . . . . . . . . . . . . . . . . . . . . . . . . 114
19 - Cooling . . . . . . . . . . . . . . . . . . . . . . . . . . . . . . . . . . . . . . . . . . . . . . . . . . . . . . . . . . 117
1 Parts of the cooling system . . . . . . . . . . . . . . . . . . . . . . . . . . . . . . . . . . . . . . . . . . . . . . . . 117
1.1 Parts of cooling system - body side, engine codes BLS, BRM . . . . . . . . . . . . . . . . . . . . . . 118
1.2 Parts of cooling system - body side, engine codes BKC, BXE . . . . . . . . . . . . . . . . . . . . . . 119
1.3 Parts of cooling system - engine side, engine codes BLS, BRM . . . . . . . . . . . . . . . . . . . . 120
1.4 Parts of cooling system - engine side, engine codes BKC, BXE . . . . . . . . . . . . . . . . . . . . 123
1.5 Coolant hose connection diagram . . . . . . . . . . . . . . . . . . . . . . . . . . . . . . . . . . . . . . . . . . . . 125
1.6 Draining and filling coolant . . . . . . . . . . . . . . . . . . . . . . . . . . . . . . . . . . . . . . . . . . . . . . . . . . 127
1.7 Removing and installing radiator fan V7 and radiator fan 2 V177 . . . . . . . . . . . . . . . . . . . . 130
1.8 Removing and installing radiator . . . . . . . . . . . . . . . . . . . . . . . . . . . . . . . . . . . . . . . . . . . . 132
1.9 Removing and installing coolant pump . . . . . . . . . . . . . . . . . . . . . . . . . . . . . . . . . . . . . . . . 134
1.10 Removing and installing thermostat . . . . . . . . . . . . . . . . . . . . . . . . . . . . . . . . . . . . . . . . . . 136
1.11 Checking cooling system for leaks . . . . . . . . . . . . . . . . . . . . . . . . . . . . . . . . . . . . . . . . . . . . 138
1.12 Checking oil cooler for leaks . . . . . . . . . . . . . . . . . . . . . . . . . . . . . . . . . . . . . . . . . . . . . . . . 140
20 - Fuel supply system . . . . . . . . . . . . . . . . . . . . . . . . . . . . . . . . . . . . . . . . . . . . . . . . 142
1 Safety precautions when working on fuel supply system . . . . . . . . . . . . . . . . . . . . . . . . . . 142
2 Rules for cleanliness . . . . . . . . . . . . . . . . . . . . . . . . . . . . . . . . . . . . . . . . . . . . . . . . . . . . . . 143
3 Fuel tank, models with front-wheel drive . . . . . . . . . . . . . . . . . . . . . . . . . . . . . . . . . . . . . . 144
3.1 Assembly overview - fuel tank . . . . . . . . . . . . . . . . . . . . . . . . . . . . . . . . . . . . . . . . . . . . . . 145
3.2 Draining fuel tank . . . . . . . . . . . . . . . . . . . . . . . . . . . . . . . . . . . . . . . . . . . . . . . . . . . . . . . . 147
3.3 Removing and installing fuel tank . . . . . . . . . . . . . . . . . . . . . . . . . . . . . . . . . . . . . . . . . . . . 149
3.4 Removing and installing fuel delivery unit . . . . . . . . . . . . . . . . . . . . . . . . . . . . . . . . . . . . . . 152
3.5 Removing and installing fuel gauge sender . . . . . . . . . . . . . . . . . . . . . . . . . . . . . . . . . . . . 154
3.6 Checking fuel pump . . . . . . . . . . . . . . . . . . . . . . . . . . . . . . . . . . . . . . . . . . . . . . . . . . . . . . 154
4 Repairing fuel supply system . . . . . . . . . . . . . . . . . . . . . . . . . . . . . . . . . . . . . . . . . . . . . . 158
4.1 Assembly overview - fuel filter . . . . . . . . . . . . . . . . . . . . . . . . . . . . . . . . . . . . . . . . . . . . . . 158
4.2 Removing and installing fuel cooler . . . . . . . . . . . . . . . . . . . . . . . . . . . . . . . . . . . . . . . . . . 159
4.3 Checking tandem pump . . . . . . . . . . . . . . . . . . . . . . . . . . . . . . . . . . . . . . . . . . . . . . . . . . . . 160
4.4 Removing and installing tandem pump . . . . . . . . . . . . . . . . . . . . . . . . . . . . . . . . . . . . . . . . 166
5 Electronic power control (EPC) . . . . . . . . . . . . . . . . . . . . . . . . . . . . . . . . . . . . . . . . . . . . . . 170
5.1 Function of EPC system . . . . . . . . . . . . . . . . . . . . . . . . . . . . . . . . . . . . . . . . . . . . . . . . . . . . 170
5.2 Assembly overview - accelerator pedal module . . . . . . . . . . . . . . . . . . . . . . . . . . . . . . . . . . 171
5.3 Removing and installing accelerator pedal module . . . . . . . . . . . . . . . . . . . . . . . . . . . . . . 171
21 - Turbocharging/supercharging . . . . . . . . . . . . . . . . . . . . . . . . . . . . . . . . . . . . . . . . 173
Jetta 2005 ➤ , Bora 2006 ➤ , Golf Variant 2007 ➤
4-cylinder diesel engine with unit injector - Edition 05.2007
ii Contents

P
rote
cte
d
b
y
c
o
p
yrig
ht.
C
o
p
yin
g
fo
r
p
riv
a
t
e
o
r
c
o
m
m
e
r
c
i
a
l
p
u
r
p
o
s
e
s
,
i
n
p
a
r
t
o
r
i
n
wh
o
l
e
,
i
s
n
o
t
p
e
r
m
itte
d
u
n
le
s
s
a
uth
o
ris
e
d
b
y
V
olk
s
w
a
g
e
n
A
G
.
V
olks
w
a
g
e
n
A
G
d
o
e
s
n
ot
g
u
ara
nte
e
o
r
a
c
c
e
p
t
a
n
y
lia
b
ilit
y
w
it
h
r
e
s
p
e
c
t
t
o
t
h
e
c
o
r
r
e
c
t
n
e
s
s
o
f
i
n
f
o
r
m
a
ti
o
n
in
t
h
is
d
o
c
u
m
e
n
t.
C
o
p
yrig
ht
b
y
V
olk
s
w
a
g
e
n
A
G
.
1 Charge air system with turbocharger . . . . . . . . . . . . . . . . . . . . . . . . . . . . . . . . . . . . . . . . . . 173
1.1 Safety precautions . . . . . . . . . . . . . . . . . . . . . . . . . . . . . . . . . . . . . . . . . . . . . . . . . . . . . . . . 173
1.2 Rules for cleanliness . . . . . . . . . . . . . . . . . . . . . . . . . . . . . . . . . . . . . . . . . . . . . . . . . . . . . . 173
2 Charge air system with turbocharger, engine codes BKC, BXE . . . . . . . . . . . . . . . . . . . . 175
2.1 Turbocharger - Assembly overview, engine codes BKC, BXE . . . . . . . . . . . . . . . . . . . . . . 175
2.2 Removing and installing turbocharger, engine codes BKC, BXE . . . . . . . . . . . . . . . . . . . . 177
2.3 Parts of charge air cooling - Assembly overview, engine codes BKC, BXE . . . . . . . . . . . . 183
3 Charge air system with turbocharger, engine codes BLS, BRM . . . . . . . . . . . . . . . . . . . . 185
3.1 Turbocharger - Assembly overview, engine codes BLS (without diesel particulate filter), BRM
. . . . . . . . . . . . . . . . . . . . . . . . . . . . . . . . . . . . . . . . . . . . . . . . . . . . . . . . . . . . . . . . . . . . . . 185
3.2 Removing and installing turbocharger, engine codes BLS (without diesel particulate filter),
BRM . . . . . . . . . . . . . . . . . . . . . . . . . . . . . . . . . . . . . . . . . . . . . . . . . . . . . . . . . . . . . . . . . . 188
3.3 Turbocharger - Assembly overview, engine code BLS (with diesel particulate filter) . . . . 195
3.4 Removing and installing turbocharger, engine code BLS (with diesel particulate filter) . . . . 196
3.5 Parts of charge air cooling - Assembly overview, engine codes BLS, BRM . . . . . . . . . . . . 198
4 Hose connections . . . . . . . . . . . . . . . . . . . . . . . . . . . . . . . . . . . . . . . . . . . . . . . . . . . . . . . . 200
4.1 Hose connections . . . . . . . . . . . . . . . . . . . . . . . . . . . . . . . . . . . . . . . . . . . . . . . . . . . . . . . . 200
5 Removing and installing charge air cooler . . . . . . . . . . . . . . . . . . . . . . . . . . . . . . . . . . . . . . 202
5.1 Removing and installing charge air cooler . . . . . . . . . . . . . . . . . . . . . . . . . . . . . . . . . . . . . . 202
6 Checking charge air system for leaks . . . . . . . . . . . . . . . . . . . . . . . . . . . . . . . . . . . . . . . . 204
7 Vacuum hoses for connection diagram . . . . . . . . . . . . . . . . . . . . . . . . . . . . . . . . . . . . . . . . 206
7.1 Vehicles with engine codes BKC, BXE . . . . . . . . . . . . . . . . . . . . . . . . . . . . . . . . . . . . . . . . 206
7.2 Vehicles with engine codes BLS, BRM . . . . . . . . . . . . . . . . . . . . . . . . . . . . . . . . . . . . . . . . 207
23 - Mixture preparation - injection . . . . . . . . . . . . . . . . . . . . . . . . . . . . . . . . . . . . . . . . 208
1 Diesel direct injection system . . . . . . . . . . . . . . . . . . . . . . . . . . . . . . . . . . . . . . . . . . . . . . . . 208
1.1 Safety precautions . . . . . . . . . . . . . . . . . . . . . . . . . . . . . . . . . . . . . . . . . . . . . . . . . . . . . . . . 209
1.2 Rules for cleanliness . . . . . . . . . . . . . . . . . . . . . . . . . . . . . . . . . . . . . . . . . . . . . . . . . . . . . . 210
1.3 Fitting locations overview . . . . . . . . . . . . . . . . . . . . . . . . . . . . . . . . . . . . . . . . . . . . . . . . . . 211
1.4 Assembly overview - unit injector . . . . . . . . . . . . . . . . . . . . . . . . . . . . . . . . . . . . . . . . . . . . 217
1.5 Removing and installing unit injector . . . . . . . . . . . . . . . . . . . . . . . . . . . . . . . . . . . . . . . . . . 219
1.6 Removing and installing unit injector O-rings . . . . . . . . . . . . . . . . . . . . . . . . . . . . . . . . . . . . 222
1.7 Assembly overview - intake manifold . . . . . . . . . . . . . . . . . . . . . . . . . . . . . . . . . . . . . . . . . . 224
1.8 Removing and installing intake manifold . . . . . . . . . . . . . . . . . . . . . . . . . . . . . . . . . . . . . . 226
1.9 Removing and installing intake pipe with exhaust gas recirculation potentiometer G212 and
exhaust gas recirculation valve N18 , engine codes BLS, BRM . . . . . . . . . . . . . . . . . . . . 233
1.10 Dismantling and assembling intake pipe with with exhaust gas recirculation potentiometer
G212 and exhaust gas recirculation valve N18 , engine codes BLS, BRM . . . . . . . . . . . . 234
1.11 Removing and installing intake manifold flap motor V157 . . . . . . . . . . . . . . . . . . . . . . . . . . 235
1.12 Assembly overview - air filter . . . . . . . . . . . . . . . . . . . . . . . . . . . . . . . . . . . . . . . . . . . . . . . . 237
1.13 Connection diagram for charge pressure control, engine codes BKC, BXE . . . . . . . . . . . . 238
1.14 Connection diagram for solenoid valve block, engine codes BKC, BXE . . . . . . . . . . . . . . 238
1.15 Removing and installing engine speed sender G28 . . . . . . . . . . . . . . . . . . . . . . . . . . . . . . 239
1.16 Removing and installing engine speed sender G28 . . . . . . . . . . . . . . . . . . . . . . . . . . . . . . 240
1.17 Removing and installing automatic glow period control unit J179 . . . . . . . . . . . . . . . . . . . . 240
2 Engine control unit . . . . . . . . . . . . . . . . . . . . . . . . . . . . . . . . . . . . . . . . . . . . . . . . . . . . . . . . 243
2.1 Reading and clearing engine control unit fault memory . . . . . . . . . . . . . . . . . . . . . . . . . . . . 243
2.2 Adapting functions and components . . . . . . . . . . . . . . . . . . . . . . . . . . . . . . . . . . . . . . . . . . 244
2.3 Removing and installing engine control unit . . . . . . . . . . . . . . . . . . . . . . . . . . . . . . . . . . . . 245
26 - Exhaust system . . . . . . . . . . . . . . . . . . . . . . . . . . . . . . . . . . . . . . . . . . . . . . . . . . 248
1 Exhaust system . . . . . . . . . . . . . . . . . . . . . . . . . . . . . . . . . . . . . . . . . . . . . . . . . . . . . . . . . . 248
1.1 Parts of exhaust system - Assembly overview . . . . . . . . . . . . . . . . . . . . . . . . . . . . . . . . . . 250
1.2 Removing and installing front exhaust pipe . . . . . . . . . . . . . . . . . . . . . . . . . . . . . . . . . . . . 254
1.3 Connecting and disconnecting front and rear silencers . . . . . . . . . . . . . . . . . . . . . . . . . . . . 259
Jetta 2005 ➤ , Bora 2006 ➤ , Golf Variant 2007 ➤
4-cylinder diesel engine with unit injector - Edition 05.2007
Contents iii

P
rote
cte
d
b
y
c
o
p
yrig
ht.
C
o
p
yin
g
fo
r
p
riv
a
t
e
o
r
c
o
m
m
e
r
c
i
a
l
p
u
r
p
o
s
e
s
,
i
n
p
a
r
t
o
r
i
n
wh
o
l
e
,
i
s
n
o
t
p
e
r
m
itte
d
u
n
le
s
s
a
uth
o
ris
e
d
b
y
V
olk
s
w
a
g
e
n
A
G
.
V
olks
w
a
g
e
n
A
G
d
o
e
s
n
ot
g
u
ara
nte
e
o
r
a
c
c
e
p
t
a
n
y
lia
b
ilit
y
w
it
h
r
e
s
p
e
c
t
t
o
t
h
e
c
o
r
r
e
c
t
n
e
s
s
o
f
i
n
f
o
r
m
a
ti
o
n
in
t
h
is
d
o
c
u
m
e
n
t.
C
o
p
yrig
ht
b
y
V
olk
s
w
a
g
e
n
A
G
.
1.4 Stress-free alignment of exhaust system . . . . . . . . . . . . . . . . . . . . . . . . . . . . . . . . . . . . . . 260
2 Exhaust gas recirculation system . . . . . . . . . . . . . . . . . . . . . . . . . . . . . . . . . . . . . . . . . . . . 262
2.1 Parts of exhaust gas recirculation - Assembly overview . . . . . . . . . . . . . . . . . . . . . . . . . . 262
2.2 Parts of the exhaust gas recirculation cooler - Assembly overview, engine codes BLS,
BRM . . . . . . . . . . . . . . . . . . . . . . . . . . . . . . . . . . . . . . . . . . . . . . . . . . . . . . . . . . . . . . . . . . 265
2.3 Removing and installing exhaust gas recirculation cooler . . . . . . . . . . . . . . . . . . . . . . . . . . 266
2.4 Check mechanical exhaust gas recirculation valve, engine codes BKC, BXE . . . . . . . . . . 272
28 - Glow plug system . . . . . . . . . . . . . . . . . . . . . . . . . . . . . . . . . . . . . . . . . . . . . . . . . . 274
1 Checking glow plug system . . . . . . . . . . . . . . . . . . . . . . . . . . . . . . . . . . . . . . . . . . . . . . . . 274
1.1 Checking, removing and installing glow plugs . . . . . . . . . . . . . . . . . . . . . . . . . . . . . . . . . . 274
Jetta 2005 ➤ , Bora 2006 ➤ , Golf Variant 2007 ➤
4-cylinder diesel engine with unit injector - Edition 05.2007
iv Contents
P
rote
cte
d
b
y
c
o
p
yrig
ht.
C
o
p
yin
g
fo
r
p
riv
a
t
e
o
r
c
o
m
m
e
r
c
i
a
l
p
u
r
p
o
s
e
s
,
i
n
p
a
r
t
o
r
i
n
wh
o
l
e
,
i
s
n
o
t
p
e
r
m
itte
d
u
n
le
s
s
a
uth
o
ris
e
d
b
y
V
olk
s
w
a
g
e
n
A
G
.
V
olks
w
a
g
e
n
A
G
d
o
e
s
n
ot
g
u
ara
nte
e
o
r
a
c
c
e
p
t
a
n
y
lia
b
ilit
y
w
it
h
r
e
s
p
e
c
t
t
o
t
h
e
c
o
r
r
e
c
t
n
e
s
s
o
f
i
n
f
o
r
m
a
ti
o
n
in
t
h
is
d
o
c
u
m
e
n
t.
C
o
p
yrig
ht
b
y
V
olk
s
w
a
g
e
n
A
G
.
00 – Technical data
1 Technical data
Engine number ⇒ page 1
Engine data ⇒ page 1
1.1 Engine number
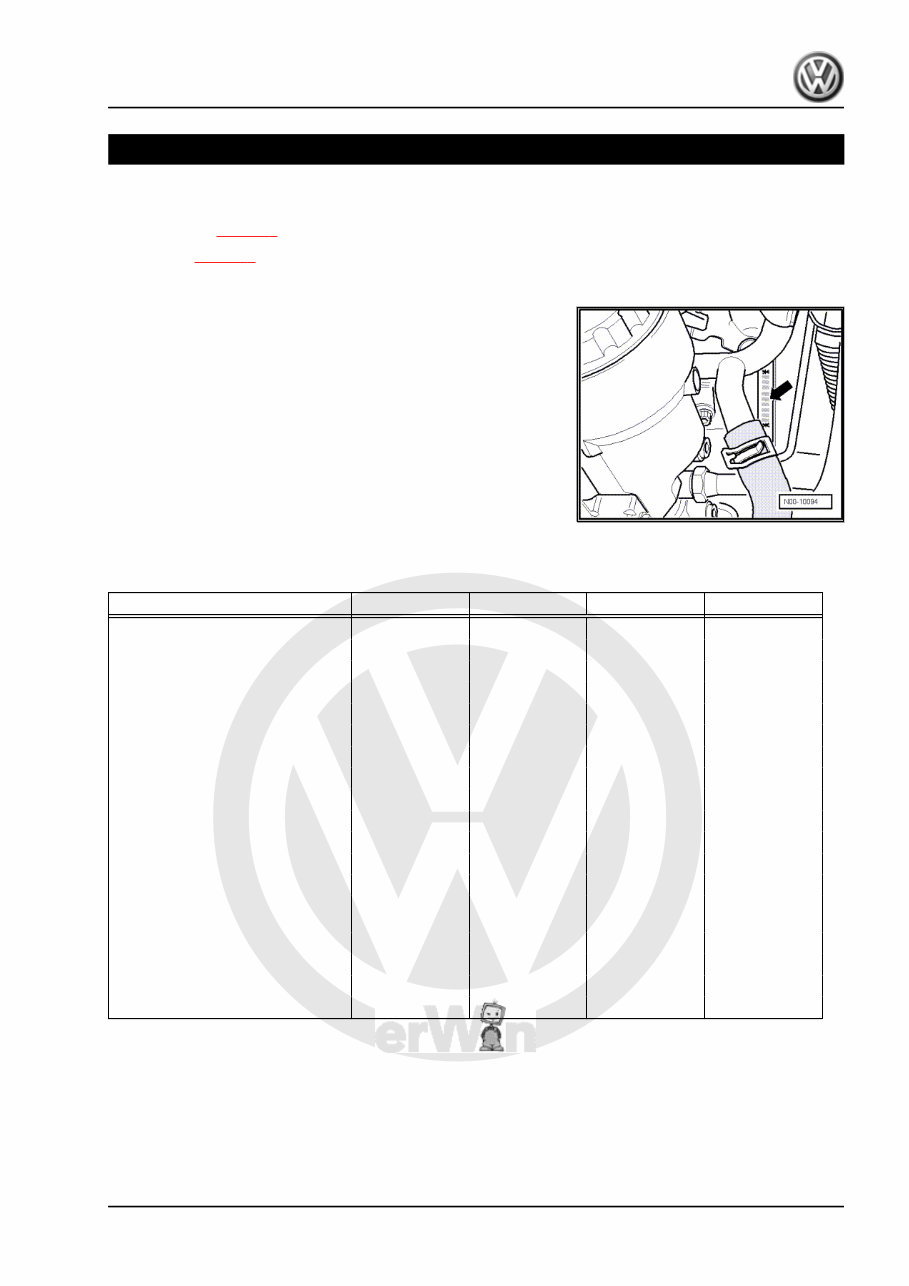
The engine number (“Engine code” and “Serial number”) can be
found on the join between engine and gearbox -arrow-.
The engine number consists of up to nine characters (alphanu‐
meric). The first part (up to 3 code letters) represents the “engine
code letters”, the second part (6 digits) the “serial number”. If more
than 999,999 engines were produced with the same code letters,
the first of the 6 digits is replaced by a letter.
Additionally there is a sticker on the toothed belt guard with “en‐
gine code” and “serial number”.
The engine code is also located on the vehicle data sticker. The
vehicle data sticker is located in the Servicing schedule and in
rear of vehicle in the spare wheel recess or the luggage compart‐
ment floor.
1.2 Engine data
Engine code BKC BLS BRM BXE
Manufactured 05.05 ▸ 05.05 ▸ 11.04 ▸ 03.06 ▸
Emissions fulfil EU4 standard EU4 standard Tier 2 EU4 standard
Capacity l 1.9 1.9 1.9 1.9
Power output kW at rpm 77/4000 77/4000 74/4000 77/4000
Torque Nm at rpm 250/1900 250/1900 250/1900 250/1900
Bore ∅ in mm 79.5 79.5 79.5 79.5
Stroke mm 95.5 95.5 95.5 95.5
Valves per cylinder 2 2 2 2
Compression ratio 19.0 19.0 19.0 19.0
CN at least 51 51 51 51
Firing order 1-3-4-2 1-3-4-2 1-3-4-2 1-3-4-2
Catalytic converter yes yes yes yes
Exhaust gas recirculation yes yes yes yes
Diesel particulate filter no depending on
version
no no
Lambda control no yes no no
Turbocharging/supercharging yes yes yes yes
Charge air cooler yes yes yes yes
Electronic power control yes yes yes yes
Jetta 2005 ➤ , Bora 2006 ➤ , Golf Variant 2007 ➤
4-cylinder diesel engine with unit injector - Edition 05.2007
1. Technical data 1
P
rote
cte
d
b
y
c
o
p
yrig
ht.
C
o
p
yin
g
fo
r
p
riv
a
t
e
o
r
c
o
m
m
e
r
c
i
a
l
p
u
r
p
o
s
e
s
,
i
n
p
a
r
t
o
r
i
n
wh
o
l
e
,
i
s
n
o
t
p
e
r
m
itte
d
u
n
le
s
s
a
uth
o
ris
e
d
b
y
V
olk
s
w
a
g
e
n
A
G
.
V
olks
w
a
g
e
n
A
G
d
o
e
s
n
ot
g
u
ara
nte
e
o
r
a
c
c
e
p
t
a
n
y
lia
b
ilit
y
w
it
h
r
e
s
p
e
c
t
t
o
t
h
e
c
o
r
r
e
c
t
n
e
s
s
o
f
i
n
f
o
r
m
a
ti
o
n
in
t
h
is
d
o
c
u
m
e
n
t.
C
o
p
yrig
ht
b
y
V
olk
s
w
a
g
e
n
A
G
.
10 – Removing and installing engine
1 Removing and installing engine
Removing engine ⇒ page 2
Securing engine to assembly stand ⇒ page 15
Installing engine ⇒ page 16
Checking and adjusting assembly mounting ⇒ page 19
Assembly mounting - Torque settings ⇒ page 23
1.1 Removing engine
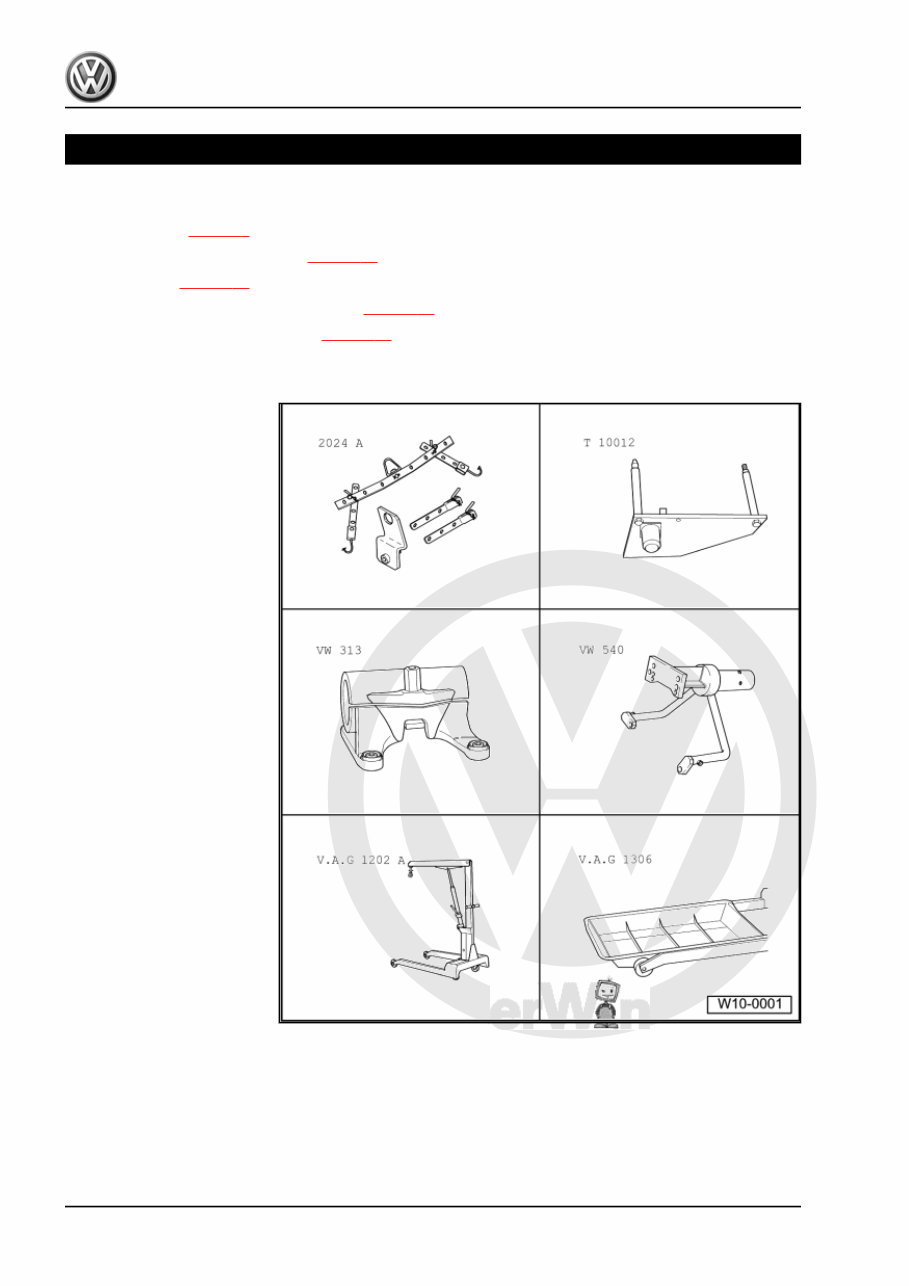
Special tools and workshop
equipment required
♦ Lifting tackle -2024 A-
♦ Engine support -T10012-
♦ Support clamp -VW 313-
♦ Engine and gearbox sup‐
port -VW 540-
♦ Workshop crane -VAS
6100- or
♦ Workshop crane -V.A.G
1202 A-
♦ Drip tray -V.A.G 1306- or
drip tray for workshop hoist
-VAS 6208-
Jetta 2005 ➤ , Bora 2006 ➤ , Golf Variant 2007 ➤
4-cylinder diesel engine with unit injector - Edition 05.2007
2 Rep. Gr.10 - Removing and installing engine
P
rote
cte
d
b
y
c
o
p
yrig
ht.
C
o
p
yin
g
fo
r
p
riv
a
t
e
o
r
c
o
m
m
e
r
c
i
a
l
p
u
r
p
o
s
e
s
,
i
n
p
a
r
t
o
r
i
n
wh
o
l
e
,
i
s
n
o
t
p
e
r
m
itte
d
u
n
le
s
s
a
uth
o
ris
e
d
b
y
V
olk
s
w
a
g
e
n
A
G
.
V
olks
w
a
g
e
n
A
G
d
o
e
s
n
ot
g
u
ara
nte
e
o
r
a
c
c
e
p
t
a
n
y
lia
b
ilit
y
w
it
h
r
e
s
p
e
c
t
t
o
t
h
e
c
o
r
r
e
c
t
n
e
s
s
o
f
i
n
f
o
r
m
a
ti
o
n
in
t
h
is
d
o
c
u
m
e
n
t.
C
o
p
yrig
ht
b
y
V
olk
s
w
a
g
e
n
A
G
.
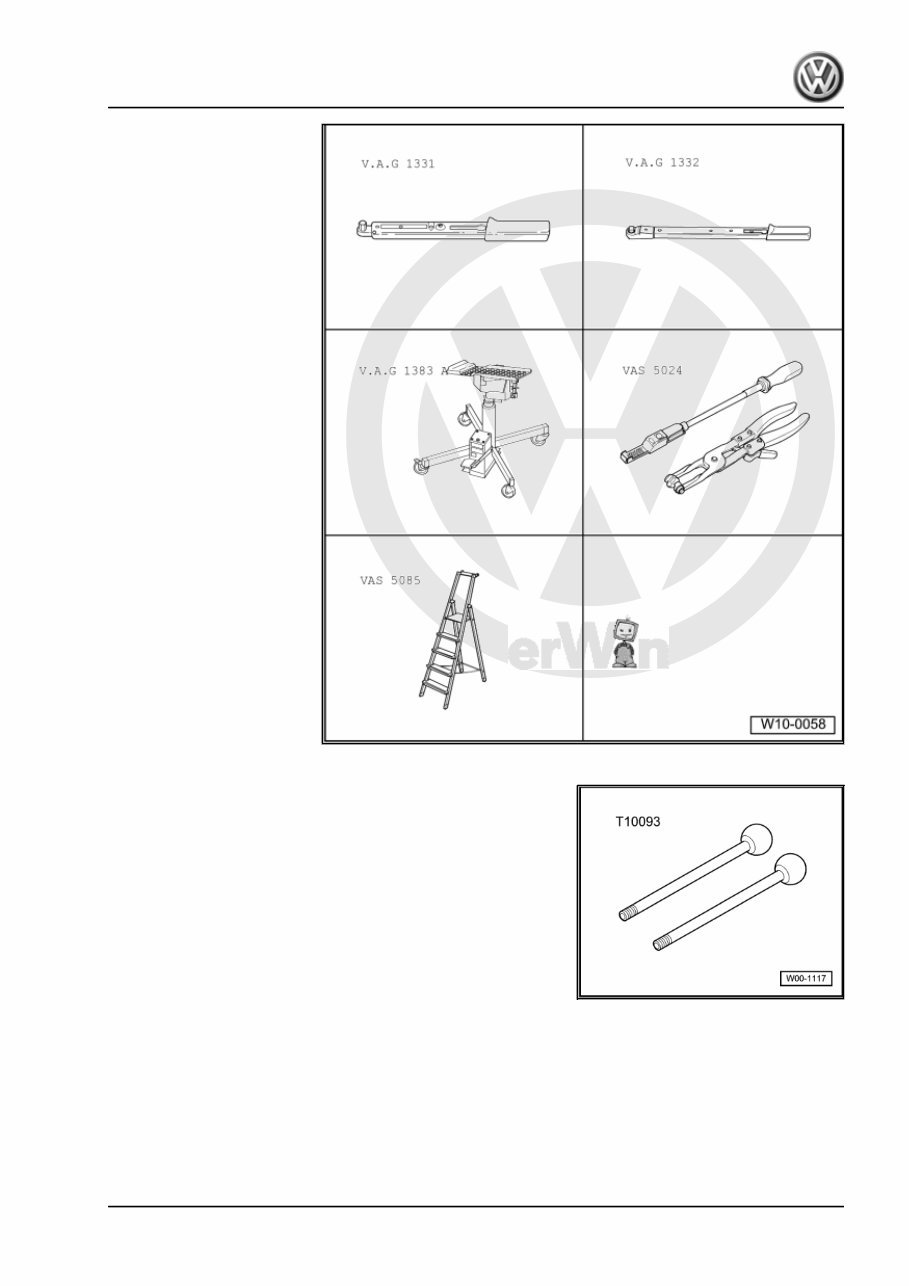
♦ Torque wrench -V.A.G
1331-
♦ Torque wrench -V.A.G
1332-
♦ Engine and gearbox jack -
V.A.G 1383 A-
♦ Spring-type clip pliers -VAS
5024A-
♦ Stepladder -VAS 5085-
♦ Guide rods -T10093-
♦ Cable ties
Jetta 2005 ➤ , Bora 2006 ➤ , Golf Variant 2007 ➤
4-cylinder diesel engine with unit injector - Edition 05.2007
1. Removing and installing engine 3
P
rote
cte
d
b
y
c
o
p
yrig
ht.
C
o
p
yin
g
fo
r
p
riv
a
t
e
o
r
c
o
m
m
e
r
c
i
a
l
p
u
r
p
o
s
e
s
,
i
n
p
a
r
t
o
r
i
n
wh
o
l
e
,
i
s
n
o
t
p
e
r
m
itte
d
u
n
le
s
s
a
uth
o
ris
e
d
b
y
V
olk
s
w
a
g
e
n
A
G
.
V
olks
w
a
g
e
n
A
G
d
o
e
s
n
ot
g
u
ara
nte
e
o
r
a
c
c
e
p
t
a
n
y
lia
b
ilit
y
w
it
h
r
e
s
p
e
c
t
t
o
t
h
e
c
o
r
r
e
c
t
n
e
s
s
o
f
i
n
f
o
r
m
a
ti
o
n
in
t
h
is
d
o
c
u
m
e
n
t.
C
o
p
yrig
ht
b
y
V
olk
s
w
a
g
e
n
A
G
.
Note
♦ Before carrying out further work, disconnect battery earth
strap. First check whether a coded radio is fitted. Obtain anti-
theft code first if necessary.
♦ The engine is removed downwards together with the gearbox.
♦ Renew all cable ties which are opened or cut open when re‐
moving the engine. Refit in the same position when installing
the engine.
Caution
When doing any repair work, especially in the engine compart‐
ment, pay attention to the following due to the cramped condi‐
tions:
♦ All wirings (e.g. for fuel, hydraulic system, coolant and re‐
frigerant liquid, brake liquid, vacuum) and electrical wir‐
ings must be installed in the original way.
♦ Ensure that there is sufficient clearance to all moving or
hot components.
Procedure
– With ignition switched off, disconnect earth strap from battery.
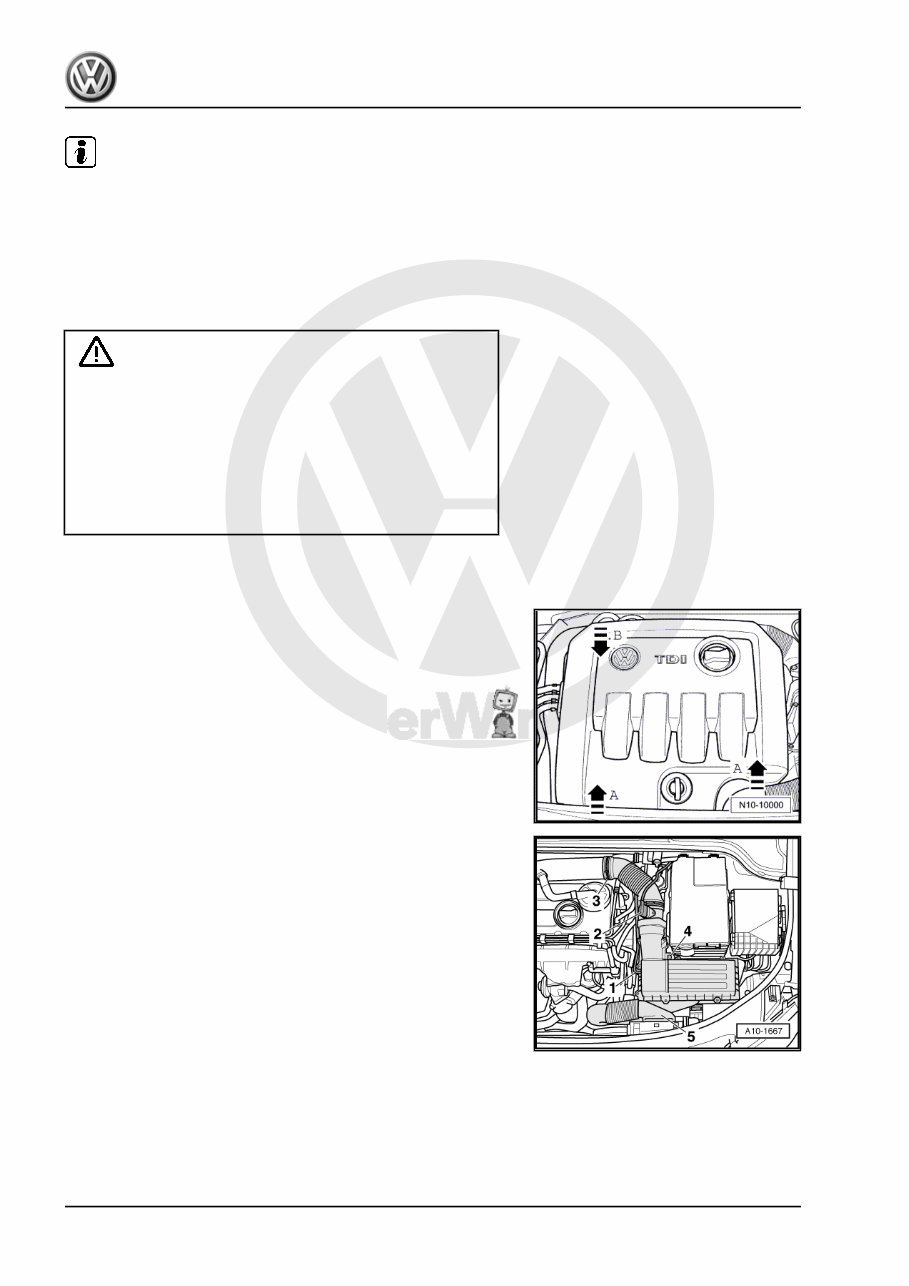
– Remove engine cover. To do this, pull engine cover upwards
abruptly at front -arrows A- and then pull forwards out of rear
fastening -arrow B-.
– Remove bulkhead in plenum chamber ⇒ General Body Re‐
pairs, Exterior; Rep. Gr. 50 ; Plenum chamber bulkhead .
Vehicles with engine codes BKC, BXE
– Remove air filter housing with air mass meter and connecting
pipe.
– Disconnect connector -2- on air mass meter -G70- .
– Pull breather hose -1- and air duct hoses -3- and -5- off.
– Unscrew bolt -4- and take off air filter housing.
Vehicles with engine codes BLS, BRM
– Remove air cleaner housing with air mass meter.
Jetta 2005 ➤ , Bora 2006 ➤ , Golf Variant 2007 ➤
4-cylinder diesel engine with unit injector - Edition 05.2007
4 Rep. Gr.10 - Removing and installing engine
You're Reading a Preview
What's Included?
 Lifetime Access
Fast Download Speeds
Online & Offline Access
Access PDF Contents & Bookmarks
Full Search Facility
Print one or all pages of your manual
$31.99
2005-2008 Volkswagen Jetta Golf Bora 4 Cylinder Diesel Engine With Unit Injector Service & Repair Manual
Viewed 77 Times Today

What's Included?
Lifetime Access
Fast Download Speeds
Online & Offline Access
Access PDF Contents & Bookmarks
Full Search Facility
Print one or all pages of your manual
$31.99

Secure transaction
What's Included?
Lifetime Access
Fast Download Speeds
Online & Offline Access
Access PDF Contents & Bookmarks
Full Search Facility
Print one or all pages of your manual
Description
The VOLKSWAGEN VW JETTA GOLF BORA 4 CYLINDER Diesel Engine with UNIT INJECTOR Shop Manual 2005-2008 is a comprehensive guide suitable for individuals working with or owning a 2005-2008 Volkswagen Jetta, Golf, or Bora model equipped with a 4-cylinder diesel engine and unit injector system.
- Comprehensive Coverage: This shop manual offers detailed information and step-by-step instructions for all aspects of engine maintenance, repair, and troubleshooting, covering routine oil changes to more complex engine overhauls.
- Model Compatibility: Tailored for 2005-2008 Volkswagen Jetta, Golf, and Bora models with 4-cylinder diesel engines and unit injectors, ensuring accurate and relevant information.
- Easy-to-Follow Instructions: Organized in a user-friendly manner with clear diagrams, illustrations, and concise explanations accompanying each step, ensuring smooth and efficient repairs.
- Maintenance Tips: Provides guidance on properly caring for the diesel engine and unit injector system, emphasizing the importance of regular maintenance to prolong engine life and reduce the risk of costly repairs.
- Must-Have Resource: Whether a professional mechanic or a DIY enthusiast, this shop manual is an essential resource, saving time and money while ensuring the job is done right.
Invest in the VOLKSWAGEN VW JETTA GOLF BORA 4 CYLINDER Diesel Engine with UNIT INJECTOR Shop Manual 2005-2008 to maintain, repair, and troubleshoot your 2005-2008 Volkswagen Jetta, Golf, or Bora with confidence.


