P rote cte d b y c o p yrig ht. C o p yin g fo r p riv a t e o r c o m m e r c i a l p u r p o s e s , i n p a r t o r i n wh o l e , i s n o t p e r m itte d u n le s s a uth o ris e d b y V olk s w a g e n A G . V olks w a g e n A G d o e s n ot g u ara nte e o r a c c e p t a n y lia b ilit y w it h r e s p e c t t o t h e c o r r e c t n e s s o f i n f o r m a ti o n in t h is d o c u m e n t. C o p yrig ht b y V olk s w a g e n A G . Workshop Manual ID.3 2020 ➤ ID.3 2023 ➤ Electrical system Edition 10.2023 Service Service Department. Technical Information
P rote cte d b y c o p yrig ht. C o p yin g fo r p riv a t e o r c o m m e r c i a l p u r p o s e s , i n p a r t o r i n wh o l e , i s n o t p e r m itte d u n le s s a uth o ris e d b y V olk s w a g e n A G . V olks w a g e n A G d o e s n ot g u ara nte e o r a c c e p t a n y lia b ilit y w it h r e s p e c t t o t h e c o r r e c t n e s s o f i n f o r m a ti o n in t h is d o c u m e n t. C o p yrig ht b y V olk s w a g e n A G . 4.1 Assembly overview – rear window wiper system . . . . . . . . . . . . . . . . . . . . . . . . . . . . . . . . 45 4.2 Removing and installing wiper blade . . . . . . . . . . . . . . . . . . . . . . . . . . . . . . . . . . . . . . . . . . 45 4.3 Removing and installing wiper arm . . . . . . . . . . . . . . . . . . . . . . . . . . . . . . . . . . . . . . . . . . 46 4.4 Adjusting wiper arm . . . . . . . . . . . . . . . . . . . . . . . . . . . . . . . . . . . . . . . . . . . . . . . . . . . . . . 47 4.5 Removing and installing rear window wiper motor [V12] . . . . . . . . . . . . . . . . . . . . . . . . . . 48 5 Rear window washer system . . . . . . . . . . . . . . . . . . . . . . . . . . . . . . . . . . . . . . . . . . . . . . . . 50 5.1 Assembly overview – rear window washer system . . . . . . . . . . . . . . . . . . . . . . . . . . . . . . 50 5.2 Removing and installing spray jet, rear window washer system . . . . . . . . . . . . . . . . . . . . 50 94 - Lights, bulbs, switches - exterior . . . . . . . . . . . . . . . . . . . . . . . . . . . . . . . . . . . . . . 52 1 Safety information and repair notes . . . . . . . . . . . . . . . . . . . . . . . . . . . . . . . . . . . . . . . . . . 52 1.1 Safety information . . . . . . . . . . . . . . . . . . . . . . . . . . . . . . . . . . . . . . . . . . . . . . . . . . . . . . . . 52 1.2 Repair instructions . . . . . . . . . . . . . . . . . . . . . . . . . . . . . . . . . . . . . . . . . . . . . . . . . . . . . . . . 52 2 LED headlight . . . . . . . . . . . . . . . . . . . . . . . . . . . . . . . . . . . . . . . . . . . . . . . . . . . . . . . . . . . . 53 2.1 Assembly overview – headlight . . . . . . . . . . . . . . . . . . . . . . . . . . . . . . . . . . . . . . . . . . . . . . 53 2.2 Removing and installing headlight . . . . . . . . . . . . . . . . . . . . . . . . . . . . . . . . . . . . . . . . . . . . 54 2.3 Installing repair kit for headlight housing . . . . . . . . . . . . . . . . . . . . . . . . . . . . . . . . . . . . . . 55 2.4 Removing and installing front turn signal bulb [M5]/[M7] . . . . . . . . . . . . . . . . . . . . . . . . . . 56 2.5 Removing and installing headlight range control motor [V48]/[V49] . . . . . . . . . . . . . . . . . . 57 2.6 Removing and installing output module 1 for LED headlight [A27]/[A31] . . . . . . . . . . . . . . 59 2.7 Removing and installing light conductor for contour lighting in radiator grille [L362]/[L363] . . 61 2.8 Removing and installing LED module for daytime running lights [L377]/[L378], GTX . . . . 62 3 LED matrix headlight . . . . . . . . . . . . . . . . . . . . . . . . . . . . . . . . . . . . . . . . . . . . . . . . . . . . . . 63 3.1 Assembly overview – headlight . . . . . . . . . . . . . . . . . . . . . . . . . . . . . . . . . . . . . . . . . . . . . . 63 3.2 Removing and installing headlight . . . . . . . . . . . . . . . . . . . . . . . . . . . . . . . . . . . . . . . . . . . . 65 3.3 Installing repair kit for headlight housing . . . . . . . . . . . . . . . . . . . . . . . . . . . . . . . . . . . . . . 66 3.4 Removing and installing headlight range control motor [V48]/[V49] . . . . . . . . . . . . . . . . . . 67 3.5 Removing and installing LED module for daytime running light and side light [L176]/[L177] . . 70 3.6 Removing and installing output module 1 for LED headlight [A27]/[A31] . . . . . . . . . . . . . . 71 3.7 Removing and installing light conductor for contour lighting in radiator grille [L362]/[L363] . . 72 3.8 Removing and installing headlight fan [V407]/[V408] . . . . . . . . . . . . . . . . . . . . . . . . . . . . . . 73 3.9 Removing and installing LED module for daytime running lights [L377]/[L378], GTX . . . . 75 4 Tail lights . . . . . . . . . . . . . . . . . . . . . . . . . . . . . . . . . . . . . . . . . . . . . . . . . . . . . . . . . . . . . . 77 4.1 Removing and installing tail light cluster [MX3]/[MX4] . . . . . . . . . . . . . . . . . . . . . . . . . . . . 77 4.2 Removing and installing rear fog light [X3] . . . . . . . . . . . . . . . . . . . . . . . . . . . . . . . . . . . . . . 78 4.3 Removing and installing tail light cluster on rear lid . . . . . . . . . . . . . . . . . . . . . . . . . . . . . . 78 5 Lights in exterior mirror . . . . . . . . . . . . . . . . . . . . . . . . . . . . . . . . . . . . . . . . . . . . . . . . . . . . 81 5.1 Removing and installing turn signal repeater bulb [L131]/[L132] . . . . . . . . . . . . . . . . . . . . 81 5.2 Removing and installing entry light in exterior mirror [W52]/[W53] . . . . . . . . . . . . . . . . . . . . 82 6 High-level brake light . . . . . . . . . . . . . . . . . . . . . . . . . . . . . . . . . . . . . . . . . . . . . . . . . . . . . . 83 6.1 Removing and installing high-level brake light . . . . . . . . . . . . . . . . . . . . . . . . . . . . . . . . . . 83 7 Number plate light . . . . . . . . . . . . . . . . . . . . . . . . . . . . . . . . . . . . . . . . . . . . . . . . . . . . . . . . 84 7.1 Removing and installing number plate light [X4]/[X5] . . . . . . . . . . . . . . . . . . . . . . . . . . . . . . 84 8 Entry and start authorisation system . . . . . . . . . . . . . . . . . . . . . . . . . . . . . . . . . . . . . . . . . . 85 8.1 Overview of fitting locations ? entry and start authorisation system . . . . . . . . . . . . . . . . . . 85 8.2 Overview of fitting locations ? keyless entry system . . . . . . . . . . . . . . . . . . . . . . . . . . . . . . 87 8.3 Removing and installing entry and start authorisation control unit [J518] . . . . . . . . . . . . . . 91 8.4 Removing and installing interior aerial 1 for entry and start system [R138] . . . . . . . . . . . . 93 8.5 Removing and installing luggage compartment aerial for entry and start system [R137] . . 94 8.6 Removing and installing front control unit for break-in protection . . . . . . . . . . . . . . . . . . . . 95 8.7 Removing and installing rear control unit for break-in protection . . . . . . . . . . . . . . . . . . . . 96 8.8 Removing and installing entry and start authorisation aerials . . . . . . . . . . . . . . . . . . . . . . 97 8.9 Alcohol interlock . . . . . . . . . . . . . . . . . . . . . . . . . . . . . . . . . . . . . . . . . . . . . . . . . . . . . . . . . . 97 9 Steering column switch module . . . . . . . . . . . . . . . . . . . . . . . . . . . . . . . . . . . . . . . . . . . . . . 109 ID.3 2020 ➤ , ID.3 2023 ➤ Electrical system - Edition 10.2023 ii Contents
P rote cte d b y c o p yrig ht. C o p yin g fo r p riv a t e o r c o m m e r c i a l p u r p o s e s , i n p a r t o r i n wh o l e , i s n o t p e r m itte d u n le s s a uth o ris e d b y V olk s w a g e n A G . V olks w a g e n A G d o e s n ot g u ara nte e o r a c c e p t a n y lia b ilit y w it h r e s p e c t t o t h e c o r r e c t n e s s o f i n f o r m a ti o n in t h is d o c u m e n t. C o p yrig ht b y V olk s w a g e n A G . 9.1 Assembly overview - steering column switch module . . . . . . . . . . . . . . . . . . . . . . . . . . . . 109 9.2 Removing and installing steering column electronics control unit [J527] . . . . . . . . . . . . . . 110 9.3 Removing and installing immobiliser reader coil [D2] . . . . . . . . . . . . . . . . . . . . . . . . . . . . . . 111 10 Towing bracket . . . . . . . . . . . . . . . . . . . . . . . . . . . . . . . . . . . . . . . . . . . . . . . . . . . . . . . . . . 112 10.1 Removing and installing trailer detector control unit [J345] . . . . . . . . . . . . . . . . . . . . . . . . 112 96 - Lights, bulbs, switches - interior . . . . . . . . . . . . . . . . . . . . . . . . . . . . . . . . . . . . . . 114 1 Safety information and repair notes . . . . . . . . . . . . . . . . . . . . . . . . . . . . . . . . . . . . . . . . . . 114 1.1 Safety information . . . . . . . . . . . . . . . . . . . . . . . . . . . . . . . . . . . . . . . . . . . . . . . . . . . . . . . . 114 1.2 Repair instructions . . . . . . . . . . . . . . . . . . . . . . . . . . . . . . . . . . . . . . . . . . . . . . . . . . . . . . . . 114 2 Lights . . . . . . . . . . . . . . . . . . . . . . . . . . . . . . . . . . . . . . . . . . . . . . . . . . . . . . . . . . . . . . . . . . 115 2.1 Overview of fitting locations – lights in dash panel . . . . . . . . . . . . . . . . . . . . . . . . . . . . . . . . 115 2.2 Overview of fitting locations - lights in front doors . . . . . . . . . . . . . . . . . . . . . . . . . . . . . . . . 115 2.3 Overview of fitting locations – lights in luggage compartment . . . . . . . . . . . . . . . . . . . . . . 116 2.4 Overview of fitting locations - lights in centre console . . . . . . . . . . . . . . . . . . . . . . . . . . . . 117 2.5 Overview of fitting locations – lights in roof trim . . . . . . . . . . . . . . . . . . . . . . . . . . . . . . . . . . 118 2.6 Removing and installing footwell/luggage compartment light . . . . . . . . . . . . . . . . . . . . . . . . 119 2.7 Removing and installing central locking SAFELOCK function warning lamp [K133] . . . . . . 120 2.8 Removing and installing rear illuminated vanity mirror [W49]/[W50] . . . . . . . . . . . . . . . . . . 121 2.9 Removing and installing dynamic light strip 3 for information in dash panel [L385] . . . . . . 121 2.10 Removing and installing light 1 for front centre console background lighting [L193] . . . . . . 122 2.11 Removing and installing light for dash panel contour lighting . . . . . . . . . . . . . . . . . . . . . . 123 3 Controls . . . . . . . . . . . . . . . . . . . . . . . . . . . . . . . . . . . . . . . . . . . . . . . . . . . . . . . . . . . . . . . . 126 3.1 Overview of fitting locations – controls in dash panel . . . . . . . . . . . . . . . . . . . . . . . . . . . . . . 126 3.2 Overview of fitting locations – controls in front doors . . . . . . . . . . . . . . . . . . . . . . . . . . . . . . 127 3.3 Overview of fitting locations – controls in rear doors . . . . . . . . . . . . . . . . . . . . . . . . . . . . . . 128 3.4 Overview of fitting locations – controls in luggage compartment . . . . . . . . . . . . . . . . . . . . 128 3.5 Overview of fitting locations – controls in roof trim . . . . . . . . . . . . . . . . . . . . . . . . . . . . . . . . 129 3.6 Removing and installing operating unit for lighting [EX59] . . . . . . . . . . . . . . . . . . . . . . . . . . 130 3.7 Removing and installing centre switch module in dash panel [EX22] . . . . . . . . . . . . . . . . 132 3.8 Removing and installing operating unit for window regulator in driver door [EX36] . . . . . . 132 3.9 Removing and installing window regulator switch/door operating unit . . . . . . . . . . . . . . . . 133 3.10 Removing and installing operating unit in rear door, driver side/passenger side [EX60]/ [EX61] . . . . . . . . . . . . . . . . . . . . . . . . . . . . . . . . . . . . . . . . . . . . . . . . . . . . . . . . . . . . . . . . . . 134 3.11 Removing and installing starter button [E378] . . . . . . . . . . . . . . . . . . . . . . . . . . . . . . . . . . 135 3.12 Removing and installing front roof module [WX3] . . . . . . . . . . . . . . . . . . . . . . . . . . . . . . . . 136 3.13 Removing and installing rear interior light [WX2] . . . . . . . . . . . . . . . . . . . . . . . . . . . . . . . . 137 4 Controls . . . . . . . . . . . . . . . . . . . . . . . . . . . . . . . . . . . . . . . . . . . . . . . . . . . . . . . . . . . . . . . . 139 4.1 Overview of fitting locations – controls in dash panel . . . . . . . . . . . . . . . . . . . . . . . . . . . . . . 139 4.2 Overview of fitting locations – controls in front doors . . . . . . . . . . . . . . . . . . . . . . . . . . . . . . 139 4.3 Overview of fitting locations – controls in rear doors . . . . . . . . . . . . . . . . . . . . . . . . . . . . . . 140 4.4 Overview of fitting locations – controls in luggage compartment . . . . . . . . . . . . . . . . . . . . 141 4.5 Overview of fitting locations – controls in roof trim . . . . . . . . . . . . . . . . . . . . . . . . . . . . . . . . 142 4.6 Removing and installing hazard warning light switch [E3] . . . . . . . . . . . . . . . . . . . . . . . . . . 143 4.7 Removing and installing operating unit for lighting [EX59] . . . . . . . . . . . . . . . . . . . . . . . . . . 144 4.8 Removing and installing operating unit for window regulator in driver door [EX36] . . . . . . 146 4.9 Removing and installing window regulator switch/door operating unit . . . . . . . . . . . . . . . . 146 4.10 Removing and installing operating unit in rear door, driver side/passenger side [EX60]/ [EX61] . . . . . . . . . . . . . . . . . . . . . . . . . . . . . . . . . . . . . . . . . . . . . . . . . . . . . . . . . . . . . . . . . . 147 4.11 Removing and installing starter button [E378] . . . . . . . . . . . . . . . . . . . . . . . . . . . . . . . . . . 148 4.12 Removing and installing front roof module [WX3] . . . . . . . . . . . . . . . . . . . . . . . . . . . . . . . . 149 4.13 Removing and installing rear interior light [WX2] . . . . . . . . . . . . . . . . . . . . . . . . . . . . . . . . 150 5 Anti-theft alarm system . . . . . . . . . . . . . . . . . . . . . . . . . . . . . . . . . . . . . . . . . . . . . . . . . . . . 152 5.1 Assembly overview – interior monitor . . . . . . . . . . . . . . . . . . . . . . . . . . . . . . . . . . . . . . . . . . 152 5.2 Removing and installing alarm horn [H12] . . . . . . . . . . . . . . . . . . . . . . . . . . . . . . . . . . . . . . 152 ID.3 2020 ➤ , ID.3 2023 ➤ Electrical system - Edition 10.2023 Contents iii
P rote cte d b y c o p yrig ht. C o p yin g fo r p riv a t e o r c o m m e r c i a l p u r p o s e s , i n p a r t o r i n wh o l e , i s n o t p e r m itte d u n le s s a uth o ris e d b y V olk s w a g e n A G . V olks w a g e n A G d o e s n ot g u ara nte e o r a c c e p t a n y lia b ilit y w it h r e s p e c t t o t h e c o r r e c t n e s s o f i n f o r m a ti o n in t h is d o c u m e n t. C o p yrig ht b y V olk s w a g e n A G . 5.3 Removing and installing anti-theft alarm sensor [G578] . . . . . . . . . . . . . . . . . . . . . . . . . . . . 153 6 Cigarette lighter, socket . . . . . . . . . . . . . . . . . . . . . . . . . . . . . . . . . . . . . . . . . . . . . . . . . . . . 155 6.1 Removing and installing 12 V socket [U5/U19] . . . . . . . . . . . . . . . . . . . . . . . . . . . . . . . . . . 155 97 - Wiring . . . . . . . . . . . . . . . . . . . . . . . . . . . . . . . . . . . . . . . . . . . . . . . . . . . . . . . . . . 156 1 Safety information and repair notes . . . . . . . . . . . . . . . . . . . . . . . . . . . . . . . . . . . . . . . . . . 156 1.1 Safety information . . . . . . . . . . . . . . . . . . . . . . . . . . . . . . . . . . . . . . . . . . . . . . . . . . . . . . . . 156 1.2 Repair instructions . . . . . . . . . . . . . . . . . . . . . . . . . . . . . . . . . . . . . . . . . . . . . . . . . . . . . . . . 156 2 Relay carriers, fuse holders, electronics boxes . . . . . . . . . . . . . . . . . . . . . . . . . . . . . . . . . . 157 2.1 Overview of fitting locations - relay carriers, fuse carriers . . . . . . . . . . . . . . . . . . . . . . . . . . 157 2.2 Assembly overview ? relay carriers, fuse holders, electronics boxes . . . . . . . . . . . . . . . . 157 2.3 Removing and installing electronics box . . . . . . . . . . . . . . . . . . . . . . . . . . . . . . . . . . . . . . 159 2.4 Removing and installing fuse holder A [SA] . . . . . . . . . . . . . . . . . . . . . . . . . . . . . . . . . . . . 160 2.5 Removing and installing fuse holder B [SB] . . . . . . . . . . . . . . . . . . . . . . . . . . . . . . . . . . . . 162 2.6 Removing and installing fuse holder C [SC] . . . . . . . . . . . . . . . . . . . . . . . . . . . . . . . . . . . . 164 3 Control units . . . . . . . . . . . . . . . . . . . . . . . . . . . . . . . . . . . . . . . . . . . . . . . . . . . . . . . . . . . . 168 3.1 Overview of fitting locations ? control units . . . . . . . . . . . . . . . . . . . . . . . . . . . . . . . . . . . . 168 3.2 Removing and installing onboard supply control unit [J519] . . . . . . . . . . . . . . . . . . . . . . . . 169 3.3 Removing and installing bracket for onboard supply control unit [J519] . . . . . . . . . . . . . . 172 3.4 Removing and installing data bus diagnostic interface [J533] . . . . . . . . . . . . . . . . . . . . . . 174 3.5 Removing and installing fan for control unit [V274] . . . . . . . . . . . . . . . . . . . . . . . . . . . . . . 176 ID.3 2020 ➤ , ID.3 2023 ➤ Electrical system - Edition 10.2023 iv Contents
P rote cte d b y c o p yrig ht. C o p yin g fo r p riv a t e o r c o m m e r c i a l p u r p o s e s , i n p a r t o r i n wh o l e , i s n o t p e r m itte d u n le s s a uth o ris e d b y V olk s w a g e n A G . V olks w a g e n A G d o e s n ot g u ara nte e o r a c c e p t a n y lia b ilit y w it h r e s p e c t t o t h e c o r r e c t n e s s o f i n f o r m a ti o n in t h is d o c u m e n t. C o p yrig ht b y V olk s w a g e n A G . 00 – Technical data 1 Safety information and repair notes 100056CJ2C47.009.1 - 10.2023 1.1 Safety information Observe safety information ⇒ Safety information and repair notes; Rep. gr. 00 ; Safety information . 1.2 Repair instructions Observe repair instructions ⇒ Safety and repair instructions; Rep. gr. 00 ; Repair instructions . ID.3 2020 ➤ , ID.3 2023 ➤ Electrical system - Edition 10.2023 1. Safety information and repair notes 1
P rote cte d b y c o p yrig ht. C o p yin g fo r p riv a t e o r c o m m e r c i a l p u r p o s e s , i n p a r t o r i n wh o l e , i s n o t p e r m itte d u n le s s a uth o ris e d b y V olk s w a g e n A G . V olks w a g e n A G d o e s n ot g u ara nte e o r a c c e p t a n y lia b ilit y w it h r e s p e c t t o t h e c o r r e c t n e s s o f i n f o r m a ti o n in t h is d o c u m e n t. C o p yrig ht b y V olk s w a g e n A G . 2 Electrical components 2.1 Access to diagnoses Checking battery - A- Battery monitor control unit - J367- – commissioning Renewing display unit for driver information system Renewing control unit for head-up display Activating test screen for calibration of head-up display Renewing wiper motor Coding rain and light sensor Renewing output module Renewing entry and start authorisation control unit Parametrisation of anti-theft alarm sensor Renewing onboard supply control unit Renewing data bus diagnostic interface Checking fibre optic cables ID.3 2020 ➤ , ID.3 2023 ➤ Electrical system - Edition 10.2023 2 Rep. gr.00 - Technical data
P rote cte d b y c o p yrig ht. C o p yin g fo r p riv a t e o r c o m m e r c i a l p u r p o s e s , i n p a r t o r i n wh o l e , i s n o t p e r m itte d u n le s s a uth o ris e d b y V olk s w a g e n A G . V olks w a g e n A G d o e s n ot g u ara nte e o r a c c e p t a n y lia b ilit y w it h r e s p e c t t o t h e c o r r e c t n e s s o f i n f o r m a ti o n in t h is d o c u m e n t. C o p yrig ht b y V olk s w a g e n A G . 27 – Starter, current supply, CCS 1 Safety information and repair notes 1.1 Safety information Observe safety information ⇒ Safety information and repair notes; Rep. gr. 00 ; Safety information . 1.2 Repair instructions Observe repair instructions ⇒ Safety and repair instructions; Rep. gr. 00 ; Repair instructions . ID.3 2020 ➤ , ID.3 2023 ➤ Electrical system - Edition 10.2023 1. Safety information and repair notes 3
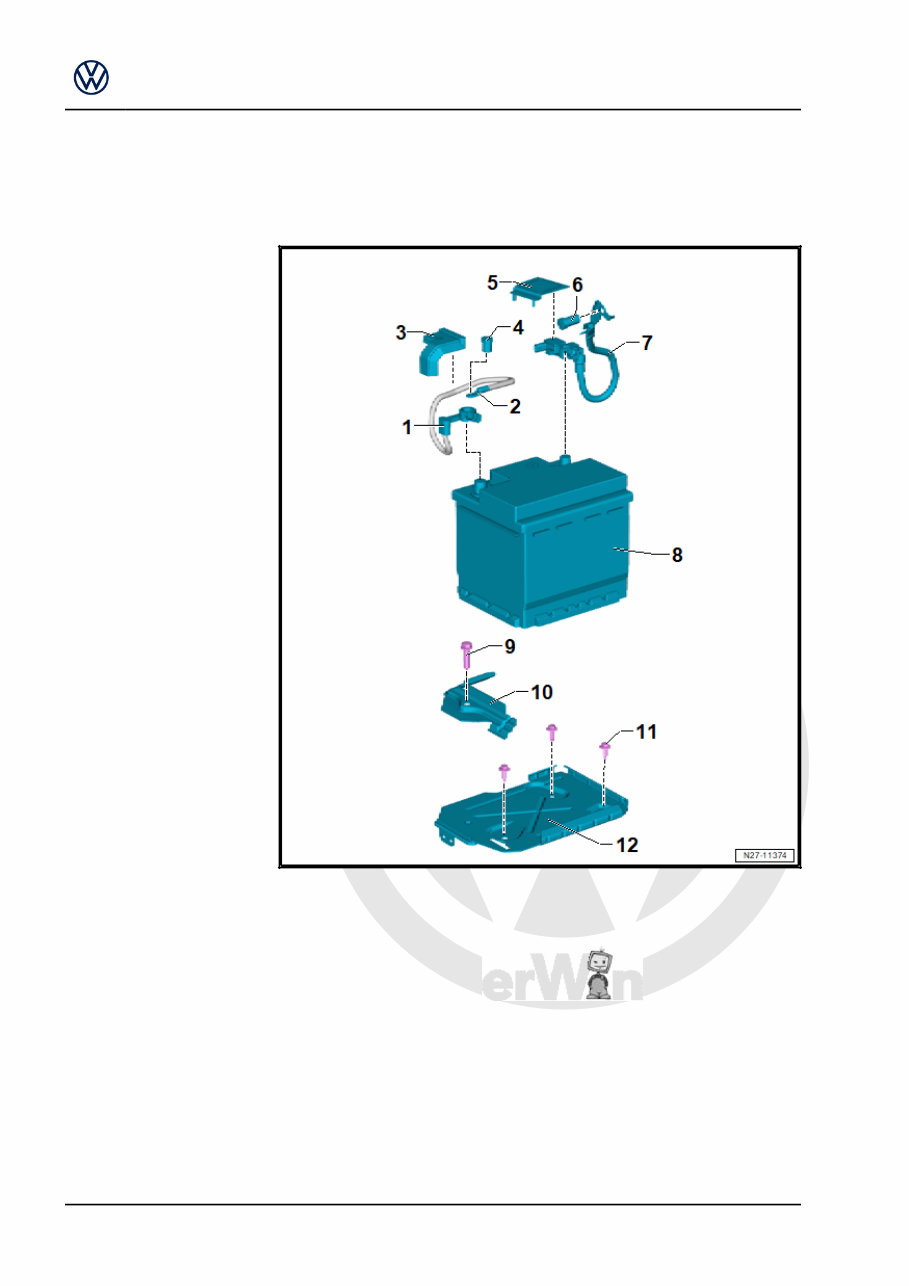
P rote cte d b y c o p yrig ht. C o p yin g fo r p riv a t e o r c o m m e r c i a l p u r p o s e s , i n p a r t o r i n wh o l e , i s n o t p e r m itte d u n le s s a uth o ris e d b y V olk s w a g e n A G . V olks w a g e n A G d o e s n ot g u ara nte e o r a c c e p t a n y lia b ilit y w it h r e s p e c t t o t h e c o r r e c t n e s s o f i n f o r m a ti o n in t h is d o c u m e n t. C o p yrig ht b y V olk s w a g e n A G . 2 Battery 2.1 Assembly overview – battery 1 - Battery clamp for battery positive terminal ❑ 5 Nm 2 - Positive cable 3 - Cover for positive battery terminal 4 - Nut for positive jump start terminal ❑ 20 Nm 5 - Cover for negative battery terminal 6 - Nut for negative jump start terminal ❑ 20 Nm 7 - Earth cable ❑ With battery clamp for negative battery termi‐ nal ❑ With battery monitoring control unit - J367- ❑ ⇒ Rep. gr. 27 ; Removing and instal‐ ling earth wire with bat‐ tery monitor control unit [J367] ❑ ⇒ Rep. gr. 27 ; Adapt‐ ing battery monitor con‐ trol unit [J367] ❑ 5 Nm 8 - Battery - A- ❑ ⇒ Rep. gr. 27 ; Re‐ moving and installing battery [A] ❑ ⇒ Rep. gr. 27 ; Disconnecting and connecting battery 9 - Bolt ❑ 20 Nm 10 - Retaining clip 11 - Bolt ❑ Qty. 3 ❑ 9 Nm 12 - Battery tray ❑ ⇒ Rep. gr. 27 ; Removing and installing battery tray 2.2 Removing and installing battery [A] Special tools and workshop equipment required ID.3 2020 ➤ , ID.3 2023 ➤ Electrical system - Edition 10.2023 4 Rep. gr.27 - Starter, current supply, CCS
You're Reading a Preview
What's Included?
Lifetime Access
Fast Download Speeds
Online & Offline Access
Access PDF Contents & Bookmarks
Full Search Facility
Print one or all pages of your manual
$52.99
2021 Volkswagen ID.5 GTX Download Service & Repair Manual
The 2021 Volkswagen ID.5 GTX Download Service & Repair Manual is a comprehensive guide designed for both professional mechanics and DIY enthusiasts. This manual provides detailed instructions on troubleshooting, repair, and maintenance of your vehicle, covering various topics such as engine, transmission, brakes, and more.
The manual features:
Step-by-step instructions
Troubleshooting charts
Comprehensive diagrams
Detailed and clear illustrations
Torque specifications
Special tools required
1000+ images and illustrations
Fully printable
Compatible with all computers and electronic devices
This manual is an essential tool for anyone who wants to maintain and repair their vehicle, providing a vast array of information to ensure your vehicle runs smoothly and efficiently. With this manual, you'll have the knowledge and guidance to tackle various tasks, from routine maintenance to more complex repairs.
Suitable for both professionals and DIY enthusiasts, this manual is a valuable resource for anyone who wants to work on their Volkswagen ID.5 GTX.
Reviews
Q&A
Recently Viewed
5,521,897Happy Clients
2,594,462eManuals
1,120,453Trusted Sellers
15Years in Business
Price:
Actual Price:
2021 Volkswagen ID.5 GTX Download Service & Repair Manual